To perform a certain type of woodworking, available tools alone may not be enough. Therefore, there is often a need to have a lathe for these purposes. Many people rack their brains about where to buy such equipment, but the box just opens. Why buy second-hand when you can make it yourself?
A home lathe , which you make yourself, will allow you to save significantly on the purchase of such equipment on the specialized equipment market. You can, of course, purchase old models that are in storage, but the problem is that:
- Factories with such models must first be found.
- It is not a fact that the equipment during conservation did not deteriorate, because it stood idle for 10, 15, and maybe even 25 years.
So it turns out that making equipment with your own hands will allow you, even if you put in some effort, but you will definitely get exactly what you need for your home workshop . In terms of technical indicators, equipment made personally will not be inferior to a unit created by a factory. how to make equipment.
The device of a wood lathe
To determine the scope of the upcoming work, you need to familiarize yourself with the structure of a wood lathe.
The standard tool has the following components:
- bed;
- headstock;
- tailstock;
- caliper
The base, or bed, is a supporting structure that ensures the stable location of all parts of the mechanism. The stop for a wood lathe at home is made from a flat board or a wide channel.
The front and tailstocks allow you to securely fasten the element being processed. Unlike the front, the back is movable.
The caliper is responsible for moving the cutting tool along the main axis. If it is not possible to make a support for a wood lathe, a tool rest will play its role.
The device of a wood lathe
In order for a self-made device to work well, you must first draw a plan. A diagram is necessary for each design detail in order to visualize not only the location of the parts relative to each other, but also to eliminate errors in the design of the component elements.
Machine capabilities
Woodworking machines for working with solid wood are universal, as they allow you to perform a large number of operations. By making a wood lathe, you will be able to carry out a full range of work on mechanical wood processing:
- drilling;
- creating grooves;
- figured turning;
- end processing.
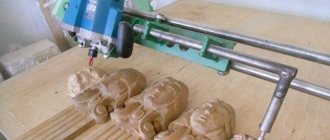
With proper assembly of a mini turning device for woodworking, a home craftsman will be able to produce not only functional pieces of furniture (table legs, counters, elements for stair railings), but also decorative elements. Even with a simple machine you can make beautiful dishes, gift boxes and children's toys. And by making a wood milling machine with your own hands, you can make more complex shaped wood products.
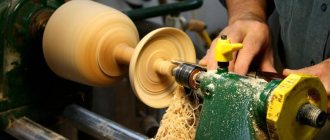
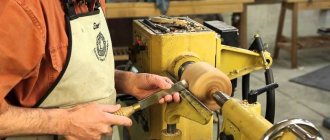
Processing wood on a lathe
What other types of machines can be made
Even the simplest homemade wood lathes can be turned into multifunctional devices by equipping them with additional equipment. In addition, using ready-made components and parts from other equipment, you can assemble an excellent model for home creativity.
With a copier
This device will make it possible to put into production the production of similar parts. With a copier, the easiest way to turn out a chess set, cutlery handles and other items. The essence of this device is to fix a template with the profile of a future plywood blank or a finished wood part on a tool rest. To work in this case, you will need to upgrade the hand cutter by installing a limiter on it. When processing wood, the cutter processes the part, and having reached the required diameter, it rests against the edge of the template, and then, moving along the relief, it creates the desired profile on the part itself.
Mini
A mini wood lathe is needed primarily to gain initial woodworking skills. The tabletop machine is also useful for creating crafts, such as checkers or chess, and for professional use - for modelers creating architectural models or exhibition dioramas. This model is usually small in size, because most parts are rarely longer than 10 centimeters.
From an electric drill
This type of tool is simply created to be used in the construction of lathes for woodworking. Essentially, this is a ready-made headstock - there is a motor, there is a clamping chuck, there is an electric drill speed control. All that remains is to clamp the body in a clamp and install the tailstock opposite. Of course, it’s not worth working on it for hours, but for small parts this is what you need.
Material and components
All main working parts of the turning mechanism must be made of reliable materials. The main rotating element of the engine from the washing machine can be used as a drive. Some craftsmen use motors from machines to sharpen knives, but finding a working motor from a washing machine is much easier. To operate the mechanism, you will also need a set of drive belts.
For the tailstock, you need to find or make your own screw with the ability to fix it horizontally. One of the elements of the front clamp of a wooden workpiece can be a rotary chuck (head) from an old hammer drill or drill.
To avoid movement of the structure during operation, the base is made of a thick metal profile.
It is impossible to make a woodworking lathe with your own hands without using tools. To complete all the work you will need:
- drilling machine;
- files and sandpaper;
- Angle grinder (grinder) and a set of discs for cutting metal;
- welding machine.
You should also prepare screws, bolts and nuts for fastening the elements.
What can be done on a lathe?
When planning to make a mini-lathe with his own hands, the master assumes what products will be made on it in the future. Often the choice depends on demand, which is studied locally or on the Internet. There are special resources where masters share their suggestions. There are also those who purchase finished products in bulk and then engage in retail sales.
One of the largest markets for wooden products made on turning equipment is Arbat. The daily turnover of goods here on some days reaches several million dollars. The place of pilgrimage for foreign tourists is constantly filled with buyers who come here in search of souvenirs. It is difficult to break into this market, but if you wish, you can become a supplier of original products.
The bowl with spoon and lid are carved from solid pieces of wood:
Blanks for flights of stairs and turning platforms are in great demand. In any city there are companies that make stairs for country houses. Balusters based on cylindrical products are in demand.
Staircase manufacturers rarely engage in ancillary production. It’s easier for them to buy semi-finished products. Subsequently, the blanks form the final product. Therefore, it makes sense to look for suitable construction companies where you can offer your goods.
Balusters for wooden stairs:
Chess is traditionally made from valuable wood. Some do not even paint additionally, they combine wood: rosewood or teak wood is used to make black (dark) figures; birch, linden, and ash are used for turning white figures.
Checkers are not only used when playing this game. Checkers are also used in backgammon. If they are additionally decorated with additional emblems, then the demand for them will be higher.
Chess carved from wood:
Vases and flowerpots are bought for the home. They are given for birthdays, weddings and anniversaries. A skillfully crafted piece of furniture itself serves as an additional decoration. Therefore, making gift souvenirs is a rather interesting area of individual activity.
Large productions will not become competitors; other problems are being solved there. But individual production fills its niche with consumer goods. The efficiency and profitability of such activities can be quite high.
Wooden vases and flowerpots carved from apple and cherry trees are quite attractive:
Kitchen utensils: rolling pins; small containers for storing bulk products; spoons - all these items diversify the kitchen of a modern housewife. The ingenuity of the craftsman can offer something original that will attract the main consumers of original products.
The slow craftsmen who offered creative products to the market subsequently have regular customers. They expect novelty and something new. It makes sense to become such a manufacturer in your area. There will be income and recognition.
Jar with lid for storing salt (birch):
But to start producing such products or inventing new forms, you need to acquire a machine for your home. Having such equipment at home has several advantages:
- There is no need to run early in the morning to the other end of the city in order to be in time for the start of the working day.
- If you're not in the mood to work, you can take a day off. You have to work only for yourself and for yourself.
- There is a desire to make what you like, you can do it, experiment, look for new forms and methods. Every day you can do something new.
- The raw material used is material that may not cost anything. You just need to bring it home.
- You can sell it not only in your own locality; the Internet and its trading platforms are open around the clock. You can organize sales hundreds and thousands of kilometers from your own home.
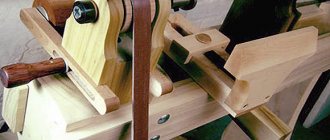
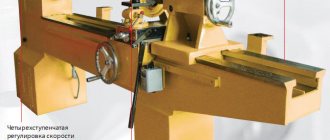
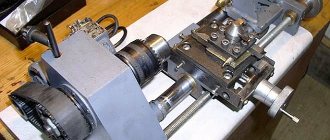
Base, frame and spindle box
Before you start making a wood lathe with your own hands, you need to decide what type of equipment is needed - portable or stationary. Portable can be used in any convenient place and, if necessary, transported. The stationary turning mechanism has high legs and can only be carried indoors.
It is on the frame that the drive, the headstock and tailstock, as well as the tool rest will be attached, so you should pay close attention to its design.
Frame for a homemade wood lathe
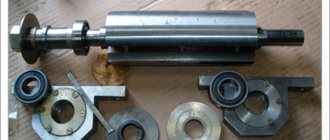
Spindle unit
The reliable frame is made of a channel 125 cm long. A motor is installed at one end of the base. It can be secured using a steel plate welded to the motor itself and to the channel.
If you plan to make a shaft system to evenly distribute the load on the motor, the motor should be installed perpendicular to the base. To do this, you will need to weld an additional platform to the base from a piece of channel of the required width.
Next, several holes are made in the frame for attaching the tool rest and tailstock. It is recommended to make holes every 10 cm to the very end of the base - this will allow more precise adjustment of the mechanism. To ensure fast fixation of all moving elements of the lathe, threads are cut into the holes. If you don’t have a tap in your arsenal, nuts of suitable size are welded on the back side of the frame.
The simplest option for manufacturing a spindle box is to directly attach the spindle to the rotating element of the motor. This option is suitable for turning small workpieces made of pliable material. A more complex design of the spindle of a DIY benchtop wood lathe is called the headstock.
How to make a mini lathe yourself?
Any production must begin with the development of the project.
- At the design stage, specifications are developed. Specifications are a list of parts included in an assembly.
- There can be quite a lot of nodes in an installation. Some details may be repeated. But there may also be the presence of many very diverse blanks. The designer should strive to unify the parts used as much as possible, only then will the product be competitive in cost.
- After the first design stage, the selection of components begins. It will allow you to determine the actual design, where there will be a minimum number of original parts. Then it is easier to produce a working sample.
- When picking, parts are identified that are impossible to do without. They will have to be made. Everything else is cheaper to buy.
Lathe projections:
Most attention is paid to the headstock. The engine is located here, and a cartridge is installed at the same time. For wooden products, three-jaw fasteners are rarely used. Drive chucks are more often used; they require initial centering of the workpiece, and then installation of a driver, which will rotate the workpiece.
Lathe headstock option:
Some craftsmen make a drive from a drill. They have enough power (among modern power tools you can choose a drill up to 2…3 kW). They have a mechanism for smoothly changing the rotation speed. There is also a reverse.
Novice craftsmen are often interested in how much a small machine made by themselves costs. Sometimes a product will cost almost nothing, since components can be found for free. All that remains is to correctly assemble the machine and start using it effectively.
Headstock and tailstock
The front workpiece clamp is a complex composite design that allows the engine not to experience overload when processing wood. Before manufacturing this part, it is recommended to draw drawings of the rotating mechanism.
The drilling part of an old unnecessary drill can act as a headstock. Its base (pin) is fixed by welding in the center of the rotating shaft. A drive belt is laid from the motor to the shaft. A casing is made from a sheet of metal 15-20 cm wide, which will protect against accidental jumping of the belt.
Headstock
The main difficulty is to accurately calculate the center of the rotating shaft. The easiest way is to transfer the workpiece to a checkered sheet of paper, circle it, and then find the point of intersection of the diameters of the circle.
A simpler design for the headstock is to make a faceplate that will fit directly onto the motor screw and fix it. To do this, you need to cut out a circle with a diameter of 15-20 cm from a dense material (wood, plywood or iron sheet), and drill 5 holes in it - the central one and 4 at the intersection of two diagonals. Angles are attached to the four holes, and retaining screws are attached to the opposite side of them. By adjusting the screws, you can clamp a workpiece of any diameter.
Making a tailstock for a wood turning mechanism is much easier. This will require a wide screw with a tapered end. You can make such an element yourself by sharpening an ordinary wide screw at one end using a grinding machine. The spike is attached to the post using lock nuts - from the front and back of the support.
A more reliable design would be a screw support welded from two plates and a pipe. Nuts suitable for the size of the tenon are welded into the pipe on both sides. For quick fixation, a small handle is welded to the opposite end of the screw.
Tailstock
If the headstock is a fixed structural element, then the rear clamp must be able to move along the base, adjusting to the size of the wooden workpiece. Therefore, the tailstock post must have a hole for a fixing screw.