Repair, construction, furniture making in a home workshop - all this is impossible without the use of shaped wood products.
Skirting boards, platbands, planed slats with ornaments - this is what a homemade milling machine will help you make. Removing a chamfer, grinding a groove, without which it is impossible to assemble a three-dimensional product into a single whole, is also his job.
Using this universal tool, it is easy to make a selection for a key, cylindrical or rectangular groove. By changing the milling tool, you can saw, plan, drill and even make figurines from wood.
Principle of operation
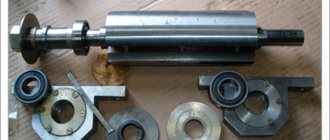
Wood processing on a milling machine is performed using a special cutting tool - a milling cutter. The cutter is fixed in a carriage, with which you can adjust the height of the cutting edge. During operation, the cutter rotates at a very high speed, resulting in a perfectly smooth surface of the product.
The range of cutters for wood processing is wide, it is easy to choose a tool for any type of work. Most often used:
- end mills that look like a regular drill;
- disk, which are gears with sharp teeth;
- cutters with a spherical cutting edge;
- multi-level cutters allowing the production of shaped products.
When performing most operations, the milling tool shaft does not make translational movements, and the workpiece moves towards its cutting edge. Some jobs require mutual movement, which is implemented by additional devices.
Recommendations
Beginning woodworking craftsmen should familiarize themselves with the basic recommendations of experts not only regarding the operation of the unit, but also the choice of a tool for personal use
Since the market offers a wide selection of routers, the first thing is to decide what type of work you are going to do - cutting lumber, decorating, grooves and recesses, etc.
In addition, it is important to pay attention to the power of the device, the presence of auxiliary elements, its stability, reliability and durability. For productive milling, the workpiece must be securely fixed, and the cutting element itself must be secured in the collet. After this, the equipment operating parameters, movement path and milling depth are configured
After this, the equipment operating parameters, movement path and milling depth are configured
For productive milling, the workpiece must be securely fixed, and the cutting element itself must be secured in the collet. After this, the equipment operating parameters, movement path and milling depth are adjusted.
It is worth talking about the rules that will help you do your work safely and efficiently. When operating such equipment, you should not rush, as this can lead to damage to the workpiece or even injury. Therefore, if you are going to replace the equipment, first turn off the tool, only then secure the workpiece using clamps. This does not take much time, but will ensure safety and reliability.
Some beginners try to remove a large layer of wood in one pass, but this will not bring the desired result, and not every cutter can withstand such loads.
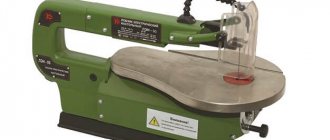
A hand router is a small tool that you can install in your home workshop and process wood. Thanks to the unit, the possibilities for creative crafts and even your own production of furniture or other products from such material expand.
Anyone can learn how to operate such a machine; the main thing is to choose a high-quality and reliable unit, set it up correctly and follow the instructions. Study the technical and operational characteristics of this device, try different processing options to improve your own skills. This can open the door to good income, and at any time you can do something for yourself. Good luck in your new business!
How to work with a router, watch the video.
Purpose of the machine
The list of works that can be performed on a milling machine is quite wide. He can:
- drill a hole, create cylindrical and spherical recesses of any size;
- grind a groove of any configuration;
- manufacture plinths, platbands, frame strips and other similar products;
- create a pattern on the surface of wood or make three-dimensional products from it.
Among other things, using attachments, this machine can replace a number of other devices. With its help you can saw, drill, plane, even grind wooden parts.
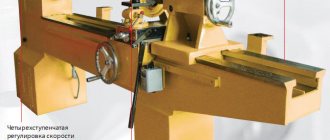
Types of machines
The milling machine can be stationary or tabletop. In the second case, a workbench or other strong and stable table for manual work is used as a bed. The devices are also distinguished by a number of design features.
Among the most popular:
- machines with one spindle and a vertical drive shaft;
- multi-spindle configurations, with the ability to simultaneously use different types of cutters;
- milling designs that allow you to change the angle of inclination of the shaft or tabletop;
- copy milling machines.
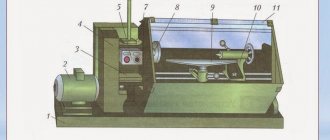
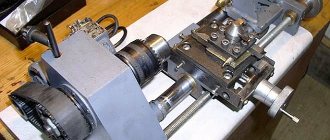
The optimal choice for the home is a design with one vertical spindle. It is not difficult to make such a milling table with your own hands. It consists of a frame (frame on legs) and a table top, into the hole of which a spindle with a chuck for a cutting tool is inserted.
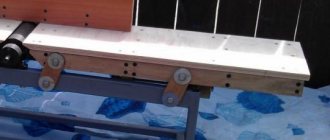
Milling table made of plywood - economical option
Hello everybody! The simplest milling table for home use can be made with your own hands with virtually no financial investment and with a minimum set of power tools. Of course, you shouldn’t expect maximum functionality and quality from such a homemade product, but it is quite a suitable tool for performing simple tasks and for a novice DIYer. The desire to make something like this arose a long time ago and I was eagerly awaiting the Interskol FM-32/1900E manual milling machine purchased in the distant past. I have no experience in this area, so do not judge strictly, advice and criticism are welcome.
After monitoring the World Wide Web and considering many options, I decided to make for the first time the simplest and most inexpensive, in my opinion, table for a manual router.
First you need to decide on the size of the working surface. There are many options on the Internet with completely different sizes, and in this case the main problem is the material from which to make the table. It can be thick plywood, chipboard or a similar material, the main thing is that the surface is smooth and sufficiently hard. After the renovation, a piece of birch plywood 1500 * 450 * 18 mm remained in stock, and the main elements of the table were made from this scrap. In this version, the working surface has dimensions of 80*44 cm. From the rest of the plywood, I later made a parallel stop and a lift for the router.
I removed the sole from a hand router, with which I marked and cut out a through contour in the tabletop using a jigsaw. I made the hole in the tabletop a little larger than the sole so that the router plate could fit in freely.
I marked the outline of a steel plate on the tabletop and, using a still-hand-held router, I recessed the future sole flush. Perhaps, due to lack of experience, it was not possible to mill it perfectly accurately and during installation it was necessary to adjust it to one plane, using pads for the slab made from scraps from a plastic bottle.
Marked and drilled holes for mounting to the router. I drilled all the holes with a larger diameter drill so that the heads of the bolts and screws securing the plate to the router and to the table were flush.
I secured the router and marked the center of the future hole for the router. At this stage, several questions arose, namely what diameter to make the hole for the cutters and whether it is worth making a composite plate to be able to install large cutters. I decided to abandon the sectional plate, since it complicates this design, and the initial goal was to make a simple milling table. It was decided to make the diameter of the hole for the cutter slightly larger than the largest cutter that was available, namely 32 mm in diameter. Most likely, this will be enough for this table, but in case of urgent need to use cutters of larger diameter, you will have to make another steel plate or improve the existing one. The hole was drilled with a small-diameter drill along the outer circumference, followed by processing with a round file - this is the most labor-intensive stage.
The entry-level rip fence is ready, all that remains is to check that the 90-degree angle is set correctly; at first it didn’t match a little. To adjust the angle, I placed thin pads under the mounting corners.
The next stage is a lift for the router. Initially, three versions were considered: with top adjustment, with adjustment using a car jack, and with a threaded rod. With top adjustment is a convenient option, but it requires changing the design of the router and is the most labor-intensive, and since this is a trial option, I had to abandon it. There was no extra car jack available, therefore, the second version was also no longer needed. Started implementing the third version.
Selecting material for a reliable frame
The basis of the entire structure is the bed. This is the frame to which all the main parts of the machine are attached. It must be strong, reliable and stable. Based on the combination of these characteristics, the optimal material for a milling machine bed is steel. It is best to make the frame from a profile pipe or a thick-walled square. To connect parts into a single whole, you can use welding or use a bolted connection.
The dimensions of the frame directly depend on the size of the workpieces that you plan to work with; in addition, it is worth taking into account the dimensions of the workshop. If the room is not spacious, you should think about creating a prefabricated structure with bolts. It can be dismantled at any time and, if necessary, reassembled.
Assembly technology
In general, the step-by-step process is as follows.
- Mark and cut the board and wooden slab into components (future parts), referring to the drawing of the future table.
- Mark and cut steel sheets and corrugated pipes.
- Mark, saw and drill technological holes, openings and recesses provided for by the future design. For cutting, a grinder, a reciprocating saw and a jigsaw are used. Maintain a smooth ride without deviating from the markings.
- To make a frame that holds the engines, mark and cut the corrugated pipe and corners, referring to the design drawing.
- Assemble the frame and mount the main engine on it. To secure the motor, use corners and technological stands. It must be fixed securely.
- Install horizontal guides in the opening (if there is one). Vertical ones are installed above the opening - perpendicular to the tabletop. Match them - they should not move. Check their operation by temporarily placing between them, for example, a test block or a metal structure, an element of torsional mechanics, to be processed. Make sure the feed skid is securely attached.
- Place the stepper motors and their driver boards in the space of the frame. These engines are used in semi-automatic machines designed for high-speed professional processing of parts. Place the elements of the transmission mechanism (if provided) - the gearbox will extend the life of the engine bearings by taking part of the load from the workpiece upon itself. Gear or belt drive – depends on user preference.
- Mount the power supply for the stepper motors. Often these engines do not use 220 V - they require a lower voltage, for example, 12 V.
- Place the clamps and fasteners (thumb screws). They will help to fix the workpiece, for example, vertically, making it free to feed horizontally.
- Assemble the wiring diagram by soldering wires and cables to the corresponding terminals of the electrical used. Place switches and buttons according to the assembly drawing of the workbench with a router. Test the operation of the main and auxiliary motors by applying constant voltage (for example, 5 and 12 V from the power supply) to the stepper motors. The main motor may require 220 or 380 V.
- Place sockets. You can use a ready-made extension cord - if the workbench is universal. Check their operation by connecting the common cable to the nearest outlet. It is recommended to install a separate automatic fuse for the machine (with workbench). Its operating current is 16 amperes.
- Place a lamp. Check its operation.
Make sure the motors and feed mechanism operate smoothly. If the machine is powerful enough, then try evenly grinding, say, a piece of aluminum pipe from an old folding bed.
Comfortable and durable tabletop
The tabletop of a professional machine is made of steel. This material is durable, its surface is not subject to the formation of burrs, but at home it is extremely difficult to work with a thick sheet of metal; it is much easier and cheaper to use wood. You can choose the material for the countertop:
- thick multilayer plywood;
- wood boards (chipboard, OSB and others);
- planed board.
Whatever material is chosen, it is important to remember that the surface of the countertop must be smooth and withstand high loads. The wooden surface must be impregnated with drying oil or oil; you can create a durable structure by covering the wood with sheet steel or durable plastic.
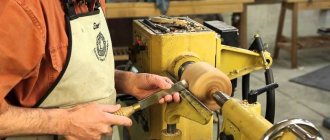
Motor selection
The most important part of the machine is the engine. In many ways, the list of works that can be performed on a homemade machine depends on its parameters. Both commutator and asynchronous electric motors can be used as the driving part. The commutator brushes are distinguished by their low cost, but have less power; in addition, their graphite brushes quickly burn out, which is the reason for frequent repairs.
Asynchronous motors are the best choice for a stationary home machine. They are powerful, unpretentious, do not require special care, the only drawback is noise. But the noise in the workshop is unlikely to surprise anyone.
The engine of a small home milling machine can easily be an electric drill or screwdriver. Such a machine will not cope with deep processing of hard wood, but will help in surface processing of small workpieces. Another option for a simple mini-machine is a device assembled on the basis of a portable milling cutter. For it, it is enough to make a suitable frame, screw it to the tabletop, and the machine is ready.
Additional accessories
A full-fledged milling machine should provide convenience and safety of work. To do this, its package must include:
- emergency stop button;
- rotary cutter guard casing;
- system for removing dust from the working area;
- autonomous lighting.
Processing long workpieces has its own characteristics. The production of skirting boards, platbands and other similar products will require an additional device - a vertical stop. It is a board or sheet of thick metal with a cutout for a cutter. The stop is mounted vertically, with its help it is convenient to adjust the angle and depth of processing the workpiece.
The universal milling machine allows you to process both large and small parts. It will be more convenient and safer to process small workpieces if clamps like clamps are installed on the tabletop. They must be removable; several holes are drilled in the tabletop to attach them.
Types of unit
There are many types of milling equipment, each of which has its own distinctive design features and purpose. Conventionally, devices can be divided into several types.
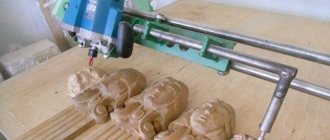
Machine tool with numerical program device
The design of this type of device has a built-in microprocessor with a certain amount of RAM and an operating system. Thanks to this, it can be programmed to perform a certain sequence of operations and configure the functions of the device.
The advantages of running a CNC machine are as follows:
capable of performing several types of operations simultaneously;- allows you to save costs on labor costs and organizing the production process;
- increasing the level of labor productivity;
- reducing the time required to complete a task.
To work with this type of milling device, you must have special skills and knowledge.