Specifications
timber width from 100 to 400mm timber height from 100 to 400mm
The templates are designed for connecting timber using the Dovetail type. The resulting configuration provides a reliable, durable connection in both longitudinal and transverse directions. Ideal for corner joints of timber and lengthening the walls of the house. Provides the warmest possible corner.
Contents of delivery:
Template type spike….1 pc. Groove type template…..1 pc. Copy sleeve…..1 pc. Backing for mounting on a router…..1 pc. Template execution Steel 3
Available separately:
F-shaped quick-clamp or screw clamp, router, milling cutter
Cutters used for our templates:
Dovetail groove cutter D38.1 h30 a14.3° xv. 12mm Tideway (Art. No. 0303-38) Link to the manufacturer’s website page
Dovetail groove cutter analogue Arunda (Article 664.395.11) Link to the manufacturer’s website page
Detailed photos of the product in the Gallery section
We will make templates for any section of timber.
Dovetail is more than just aesthetics
It is a common belief that today, in an era of affordable quality glue and cheap fasteners, the use of dovetail is more of an aesthetic whim. This judgment is only partly true. Undoubtedly, all possible variations of this tenon joint are very expressive, testify to the carpenter’s skill and can decorate any project. But in addition to beauty, the dovetail also has important functional advantages.
The connection resists natural wood deformations well without losing structural integrity. Thanks to this quality, it is advisable to use it in large parts, especially in solid wood products in the manufacture of furniture and drawers.
Using a dovetail, you can choose the optimal strength of the connection: this is influenced by the total number of studs and the angle of inclination of the eye. Another feature that increases mechanical strength is a large gluing area.
What should you consider when designing a connection?
When designing a dovetail, there are a number of considerations that will affect both its strength and appearance.
Interval between spikes . The distance between the tenons and their size determine the strength of the connection.
At equal intervals (ratio 1:1), the mechanical strength is the highest. But this configuration is rarely used. Because due to the larger number of elements, manufacturing the part takes corresponding time. The likelihood of making mistakes that will cause a loose fit is also higher. Typically a ratio of 2:1 or 3:1 is used. In these cases, the strength of the connection remains just as high.
When joining wide parts, additional tenons are made at the edges at small intervals. This solution helps to effectively combat wood warping.
The dovetail angle is an important parameter that determines the mechanical characteristics of the joint. If the angle is too small, the lock will not lock and the fastening will turn into a regular tenon joint. If the angle is too large, the tapered part of the dovetail may split during assembly and the tenon will fall off.
For soft wood, the dovetail angle is made steeper, since it is more susceptible to crushing and deformation under loads. The optimal ratio is 1:6. For hardwood, the angle is made less steep - 1:8.
The design principle of the dovetail shape is shown in the drawing.
Connecting logs into a paw
- Direct connection. Can be one-sided or two-sided. In the first case, grooves are cut or cut at the ends of the beams to the length of the cross-section of the element and to a depth equal to half its thickness. In the second option, the grooves are selected from the top and bottom of the element to a quarter of its thickness. The fastening of the crowns in the corners is done with wooden dowels made of hardwood. Fastening occurs in holes drilled in a staggered pattern. The spikes must fit tightly into the hole, for which their diameter is chosen slightly larger than the holes themselves.
- Dovetail. The paws in such joints are made with a slight inclination. The middle part of each is fixed between the upper and lower legs in the form of a wedge. The connection turns out to be stronger and more reliable, but the most difficult to execute. Sloping surface shapes provide the structure with additional stability, but the inclined surface makes it easier for moisture to penetrate into the corner during rain. To avoid negative consequences, high-quality additional waterproofing is required.
- Connection with an additional spike, called prisek. Cutting corners into a paw with such joints is more reliable than described above, but is more difficult to perform. At the internal corners of the frame, a tenon in the form of a protrusion of about 2 cm and an area of up to a quarter of the area of the notch is left on the top part. A groove is hollowed out in the lower element for this protrusion. The fit of the notch into the groove should be tight without the slightest possibility of displacement of the connection. Assembling a log house is reminiscent of a children's construction set. With high-quality execution, a tight fit of the crowns without displacement is ensured.
Regardless of the method of execution, when cutting a log house into a paw with your own hands without sufficient experience in carrying out such work, it is recommended to follow the golden rule: initially, cut down to a slightly smaller size than the required size. If the cutting exceeds the required dimensions, it will be impossible to correct such an omission, and it is not difficult to fit the connection tightly, removing the excess after fitting.
How to make accurate markings?
When making a dovetail with your own hands, the accuracy of the markings is of primary importance. To apply it, they traditionally use a grinder and a square.
A more practical and convenient device for these purposes is a special template. These markers come in different angles and are designed for soft or hard wood.
How to make a dovetail with a router
For mass production of parts with such a lock, it is advisable to use mechanized methods. The best option in this case is to use special templates, in which one side is intended for milling dovetails, the other for creating tenons.
Dovetail templates require the use of two different cutters. The first is a cone cutter for cutting trapezoidal dovetails. The second is a straight wood cutter for creating tenons.
We position the part with the “tails” so that its edge is located strictly in the center of the slot. We install the second part (with spikes) flush on the reverse side. To accurately fit two pieces, we use a carpenter's square.
We fix the assembled structure in a horizontal position, clamping it with clamps or in a vice.
- Dovetail milling
For convenience, we mark the waste part with a pencil. We set the desired offset of the cone cutter and cut out the gaps between the dovetails.
- Milling a part with tenons
On the corresponding side of the template, use a straight cutter to cut out tenons along the entire length of the part.
Cutting off excess thorns. We release the clamps and move the template so that each tenon is in the center of the slot.
Preparatory work
Regardless of the chosen connection method, there are several general rules that should be strictly followed. When choosing a material for construction, you need to keep in mind that the thicker the timber, the warmer the building will end up, since it has fewer connecting grooves.
When installing the lower - frame - crown, the thickest beams are used for it. If, for the construction, a high-quality leveled beam of the same width was purchased, then for the installation of the casing crown it is better to additionally purchase 4 beams with a slightly larger cross-section.
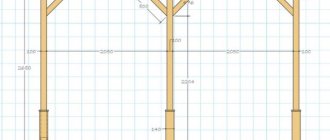
Figure 1. Scheme of cutting into a paw with a tooth.
Before you begin installation, you first need to carry out preparatory work, especially if the material for construction is rounded timber or ordinary logs. In this case, you first need to use a plane or sanding machine to give a flat surface to the side that will be located indoors after assembly.
The side opposite to it is processed to a length of 2-2.5 times the diameter of the timber from the edge of the end. The sides need to be processed to a length of 1-1.5 diameters from the edge of the end. When performing processing, it should be taken into account that the butt of the log will always be thicker than the top.
The trim crown is arranged in the same way for all methods. The first two beams or logs are laid strictly parallel to each other. The next two crowns are placed perpendicularly on top of them. The square formed as a result of laying is leveled strictly according to the level. Further cutting of the log house depends on the chosen connection method, but in any case, the total depth of the groove for planting the upper crown should not be more than half the thickness of the log or timber.
Methods for connecting timber
Let's divide all types of timber connections during the construction of a wooden house by type of work:
- Connecting log corners
- Longitudinal beam connection
- Construction of interior partitions from timber.
- Connection of crowns
- Installation of the rafter system
- Connecting the corners of the log house.
The corners of a log house can be connected “with the rest”
WITH THE REMAINDER
In some articles you can read that when connected “to the rest” the house will be warmer and the structure will be more stable. In my opinion, any reliable and gap-free timber connection will make a house warm. I don’t even want to talk about the stability of the structure - this statement (taking into account the connection of the crowns of the house with dowels) does not stand up to any criticism. In my opinion, the only advantage of a house whose corners are assembled with the remainder is its design.
When constructing with a remainder, a “quarter” connection is used. The locks of this connection, made in the form of rectangular grooves, come in three types:
- One-sided (a cut half the height is made on one side of the beam)
- Double-sided (¼ of its height is removed on the lower and upper sides of the beam) This is where the common name for this “quarter” method came from.
- Four-sided, when it is necessary to “remove the excess” from four sides of the beam.
The ShBCh-1 milling device will help you make connections to the rest without gaps, reliable and neat, which means the built house will be warm and durable. This device is also intended for milling locking grooves in bay windows that are not perpendicular to each other and for making grooves in the core of stairs.
Advantages of felling logs
A special feature of connecting logs into a paw is the absence of protruding ends of the logs in the corners of the log house.
This allows you to more fully use the entire useful length of the logs. In addition, cutting logs into the paw gives the log house a more attractive appearance. If you want to cover the log house with siding, then the protruding ends of the log logs with the connection of the logs into a bowl will interfere with creating a beautiful finish.
A log house made of logs connected into a paw is free of such disadvantages, and can be easily sheathed with vinyl or metal siding.
The only disadvantage of a log house in a paw can be considered to be the somewhat greater labor intensity of manufacturing compared to a log house in a bowl (in an oblo). Marking the ends of logs should be carried out by a specialist with experience in such work.