© Author: Elena Simonova
From time to time, every carpenter hides a beautiful scrap, a precious piece of wood, a valuable piece in his special stash called “someday I will make something out of this.” Recognize yourself!
EVERYTHING YOU NEED FOR THIS ARTICLE IS HERE >>>
Today I offer you one of the options on how to put these treasures to work. We will work with homemade thick veneer. And we'll make a box for the ring.
Advantages of thick veneer:
You can prepare it yourself, often for free.
Some burls and veneers are cheaper and easier to find in a piece than buying expensive thin root veneer.
Convenient for finishing; there is no risk of sanding, as with thin veneer.
Thick veneer after high-quality finishing gives greater visual depth, this effect is especially noticeable on light-colored rocks. For example, a birch burl will give a stunning pearlescent shimmer.
Thick veneer is not nearly as fragile as thin veneer, so the replaceable insert on the sawing device can be changed much less frequently))).
MATERIALS: WHERE WE GET FROM
1. Stash for yourself and your friends. The smallest pieces can be used.
2. Dacha. Which of us, while sawing a dried plum tree (apple tree, cherry tree...), did not think: “What can be made from this, except firewood for the barbecue?” If you don’t have a dacha, just call out to your friends, and the main local breeds will be given to you in abundance.
3. Waste from parquet production. I know of cases where people agreed to take away scraps or cuttings of valuable wood at absolutely no cost.
4. The Internet is ideal for targeted replenishment of the palette. On forums and in stores for knife makers, blanks for handles are sold from all possible types of wood, from burls to exotic ones. If you realize that you are missing a specific color, go there. The material is already dried and ready for use.
In addition, on the forums, pay attention to topics dedicated to wood harvesting. There you will find a lot of tips on how to saw, dry and store, especially for complex wood such as lilac, apple, burls or wiles.
Facebook also has sales accounts. For example, I buy wonderful bars of plane tree and walnut root there.
So, we've collected the pieces, let's get to work. We will make a box for rings. The drawing needs to be small, the product will turn out very impressive.
Amateur veneering at home (www.ivk-audio.ru)
Advantages and disadvantages
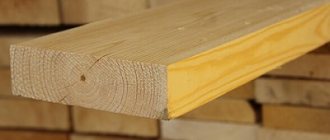
Veneer is a thin section of natural wood, not exceeding 3mm in thickness. It is widely used in the production of modern furniture, musical instruments, and is also used as a finishing material in creating fashionable interiors. The popularity of this natural material is due to the optimal combination of price and attractive appearance of the finished products. To make it easier to make a choice, we will analyze all the pros and cons that veneer furniture has.
The advantages of the material are as follows:
- variety of colors and textures. Various types of wood are used for production: from classic pine to the most expensive varieties;
- it is a natural, environmentally friendly material. Veneer is a covering made from natural wood;
- ease of processing allows the use of veneered blanks for products of various shapes and configurations;
- relatively low cost. Furniture made from veneer is much cheaper than products made from solid wood, which makes it more accessible;
- excellent appearance - high-quality products have the correct selection of patterns, beautiful texture, which give veneered furniture a wonderful appearance;
- practicality, resistance of facades to temperature changes and high humidity. Veneer facades are not subject to cracking or deformation as a result of exposure to external factors.
The material also has disadvantages:
- veneer coating is afraid of direct sunlight: under their influence it can change color;
- choosing a pattern at the joints can be difficult, because each sheet has its own unique pattern;
- easy to care for, eliminates the use of chemical cleaners that can damage the surface;
- products made from expensive veneer options (oak, ash, beech) are not cheap.
MANUAL METHOD OF VENEER MANUFACTURING
Small pieces of thick veneer can be made using only hand tools. This is an ideal solution for home workshops.
Historically, for example, I work with veneer 1.5 mm thick. In general, up to 3 mm is a completely working and comfortable thickness.
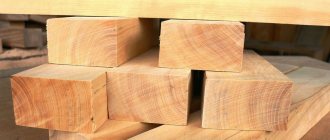
So, take a piece of dried wood (photo 1). In my case, this is a birch tree with interesting rot, which I personally saved from the fate of frying a steak on it. The rot produced an interesting pattern, but the wood remained solid.
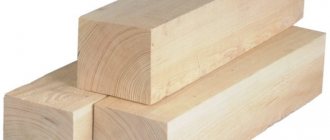
I saw off a piece a little larger than the palm of my hand and manually trim it into a rectangular block (photo 2). Next, using a thicknesser along the entire perimeter, I mark the thickness of the layer that needs to be sawed off. To obtain 1.5 mm veneer, it will be approximately 2 mm.
I secure the block in a vice and carefully saw off the face (photo 3).
To simplify the work, I first carefully cut into the corners of the block with a saw blade. Further from the corner I continue to cut onto the plane of the block, shallowly. I turn the block, again there is a shallow saw on its other side. I turn again, then I cut a little deeper... As a result, I get quite deep cuts on all four sides of the block, ideally according to the markings, the saw has no chance to turn sideways. If the depth of the back saw is not enough to finish the job, I change it to a backless one. It already works like a miter box.
I carefully plan the resulting plate in the calibration bottom (photo 4). It consists of two walls of the required height (I have 1.5 mm, for the walls take the hardest wood you have - they will last longer), glued at a 90° angle to each other. I rest the plate against the corner and move the plane from one of the walls. When the plane rests on both walls, everything is ready.
VENEER PREPARATION
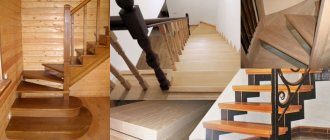
First, decide whether you are ready to embed the picture directly into the background. This is faster in terms of time, but more responsible in terms of the accuracy of the work: you cannot accidentally cut yourself into the background with a blade, all cuts must end exactly where intended. In my works, given at the beginning of the article, the first two were not performed in the background, it was simply added at the end.
If the work is not done in the background, then the picture is glued with any convenient glue onto a rough veneer that you don’t mind, or onto a sheet of thick paper or thin cardboard approximately the thickness of the veneer (all sorts of cereal boxes, candy boxes and other packaging of this kind are good ). As you work, you will replace all parts of the picture with the desired veneer, so it doesn’t matter what you glue it to.
If the work is done directly into the background, then the front side on which you apply the drawing will be used for gluing to the base, so there is no need to firmly glue the picture to it - we will have to worry about cleaning it off from the background before pressing it. There are several options:
1. Translate the picture using carbon paper.
2. Glue with glue, which can then be easily removed. This is my option, I use NovBytKhim glue based on natural rubber. It does not penetrate the veneer at all and then when removed it simply rolls off with your finger.
3. You can simply glue the sheet with the picture to the base with masking tape along the edges, but then carefully control it so that everything does not creep.
To prevent chipping of corners and splitting of veneer when cutting across the fibers, the veneer can be strengthened on the reverse side by gluing newspaper to PVA or gummer. I always glue the base veneer with gum along the edges transverse to the fibers (here above and below) so that it does not accidentally crack during work.
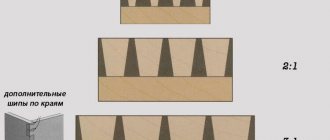
One of the universal principles of doing work in marquetry is to go from the middle to the edges. Therefore, first we make all the details inside the large triangle, then we frame it. I show this using the example of a central triangle.
We start by looking for the most inconvenient part. For us, this is a horizontal crossbar (2), which rests against other crossbars with both edges. If you first make the side crossbars, and then try to cut the central one between them, there is a high probability of accidentally cutting into the ready-made side ones with the cutter. Therefore, we start from the central part, then you can safely cut into the sides: then all the excess will be cut off.
This point is very important in planning work. Always look where there is a part that will later be covered by others to save time by not trying to stay perfectly within the boundaries right away.
MACHINE PRODUCTION METHOD OF VENEER
Using machines you can prepare thick veneer of large sizes. And, of course, everything will work out much faster on machines. The simplest option: we cut the block into a layer slightly larger than the required thickness on a band saw and then pass it through a grinding and calibrating machine. Ready.
In both cases, pay attention: the bar has four sides. Each of these parties can offer their own drawing!
In addition, there is no need to harvest a large volume of veneer unnecessarily, for future use. Let the wood be stored in blocks, and for each project you make the required amount of veneer with the desired pattern.
I will show and comment on some breeds from my collection:
1. Photo 5 – all this is maple. See what different colors and textures you can find in the materials at hand.
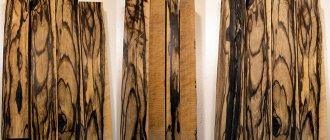
2. Fig. 6 – shades of yellow. Yes, lilac and mulberry also produce purple and pink colors. Moreover, the purple color of lilac is quite durable; this veneer was sawn two years ago. Lilac is very capricious when dried, as a rule, it cracks - keep this in mind and prepare with a reserve. Also try to see what interesting grain structure the elm has.
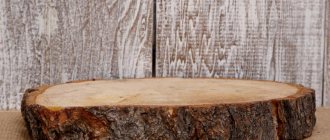
3. Photo 7 – light colors. The chestnut dried up and was cut down by me personally. In general, when sawing wood, chopping firewood, etc., look at the ends. Rot and discoloration are clearly visible there.
Tamo ash, due to the beautiful sinuous direction of the fibers, is extremely capricious in planing; make sure once again that the blade is well sharpened.
4. Country gifts (Photo 8). Anyone who has cut a plum knows what beautiful red-violet stains there are, just a sight for sore eyes. So, those in the picture on the left also had stains. In two years the paint has faded to zero. However, the beautiful texture remained. The cherry plum has retained its pinkish center, the hawthorn streaks have faded a little, but not completely. By the way, when harvesting hawthorn, keep in mind: beetles love it very much. Carefully inspect each stick before adding it to your supply. Gleditsia is a gift from southern cottages, a beautiful delicate pink color.
5. Photo 9 – dark colors. I bought the walnut and sycamore burl online. Notice how different the pattern is on walnut and sycamore, despite the fact that these are two sides of the same block! The maple burl somehow got worn out on its own, I left it for beauty.
American walnut, mahogany and other former purchased boards, of course, are also available, but so much has been written about the properties of such wood.
Regarding rot: it can produce absolutely fantastic designs, but it is very important that the process stops before the wood begins to decompose. That is, rotten wood is not suitable for us; we take only one that has retained its original hardness and density.
SELECTION OF VENEER
Usually, the selection of veneer is carried out after selecting a picture, but since the choice of material can be different for everyone, we’ll start with it, and we’ll develop a picture to match what’s available. We proceed from the understanding that even though our pyramid is made of the same material, the different arrangement of its edges relative to the light source gives them different colors. Actually, this is exactly what we need to play correctly in order to achieve the effect of volume.
So, in the maximum version, to convey the effect of volume, it is desirable to have six colors: the lightest and its two gradations towards darkening, the darkest and its two gradations towards lightening. This is the palette: from light to dark. If you don’t have six colors, take as many as you have, at least there should be three: light, shadow and partial shade.
My finished works, shown at the beginning of the article, have six colors. For this pyramid I will take four, since there are few faces.
Here is my palette: three walnuts (two American, one European) and anigre for the pyramid, bird's eye maple for the background. I definitely check by wetting how it will look after finishing. The texture is as subtle as possible.
TOOLS FOR MARQUETRY (PHOTO 10):
1. Jigsaw and files. To work with thick veneer, you can take thicker files. In the case of 1.5 mm veneer, this can be 4/0 – 7/0, depending on your skill and the task at hand.
2. Mini drill.
3. PVA glue, toothpick.
4. Device for sawing veneer.
5. Tweezers and awl – optional. It is more convenient to work with small parts with tweezers; I use an awl to prick a point for subsequent drilling.
I looked at all the tools for sawn marquetry in detail. If you need to create a shading effect using hot sand, it is done in the same way as on thin veneer, but you must burn it to a greater depth so as not to sand it off when finishing. Practice on scraps before starting work.
OPERATING TECHNIQUE
You can first cut out the window, then put veneer under it and cut out the part along the borders of the window. You can lay down the veneer at once and cut both layers at the same time. Do not try to cut through both layers the first time, the cutter may move: with strong pressure it is more difficult to control. Your task is to do it as accurately as possible, not as quickly as possible. In general, both methods are equivalent, look at your capabilities and skills.
I'm preparing a drawing.
My birch tree reminded me of the sky, so I just hand-drew some land, a couple of trees and a house onto it. The product is small, the wood is expressive: there is no point in fiddling with a complex pattern. In general, if the veneer texture has its own character, try to reveal it, play with it.
Working with thick veneer does not require mirroring the pattern to work.
I match the rest of the veneer to the picture (photo 11). Remember. that we select the veneer by first moistening it a little with water or alcohol:
Types of raw materials
Veneer manufacturers use wood of various species, with interesting colors and textures. Wood shades vary from white, creamy, light brown to chocolate and bright red. The most commonly used types of wood with a beautiful texture are:
- Pine - wood belongs to the category of soft species, veneer is inexpensive, light in color, is immune to fungi, and releases phytoncides into the atmosphere. However, wear resistance is quite low; products with pine veneer must be treated with care;
- Birch is a common tree in Russia. Its wood is inexpensive and belongs to hardwood. Birch veneer has a pleasant color of natural wood, but it is easily tinted, and if desired, you can get many new shades;
- Oak is a hardwood that is not afraid of high humidity and is resistant to insects. Oak veneers mostly have dark brown tones, but there is a variety of white oak with sandy and light brown wood shades with small inclusions;
- Karelian birch is a rare wood and belongs to the hard species. The veneer has a beige color with a hint of mother-of-pearl. Used for the production of exclusive and expensive products;
- Linden is a soft wood with a delicate yellowish-pinkish tint. Linden veneer is used in the manufacture of inexpensive furniture;
- Cherry is a softwood that has a reddish-brown hue that may darken over time. Cherry veneer looks noble and elegant and is used in the manufacture of luxury furniture;
- Maple - its wood is classified as hard wood. Maple veneer is successfully used to decorate products made from less valuable wood species. It has a light or light yellow tint. Of particular value is the bird's eye texture characteristic of maple. Maple veneer, like wood, has good resonant properties, which is why it is often used for making musical instruments.
Veneer can be made from many other types of wood. Moreover, even from inexpensive raw materials it is possible to obtain plates that are difficult to distinguish from expensive types of wood in appearance.
COMPLETING OF THE WORK
1. Transfer the design to the base veneer in any convenient way: glue it with rubber glue, use carbon paper, draw by hand. I am gluing it.
Next, we place a piece of the corresponding veneer under a specific part from below, fasten it, drill it and saw through both layers at the same time. You can attach the bottom piece with rubber glue or, for example, with high-quality masking tape (it’s better for beginners to glue; tape requires some skill).
Next, to secure the piece in the picture, I apply PVA glue to its end with a toothpick (Photo 12), and with it I put the piece in place. Therefore, gum is not needed here, and we do not mirror the drawing.
When you need to constantly open the glue to take out just a drop, it is convenient to pour it into a small container with a lid so that the main volume does not dry out. My solution: the little plastic jars that sell soy sauce in portions.
When drilling, pay attention: the hole from the drill should be as inconspicuous as possible. Either this is a corner, or, for example, an adjacent part that has not yet been cut. Look at photo 13: I drilled into the adjacent part, then this element will be replaced with the corresponding veneer, and the hole will go away.
When you need to accurately select the direction of the fibers, a special twist or color transition, you can cut out a preliminary window for positioning. The window can be narrower than the shape of the part, or a little smaller - see what is convenient for you.
Piece by piece, and our picture is ready.
Thick, hand-made veneer may not be calibrated as accurately as factory-made veneer. Therefore, it is important to ensure that the side of the work that will be glued to the base remains flat. You will then sand or plan the front side. Photo 14 is my front side, the differences in thickness are visible. The reverse side is flat.
PREPARATION OF THE FIGURE
I’ll immediately explain why we specially prepare the drawing, and don’t take it and immediately start cutting it. Firstly, the work is educational, and the process is more important than the result. While preparing a picture from scratch, you will begin to develop the skill of developing any drawing: something geometric, a flower, a river with a house. Secondly, during preparation you comprehend the drawing: you understand how, where and why each line goes, how to cut or saw it later and what color it should be. Therefore, if you don’t have someone behind you who will always tell you, show you and give you the right veneer, then learn from scratch and thoroughly, doing every job 110%. This is the only way you will see your skill grow.
We print out the desired design and trace the contours of future veneer inserts. Everything is simple here.
Who has seen paint-by-numbers, where each number is a specific color? Our task is to do the same with the layout.
FIRST STEP.
Determine the light source. My light will fall from the right, from the front (I draw an arrow). Now we strain our spatial imagination and see on which faces the light will fall directly, illuminating them as much as possible. All these edges are marked with the number “1” (the lightest veneer). You can look at the source code, but you still need to independently imagine and comprehend each facet. Leonardo da Vinci will not color other drawings for you, learn to work on your own.
SECOND STEP.
The darkest sides, turned away from the light source as much as possible, are marked with the number “4”.
THIRD STEP.
The sides that are slightly turned away from the light are the number “2”, and those that are slightly turned away from the full shadow are the number “3”. Ready.
With a palette of six gradations, the steps are the same: first the extreme values, then little by little we move away from them. If some line is unclear, leave it and fill in everything that is clear. Then go back to the blank and look. Most likely, it will be parallel to some already marked side, so little by little everything will be filled.
And we remember that the layout for marquetry is made in a mirror projection, because the side that will be the front side for us during work is then used for gluing onto the base, i.e. the design is turned over. Our pyramid, of course, is symmetrical, but still, hanging it on the side of a window or other light source, the picture will look more natural if the light on it is located the same way as it falls in life.
WE MAKE THE BOX ITSELF
1. We prepare one die for all four walls, then saw it into four parts and cut off their ends at 45° in the “donkey ear” bottom.
2. Seal the box using masking tape and rubber bands (photo 15).
3. Clean the inner corners from glue, align the top and bottom. Glue the lid (our picture) and the bottom (just a 1.5 mm veneer square).
4. To saw off the lid evenly, I first mark the cut location with a homemade thickness planer (photo 16). I chose it because of the blade: it allows you to immediately make a deep enough “groove” for cutting. But any will do, of course. Or a square and a marking knife.
Congratulations, our work is ready! Since I need boxes specifically for rings, I add another insert - a double cushion. These are two soft foam pillows covered in faux velvet.
5. I saw off the lid using the same principle as the veneer plate. First I make cuts in the corners, then I carefully cut along the markings, turning the box all the time.
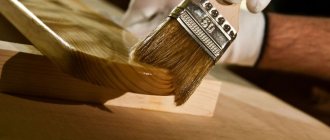
6. I sand the outside of the box, and sand the lid both inside and outside. I cover with the first layer of oil.
7. To ensure the lid holds well, add inner walls to the box. I take a 1.5 mm strip of veneer, 4 mm higher than the depth of the box, to make the sides. Next, I measure the width of the walls of the box from the inside and saw off the four inner walls.
8. On the “donkey ear” - you can’t go anywhere without it - I seal up the walls (photo 17). After that, I put them in place with a drop of glue.
9. Once again I coat both the lid and the box with oil.
Friends, give gifts made with love more often!
Love is our main engine in this world, share it!
(To be continued)
More master classes on rubankov.net