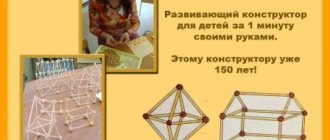
If you look back a few decades, you can see that previously toys for children were made mainly of wood. And in most cases they were completely homemade. But this in no way diminished their beauty, and most importantly, their safety for children. Even now in the modern world, many parents prefer to buy toys made from wood for their children. And many people make wooden toys with their own hands, drawings of which can easily be found on the Internet.
Varieties of wooden toys
Wooden toys are usually lightweight and very durable . For small children this is a real find. They always throw something on the floor, and ordinary plastic toys easily break when handled this way. In addition, babies always put something in their mouth to get acquainted with the world around them, and, of course, toys made of wood in this case will be safer for their body than toxic plastic . By playing with toys from a young age, children develop fine motor skills, and this is very important for the child’s speech development.
You can make a variety of wooden toys:
- Educational sorters.
- Puzzles.
- Pyramids.
- Designers.
- Various auto and motorcycle equipment and other types of transport.
- Tabletop puppet theaters.
- Movable toys.
- Mosaics.
- Sets of cubes with patterns.
The main thing is that their production does not require a lot of materials and additional costs. Typically, all that may be required is:
- Wood blocks.
- Dye.
- Varnish.
- Tools for working with wood.
And of course, a little desire and patience for this exciting process.
Pyramids of all kinds
Everyone had one of these in childhood, so don’t deprive your child of the joy of playing with a pyramid made of natural wood. All that is required of you is an hour of work on a lathe and one straight hole with a drill. And it might turn out like this:
Don't like circles? Well, you can make squares - you don’t even need a machine:
Are squares boring? Make stars - most importantly, use your imagination and be patient:
Of course, colored pyramids “like in childhood” are better - take paints and paint your masterpiece in different contrasting colors.
Educational sorter
Probably not every child will immediately understand how to play such an interesting game , but after he understands the whole process, he will definitely like it. The following materials will be required for manufacturing:
- Wooden blocks 2-3 cm high.
- Ruler.
- Compass.
- Pencil.
- Skin.
- PVA construction glue.
- Wood paint that is harmless to children (for very small children we recommend not to paint the bars, leave a natural shade, because they may put them in their mouth).
- Sandpaper.
- Cylindrical wooden pins.
- Jigsaw.
Step-by-step manufacturing instructions:
- Before starting work, make a drawing or use ours. Decide on the size of the toy and cut out all the necessary parts.
- On a solid block we drill holes for the pins. Please note that they do not have to be end-to-end. You will need to pour glue inside and install pins for gluing.
- You need to make five columns of pins. First, we place one pin from the edge, then we make room for a solid part and drill two holes according to the marked pattern. We repeat the algorithm until we drill all the holes for the pins. There should be 15 of them. Each column should have its own specific number of holes for pins, ranging from 1 to 5.
- Glue the pins into the base and leave to dry thoroughly.
- While the base is set aside, let's start cutting the parts for the sorter. You need to make 4 parts of each geometric shape from the bars. The diagram shows that they took a circle, a rectangle, a triangle, a square, and a pentagon. There should be exactly 4 pieces of each figure.
- Using a ruler and compass, we mark holes in the parts and drill them so that the figures fit freely onto the pins in the base.
- We process all the parts with sandpaper to avoid the possible appearance of splinters on the toy. And after that we paint their smooth surfaces in different colors, each figure from the column should have its own color. In total you will have to paint in four primary colors.
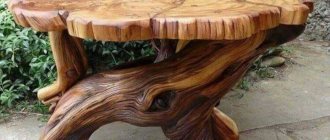
Rope horse
The horse used to be the most common wooden toy. Craftsmen made them with their own hands according to drawings to delight children. The horse as a toy was most often made in the form of a rocking chair for younger children. For older children, they made a horse out of plywood, on which they rode, skipping around the room with sabers in their hands. Such a horse allowed boys to play outdoor games.
To make a plywood horse you will need:
- Sheet of plywood.
- Hacksaw or jigsaw.
- Paints.
- Rope.
Before starting work, measure the child’s height; the horse should not touch the floor , so make it from the top of the head to approximately the knee or slightly lower. If the toy is too long, playing with it will be uncomfortable and traumatic.
Manufacturing instructions:
- On a sheet of plywood we draw the silhouette of a horse in profile. You need to draw the head to the end of the neck, and then it will just be a long stick.
- It will be convenient for a child to ride on such a stick and, importantly, hold it with one hand, since it will not be wide. We cut out the horse according to the drawn stencil.
- The horse needs to be painted so that it is beautiful and colorful; for this we will take a special wood paint. Leave until completely dry. It is recommended to paint only the head of the animal, and not to paint the base on which the child will sit.
- After the horse blank has dried, we attach a rope to its muzzle - it will serve as a bridle.
That's all. The jumping horse for children is ready, you can sit on it, pick up a bladed weapon and ride into battle with your enemies.
Advantages and disadvantages
Over the past 10 years, toys made from wood have become significantly more popular. The reason for this is the natural and environmentally friendly materials. The natural origin of various products forces most parents to partially abandon plastic and metal structures.
Just like many other types of materials, wood has both positive and negative sides. Therefore, you should consider in detail all the pros and cons of do-it-yourself wooden toys for children.
Advantages:
- Wood differs from polymer materials in the absence of toxins - the child will not have an allergic reaction. An exception may be varnishes and various paints that are used in the processing of natural materials;
- wooden products are distinguished by a high level of strength - the structures can be classified as low-traumatic products, since sharp parts do not break off when dropped;
- the large size of toys is considered one of the main advantages, which prevents the child from swallowing or inhaling parts;
- due to their texture, products are better able to develop children’s motor reflexes than other types;
- Any wooden structure is distinguished by its versatility, practicality and ease of maintenance. If the wood has been treated correctly, dirt and dust particles will not settle on the surface. The toys are quite easy to clean from any dirt.
Flaws:
- If children's toys are made without following the appropriate rules, the resulting products will be of poor quality. Improper surface treatment leads to the fact that the wood will constantly absorb moisture and accumulate dust. As a result, upon contact with the toy there is a possibility of the development of pathogenic microorganisms;
- Children are constantly exploring various products, putting them in their mouths. Therefore, the quality of the processed surface must be at a high level. There can be no talk of any splinters or poorly sanded areas;
- If the toy is constantly in contact with water, the structure will deform over time. It is necessary to carefully ensure that wood is not present in the child’s hands during water procedures;
- the downside of reliability is the impressive mass, which when thrown can lead to serious injuries;
- The shape of the crafts may seem boring to children in comparison with plastic and metal samples, but a lot depends on the artist.
Wooden toys have a right to exist. Moreover, they perfectly decorate the interior of a nursery.
https://youtu.be/zN48hHWnHe0
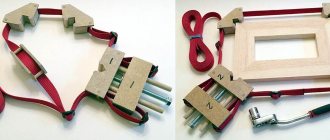
Clown on uneven bars
Toys can be not only for the development of logical thinking, but also simple dynamic ones. With the help of mechanical force on them, they begin to walk, roll over and move on their own. It is worth noting that they are also entirely made of wood, and the use of metal is not provided for in them, and this is very important.
Materials:
- Wooden block.
- Small diameter pins - 6 pcs.
- Plywood.
- Wood paint.
- Sandpaper.
- PVA construction glue.
- Ruler.
- Pencil.
This upside-down toy, like a clown on the uneven bars, will appeal to children of any age; they will be interested in the principle of its operation. And everything will be based on balance and very precise measurements.
Step-by-step instruction:
- According to the proposed scheme, cut all the necessary parts for making the craft.
- Carefully sand all cut areas to avoid getting splinters on children's hands.
- The clown part must be painted immediately, before gluing it with other parts. To do this, let's color his cap yellow and blue, and his suit red and green.
- Drill a hole as shown in the diagram, insert a pin into it and carefully secure it with glue inside. Please note that accuracy in measurements is very important here; there should be no distortions, otherwise the toy will turn over to the end of the bars.
- We assemble the beams by drilling holes in the base and top of the beams and gluing pins there for support.
After the entire structure has dried properly, you can start playing. Gently swing the clown by the cap and he will begin to turn over from one end to the other.
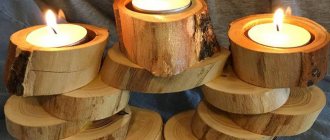
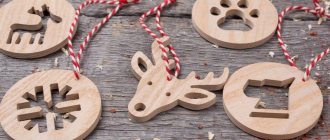
Wood crafts for the Christmas tree
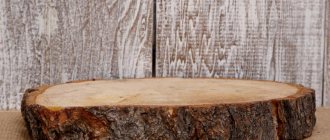
Probably not many people remember that they used to make wooden toys for the Christmas tree with their own hands all the time. Precisely because wood as a material for their manufacture was always available, but the Christmas tree decorations themselves, during a shortage in the country, were very expensive, and people could not always afford them. is very easy and simple to make such toys even for little girls and boys. To do this, you just need to saw blanks with it and drill holes in them for threading.
Step-by-step process of creative activity
Stages:
- a wooden log measuring 3 decimeters is prepared;
- a small gap is drawn on the circle;
- it must be carefully cut out, leaving the inner cavity empty;
- the walls should be half a decimeter;
- In the future, it is necessary to build a reliable mount for the feeder.
Having gone through these stages, the finished product will be necessary for our little brothers.