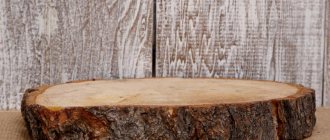
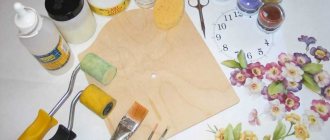
Hello dear readers and subscribers of Andrey Noak's Blog! Do you know what is most important about wood materials? This is high quality drying. Each enterprise uses a special drying technology. But if you want to dry the material yourself, then I will tell you how to make a vacuum dryer with your own hands. But first, a little theory.
Wood is a hygroscopic material, this is due to the fact that wood absorbs water evaporation from the air. Each wood material has varying degrees of moisture content, depending on storage conditions and the environment.
Why dry wood?
Drying is the process of removing moisture from a material through evaporation. When a tree grows, its metabolism is carried out by the circulation of moisture through the trunk. When cutting, the circulation stops and the moisture begins to evaporate. In order to build a house or make any wooden product, you need to properly dry the logs.
Purchased vacuum dryer
Well-dried material is protected from fungi, damage and cracks, and its service life will significantly increase.
If the drying was of high quality, then the product will serve you for many years.
Wood is divided into categories depending on the degree of moisture:
- wet is considered to be one that has been in water and its humidity is one hundred percent;
- freshly cut, with humidity ranging from 50 to 100%;
- air-dry, in cases where the material has been exposed to air for a long time. The moisture content of such wood is approximately 15-20%;
- room-dry, with humidity 8-12%
- absolutely dry, the humidity of which is exactly 0.
Wet material will be difficult to process, but is flexible and elastic.
How to properly dry wood so that cracks do not appear in it?
Proper wood drying processes are the key to obtaining high-quality material, without the formation of various cracks and other deformations of the wood.
The arrows indicate the process of evaporation of excess moisture from wood
Drying wood under the influence of atmospheric air assumes the presence of exposure to weather conditions, therefore a change in appearance may occur under the influence of strong sun or rain.
Ventilated wood should be placed under awnings. The drying process should be organized immediately after sawing the wood. It is necessary to correctly position the stacks of wood, create a gap between the stack and the ground surface of at least five hundred millimeters, using a variety of pads for this.
Air channels should be installed between rows in stacks for a more uniform drying process. In order to prevent cracking processes, the ends of the wood should be treated with drying oil or any type of oil paint.
Automatic drying processes are simpler in this sense, since the necessary data is already built into the programs.
In automatic dryers, a necessary condition for avoiding the deformation process is strict adherence to wood drying technology.
Ancient drying methods
A long time ago, people used only wood to build houses. In houses you can find wooden utensils. Therefore, it was necessary to come up with ways to properly dry logs as the main building material. At that time, people used several drying methods.
Wood evaporation
For this method, they took the necessary piece of wood, water and sawdust. The water was heated to 70 degrees, the workpiece was placed in it, then it was covered with sawdust and left for a certain time so that the material was steamed.
After drying, the workpiece did not crack, and the structure became denser and more flexible.
Waxing
Paraffinization is another method that has been widely used for a very long time. Here, wooden blanks were dipped into paraffin heated to 40 degrees and left for several hours. It was important to maintain the same temperature of the substance.
After the procedure, the wood must dry for several days. The properties of the material change after drying. The workpiece does not crack, does not rot, and acquires an original tinted shade.
Craftsmen used this drying method to make wooden utensils, and then skillfully painted the finished product.
Wood moisture content, measurement methods
There are many ways to determine humidity. To accurately determine the moisture content of wood, special instruments are used. Electric moisture meters are capable of determining humidity with an accuracy of 2-3%. The basic principle of such devices is based on the fact that wood of different moisture content has different electrical resistance.
There are many more “folk” ways to determine humidity, but only professionals use them:
- By weight, weighing identical pieces of wood of the same species in hand or on scales one by one.
- Experienced specialists determine humidity “by eye”, by the presence of cracks and breaks.
- According to the shavings. When processing lumber, small shavings are compressed in a fist. If it wrinkles easily, then the material is wet. Dry wood is indicated by the fragility of the chips, but if the chips crumble, then most likely the wood has been overdried.
- By cutting. If, when processing wood with a chisel, a wet mark is noted, and the material is easily and smoothly cut, then it is not dried. It is better not to carve on such a surface, as cracks and flaws will appear when it dries.
Assembling a vacuum dryer at home
It is very profitable to dry the wood yourself, and if you do this using a vacuum dryer, the drying time will be reduced significantly. But buying vacuum drying from factories is quite expensive, and I will tell you how you can make it yourself, and also save on it.
Drying at home takes place in special chambers. To set it up, you will need a large room, a heat source, and a fan to distribute the heat inside the structure.
The floor, walls and ceiling of such drying must be very strong; reinforced concrete or an iron conveyor is best. If you take a cheap used iron conveyor, for example from a railway, then this will even be a very cheap option. Or, for example, to reduce the cost, you can weld the conveyor yourself from old iron.
To preserve heat inside the chamber, we reinforce the walls with foam plastic and line them with clapboard. Instead of polystyrene foam, you can use mineral wool or other insulation.
To reflect heat, you need to lay a special material. You can use foil, but penofol will also work, especially since its heat-reflecting and preserving qualities are much better.
We proceed to installing the heating device. The entire heating system must be installed separately from other heating circuits and must be constantly running. You can use a heating radiator, with which the water is heated to 65-90 degrees. In order for the heat in the chamber to be equally distributed, a fan is required, otherwise there will be uneven drying of the raw materials and, accordingly, low quality. One more point, the temperature in the chamber should change smoothly and gradually.
When building your own drying facility, you must comply with all fire safety rules.
An important point is the construction of a system for loading lumber into the chamber. You will be loading large and fairly heavy boards. Carts running on rails or a forklift work well for this. The material inside is placed on shelves or simply on the floor. To control the drying process you must install special sensors, and these are thermocouples and vacuum (pressure) sensors. If you do everything correctly, you can get very high-quality wood with a good presentation.
The main point in the construction of a dryer is to achieve the necessary parameters inside the chamber, and the materials and equipment that were used do not matter. In your chamber you can reduce the drying process of raw materials to 2 weeks.
Theoretical aspects
Moisture in wood
Before we start designing a dryer, we need to understand why it is needed. As the name suggests, such devices are designed to remove excess liquid from wood, and here it is worth paying attention to the theory.
Difference Between Types of Moisture
All moisture in wood is divided into two groups:
- free - found in cell cavities and intercellular spaces. The free moisture content is primarily determined by the conditions in which the tree grew, as well as the storage conditions of the sawn pieces. When drying, free moisture leaves the wood quite quickly;
- bound (structural) – a liquid that is part of the cell walls. Each type of wood normally has its own level of moisture content in the structure. In this case, the removal of bound liquid occurs very slowly, therefore, under natural conditions, drying can take from several months to several years.
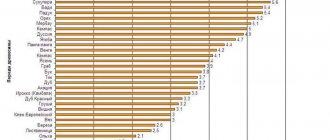
Dependence of deformation on board type
As a rule, the limit of wood saturation with moisture is at the level of 30%. Wood with higher humidity is considered damp and is almost never used for work.
Humidity indicators for different materials differ:
| Material | Moisture contents, % |
| Lumber transported over long distances (so-called transport moisture) | 18 — 22 |
| Molded products (floor boards, floor coverings, decking boards) | 15 — 17 |
| Products made from solid or laminated wood | 8 — 15 |
| Furniture | 6 – 10 |
| Blanks for high-precision joints (parquet, sports equipment, musical instruments) | 6 — 8 |
Why is drying necessary?
So, we’ve dealt with moisture itself, now let’s analyze why we need to reduce its content in wooden blanks.
Cracking along the grain
- When moisture is removed, the configuration of the wood fibers naturally changes, resulting in a reduction in the size of the board - it “dries out.”
- In this case, the workpiece loses moisture unevenly, so deformation can also occur in different planes at different rates.
- Due to this, stress lines are formed inside the wood, which subsequently give rise to cracks.
Note! As a rule, the board cracks along the grain, starting from the end. This is due to the least strong bonds between the longitudinal fibers.
Deformation of lumber by an arc and a “propeller”
- In addition to cracking, transverse deformation of the board is also possible: the part either bends in an arc, or due to uneven lifting of the edges, a so-called “propeller” is formed. This behavior is explained simply: not all fibers dry at the same time, which means their length also decreases in different ways.
As you can see, if you use wood with a high moisture content to build structures or make various structures, over time, individual parts may become unusable. There is one way to avoid this - before starting work, prepare the raw materials by drying them in one way or another.
Drying modes
The use of drying chambers can significantly reduce the time required to prepare lumber for work. At the same time, by controlling the dehydration regime, we can control the performance properties of the resulting material. Today, experts distinguish three drying modes:
Intensive drying is usually used in wood processing plants
| Mode | Peculiarities |
| Soft | The temperature in the chamber rises gradually, due to which not only the natural strength of the wood is preserved, but also its color. |
At the same time, the rate of dehydration of raw materials is slightly reduced.
In this case, a slight change in shade is possible.
It is also possible that the wood may darken and a characteristic odor may appear.
How does vacuum drying work?
After you have placed the material in the drying chamber and closed the door tightly, you can begin drying. Air is extracted from the chamber to create a vacuum of about 9 - 10 bar. It is known that when pressure decreases, water boils faster.
Thanks to this technology, bound and free moisture will move evenly from the center to the periphery, thereby ensuring high-quality and uniform drying of the material, regardless of location.
Dry top wood cells will absorb moisture from those located in the core. First, thin places dry out, then moisture from thicker layers moves to the dry ones, thereby moisturizing them. If this process is interrupted, the material may collapse as thinner layers begin to shift.
Coating the ends of thick lumber to prevent the rapid release of moisture and the formation of cracks during drying...
To prevent displacement, lumber is treated with a special mixture made from chalk and drying oil. Often the end parts of workpieces need to be processed.
Drying excludes the use of humidification systems, and thermometers should not be installed in the chambers. The process can be controlled using special sensors, which are controlled externally, often in a separate vestibule.
Very often, vacuum installations are used for drying expensive species such as oak, merbau, padauk, wenge, and zebrawood. It is very convenient, since the wood is practically not destroyed when dried.
Creating a drying chamber
Finished premises
Drying chamber for industrial production
So, we have argued the thesis that lumber must be prepared for use by drying. Now let's figure out how to make a board dryer with your own hands.
First, we need to select the room in which the drying process will take place:
- Since removing moisture from wood requires significant energy expenditure, the drying area must be selected based on the planned volumes of material.
- The optimal room height is 2 – 2.5 m (so as not to bend over). The width should allow the placement of one or two stacks of boards of 1.8 - 2 m each with a passage between them.
- The windows in the dryer must be bricked. We expand the doors so that we can easily load the material being processed.
You can use an old garage or barn for processing.
Note! For ventilation, either a small window or a vent is left, into which we will later lead the air duct.
- If drying boards is planned in a fairly large room, then it is advisable to make a separate partition in it. We build partitions from brick or thick enough timber to provide thermal insulation.
Construction of a dryer
However, it is not always possible to find a suitable room (most often a garage or barn plays this role).
This is why it will be useful to learn how to make a drying board for boards from scratch:
- We lay a strip or column foundation under the structure. Since the mass of the structure will be small, we make the base shallow.
- After the foundation concrete has dried, we assemble a frame from an aluminum or galvanized steel profile. We connect the frame parts using bolts and special brackets.
Note! The price of aluminum structures is much higher, but at the same time they are significantly more resistant to corrosion in warm and humid environments. So the use of more expensive load-bearing elements is completely justified.
- We cover the walls and roof with steel sheets, which we fix to the frame with metal screws (with a drill). For maximum efficiency, we perform double cladding, laying a layer of mineral wool insulation with a thickness of 100 - 150 mm between the metal sheets.
Read also: Mit 4v precious metals content
Photo from inside a metal structure
- We lay a dense waterproofing membrane on the floor, which we cover with a layer of sawdust.
- We install doors that should close as tightly as possible. For additional sealing, you can reinforce the door frame with bars with rubber sheets attached.
- As in the case of using a ready-made room, be sure to install ventilation ducts for air circulation.
After completing the work, we check the tightness of the room, if necessary, eliminating defects in the cladding. Now we just need to equip our drying chamber.
Note! A closed dryer should not have any gaps that allow uncontrolled air flow. This is due to the fact that the presence of the slightest draft can provoke uneven processing of the boards, causing them to crack or deform.
Equipment
Instructions for arranging a dryer can be very different, because the equipment of the chamber largely depends on both our requests and financial capabilities.
And yet it is quite possible to formulate a general scheme:
- First, we make supports on which the stack of boards will be installed. We fix structures made of wooden beams on the floor, allowing the material to be dried to be raised approximately 10-15 cm above the floor level to ensure circulation in the lower layer of air.
Boards on a pallet with cross spacers
- Instead of supports, you can use wall racks. At the same time, we attach metal brackets to the load-bearing surfaces, intended for laying stacks along the walls of the drying chamber.
Note! This option is most often used when temporarily converting part of an outbuilding into a dryer.
Option with wall racks
- Next, install the heating device. This could be a stove, fireplace, heat gun, fan heater, etc. – it all depends on your preferences. The key parameter will be the power of the device, which is calculated based on the volume of loaded wood: to dry 1 m3 of boards, at least 3 kW of thermal energy is required, respectively, the more raw materials we need, the more powerful the device we will need.
- Together with heating devices, we install fans that will ensure air movement. Of course, you can save on buying a ventilation system and get by with natural exhaust, but in this case the time to prepare the boards for work will increase significantly, which means the cost of heating the chamber will also increase.
Placement of ventilation and heating
- We place fans and heating devices in such a way that warm air flows across the air flow. This installation can significantly reduce the aerodynamic resistance of the system, so that the dryer will work more efficiently.
Since our camera will require a large amount of electricity to operate, it is advisable to connect a separate power cable to it. In this case, we connect all used units to the distribution panel through an RCD with the corresponding power partners. Such a precaution will not be superfluous, since wood, even if not completely dried, can catch fire from the slightest spark that appears during a short circuit.
Advice! It is also advisable to install an automatic temperature and ventilation control system. It is quite expensive, but its use allows you to control the parameters of the internal environment of the dryer, thereby ensuring maximum quality of wood processing.
Integrated heating and ventilation system
My help
I have the opportunity to provide advice on drying technology, selection of new and used equipment. You can contact me through SUPPORT.
My new book was recently published, which provides recommendations on the operation of drying systems in production. The information given in the book is simply unique, you definitely won’t find it anywhere else. More information about the book can be found in the “MY BOOKS” section.
Good luck and see you again!