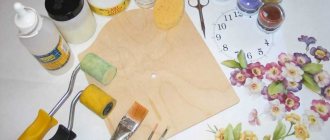
Artificially aged wood is an inexpensive, durable material with the original beauty of antiquity. It is needed for decorating the interior of a house, making furniture, equipping small architectural forms and other purposes.
The use of artificially aged wood
There are many ways to change the decorative qualities of wood. However, the desired aging method is chosen primarily based on the type of wood, interior style, and the availability of materials and tools:
- Mechanical aging of wood
- 3 methods of thermal aging of wood
- 4 ways to chemically age wood
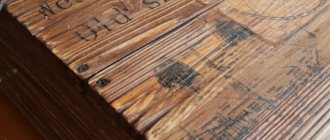
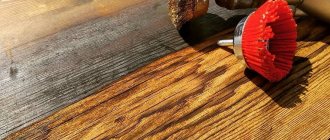
Stained wood - incredible beauty and strength
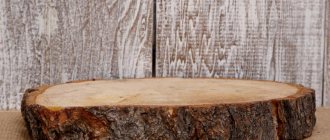
Tree trunks and fragments lying under water are usually called driftwood. A logical name, considering that the tree actually ends up drowned and has been at the bottom of the sea, lake, river, or swamp for decades. It is noteworthy that some trunks turn into dust, rot and, of course, cannot be used. But other trees, on the contrary, acquire truly stone strength.
The most valuable stained wood is oak. This royal tree is already valued for its strength and beautiful texture. After lying under water for at least 300 years, oak acquires delicate fawn shades. If the tree is black, then it has lain in the reservoir for about 1000 years!
In the pre-industrial era, “black gold” was not called oil at all, but bog oak. Products made from it are practically eternal and are not subject to rotting, mildew or mildew. They do not need a protective coating, and stained wood also looks incredibly beautiful.
Besides oak, larch is considered the most valuable stained wood. No wonder. It is these tree species that, due to their high density, sink and sink to the bottom, where a transformation process occurs under a layer of silt or sand. Even in fresh water there are salts that interact with the tannins of wood and help it acquire special hardness and strength.
According to experts, for a tree to really become stained, it must lie under water for at least 40 years. In general, the longer the better, experts say. Ideal places to obtain stained wood are standing waters of swamps or lakes. But a tree that has lain in sea water, soaked in salt, will also be no less durable.
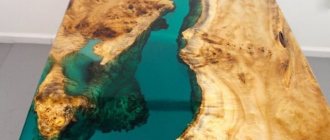
You can make literally anything from stained wood: furniture, parquet, various crafts, figurines and figurines, boxes, billiard cues, pipes, other interior items and even jewelry. This material has no disadvantages, but it is not accessible to everyone. Stained wood, especially oak and larch, is very expensive! There are several good reasons for this:
- Firstly, this is a rare material. Although, as calculated by the Central Research Institute of Lesoslava, during the transportation of tree trunks, approximately 1% of the total floated volume drowns, and about 9 million m3 of driftwood has accumulated in the Volga basin. That's a lot, you say. But finding sunken trunks is not easy. In addition, only 50% of all sunken wood can be classified as commercial, that is, suitable for further use. And there is no more than 5% oak among the driftwood. In Europe, the search for and lifting of flooded trees has been carried out for a long time and purposefully, so it is already very difficult to find driftwood in European countries. Russia still has reserves of this material;
- Secondly, lifting a tree to the surface is technically difficult. Special equipment is needed, usually requiring the help of scuba divers. The wood becomes heavy; you cannot get a whole trunk by hand;
- Thirdly, it’s not enough to get some driftwood. It also needs to be dried before use. This takes about a year, and in no case should you speed up the process; drying should occur naturally;
- Fourthly, it is difficult to process wood that has become very durable; special skills and tools are needed. Not all carpenters undertake to work with bog oak.
Therefore, for three kilograms of bog black oak on the Internet they often ask about 2 thousand rubles! Or 200 rubles for one small piece, literally a cube, suitable only for cutting out, for example, a knife handle. And a finished bog oak comb, such as shown in the photo above, will cost more than 12 thousand rubles.
You can imagine how much a parquet made of such material or a kitchen set will cost. Experts compare the cost of a good stained oak log with the price of a car. Cheaper are stained birch, pine, and aspen - they charge from 1.5 to 20 thousand rubles per cubic meter, depending on the condition and quality of the wood.
With such prices for stained wood, it is not surprising that manufacturers of furniture and interior items achieve similarity with the help of stains and special impregnations. Yes, this is already an imitation; in terms of strength and hardness, such wood is no different from ordinary wood, but the color becomes darker, more noble, and the structure is emphasized.
Stained wood is an elite material. Only for expensive interiors, decoration of yachts, interiors of exclusive cars, furniture that stands in the offices of presidents and executives of large companies. published
Subscribe to our Yandex Zen channel!
If you have any questions on this topic, ask them to the experts and readers of our project.
Stains or stains are tinting compounds that are used to finish wood to give it a more expressive shade. Absorbing into the wood structure, the liquid paints the surface layer, preserving the natural texture and surface relief.
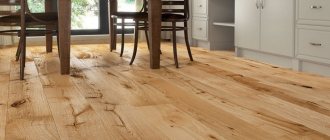
Treatment with stain allows you to easily and without extra costs give inexpressive types of wood a more noble appearance. The ability to experiment with shades opens up wide possibilities when finishing projects.
The composition of the stains does not in any way affect the basic characteristics of the material. A film does not form on the surface, rot resistance, hardness and strength of the wood remain unchanged (in the absence of special components). Techniques for applying paint are quite easy to master.
The basis for stains can be water, alcohol, oil and other substances. Each type of finishing composition has its own characteristics, knowing which it is easy to choose the optimal type of finishing for a particular project.
New qualities of wood
The image is for illustrative purposes only.
As soon as the forest found itself in the water column for various reasons, over time it turned into a durable, highly valued material. Not all trees rot in water. Certain breeds acquire “superpowers.”
The trunks lying under water are called driftwood. This name is quite logical. After all, what else can you call a forest that has lain at the bottom of a swamp, lake or river for several decades. It is noteworthy that some types of driftwood rot and become dust. Metamorphosis occurs with other trees: they acquire the ability to become like stone, durable and incredibly beautiful raw materials.
Valuable stained wood is oak. It is considered the royal tree. And if it lay under water for about 1000 years and turned black, it can be considered “black gold.” Products made from this material acquire delicate fawn shades with an original texture. In addition, wood is practically timeless: it does not rot and resists mold and fungi.
Larch is also valuable. The log has a high density, so it sinks to the bottom of the reservoir. There, under a layer of silt or sand, it acquires strength and hardness over time.
The ideal environment for such a “transformation” is considered to be standing water in a lake, swamp or salty sea water.
Water stain and its specifics
Water-based stain is available as a ready-to-use liquid and as a powder that can be diluted to the desired concentration. Water-based stains have good adhesion, naturally highlight the grain of the wood and come in a wide range of shades, from light tones to deep dark reds. The absence of toxic odors makes such compositions indispensable when performing interior work.
When processing resinous wood, water stain may become stained due to uneven absorption into the structure of the material. In this case, it is recommended to subject the surface of the product to a de-tarring procedure.
Another disadvantage when working with water stains is the problem of raised lint. To eliminate this defect, the prepared surface is moistened with water and allowed to dry. Then the product is sanded with fine-grained paper and opened with a finishing compound.
After treating wood with water stain, it takes 12-14 hours for it to dry completely.
All wood stains are divided into types depending on the base on which they are made
- Water-based wood stains;
- Alcohol-based wood stains;
- Nitro stains for wood;
- Oil stains for wood;
- Wax stains for wood.
Water-based wood stains.
As the name suggests, the basis of this type of stain is water. Water-based stain can be sold either ready-made or in the form of a powder that is dissolved in water. This stain is easy to work with, it is very easy to apply and dries quickly. The only, but significant, disadvantage of water-based wood stain is its ability to lift wood fibers. This is due to the fact that wood, when saturated with water, swells and its fibers rise. This feature disrupts the appearance of the material. To avoid this phenomenon, before starting to treat the wood with stain, you should moisten it with water and leave it for a while, after which, when the fibers rise, sand the surface, and only after that start processing with stain. The color range of such stains consists of colors close to natural wood, from light tones to the color of mahogany and wenge.
Alcohol-based wood stains.
Alcohol-based wood stains consist of a dye or tinting component dissolved in alcohol. Such stains are sold, just like water-based stains, in the form of a ready-made solution or powder. If you choose powder, be careful, alcohol-based stain is only diluted with 96% alcohol. If you are not sure that the alcohol you purchased is exactly 96%, it is better to choose a stain in a ready-made solution. A feature of this type of stain is its short drying time. Alcohol stains dry out very quickly, so you need to be very careful when using them. If, while staining the surface using alcohol stain, you are distracted or make incorrect strokes, stains may remain on the surface that are quite difficult to remove or tint.
Nitro stains for wood.
This type of wood stain is made on a solvent basis. Nitro stains, like alcohol stains, dry very quickly, which makes treating large surfaces very problematic, and they also have a strong and unpleasant odor, which limits the possibility of using them indoors. Nitro stains are best used for staining small surfaces, such as doors, windows, and small decorative elements.
Oil stains for wood.
Oil stains for wood are the most versatile and frequently used type of wood stain. The composition includes oils and oil-soluble coloring components. Oil-based wood stain is easy to apply, goes on smoothly, dries quickly enough, but at the same time makes it possible to cover the surface evenly and without streaks. Oil stains for wood are environmentally friendly, odorless, and can be used both outdoors and indoors. Oil stains, unlike others, have not only a decorative, but also a protective function for wood. Oil, penetrating into the upper layers of wood, protects it from dampness, moisture and other atmospheric phenomena. The color range of oil stains is very wide, here you can choose a color and shade to suit every taste and for any interior.
Wax stains for wood.
Wax stains are one of the modern construction developments. When applying this type of stain, a protective film of wax is created on the surface, which creates effective and thorough protection from moisture.
When choosing wood stains, it is important to consider the following factors:
- Tree species. Different types of wood respond differently to staining. For example, wood species that contain resins (pine, etc.) become stained when treated with stains, since the stain does not penetrate well into the areas where the resin is concentrated.
- Specifics of wood use. If you are going to stain wooden dishes or, for example, children's toys, it is better to use oil or wax stains; they are safe for health and do not have an unpleasant odor.
Irina Zheleznyak, Staff correspondent of the online publication “AtmWood. Wood-Industrial Bulletin"
How useful was the information for you?
| Copyright atmwood.com.ua. Copying of material is permitted provided a hyperlink to the source is provided. |
In what cases are alcohol stains appropriate?
Alcohol stains are a category of finishing compounds based on aniline dyes diluted in alcohol. Like water stains, this product is available in powder and liquid form. A distinctive feature of the finish is the accelerated penetration of coloring pigments into the wood structure and rapid drying.
The optimal method for applying alcohol stain is to use a spray gun. Using a brush, roller and tampons when working with such compositions is ineffective due to rapid drying. The use of manual methods often results in streaks, uneven tone, spots and other defects.
Such compositions are optimal for finishing large surfaces. Similar in characteristics to them are nitro stains - solvent-based stains.
Alcohol-based stain dries in 20-30 minutes.
Choosing a tool for stain processing
The choice of tool for applying stain depends on the area of the surface to be treated and the type of stain
If you need to process small parts, then the method of immersing wood in a container with stain is quite suitable. The coating will be dense, and the process will not take much time.
For large surfaces, rollers, spray guns or wide brushes are used. The bristles should not fall out of the brush. Alcohol-based stains are more convenient to apply with a spray gun. The same applies to nitromortars. This is due to the fact that these types of stains dry very quickly, and the spray gun will allow you to apply the composition as quickly as possible, in order to avoid drips and stains.
Oil stains and their features
The finishing composition consists of dyes dissolved in oil, usually linseed. The stain is easily and evenly applied to the wood, both manually and with a spray gun. It does not form surface films, emphasizes the wood texture and provides air exchange.
A distinctive feature of the coloring pigments of such compositions is their resistance to UV radiation, due to which the painted surfaces do not fade in the sun, maintaining color saturation for years. White spirit is used to dilute oil formulations.
How long such a stain dries depends on the degree of its concentration and a number of other factors. On average, this takes from 2 to 4 hours.
Wax and acrylic compositions
In all basic characteristics, such stains are similar to their oil counterparts. A distinctive feature of wax and acrylic sealants is their moisture-proof properties. The finish protects the wood surface well from water, but is vulnerable to mechanical damage.
Wax and acrylic compositions are easy to apply by hand, maintain the same tone, and do not leave streaks. They do not raise the pile and highlight the natural texture of the wood well. This type of finishing is actively used in furniture restoration. Beads of this type are offered in a wide range of colors.
How long such a stain dries also depends on a set of factors. On average, the process of complete drying of wax and acrylic stains takes 4-5 hours.
What tools are used to apply stain?
Staining wood at home can be done with a brush, a foam or fabric swab, a paint roller, or a spray gun. The choice of technology is determined primarily by the type of finishing composition.
Optimal ratio of materials and tools used:
- alcohol and nitro stains – spray gun;
- water stains - swabs, roller, brushes with synthetic bristles;
- oil and acrylic stains - wide brushes with natural bristles, lint-free swabs.
Support the author!
If you like the material from this user, then please write your comment or review about this game content a little higher. The author and all site visitors will be very interested to know what you think.
In this video, guys, you will learn how to build a simple and cozy treehouse in Minecraft in just 10 minutes. The map is suitable for Minecraft. From MrUnfiny
The most convenient and compact tree farm! DON'T FORGET TO LIKE AND SUBSCRIBE (⌒▽⌒)☆ MY BLOG FOR THE SMART: VK: . From Skrynnik Dmitry.
How to stain wood: methods of applying finishing composition
There are two generally accepted methods for treating wood with stain:
- Applying the composition in excess and then removing the excess with a swab.
The technique is relevant primarily for aqueous compositions. It allows you to even out color transitions, eliminate smudges and achieve lighter tones. The stain is applied in a circular (tampon) or longitudinal (roller, brush) motion, followed by wiping along the fibers. After the first layer has dried, the second is applied. The procedure is repeated until the desired color saturation is achieved.
- Applying the composition in excess without subsequently wiping off the excess.
This technique is more appropriate when using wax, oil and acrylic stains when the task is to achieve deep shades of wood. Partial wiping of excess is allowed after the main part of the composition is absorbed into the structure of the wood. This allows you to even out the tone and get rid of minor defects that may occur when applying the composition.
- to enhance adhesion, the stain can be slightly heated, this will improve the speed and depth of penetration of the composition into the wood structure;
- It is not recommended to heavily soak a brush, swab or roller in the finishing composition. Controlled removal of stain minimizes the risk of smudges and blots.
- The ends of the board are treated with stain more intensively than the main surface, because they absorb the composition more actively.
How to prepare the surface for finishing?
Speaking about the advantages of stain, we should not forget that it emphasizes not only the expressiveness of the wood texture, but also all the defects present on its surface. Therefore, special attention is paid to proper preparation of the product.
- The wooden surface is sanded with medium and fine-grained paper. The old coating, if any, is completely removed.
- The surface, cleaned and leveled by grinding, is degreased with a sponge soaked in white spirit.
- Coniferous species are subjected to a de-tarring procedure; for this purpose they are treated with a special composition.
- When working with water stains on a wooden surface, first remove the raised pile (see point 2).
- A color test is made on the prepared surface. A test stain will allow you to understand how the composition interacts with a specific type of wood and how many layers will need to be applied to achieve the desired color.
Following this algorithm will help you achieve a professional result when staining wood at home.
Dark oak sapling
A dark oak sapling in Minecraft is a decorative block that can transform, that is, grow, and become a large dark oak tree. But this may not happen if you don’t take care of the soil, decent lighting (no less than free space. What kind of tree will grow in a pot, for example. But it’s not that much trouble, especially since you don’t have to think about the availability of water If you want dark oak to grow faster, use bone meal for this purpose.
The screenshot shows all the seedlings that exist in Minecraft. Above them is the wood in section, and in the background is the external grain.
You cannot make a dark oak seedling in Minecraft. We'll have to find him first, and then put him away. It is better to do this close to the house, but, of course, if the trees do not spoil the landscape and topography of the area. But before that, we still need to study the probable height, look at the ground and space. The tree will not be able to grow if the soil is unsuitable or there is no room for the chosen height. The standard use of wood in Minecraft is probably known to everyone. But the seedlings also burn in the oven, but not for long.
Minecraft Dark Oak, like other woods, is an important resource. And which seedling to plant (or even several) depends on the player’s goals or taste.
How to solve the problem of spotting?
An uneven tone of the finish, when the stain is stronger in some places and weaker in others, is a common problem that is associated with the characteristics of certain types of wood. Spotting can occur when processing resinous wood, as well as wood with uneven density or plywood. In the first case, it is recommended to deresin the surface, in the second - to pre-treat the wood with special conditioners that will close the pores and ensure uniform absorption of the stain.
Painting wooden products with stain and varnish
To enhance the wear resistance and attractiveness of the surface of wooden products painted with stain, they are additionally opened with varnish. At this stage, many are faced with a problem when, when applying varnish, the stain begins to smear, which ultimately irreparably spoils all the work done.
At the finishing stage it is important to remember:
- water-based stains must be combined with NON-aqueous varnishes;
- alcohol stains – with non-alcohol paints and varnishes.
Wood, under the influence of negative factors, loses its natural attractiveness over time.
and deteriorate performance characteristics: they fade under the influence of UV; deformed from excess moisture; rot when pathogenic microflora multiply.
To give a rich shade, preserve the structure, protect against destruction and extend service life
, a special wood stain is used. Read more about what types of compositions there are, how to prepare them and what are the features of processing wooden surfaces.
What is stain used for?
Stain, or stain, is a special deep penetration composition that allows you to preserve the natural structure
wood and give it
the required shade
. It can also be used to treat surfaces made of plywood, fiberboard, chipboard and MDF.
The main difference between stains and decorative enamels and paints is the deep penetration of tinting components
, which allow you to paint wood from the inside, preserving its texture and without forming a protective film on the surface.
You need to stain a tree to achieve the following goals:
- painting wood in a certain color or imitating expensive species;
- from rotting and internal destruction due to the negative effects of moisture, infection with mold and pathogenic microorganisms;
- restoration and restoration of old and damaged wooden surfaces;
- giving wood a natural attractiveness;
- increasing strength and weather resistance;
- increasing the service life of the material;
- decoration by combining different shades.
When choosing impregnation, it is important to consider that not all compositions have the above characteristics.
Advantages of bog wood
Today, many have heard about such a material as stained oak wood, but there are many other species, the main feature of which is that they have properties that are radically different from standard options.
Let's take a closer look at what this option is.
First, let's figure out why this group of materials is so valuable, and there are many reasons for its popularity:
| Extraordinary structure | The color of wood differs from standard options, and this effect will be difficult to achieve using artificial methods. Of course, no wood darkens as it will, but pine and birch also get a unique look that will decorate any interior. As you can see, this material is not in vain used when decorating elite buildings. |
| Strength | The hardness of the material is many times greater than that of ordinary wood, so you can find all sorts of stained wood products that were made many years ago, and at the same time look as if they had not been in water for long. There are no exact indicators and characteristics, since it depends on many factors, but there is no doubt that they are many times better. |
| Resistance to negative influences | As experts note, the resistance of such wood to water is quite high, and therefore using it for garden sculptures and furniture would be the right decision - the products will last for decades. Another advantage is that the material cannot be damaged by pests, and this only has a positive effect on durability. |
| Uniqueness of the material | The color of each log will depend on the conditions in which it was located, as well as on the ratio of minerals, water temperature, etc. It turns out that each element is unique and it is impossible to find exactly the same one, and each product made of stained wood can be equated in value to antiques. |
Another option is stained birch, which is mined from the bottom of reservoirs and used to create various products.
Types and composition
Modern impregnating stains can be classified according to their composition
. The following types are distinguished:
- aquatic;
- oil;
- alcohol;
- acrylic;
- waxy.
Water based
Such impregnations are produced in powder form (soluble in water) and ready-made liquid formulations. It is environmentally friendly and safe
a product with an impressive range of shades.
Water stain does not have a pronounced odor, so it can be used to treat interior and exterior wooden surfaces. In addition, it is characterized by high elasticity and adhesion to wood.
.
Despite its safety and practicality, the composition has some disadvantages.
The main one is that it is not suitable for processing wood with a high resin content.
. This may cause dark spots to appear.
The next drawback is that when painting, wood fibers rise, which entails mandatory sanding of the surface.
. To eliminate this drawback, a non-aqueous wood stain is used.
Another drawback is a decrease in moisture-resistant characteristics
wood with prolonged contact with moisture. They are quickly washed out by water, so they are not able to provide reliable protection of the material.
Oil based
Oil stains are based on coloring solutions in linseed oil or drying oil.
They are easy to apply with any available tool and have good resistance to fading, high humidity and temperature changes.
In addition, they do not lift wood fibers or fill them with excess moisture when painting
.
Due to its high performance characteristics, this type of composition is suitable for treating structures inside and outside, forming a moisture-resistant protective film.
Thickened stain is diluted using white spirit.
Alcohol based
Impregnations are special solutions consisting of aniline dyes and denatured alcohol (alcohol base). They come in powder form and in the form of ready-made formulations.
Deep penetration of dyes into wood fibers leads to rapid coloring and drying of the surface
.
To evenly stain wood with alcohol stain, it is recommended to use a spray gun.
. This will avoid the appearance of characteristic stains and stains.
Such compositions provide reliable protection of wood from negative atmospheric influences, therefore they have long been used to treat surfaces that are used outdoors
.
Important!
The main disadvantage of alcohol stains is the presence of a strong chemical odor.
Acrylic and wax based
Acrylic and wax impregnations are practically devoid of those disadvantages that are typical for traditional types
. The compositions allow you to paint surfaces in any shade and increase their water-repellent properties.
The stains contain special acrylic resins and natural wax, creating a thin film
to protect against the negative impact of external factors.
- Acrylic stains. They are environmentally friendly, fireproof and practical materials designed for various types of wood. They do not have a pronounced chemical odor, dry quickly, and have a wide color palette. To obtain a high staining result, it is better to apply the stain in two layers, the thickness of each of them should not exceed 3-4 mm.
- Wax stains. They are designed for treating painted wooden surfaces. Provide reliable protection from high moisture and temperature changes. The compositions are applied using a soft cloth in a circular rubbing motion.
DIY wood stain
The staining process is described in many articles, however, very little information is given about the materials that are used in this case. Of course, if you turn over a lot of websites and forums for furniture makers, you can find information on how to prepare stain, although for the most part such recipes resemble peculiar witchcraft sacraments. Well, it turns out that you can’t make stain with your own hands?
Of course, you can buy ready-made products, but making your own wood stain will make you incredibly happy. Indeed, in this case, you can prepare something special, “your own”. Recipes do not have strict restrictions, which means you can add more of something, less of something, ultimately getting a unique composition that may delight you with an incredible effect. In this article we bring to your attention both simple and practical recipes and more complex options.
Remember that the color of the stain should have certain differences from the color of the material that needs to be stained. Most often, the stain is slightly darker than the main material being processed.
Tea and coffee at work
Light-colored rocks can be darkened a little by using fairly strong tea leaves. The presence of tannin in the brew is the basis for the richness of the color of the wood. As you understand, in this case, various variations are possible, depending on the concentration of the brew.
A decoction of ground coffee beans actually allows you to get very unexpected and interesting shades of color combinations. You can also use instant coffee for these purposes, but strong. You can add baking soda to coffee beans, this will allow you to get even more interesting tones and shades.
Decoctions of herbs and plants
1. To treat birch, a fairly strong decoction of larch bark is often used. In this case, the shade will be bright, reddish.
2. If you want to get a brown color, then use nut shell powder. To do this, take a slightly rotten nut shell, dry it in the shade, grind it into powder and brew it in boiling water. After which, the broth must be filtered by adding a small amount of soda or potassium carbonate.
In this case, you can also get a slightly reddish tint if, after the treated surface has dried, you treat it with an aqueous solution of potassium dichromate. If you treat the surface with acetic acid, the tint will become slightly grayish.
3. To create a reddish tint of light-colored trees, it is best to use a decoction of onion peels. The broth should be very strong. It can be used as a stand-alone coating or as a kind of additive to any brown stain.
4. If you want to get an even brown color with a natural look, use the following recipe: crushed oak bark, alder catkins, willow bark, walnut shells are taken in equal parts. The entire composition is thoroughly mixed and filled with cold water. After which, bring the broth to a boil and add 0.5 tsp of baking soda. The solution needs to be boiled a little over low heat. We filter and treat the surface.
You can also use a solution made from tincture of black walnut, willow and apple bark. The result will be a very even brown color.
5. A solution of alder and willow bark will allow you to get a fairly rich black color.
6. If you want to get a uniform color on relief shapes, you need to pre-soak the product with cotton oil. It must be heated before use. Thus, you can, firstly, make the carving more durable, and secondly, give the product a dark, noble color. After this treatment, the product can be varnished and polished.
7. Using a decoction of unripe buckthorn fruits, you can get a yellowish tint, but only for light wood species. If you want to get a brown color, use a decoction of walnut shells and apple tree bark.
If you add alum to any of the above decoctions, you can get a brighter color tone.
Popular recipe - ebony
In the process of coating wooden products, many non-standard recipes are used. Fill iron filings or small nails, which must first be degreased, with acetic acid. This composition must be infused from a day to a week; the saturation of the solution depends on the infusion time. The infusion should stand in a dark place.
It has a rather pungent smell, so it is best to work with this stain exclusively in the fresh air. In America, this recipe is called ebony, since after processing the material receives a rich, pronounced black color.
It should be noted that experts say that after such treatment you should never use water-based polyurethane varnish, as it will simply curl. This phenomenon is caused by the presence of high concentration vinegar.
Potassium permangantsovka
If you want to get a cherry or dark brown tint, it is best to use a solution of potassium permanganate. Do-it-yourself wood stain based on potassium permanganate is one of the most effective processing methods.
Per liter of water – 50g. potassium permanganate. The water should be warm. Mix the mixture carefully and thoroughly. It must be applied to the product immediately after preparation. Five minutes after treatment, wipe the surface with a damp cloth. The processing process can be repeated until the desired color and shade are achieved.
When processing birch veneer, a golden brown color can be obtained. To do this, you need to use a 3.5% solution of potassium permanganate. After processing, the product must be varnished, otherwise the potassium permanganate will simply fade over time.
Chemical tricks
Do-it-yourself wood stain can be made using various chemical components:
1. The surface of the wood can be treated with potassium carbonate (no more than 35 g per liter of water), you can use soda ash (75 g). After drying, the surface should be moistened with tannin (50g per liter of water).
2. Oak is a tree with a high tannin content and can be treated with slaked lime. After drying, the material will acquire a light brown color. The walnut can thus be colored greenish-brown.
3. To make the oak even darker, you can use ammonia diluted in water (88%). When working, it is very important not to inhale alcohol vapors and prevent it from getting on the skin, otherwise a burn will occur. It is best to work with such drugs outdoors, but it must be borne in mind that in this case it can very quickly lose its effectiveness. Therefore, it should be applied quickly, and the portions should be mixed gradually.
After the wood has acquired the shade you want, you need to wash the solution off the surface with plain water. If you are painting a small part, then you can simply place it in a glass container, put a jar of alcohol in it, and close the container itself tightly. In a couple of hours the part will be ready.
4. A decoction of barberry root can help you color sliced veneer yellow. After preparation, the broth must be filtered and no more than 2% alum must be added to it. After adding, heat the solution again. Use chilled. All ingredients can be purchased at the pharmacy.
5. Using a decoction of young poplar shoots, supplementing it with alum, you can get a very expressive orange color. Recipe: 150g. poplar branches for 1 liter. water. Bring to a boil, add alum and cook for one hour. The mixture must be filtered and left for a certain time in an open container. It is best to carry out the settling process within a week. The broth should acquire a golden yellow color.
6. If you want to get greenish shades, use a decoction of alum, poplar shoots and oak bark. Also, verdigris powder can help you in this process. 50-60g. dissolve in vinegar and boil for 10-15 minutes. Ideal for sliced veneers that need to be soaked in a hot solution.
7. If you want to get a black color, use wolfberry juice, which must be mixed with acids. To get a blue color, use baking soda. If you want to get a red tint, mix the juice of wolfberries with Glauber's salt; if you mix the juice of the berries with vitriol, you can get a pronounced brown color, and the combination of juice with potash will give you a green tone.
8. To get a gray or silver color (sliced veneer), use a combination of rainwater and vinegar in a 1:1 ratio. Place wire or rusty nails in this solution. When the solution is infused, it can be applied to the product.
vseprostroiku.ru
How long does it take to dry?
Each type of stain has different drying times.
, which are indicated on the packaging or in the instructions for the selected composition.
- When applied to a surface, water stains dry from 12 to 20 hours;
- alcohol compositions dry quickly, up to 5-7 minutes. In low temperature or high humidity conditions, drying time may be 30 minutes;
- oil impregnations dry in 1 to 2 days after application;
- acrylic compositions dry within 60 minutes;
- Wax stains dry for 12-14 hours after application.
Color spectrum
In accordance with the international classification, each color is assigned its own code and name
.
For example, “pine”, “walnut” or “fruit wood” stain.
To select a wood stain in a suitable color range, you need to carry out a test painting
wood and take into account:
- natural shade and type of wood subject to processing. Painting with stain can lead to the appearance of new shades;
- the color range stated in the catalogue. Colors under the same code from different manufacturers can produce shades of different depth and saturation on different types of wood. The same composition on pine will look lighter than on red wood. This can be explained by the fact that such wood has a more saturated natural shade;
- quality of stains. Compositions in the same color from different manufacturers can give different coloring effects. Therefore, you should not choose products of dubious quality;
- density of stains. The lower the density, the more the composition is absorbed into the wood. This results in a less saturated and deep shade.
The following colors of water-based wood stains are considered the most popular:
- “oak” – rich brown shade;
- “mahogany” – a noble burgundy shade;
- “pine” – the shade is close to the natural color of the wood;
- “natural” – natural light yellow shade;
- “light walnut” – practically does not change the natural color of the wood, and is used as a protective composition;
- “cherry” – light red and rich burgundy shade;
- “mahogany” – brown with light shades of red;
- “Wenge” – dark shades of brown;
- “larch” – from dark yellow to orange hue.
Problems of water staining of wood and possible ways to solve them
Water-based stains
- these are products that have long proven themselves with a variety of options and extremely simple use, which do not harm the environment, since the basis of their recipes is water. There are various formulations of such stains for application by spraying, brushing, rolling or dipping. In this article we bring to your attention a compact analysis of the most frequently encountered problems during water seaming.
| Problem | Ways to solve it |
| The staining composition gives off an unpleasant odor | Deterioration in the quality of the staining composition as a result of bacterial and/or fungal contamination. Fighting this is impossible and makes no sense since the important ingredients have already decomposed, and the original color of the stain has been lost. This problem can be prevented by adding preservative BZ 900. Prevention for warehouse storage: it is enough to add a preservative in an amount of 1%. If the stain is used, for example, for application by dipping, or if a small amount of stain is often taken out of a large container, it is recommended to increase its dosage to 2-3% (wt.). |
| The stain dries too slowly | First you need to check the spatial conditions:
Otherwise, only adding a quick-drying solvent, for example BZR 0101 or CV 570, can help. Add up to 25% to stains for valuable wood species, add up to 10% to primer stains. If it is necessary to use a quick-drying solvent in other types of stains or if necessary to add in large quantities, consultation with a water staining laboratory is necessary. |
| The staining compound is absorbed too quickly | This problem occurs mainly when using spray stains or hand-applied stains, especially on old and hygroscopic wood or highly absorbent wood species. The addition of retarding solvents is usually not effective, since the problem is not that the stain dries out quickly, but that it is absorbed into the wood too quickly. When staining with stains for valuable wood species, primers or colored stains, this problem can be solved by adding 5..15% of the BZ 120 product to the stain composition. The same additive can also be used in stains for hydropositive staining. However, it should be borne in mind that the positive effect in this case is reduced. And one more important point: in the workplace, when performing seaming work, it is always necessary to exclude the possibility of exposure to direct thermal radiation and drafts. |
| Wettability problem | Wetability problems (mostly on oily woods) can be corrected by adding a binder and/or wetting agent. As a rule, adding 0.1-0.5% BZ 923 is sufficient. If you want to achieve more intense wetting, you can additionally add, for example, 5% solvent BZR 0101. Just adding solvent alone, without using BZ 923, gives too little effect. In addition, an overdose of solvent is dangerous due to the occurrence of incompatibility with the binder. In this case, adding a small drop of dishwashing detergent will help solve the problem (In this case, be sure to conduct a test application of stain/varnish!). |
| Painting pattern with spots and interruptions | This problem can have many causes:
|
| Adhesion (adhesion) disorders | This problem mainly arises only when highly pigmented and colored stains are used with “critical” varnish systems. The problem is eliminated by adding a binder (for example, BZ 621) in an amount of 5%. The basic rule: add as much as you need, but as little as possible (price!!!). |
| Resinous or greasy inclusions in wood | On resinous wood, for example, on some types of pine, positive staining can only give a good effect under certain conditions (due to the high resin content). When working with such wood, pre-treatment with wood soap BZ 850 is recommended. To do this you need:
|
| The core is too dark | In most cases, this is due to too much staining. In this case, spraying without distribution (without rubbing) may be ideal. Alternatively, you can pre-wet the entire wood, especially the core. Without allowing it to dry, apply stain to damp wood. In this case, the shade of the stain will have to be made more concentrated (more intense). In all other cases, consultation with a water staining laboratory may be necessary. |
| The wood is too rough | The roughness of wood leads to higher consumption of paints and varnishes as a result of increased absorption of the primer. By adding a large amount of binder to the stain, good preliminary insulation of the wood is achieved. As a result, the surface becomes subjectively rougher due to the elevation of the fibers, but provides an optimal basis for varnishing. Here, depending on the desired effect, it is advisable to use the binder BZ 625, BZ 621, or BZ 630 (the concentration of the latter should not exceed 20%). |
| The positive effect is not pronounced | When processing softwood:
For gloss staining:
|
| The positive effect is too pronounced | With positive staining, the intensity of the positive effect can most easily be controlled by reducing the content of BZ 882. When adjusting the finished staining composition, even a small amount of binder (BZ 625, for example, from 2%) leads to a decrease in the positive effect. The last method is recommended to be used only as a last resort! |
| The rustic effect is not pronounced | If problems with a weak rustic effect are related to wetting, they can be solved using the measures described below. If the pores are filled, for example, with glue, the improvement can only be minimal:
|
| The rustic effect is too pronounced | There are also several possibilities to solve the problem:
|
Busch Guido /Hesse GmbH & Co. (Germany) Tsilenko Pavel
How to make it yourself
a simple stain for wood processing yourself
at home:
- from plant ingredients;
- from tea and coffee products;
- from chemical components.
Based on plant materials
- Decoction of onion peels
to obtain a bright red hue. - A decoction of walnut peels
to obtain a rich brown hue.
To do this, the shell is crushed to a powder and boiled for 12 minutes in water. Add 1 tsp
to the finished strained broth soda _ To obtain a red tint, potassium bichromate is added instead of soda; for a gray color, vinegar essence is added. - Decoctions of oak, willow and alder bark
give a rich black color. - A decoction of buckthorn berries
will paint the wood an attractive golden color.
From coffee, tea and vinegar essence
- To get a rich brown tint, it is enough to combine natural ground coffee and soda
. - To stain light wood, you can use a strong brew of black tea
. - To obtain a deep black shade, you need to place metal nails in a container and fill them with acetic acid
. Leave for 5-7 days in a dark place.
Based on chemical components
- The brown tint is obtained after treating the wood with a solution of slaked lime
. - A deep cherry tint is achieved by applying a solution of potassium permanganate
. To do this, you will need 60 g of potassium permanganate, which is diluted with a liter of heated water. - A rich yellow tint is obtained by treating the surface with a decoction of barberry roots
, to which alum is added. - The herbal color will be obtained by combining 60 g of verdigris and vinegar essence
. The mixture is boiled for 10 minutes. - The dark brown color is obtained by combining wolfberry with copper sulfate
. Glauber's salt with these berries gives a red color, and soda gives a blue tint.
With whitening effect
Bleaching stains are used as a base before painting wood, allowing you to achieve unusual color solutions
. For example, apple wood can acquire a noble milky hue, and walnut can acquire a red or light pink color.
Whitening
stains can be prepared as follows:
- Composition based on oxalic acid. To do this, 6 g of acid is diluted with 120 g of warm water. The finished stain is suitable for processing light or bleached wood. After application, the surface is thoroughly washed with the following solution: 4 g of soda and 16 g of lime are diluted in 110 g of water.
- Hydrogen peroxide based solution. To do this, you will need a 30% peroxide solution, which is available for sale at any pharmacy. It is suitable for bleaching various types of wood. However, it should not be used on oak, rosewood or mahogany.
- The container with stain is shaken and slightly heated to a temperature of 36 degrees. This will ensure deeper penetration of the composition into the wood.
- The roller or brush is moistened with a small amount of stain. When using a spray gun, the composition is poured into a special compartment.
- The vertical surface is processed from the bottom up to avoid the formation of smudges and sagging.
- The horizontal surface is painted as follows: along the fibers - across - along. Impregnation is applied in thin, even layers.
- Excess composition is removed with a clean rag.
- Surface treatment is carried out quickly and without long breaks to prevent staining.
- The desired color is obtained by painting the surface in several layers. In this case, each subsequent protective layer is applied after the previous one has dried.
- Finally, the surface must be varnished and sanded using fine-grain sandpaper.
Staining wooden surfaces is the best way to preserve the natural texture of the material and give it an attractive shade
. Stains are suitable for treating wooden walls, ceilings and floors, decorative elements, window and door structures, and garden furniture.
This product has many advantages
, but in order to get a good effect from painting, it is necessary to correctly select the appropriate composition in accordance with the type of surface being treated.
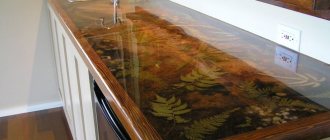
You can preserve the natural surface texture of wood products (which is often more pleasing to the eye than the utilitarian forms of the product itself) by using a transparent finish. Moreover, the natural structure can be emphasized by changing the color of the surface itself, imitating valuable species by impregnating the top layer of wood with weak dyes. This process is called staining. The stain is very easy to work with. The stain is produced in different shades that match the natural color of the wood.
How to combine correctly in the interior
Stained wood: features and uses
By using furniture in milky shades wisely, you can create a positive mood in any room. But only experienced designers without mistakes combine Pasadena oak with a variety of wall decoration, one or another floor covering, and original decorative elements. For a person without experience in such matters, such a task may seem insurmountable.
Many interior design magazines for DIY renovation enthusiasts are full of photographs of interiors with white oak furniture. We will also note the basic design techniques that allow you to fit bleached oak furniture into a residential interior.
| Reception | Characteristic |
| Eye-catching contrasts | If the room is decorated with wallpaper or decorative plaster in dark tones, then in tandem with Pasadena oak furniture the space will be filled with brightness, expressiveness, and comfort. The contrast of colors will bring positive notes to it. |
| Bright colors | If the home owner likes bright colors, you can decorate the room with a bright color. Against a bright background, Cremona oak looks even more elegant and sophisticated. |
| Beige surface | If a person is an admirer of calm beige tones, he should not refuse to purchase products in the Cremona oak shade. Designers use this technique to create a modern European interior in small rooms, because light colors of decoration and furniture visually enlarge a narrow space, making it light and airy. |
In other words, light oak as a color scheme for furniture harmonizes perfectly with almost any interior. It can be selected for both modern modern and romantic Provence. And such furniture is especially good for small spaces, where interior items should not visually burden the space. Because products of this color look very light, adding space to the room.
Preparing for staining wood at home
The surface for staining must be carefully prepared. First of all, it is sanded with 100-grit sandpaper. To remove lint, the wood is moistened with warm water and after about five hours, when the surface is completely dry, it is sanded again, but now with 180-grit paper. Sanding paper must be changed more often to remove the lint completely rather than pressing it to the surface. To completely remove lint from the surface of soft wood, this last operation is carried out several times.
How to choose wood stain
The stain is selected exclusively by testing on a piece of wood from which the entire product is made, since the same composition on different types of wood gives different colors. All prepared workpieces are treated with stain in one step under the same conditions, otherwise the color may turn out to be uneven. First, the stain is applied along the grain of the wood. Then the applied composition is rubbed in, moving the brush now across the texture lines. After about two minutes, excess stain is removed, for example, using a sponge or stamp pad. To ensure that the stain penetrates deeper into the wood, it is rubbed with a natural bristle brush. The slower the stain dries, the deeper it penetrates into the wood. Under no circumstances should the workpiece be dried near heating devices or in the sun. There is no need to rush to achieve deep, uniform staining.
Staining process
Before staining, prepare a tightly sealed tank or staining chamber, depending on the size of the item you are going to paint.
You can make a staining chamber yourself. Assemble a frame from any wooden or plastic guides, wrap it with film. The main rule: the chamber is made as small as possible so that the concentration of ammonia vapor is maximum.
A wide bowl is placed at the bottom of the tank, and the wood to be painted is placed above it. Make sure that the edges of the parts do not come into contact with each other or with the walls of the tank; do not use metal supports. If you plan to use the wood not completely, then it can be leaned against the wall above the bowl, so the main part will be completely open to ammonia vapor, and the points of contact will then be cut off.
Next, ammonium hydroxide is quickly poured into the bowl, and the container is tightly closed. The staining time with ammonia haze can range from 2 hours to a day. This period depends on the color you want to get. Once the process is complete, open the lid. Ready! You've got a classic stained wood.
Sometimes, due to humidity or a weak ammonia solution, the surface of the wood after staining is slightly deformed, and the top layer is partially lifted. In this case, you can simply sand the painted layer; do not be afraid to spoil the shade; with standard ammonia staining, the color changes over the entire surface of the product to a depth of 3–4 mm.
When staining, vapors penetrate deeply into the wood, so this method is also used for decorative beams or bars that will be sawed