The natural aging process of wood continues for decades. Antique decor is now at the peak of fashion, and turning to craftsmen with a request to age purchased wood can cost fabulous amounts of money. You can carry out the procedure yourself at home. Artificial aging of wood differs little in appearance from natural aging, but the material will serve for many years to come. Decorating furniture and interior decoration in this way is carried out in order to emphasize the structure of the wood and give it a noble appearance. You don’t need any special skills to externally age the texture of wood; you just need to correctly carry out all the stages of aging.
Aging wood with your own hands by brushing
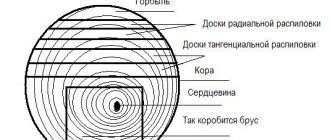
The method is simple, but not every breed is suitable for it. Spruce, larch, oak, and wenge have large fibers and the result will be impressive. Alder, cherry, birch, teak, on the contrary, are unsuitable for brushing due to their fine-fiber texture. Once you decide on the material, you need to prepare the tools.
You will need
- Hard wire brush.
- Abrasive brush or sandpaper.
- One of three coatings: varnish, wax, oil.
Sequencing
- Wet the item with water to avoid any wood dust during processing.
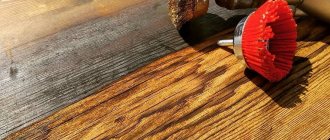
- Go over it with a wire brush, moving along the grain. A stiff brush will select soft fibers without damaging hard ones. The wood will become more prominent. The deeper the relief, the more aged the wood appears.
- Use an abrasive brush or sandpaper to clean the surface from burrs and roughness.
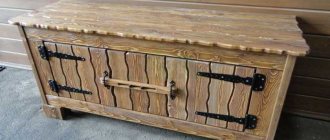
All that remains is to apply the coating and wait for it to dry. To enhance the decorative effect, you can paint the product in two colors. The grooves are in a light shade, the convex relief is in a dark shade.
Instagram @polychrome_spb78
Instagram @mara_nova_dolls
- Furniture
All about painting old furniture with your own hands
Brushing
This method of aging wood with your own hands is called from the concept brush, which translates as brush. The second name is tree structuring.
The texture is tinted with a patina effect. To age, the main wood is left in its natural shade, and the pores of the wood change it to another, resulting in the desired appearance. This is due to differences in the hardness of wood fibers. Brushing lumber means removing soft fibers. Relief areas appear on the surface and due to this it ages visually.
The degree to which it needs to age is determined by its purpose. If necessary, to create the appearance of deep antiquity, cutouts are made up to 3 mm. For floor coverings, such aging is not suitable, since it will collect a lot of dirt, and it is difficult to wash it off. On average, a depth of about 0.7 mm is left. Only hardwood can be aged using this method. Brushing wood improves its quality characteristics. It becomes stronger, lasts longer, and is not susceptible to attack by fungi and parasites.
Tools and materials for processing
The basis of the brushing aging method is cleaning with a hard metal brush. Soft fibers are cleaned manually. Using this tool, a relief is formed. The shorter the bristle of the brush, the more it will age after the procedure. Using a chisel, apply straight deep stripes, changing their curvature. Sandpaper is used to emphasize the resulting effect.
After the first stage is completed, the wood is coated with paint that has its own natural wood shades. The coloring composition is applied unevenly on purpose. This is how the upper layers age, they acquire a dark shade, while the lower ones remain lighter. The relief after this coloring stands out even more. The ideal texture of aging wood is created by gray-white paint. Before it completely dries, the top layer is wiped off the surface. The result is the appearance of a tree that is at least 10 years old.
Processing technology
Before aging by structuring, the wood must be prepared. Lumber is selected without defects with a moisture content of 10-15%. Otherwise, the fibers will not be processed and will break. How to properly age wood with your own hands:
- Moisten the surface so that there is not a lot of dust during work.
- The brush should move in the direction of the grain. Remove only soft wood fibers.
- The speed should be moderate so that the wood does not heat up.
- Primary grinding is done with a polymer brush with abrasive. Remove torn fiber residues using sandpaper. After removing the roughness, it will become clear how well the aging was done.
- If necessary, make the grooves better by brushing again.
- Decoration is done with a chisel. The appearance of cracks is created.
- Polishing. It is carried out with a sisal or hair brush, if aging is carried out with a grinder or a grinder. The final appearance of the workpiece is given. For the same purposes, fine-grain sandpaper is used for manual processing.
- Next, the piece of lumber needs to be dried and then completely cleaned of dust.
- A layer of stain creates a contrasting pattern. A generous layer without rubbing and quickly removing excess will dye soft fibers and leave hard fibers light. Gold and silver colors look especially advantageous if the wood is aged.
- Patination is the darkening of deep furrows. Gives nobility when aging.
- Finally, polish again, erasing any unevenness after painting.
- Varnishing is done with parquet varnish.
If you age the workpiece in this way, it will preserve the characteristics of the breed for a long time.
Use patination
Now we’ll tell you how to properly age wood using staining.
You will need
- Paint in two tones.
- Stiff sponge or fine sandpaper.
- Varnish.
Patination instructions
- Before processing, lightly sand the wood for better adhesion to the coating.
- Apply paint to match the furniture and let it dry.
- Repeat the procedure, but in a lighter tone.
- After drying, wipe the top layer with a hard sponge or fine sandpaper so that the bottom layer shows through.
Finally, apply varnish and let it dry. It should give the impression that the furniture has been painted many times.
Instagram @tatsianahei
Instagram @technocolor_russia
Aging methods
The process of processing antique wood with your own hands is done in several ways. The main ones are:
- Chemical treatment – used for hardwood.
- Firing or heat treatment is a universal option.
- Mechanical processing or brushing - this method can be used to process products made of oak or pine needles.
Furniture for aging is selected to be massive, with a rough texture, so that in appearance it resembles hand-made objects of past centuries. Before processing, it is better to disassemble the furniture into individual parts. This will make it possible to treat even hard-to-reach places.
To make it easier to achieve the effect of aging wood, it is better to purchase material that has already been damaged by the bug, with minor chips, cracks and knots.
If you are doing the process of aging wood yourself for the first time, then it is better to practice a little on separate unnecessary bars. The quality of the result depends on how well the solution, stain or varnish is applied. It is recommended to carry out work outdoors so as not to harm your own health.
How to make new boards or furniture look like old products? Now you know that several techniques are used for these purposes. Let's take a closer look at each of them.
Mechanical restoration
Wood can be aged mechanically in products made from species such as pine, spruce, and larch. It is these types of wood that have a pronounced texture, the presence of layers of fibers with varying degrees of hardness.
The main task during machining is the formation of various types of chips, potholes, and cracks artificially. This can be achieved by the following actions:
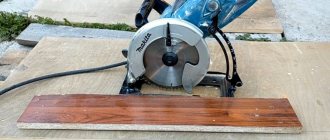
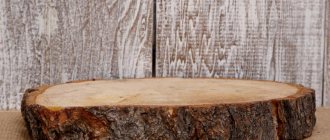
1. Wooden surfaces are processed using an ax or a special grinding machine. They are randomly marked with potholes of varying depths and widths. The block is hewn, but one should not strive for special accuracy and symmetry.
2. After this, we proceed to sanding the surface using a brush with metal bristles. It will be easier to do this with a grinder and an appropriate attachment. During processing, grinding is carried out along the grain until the caused potholes and chips take on the appearance of naturally formed defects in the wood.
3. Then we move on to the second degree of grinding. At this stage we use a brush with soft bristles and sandpaper. During this treatment, soft fibers are removed, leaving coarser ones. Thus, we get an uneven tree structure. Using the same method, you can additionally highlight knots and cracks.
4. At the next stage we work on the color of the wood. It is necessary to bring the light new wood as close as possible to the shade of the board that has darkened with age. Here you can use stain or dark acrylic-based paint.
5. When the applied product is completely dry, sand the surface with fine-grain sandpaper. At the same time, we try to perform all actions carefully. The paint should be removed from the hills and ridges, but it remains in the potholes.
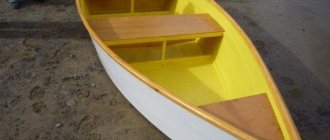
6. At the final stage, cover the treated surface with colorless or light yellow varnish and dry completely.
On video: a method of mechanical aging of a wooden board.
As for the question of how to age wood on small items, such as small pieces of furniture or wooden dishes, here the process is a little simplified. The surface to be treated is thoroughly cleaned from wood dust with a brush until the desired effect is achieved. Subsequent painting and opening with varnish occurs identical to the previously described process.
Brushing should only be done by hand using a wire brush until small dents and ridges are reached.
Heat treatment
Wood can be aged by heat treatment. A special feature of this aging method is the complete absence of mechanical processes. The disadvantage is a certain danger to human health during work. Therefore, they should be performed in the fresh air, while protecting the skin, eyes and respiratory organs.
Heat treatment or firing is carried out by exposing the wood to direct fire. You should use either a torch or a blowtorch. It is necessary to burn to a depth of about 3 mm.
If heat treatment is carried out superficially, the aging effect will not be as pronounced as with stronger firing.
After finishing the heat treatment, perform the following steps:
- Using a metal brush or grinder with a bristle attachment, begin to scrape off the layer of soot to the desired degree of antiquity. There is no need to paint the surface. The soot will highlight the entire structure.
- Sanding is done with sandpaper.
- A finishing layer of transparent varnish is applied to aged wood.
Chemical method
You can age wood by chemical treatment using such means as alkaline compounds or ammonia. You can use household chemicals that contain alkaline components.
The essence of the process is that when the product gets on wood, it burns its soft tissues. The structure of wood is distinguished by the presence of hard and soft tissues. When processing antique wood, soft tissues are removed in various ways.
In this case, the surface layer of wood is burned with alkali, which simultaneously colors it gray.
The next step is the process of washing off alkaline residues. To do this, you can use vinegar or citric acid. A solution of citric acid is prepared in the following proportion: 1 teaspoon of acid per glass of water. If vinegar is used, it should be a 9% solution. Acetic acid should not be used. Next, the treated surfaces are well dried, sanded and varnished.
Aging wood using all the methods listed above is quite simple if you put in the effort and effort. You can give the desired effect to any surface. Can be aged like small household items, furniture or even wooden floors.
How to age wooden furniture (2 videos)
Brushing wood (30 photos)
Use wax
Wax helps to achieve the effect of a destroyed top layer of paint.
You will need
- Paint in two or three colors (depending on what result you want).
- Wax (you can use a regular candle).
- Rag.
- Varnish.
- Fine sandpaper.
Sequencing
- To do the job properly, sand the wood.
- Choose a color that will be the main one. For example, the darkest of the three. Paint the product in it, using wide, uneven strokes, and let dry.
- Take a candle and, pressing hard, rub the places where you think there should be holes in the color.
- Then apply a light shade and wait until it dries.
- Using a rag, thoroughly wipe the areas where the wax was applied. The paint will peel off there, giving the product the appearance of old and shabby.
If you are satisfied with the result, then the third layer does not need to be applied. If you want to change the color, then repeat the entire procedure. At the very end, coat the product with a fixing varnish.
Cover with stain
Protective and coloring impregnation ages the wood for decades. Tinting with stain looks beautiful both on its own and with other techniques. For example, with brushing.
You will need
- Water based stain.
- White spirit stain.
- Soft sponge.
- Primer.
- Antique wax.
Antique wax is a completely natural product. It contains three types of wax: mineral (mountain), animal (bee), vegetable (carnauba). Suitable for processing any wood. Waxing saturates wood well and has restorative and protective properties.
Sequencing
- Treat the item with a water-based stain.
- Take a soft sponge and wash off the impregnation without touching the edges and corners. This way it will look more prominent.
- After drying, apply a layer of white spirit stain. Leave overnight until completely dry.
- Prime the surface with a soft sponge or brush, filling all cracks.
- Wait until dry and use a brush to apply the antique wax.
Instagram @pinkezhik
Use dry brush method
The method is simple and economical. It is suitable for furniture that does not have any relief.
You will need
- Dry, very hard brush.
- Water based paint.
You can use an old dried brush.
Sequencing
- Dip the brush into a small amount of coating and paint the furniture or decor in different directions, leaving unpainted areas.
- Let dry.
The product looks scratched after this treatment. There is a second version of this method. It requires two shades: the base one and the one with which you will imitate scuff marks. In this case, you need to act a little differently.
Instructions
- Paint the entire surface with the base color.
- Dip the brush into the second tone and dry it well with a cloth or paper. So that it becomes almost dry.
- Apply loose strokes in the direction of the grain where dirt would naturally accumulate and become shabby.
Instagram @handel.ahsap
Instagram @eugene.po.wood_lab
Recommendations and tips
Now that we've looked at all 7 methods of painting wood with an antique effect, I'd like to highlight a few basic tips that you can apply to all methods:
- If the surface you are going to paint has been treated with sealant, wax or varnish, it would be best to sand it a little so that the new paint will adhere better.
- Don't be afraid to experiment; you can mix and match these techniques to create your own personal design style.
- first on a piece of wood or on less visible areas of furniture (such as the inside of a cabinet door to be painted) before moving on to more visible parts.
And remember that the main thing here is your desire! Good luck!
| Water-soluble composition, characterized by slow drying, odorless and a wide variety of shades. Easy to apply and shade, ideally highlights the surface texture |
| A very thick composition with a pearlescent sheen. Apply to protruding areas with a dry brush, and into recesses with a sponge. Easy to rub and gives maximum antique effect |
| The composition is dark brown, most often used to shade relief. Easy to apply with a brush, does not smear, wipes well with a soft cloth |
| It has a paste-like consistency and is applied with a dry brush or thick cloth. It is considered the most optimal option for patination of wood |
Make aging using the “Provence” method
We'll tell you how to artificially age wood for a romantic, bright interior in the Provence style and more.
Required Tools
- Dye
- Brush
- Scraper or spatula
Sequencing
- Paint the item.
- While it is still wet and tacky, use a scraper or spatula to scrape off the layer of color in the desired areas.
- After drying, wipe with a soft cloth.
- Sand away any rough spots.
It is best to scrape off the sticky layer in the corners of the furniture - this way the aged effect will be more natural.
Instagram @scrapksu
Instagram @burmistrov_wwork
Painting with scrapers in Provence style
The result will be approximately the same as using sandpaper. The difference is that sandpaper not only removes some of the paint, but also evens out the surface of the wood if there were uneven spots in that area (which is not suitable if you want to preserve the structure of the wood, leaving it as natural as possible). The second difference is that sandpaper is used only after the paint has dried.
Materials needed: brush, paint, scraper (or any unnecessary plastic card).
Instructions:
- First paint the wood.
- After the paint has dried a little (not completely dry, just a few minutes when the coating has already formed, but is still sticky to the touch), take a scraper or an old plastic card and scrape off some of the paint in some places.
TIP: If you paint furniture, scrape the paint off at the corners and edges, as this is where it most often comes off during use. Thus, the antique effect will look more natural.
Use rinse
Rinsing is one of the easiest ways to age wood yourself.
You will need
- Brush
- Dye
- Water
- Rag
Sequencing
- Paint the item in the color of your choice. As with the previous method, don't wait for it to dry completely.
- Take a rag and gently rinse off some of the shade, creating the desired distressed effect.
- Wait until it dries to evaluate the result.
Instagram @brigwoodenproduct
Method of painting with wooden blocks
This is a simple method that allows you to age wood or furniture using a wooden block.
Necessary materials:
Instructions:
- Dip the end of a piece of wood into the paint and run it along the surface to be painted.
- Apply as many colors and layers as you like.
Here, for example, they made one layer of pale blue paint.
Make a vinegar solution
A solution of vinegar and steel wool can quickly give an item a noble, aged look.
You will need
- Vinegar
- Steel wool (shredded steel wool will do)
- Container for mixing them
- Gloves
- Wax
- Brush
Sequencing
We recommend treating the item with black tea before applying the solution. When reacted with vinegar, it gives very rich shades.
- Put on gloves and crumble steel wool into a container (or a regular glass jar).
- Pour vinegar over everything. After a few minutes, a chemical reaction will begin and the solution will begin to darken. The longer the solution sits, the darker the color will be. In a few hours it will be ready to use.
- Moisten the wood generously with black tea and leave to dry.
- Then spread the vinegar and steel wool solution. It will immediately begin to absorb and give a dark shade.
When the surface dries, you can make one or two more layers with the solution. Wait until the product is completely dry and varnish it to give the product a finished look. Instead of varnishing, you can use waxing.
Instagram @painted_home
Instagram @olga_nazarova63
Use baking soda
Hardwoods that contain a large amount of tannins and are dark in color are suitable for this method. Soda draws tannins out of paint and brightens the product, artificially aging it. The item you want to age must be untreated. If the item has previously been painted or varnished, sand it first. The treatment solution is very easy to prepare at home.
You will need
- Baking soda
- Water
- Brush
- Wire brush
- Rag
Sequencing
- Pour one part baking soda into a bucket or bowl and fill it with one part water. The solution should be thick.
- Apply a thick layer of solution to a horizontal surface with a brush and leave to dry, preferably in the sun. It should take at least six hours for it to dry completely.
- Use a wire brush to remove the dried mortar. Press the brush intensely to remove all the soda from the pores and additionally age the surface externally.
- Take a clean, damp cloth and wipe the item thoroughly.
- Wait until it dries to evaluate the result.
The procedure can be repeated several times.
Instagram @classic_plus_home_decor
Instagram @tarassych
What you need to know before the procedure
The spectacular appearance of aged wood can decorate the interior and become its main highlight. Do you think that such a procedure is expensive and is not available to the average consumer? Quite the opposite - you can age wood at home, even without any special skills.
Brushing allows you to give the wood a more antique look
Before the procedure, it is worth finding out several important nuances.
- What is aging ? Aging or brushing wood with your own hands is the process of treating wood with a metal brush and special compounds to give it a more vintage look.
- What to combine it with? In the interior, wood after decorative treatment will be ideally combined with other natural materials. It can be metal, stone, leather or ceramics. As for the style of the room, such surfaces will look especially advantageous in country, Provencal, vintage or classic decor.
Brushing can decorate almost any wooden furniture
- For which products should brushing be used ? In this way, you can create almost any interior item: from floor coverings, walls and ceilings to benches, chests of drawers, window sills, etc.
- What kind of wood can be processed ? In order for the processing to be as successful as possible, it is necessary to choose deciduous trees: walnut, pine, oak, ash, spruce, wenge. But it is better to avoid maple, cherry, pear, birch, beech, alder, teak and juniper. Naturally, plywood should not be used either.
For brushing you should choose hardwood
There is no need to take a board from young trees for work - it contains a lot of small fibers and does not have any special decorative value. Prefer older dried varieties.
Burn the wood
Firing is in demand when you want to quickly age a material and you have the tools for the job at hand.
You will need
- Gas torch or blowtorch
- Wire brush
- Protective glasses
- Varnish
Instructions for firing without pre-treatment
Use a blowtorch or gas torch to quickly burn the product. Do not keep the tool in one place for a long time to prevent fire.
Brushed
- Pre-treat the surface with a wire brush, choosing soft fibers. This will give the wood the necessary convexity.
- Then burn at an accelerated pace, also avoiding fire.
Do not forget about safety glasses; they should be put on at the very beginning of work. When performing both methods, the final step will be the application of varnish.
Instagram @pinatikgifts
Instagram @andy_loft43
- Furniture
How to paint chipboard at home: detailed instructions in 3 steps
Aged wood in the interior
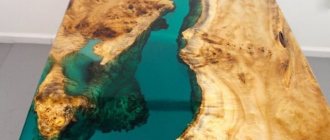
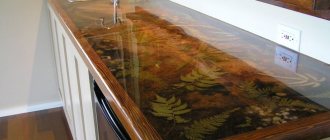
Aged wood is usually used in the interior, for example, to decorate a loft-style studio or a Provence-style kitchen. Furniture is most often made from this material, but the aged wood style is also suitable for outdoor use (Figure 6).
Figure 6. Aged wood can be used in interior and exterior decor.
As a rule, boards processed in this way are used to decorate houses in the German half-timbered style. In this case, rough wooden beams are placed on the walls. In addition, aged wood is often used in country style for the construction of fences, doors or furniture elements.
The stages of wood aging work are shown in the video.