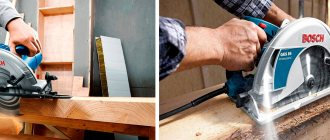
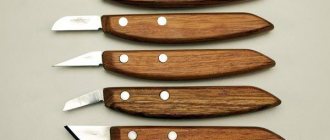
To operate a hand-held circular saw, no special qualifications are required. It is enough to try it for the first time, then after a few cuts the user will understand the capabilities of the tool: how quickly it cuts, how hard to press so as not to “strangle” the engine, how the electric saw behaves when starting, how the cord stretches so that it does not get under the saw. This applies to simple sawing, for example, firewood.
It is a little more difficult to make straight cuts and achieve an accurate carpentry cut (plus/minus 1mm or degree). It is difficult to achieve greater accuracy with such a tool, although in principle it is possible. But such tolerances are acceptable in most cases, taking into account the fact that wood can dry out and swell, changing volume and dimensions with a large amplitude (up to 10%). For jewelry precision, other tools are used, including fine-tooth hand saws.
How to set up a saw for an even cut?
The saw blade must be strictly perpendicular to the support platform. This can be seen both in the position of the disk and in the degree scale on the adjusting arc. If the disk is at an angle:
- The locking screw is released.
- The platform tilts to the desired position.
- The screw is fixed.
You should be more careful with tightening. On some models, over-tightening can strip the threads or break off the head.
Then it depends on how and what to cut.
across the board
When cutting in this way, the length of the workpiece must be accurate. Use a tape measure to measure the desired size. Two marks are made with a pencil (marker, sharp object) - at the beginning of the future cut and at the end. The marks are connected by a line. This is the place of the future cut.
On the front part (end) of the platform of each manual circular saw there is a notch. It is located opposite the disk and shows where the cut will go. The notch is aligned with the cut marking and sawed, making sure that the notch follows the marking.
On different hand saws, the cut can be shifted 1-2 mm to the left or right of the mark. Therefore, when using a new saw for the first time, you should try it on unnecessary workpieces where the cut will actually go.
Sometimes it is more convenient to make a marking strip not at the place of the cut, but along the left edge of the platform. Then it will be easier to control the accuracy of the cut. With this marking, the full length of the workpiece is marked, the saw blade is placed against it, and a mark is made on the left along the edge of the platform.
When sawing problematic workpieces (hard, thick, steamed or twisted wood with twisted fibers), there is a possibility that the blade will move away from the mark. In such cases, instead of a mark, a guide block is screwed from the edge of the platform with screws or pressed with clamps. They saw, pressing the platform to the block.
Board along
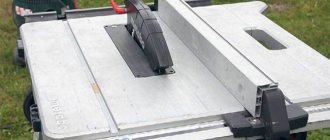
The easiest way is to make a cut along the entire length on an edged board. To do this, use a support bar on two rods, which is included in the delivery of most models. Also, it is also called a rip fence.
Rip fence
The rods are inserted into the eyes on the platform. Set the desired cutting width and secure the rods with screws. They saw by pressing the support bar against the edged board. Pencil markings are not needed.
They are required when you need to cut a wedge-shaped blank from an edged board (one end is wider, the other is narrower) and for cutting along or trimming the wane of an unedged board. In these cases, a circular saw is used to follow the markings, similar to the cross-cut described above. But we must remember that longitudinal cuts are many times longer than transverse ones.
At the same time, the engine operates with a fairly large load, especially on thick boards (35-50 mm). Therefore, they saw, moving the circular saw at such a speed that the engine does not lose speed, and the disk has time to select the wood and throw sawdust out of the cut.
How to saw a board lengthwise on the thin side? (Newbie question)
37 cm - that is, just in two halves.
But the question arises: how to cut a board on the thin side? I saw a photo where a friend was sawing with a regular saw - but this is inaccessible to me - after 5 cm of cutting I will definitely go at random. The idea arose to take a circular saw blade with a diameter of 40-45 cm and a thickness of 2.5 mm (with a larger number of teeth - 100) - these are on sale, attach it to a milling machine (fortunately there is access) and make a cut to a depth of 20 cm at once - leisurely. The second option is to take a disk half the size, saw through half and then turn the workpiece over - the gain is in the thickness of the cut. You can use a thinner disk. On the other hand, I don’t need a carload of guitars - there’s no point in saving a lot of material - so the first option is probably easier. The question of possible vibrations confuses me - although there seem to be discs with stabilizers. One of these days I’ll try it with a smaller disk - I don’t have such large disks in my arsenal. Criticize the idea, please! What if I suddenly reinvent the wheel - the whole world somehow makes soundboards? Best regards, Harry Let me warn you right away that using a circular saw is always a risk of damaging your fingers. A message just flashed by. that the manager of a timber office in Ivano-Frankivsk injured his fingers. There is hardly any doubt that he did not know how to approach the machine. Especially if some homemade products are on circular paper. It's too dangerous.
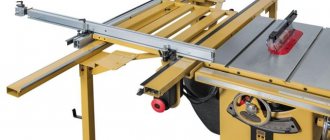
There is such a technique where a cutter is installed horizontally above the table. This circular is rotated 90 degrees. The height above the table is set, this is the thickness of the future workpiece. To drive the workpiece to its full depth, you need to drive the saw half its width and drive it from both sides towards each other. Moreover, a fairly deep blind cut like 5cm already guides a hand saw very well. Those. saw 5 cm in a circle and the remaining 10 cm is already manual, as you saw. Recently I posted a link on how to cut logs. The mechanic suggested reducing this to the level of a hand saw. The idea is interesting. In markets and shops there is a frame that guides a large hand saw, also on the frame. Theoretically, somehow this design can be adapted.
What devices should I use with a circular saw for an even cut?
In addition to the complete guide bar, guide bars of various designs are used together with manual circular saws. With their help, you can evenly trim both edged and unedged boards without pencil markings.
The difference between tires and a guide bar is that the bar moves along the already cut, even edge of the board. And the guide rail is installed on top of the board and at the required distance. The electric saw moves along the bar or inside the bar, depending on the design of the guide. Tires come in two fundamentally different options.
- A flat plane along which the saw moves.
- The grooved plane as the saw blade moves inside the bar.
The first option is the simplest. As such a guide rail, you can use available materials - a flat block, a rail, a corner.
Dozens of varieties of such devices are offered for sale. There are also many videos on the Internet on how to make guides for such work with your own hands.
We also recommend reading an interesting article with tips that will help you choose a circular saw.
Introduction
Wood has found application in a wide variety of industries. This raw material has always been popular due to its versatility, ease of extraction and processing. Furniture, interior items and even entire houses are made from wood.
Any craftsman encounters this material, but, as practice shows, not everyone is able to accurately cut a board. Tools often leave chips or nicks on the cut, which does not add beauty to your product. So what’s better, cut it yourself or order it?
Many companies offer to cut your boards when purchasing, and the price for this service is not too high. In production, boards are cut by a qualified craftsman using precision equipment, which allows you to obtain high-quality workpieces of the desired size and shape.
You, of course, can acquire expensive equipment yourself, but is there any point in this if you need to cut several boards? It’s up to you to choose, but if you still decide to cut boards at home, then I’ll tell you how and why it’s more convenient to do it.
Techniques for proper sawing at home
It is important to use the correct drive. For stationary machines, disks for longitudinal sawing differ from transverse sawing in the shape of the tooth and the sharpening angle. For manual circular saws there is no such fundamental division. You can use one disc for sawing lengthwise and crosswise.
At the same time, the disk for longitudinal and transverse sawing should be “rare-toothed”, have few teeth - from 12 to 24, depending on the diameter of the disk and the model. Discs with fine, frequent teeth are designed for a clean cut, but on long longitudinal cuts they cut slowly and overheat.
The thickness of the disc depends on the workpiece. A thin blade cuts faster, less wood is removed, and the load is reduced. But on thick hardwood workpieces, a thin disk can overheat, turn blue, lose its hardening and fail. Also, thin discs tend to move away from the markings and “wiggle” the cut.
Unlike stationary circular saws with motors up to 5 kW (10 kW or more on industrial ones) and significant inertial acceleration of the shaft, a hand-held electric saw has a smaller power reserve. Therefore, they saw with them slowly, calmly, avoiding a decrease in speed and overheating of the engine.
At an angle of 90 and 45 degrees
All manual circular saws have the ability to tilt the platform. Due to this, sawing at an angle from 90 to 45 degrees is possible. On some models and at a sharper angle.
Setting the desired angle is simple: the screw is released, the desired angle is set along an arc with degrees, and the screw is fixed. It should be remembered that the maximum depth of cut decreases when sawing at an angle. For example, if at a right angle you can completely cut a workpiece 60 mm thick, then at an angle only 45 mm.
Sawing at an angle is more difficult because the blade also cuts the wood fibers at an angle, which increases friction and resistance. The teeth of the disc must be sharpened, otherwise the wood may burn or blacken. Otherwise, sawing at an angle is carried out in exactly the same way as the straight cut described above.
Beam 150x150 and 100x100 along
The cutting depth of manual circular saws does not allow cutting through material 10-15 cm thick. The maximum for most models is 60-75 mm. However, it is possible to split timber 100x100 and even 150x150 along the length if you make two cuts on opposite sides.
The cut is made along the guide bar, just as when cutting an edged board. Then the timber is turned 180 degrees and a second cut is made. In this case, an unevenness will necessarily form at the junction of the cuts. This cannot be avoided.
Even if the beam was smooth and the cut was made exactly along the guide. A deviation of the opposite surfaces of the beam of 1-2 degrees is enough, and unevenness appears at the junction of the cuts. And such deviations are inevitable even due to lint on the wood.
Problems with this kind of sawing: the disc is completely hidden in the array, the ends of the teeth do not come out and do not cool in the air, friction is maximum over the entire area of the disc, ejection of sawdust is difficult. Therefore, there is a high probability of overheating of the disk and motor.
It is best to make a sawmill from a chainsaw for such tasks; the costs are low, but the result is good, especially cutting accuracy and productivity.
They cut intermittently, making sure that the blade and motor do not overheat. Such cutting according to the load does not correspond to the purpose of manual circular saws and is performed on sawmills or stationary circular saws. If there is a great need, you can unravel several beams of large cross-section, but a manual circular saw cannot work in this mode for a long time.
Chipboard and chipboard without chips
For sawing laminated chipboard (LDSP) sheets, as well as MDF, special machines with an additional scoring disc are used. If you don’t have such a machine in your home workshop, you can use the principle of its operation and cut the sheets using a regular circular saw.
The principle of operation of the scoring disc: it makes a shallow cut of the cladding by 1-1.5 mm, and rotates in the opposite direction. The main blade then completes the cut. The craftsmen tried sawing laminated chipboard using ordinary hand-held and stationary circular saws using the same principle, as follows:
- The position of the support platform sets the cutting depth to 1-1.5 mm.
- The cut is made so that the disc is sawed with the reverse side. A manual circular saw is turned over backwards; on a stationary circular saw, the sheet is launched from the reverse side.
- After cutting the cladding, the sheet is finished off in the usual way, on the same side from which the fine cut was made. In this case, the depth of the cut is set so that the disc comes out of the sheet to the height of the tooth.
Disc for sawing laminated chipboard
This method may not be suitable for some types of laminate. For example, the “vitreous” coating on old Soviet furniture behaves differently when cut than a more elastic laminate. Therefore, it is advisable to make a test cut on an unnecessary workpiece.
There are other ways to cut without damage.
- The cut area is sealed with tape or self-adhesive tape. During cutting, the tape holds the edges of the laminate and prevents pieces of the cladding from breaking out. The method does not always work; a lot depends on the type of laminate, disc, and speed.
- The future cut is drawn, cutting through the laminate, with a sharp tool. The method can help if you can cut through the cladding and then move the disk exactly along the cut location.
Plywood without chips
When cutting, plywood is pulled out from below the cut. This happens because when the tooth pressure is applied from above, the plywood particles are held by the lower layers of the sheet. The bottom layer of plywood does not hold anything in place, and tears and chips are possible on it. This can be avoided if you saw in exactly the same ways as described above as laminated chipboard and MDF sheets.
In this case, it is advisable to use a universal or special disk with fine, frequent teeth. They create a more uniform load than thin-toothed discs and are therefore less likely to chip.
If the circular machine has a speed control function, they are set to maximum. The higher the speed of the discs, the less it tears the material.
Log on boards
Sawmills are designed for sawing logs. Using a circular saw, you can dissolve a small amount of logs with a diameter of 15-20 cm in case of emergency.
To do this, the wane is removed from two opposite sides of the log or the slab is cut down (with an ax, a circular saw with a large disk, a chain saw, a powerful jointer) so that the surfaces are smooth, like a beam. The result is a gun carriage or block that looks like a thick unedged board or timber cut on both sides.
Next, the material is sawed in the same way as described above, like 100x100 or 150x150 timber.
The operation is labor-intensive and low-productivity. At the same time, it is difficult to obtain the correct geometry of the board, and the tool experiences large overloads.
How to cut an unedged board?
Trimming the wane of a board with a manual circular saw can be done in two ways:
- By marking with a pencil (marker, sharp tool, etc.).
- Along the guide. To do this, a block, corner or factory guide rail is attached to the board with clamps or self-tapping screws. They saw by pressing the edge of the saw platform against the guide.
Cutting along a guide usually produces a smoother cut.
We also recommend reading a useful article with reviews of the most popular and best circular saws for the home.
There's just a little bit left to do
Next, you need to set the exact size of the cut (remember, first we cut it by 5 cm, and now we set it by 4 cm). In this case, you should press one clean side, which plays the role of a base, to the saw table, and the second base to the pressure table and saw off the excess evenly (the uncut sides should be behind the saw blade and at the top).
We run it again on a circular machine. It remains to drive one more side, and that’s it, your bars are ready! In addition, you should never forget about safety precautions when working with a circular saw, because it is better to measure 7 times than to cut off a finger at once.
Source: domsdelat.ru
What can you cut with a circular saw, and what about metal and concrete?
You can use a hand-held circular saw to cut anything that can cut the disk that sits on it. If the disc is intended for sawing wood, plywood, fiberboard, chipboard, chipboard, MDF, plastic, plasterboard, plywood, then all this is sawed.
If you can find a suitable blade for outer and seat diameters for metal, concrete, etc., then you can cut these materials as well. At the same time, we must remember that the speed of a circular saw is lower than that of an angle grinder. As a result, it will cut more slowly and the disc will wear out faster.
In some cases, sawing with a manual circular saw is more convenient and safer, since it has a support platform with degrees of adjustment in tilt and depth.
Separately, it must be said that today circular hand saws specifically for cutting hard materials have appeared on sale. They have higher speeds, are protected from dust from slate, brick or concrete getting into the engine, the mounting diameters are adapted to the standards of discs for concrete, metal, etc.
Five Reasons to Dissolve
Release the board. means cutting it along its thickness, cutting along the edge. Mastering this technique opens up many new opportunities for you.
Effective use of boards made from rare or expensive exotic species. You can make more parts for your project from one piece of valuable wood. For example, when making doors from bubingo, birdseye maple, or Karelian birch, instead of making panels entirely from boards, simply saw one board into several thin sheets and glue them onto an inexpensive plywood or MDF backing. The edges of the panels will be hidden in the frame, and nothing will spoil the impression of your work.
READ Stihl Chainsaw Doesn't Start Prerequisites Spark Yes
Less material loss during thicknessing. Let's say your project requires parts that are 6mm thick. Blanks for them cannot be found on sale, and you only have 20 mm boards. Instead of turning more than 2/3 of the material into chips using a planer, simply cut the boards in two and then finish them to 6mm thickness.
Planing knives will last longer. Replacing and sharpening dull or serrated planer knives takes much longer than replacing a worn band saw blade, so it makes sense to reduce wear on expensive knives if possible. Flatten thick workpieces into plates slightly thicker than required, and then calibrate them in one or two passes to the final size on a planer.
Obtaining blanks with a symmetrical pattern. Many panel projects, from cabinet doors to box lids, can be achieved by simply unraveling the board and arranging the two panels to create a symmetrical book-like design (left photo above). In this way, you can cut boards and glue the resulting blanks into panels, which will look great as the side wall of a body or lid.
Curvilinear parts are easier to glue than to bend. Without resorting to steam bending, you can glue them together from several thin strips (usually about 3 mm thick). Such gluing, as a rule, bends less. Cut the board into strips, sharpen or sand them, and then glue them together by pressing them against the template. How this is done is described in the article “Chair with a footrest.”
Why does it cut crookedly?
The disc cuts the line to which it is directed. In this case, the tool should be held or pressed against the guide firmly enough so that it does not move to the side.
If, despite all efforts, the cut turns out to be crooked, the reason is an unusable disc. A scorched disc with double-sided blue spots may begin to wobble at the slightest heat. If the teeth on one side are normal, but on the other they are knocked out or dull, the saw may pull in one direction, no matter how hard you try to hold it.
DISSOLVING A TREE: TO THE START, ATTENTION, MARCH!
Start by assigning a rectangular shape to your workpiece and cutting wood of a similar size. With it, you can check how flat it lies on the saw table and how tightly it fits into the guide, and also adjust the band saw options. Secure the guide according to the desired cutting thickness and slowly feed the workpiece under the saw blade. At the same time, the saw motor should rotate moderately, without jamming. At the end of the cut, advance the workpiece using a pusher. Then inspect the sawn piece.
Move the guide to the angle required to align the cut. The guide adjusting bolt simplifies this problem. You can also use magnetic guides (for example, Carter Magnafence: carterproducts.com) - they significantly simplify such temporary adjustment.
If it turns out to be thicker at the top or bottom, check that the saw table is set exactly at 90° to the saw blade and adjust it as necessary.
If there is a depression or unevenness in the material, the problem may consist of insufficient saw blade tension. On many saws, the integrated tension controls are not very accurate.
Here is a perfect example of a symmetrical grain pattern. Such panels will make any furniture look even more attractive than two ordinary thick panels made from different boards.
A properly tensioned blade or blade should deviate less than 6 mm when pressed in the center (photo above left).
A very high speed of feeding material under the blade, the use of narrow blades with very frequent teeth or dull blades can also cause similar curvatures when cutting. If one end of the sawn part turns out to be thicker than the other, the problem lies in the displacement of the blade, in other words, the blade deviates from parallel relative to the guide.
If the blade is sharp, the guides are installed correctly, the feed speed is selected correctly, but the problem is still not resolved, try adjusting the tilt of the upper drive wheel so that the saw blade passes exactly in the center of both wheels (photo above right).
If this does not bring the expected result, adjust the position of the guide to compensate for the deviation of the blade. Oh, that's how it's done. Saw a block of wood into a rectangle, similar in thickness and density to the wood that you plan to saw, and draw a line on it with a pencil, parallel to the edge.
To prevent the workpieces from moving (to restore the moisture balance), it is best to lay them with slats. In this case, scraps of plywood were used as slats. They need to be positioned symmetrically, and pressed down with a weight on top to prevent the panels from bending during drying.
Without securing the fence in place, saw the block along the marked mowing line, holding it with your hands. Just before you reach the end of the cut, turn off the saw and, without moving the workpiece, run a pencil along the edge of the cut on the saw table. Set the stop exactly parallel to this mowing line (photo on the left) - as a rule, this allows you to perfectly compensate for the mixing.
In general, every time I change the saw blade, I check everything again and, if necessary, adjust the saw settings again.
READ How to cut plastic panels at home
Selection of cutting blade
Jigsaw blades vary in length and frequency of teeth. It is worth giving preference to trusted brands, in this case there is a quality guarantee for the metal, and the cut will be smooth. Files are classified by tooth configuration:
- on standard models, teeth of the same size are located at equal distances and in the same direction;
- the so-called skip-tooth file is distinguished by the absence of teeth, due to which the cutting speed increases, the blade heats up and jams less, and chips from the surface are removed to the side;
- In the case of double teeth, the cutting speed is lower, but the quality of the cut is better. The chips are removed from the cut;
- For reverse blades, some of the teeth are directed upward. Using such a tool, you can cut laminated chipboard and other wood with a jigsaw without chipping, since the upper teeth cut the material during the reverse movement.
The specific thickness of the blade depends on the material to be worked with, but the basic ones for the manual model are No. 3, No. 5, No. 7.
The advantage of sawing logs with a chainsaw
Cutting into boards can be done using tools such as an electric chainsaw and additional accessories designed to simplify the work. When choosing certain products, you need to focus on the amount of work expected. Stationary sawmills are expensive and are purchased only if you plan to organize a business to create boards.
The most accessible tool for the job is a chainsaw. Such devices have several advantages over electric ones:
- the chainsaw can be used anywhere, regardless of the availability of an electrical outlet;
- the tool is suitable for working in conditions of high humidity;
- professional chainsaws are significantly more powerful than electric ones;
- You can use the chainsaw continuously for an hour.
To cut logs into boards, a special frame is used together with a chainsaw, which is attached to the device and allows you to create boards of the same thickness. A device is also needed to secure the log in one position. In addition, you will also need a guide.
READ Attachment for grinder for cutting wood combo
Since household gasoline saws are not designed for heavy loads, it is worth using professional tools for sawing logs. When choosing, you should pay attention to devices with a power of more than 7 horsepower. Before work, the fixed frame is adjusted in accordance with the selected width of the boards. To create a frame, you can use legs from a school desk or metal corners.
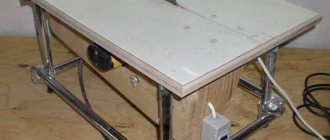
DIY jigsaw guide
If a jigsaw cuts crookedly, and it is not advisable to buy an expensive guide, you can completely get by with improvised means. Any smooth edge with a thickness of 5 mm or more can become an impromptu stop: a straight strip, usually a piece of plywood and other straight surfaces of suitable sizes. A pair of ordinary clamps can serve as clamps for the guide to the material. If the condition of the surface of the opposite part of the material being sawn is not of great importance, the guide can be screwed onto a pair of self-tapping screws.
To make the line as neat and even as possible, use the optimal file suitable for the material being processed. More visual processes for making and using a homemade guide are demonstrated in the following videos.