How to lay timber correctly
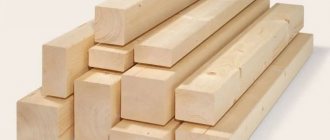
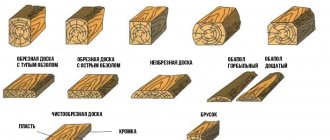
The lumber has a square or rectangular cross-section, so the joints are strong. It docks much easier than a rounded log. The timber is easy to mark and cut grooves into.
When laying building material when building a house from timber with your own hands, you should pay great attention to its fastening at the corners and along the length. If the beam is not firmly fixed enough, it may turn over.
It is not recommended to fasten the wooden parts to be joined with nails. High humidity in wood can cause nails to rust and break.
Therefore, instead of metal nails, wooden nails are used. They are called dowels. Better from birch. You can use cuttings and cut them to the desired length. They are driven vertically every 1.5-2 m into pre-prepared holes. The diameter of the dowels is approximately 20 mm. It is necessary to drill holes for them a couple of millimeters larger so that they clog freely and do not interfere with further shrinkage of the walls.
Birch dowels
Waterproofing must be laid on the foundation. This can be two sheets of roofing material or a waterproofing membrane. You can combine materials: first apply a coating layer, and then apply a roll layer.
The timber and dowels are treated with antiseptic agents and fire retardants. Before laying the crowns, defective lumber is removed. Prepare the fasteners.
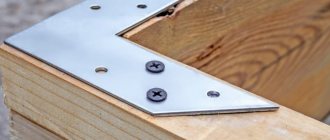
The first crown is laid. To achieve a perfectly horizontal position of the first crown, wooden pads are placed under the beam and leveled using a building level. Then the first crown is secured with anchors. The corner connection in the first row is on a dowel, and metal corners are used on the inside of the house.
T-splice
T-mount
T-shaped splicing is used for all types of lumber, since forming internal walls involves any construction of a house from profiled timber. Also, a T-shaped fastening is used to attach a vertical wooden beam to a horizontal one. To perform this type of connection, use:
- Symmetrical tenon (trapezoidal), dull or not.
- Straight spike.
- Lock with groove.
- Connection into a root tenon.
- Skovorodniy
- Half frying pan, etc.
To carry out such work, it is not necessary to invite specialists, since you will need the simplest tools: wooden dowels, a jigsaw, bars. This connection is especially popular with profiled and laminated timber, since it is easier to work with the material.
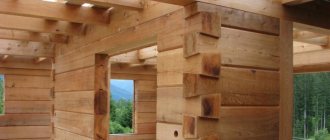
Connecting the corners of the beam with the remainder
When connected at an angle to the remainder, the workpieces extend beyond the plane of the wall. They are called corners.
Corner connection with remainder
A recess is cut out in one blank - a bowl. For a rounded log it is semicircular, for a profiled log it is rectangular. The second blank is inserted into the bowl either solid or with a cutout corresponding to its shape. Such corners do not allow the cold to pass through. Insulating the log house with careful caulking will not be necessary.
When they are fastened, scraps of wood remain. Therefore, it is necessary to purchase more material and take into account the length of its cuttings. The connection into a bowl also has another name: oblo (obly - round).
On the issue of fixation
Half-timber joinery joints do not have a mechanical connection, so they are secured using gluing. We discussed in detail how to properly glue wood and choose the appropriate glue in previous materials.
While drying, the structure must be secured with clamps. When placing the clamps, make sure that their pressure is distributed evenly. An incorrectly installed clamp can deform parts or disrupt the fit of the connection.
Unlike frame structures, logs or beams are strengthened using a different technology. In this case, screws, dowels or dowels are used to secure the connection.
Corners without remainder
Many home craftsmen want to save material, so they use the method of joining 100x100 timber (the most common) without any residue. In this case, the connection is colder, the corners are more ventilated, the lumber does not peek out from around the corner of the wall, but is located flush with it.
Corner joints without any residue include fastenings:
- Butt;
- Using a key;
- Root Thorn;
- Warm corner;
- Dovetail;
- In the paw;
- Half a tree.
Joining timber along the length of connection options
The maximum length of the workpiece is 6 m. When arranging the walls of the house, beams, rafters, one beam is missing in length. It is necessary to connect the beams to each other. For joining in the longitudinal direction, the same connection methods are used as for angular ones, but the fastening is done not at an angle, but along the beams.
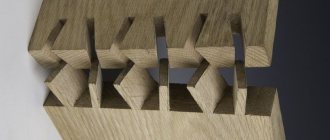
In the tenon on the dowels
This connection is the strongest. Identical grooves are cut out on 2 blanks. They are applied to each other so that the grooves coincide. Then a hardwood dowel is taken and driven between them. A key is a kind of wedge that connects two grooves to each other. The key comes in the shape of a prism or rectangle. To make the joint strong, the key is lubricated with PVA glue or wood glue.
May be useful: The best way to sheathe the outside of a wooden house
Splicing timber along the length into a root tenon
The length of the beam connection into the main tenon is similar to the same corner connection. The tenon and groove can be rectangular or trapezoidal. A trapezoidal tenon is more reliable and durable because it prevents the parts from moving. The blanks are secured with dowels.
To the castle
You can connect 100x100 beams together in a slanting lock:
The originality of this splicing method lies in the fact that the ends are not only cut obliquely, but represent steps with certain dimensions. This is a durable type of connection, which is available only to experienced craftsmen who have special tools and equipment for accurately cutting out the bends of each step. The steps resemble alternating tongue and groove, which follow the shape of the second workpiece. When connected to each other, the tenon and groove form a reliable lock.
Splicing timber into half a tree
You can make connections between timber and half a tree yourself. A right angle is cut from the end of each part to half its thickness. Only on one workpiece he looks down, on the other he looks up. Notches can be not only straight, but also oblique. One element overlaps another. The tenon and groove match. The elements are strengthened with dowels, staples, pins, and plates.
Method of splicing timber by applying
This is the easiest way to splice blanks. One solid element is applied end-to-end to another and connected with staples or overlays.
Mounting at any angle
The developer is faced with the need to assemble at an arbitrary angle when constructing roof frames and arched structures. This type of fastening is used when assembling timber logs onto a ridge assembly and connecting them to the mauerlat - a supporting beam laid on the upper crown of the log house. Mounting at an angle also provides for the technology of installing support posts.
When assembling on a ridge run, the ends of the timber logs are placed in the corner as follows:
- Overlapping, the lock is reinforced with a through bolt;
- In half a tree or on a tenon, the fastening is reinforced with metal or wooden overlays. The covers are secured with nails and self-tapping screws.
To insert rafters into the mauerlat, a single notch is made at the desired angle, the fastening unit of each beam is reinforced with bolts and plates.
Vertical supports are cut into half-tree logs or mounted on special metal hinges. The hinged structure is attached to the joists using metal clamps and secured to the supports with self-tapping screws.
What determines the choice of connection?
If you cannot decide how to connect the timber when building a house, it is important to pay attention to what structures it will be used for.
For the construction of outbuildings and baths, beams can be connected half-timbered or end-to-end. These connections are simple, you can make them yourself, you just need to secure them with dowels, pins or staples. But such methods cannot be used in the construction of a residential building.
Experienced craftsmen will not use longitudinal joints of workpieces to lay out load-bearing walls, but will try to use only solid lumber. As a last resort, they choose a rigid connection, for example, with a key. Only the key in this case must be of high quality.
The oblique lock connection can also be used on load-bearing walls, but for this the structure must be rigid with precise dimensions. And it is almost impossible to do this on your own.
Marking
For marking you need a square, thicknesser, knife or marking dowel. Use a pencil to mark only on material with a rough, untreated surface. On a fine-fibered or smooth surface, the marking line is drawn with a knife or dowel: a shallow groove will also serve to guide the saw evenly.
The prepared bars or planks are laid side by side parallel to each other and marked at the same time. This ensures complete coincidence of the marking lines, which guarantees a flawless, distortion-free connection of all parts. It is important to get everything right the first time, as it will be quite difficult to make corrections in the future.
This is how the groove is marked.
Use a thicknesser to mark half the thickness of the plank on the narrow sides.
To mark, never use ballpoint pens, felt-tip pens, ink or ink, as they leave virtually indelible marks on the wood.
When treated with a chisel, soft wood can easily split in the place where the growth rings pass. To avoid this, you need to make several additional cuts. In this case, if the tree splits, it will be between two adjacent cuts, and not across the entire width of the groove.
Spring force
Before deciding how to connect two beams, be sure to consider such fasteners.
It is one of the best, it holds building materials together and resists the appearance of cracks between the crowns during the shrinkage of a wooden house.
The “Strength” spring assembly is a long screw with a spring and 2 washers.
Spring assembly “Force” in section
The spring gives the product a clamping force of 100 kg. Using a double drill, a hole is drilled in the beams, a knot is inserted into it and tightened with a wrench until it pulls them together. For a 6 m wall, 4 clamping units are sufficient.
Marking
First, a clear marking line on the parts indicates the contours of the grooves. In order not to confuse anything when processing parts and to prevent mistakes, the areas to be removed should be marked with shading. There is a particularly great danger of making mistakes when processing parts that are to become lintels and crossbars.
The areas to be removed should be marked with hatching so that the contours of the grooves are not blocked: the main markings should be clearly visible during subsequent operations.
Light shading on the parts marks those areas that should be removed. In this case, you must not block the marking line.
To cut parts along the markings, use hacksaws or bow saws with thin, frequent teeth to make the cut as smooth as possible.
The cut line should pass through the area of the part that will go to waste. First, make a small notch with a saw. Then they saw along the front edge along the marking line to the lower limit. Thus, the marking line will always be in front of your eyes, which means you can accurately guide the saw and immediately make adjustments if the cut begins to move away from the marking line.
When the cut of one corner is ready, turn the part over and do the same on the other side. Only after this the saw is positioned horizontally and the cut is completed in this way.
When processing even wide parts in this way, the cut is very precise. Excess wood can later be removed with a chisel and file or sandpaper.
During the first movements, guide the saw blade with your thumb until you make a notch.
Saw along the front edge of the piece first, moving the saw at an angle exactly along the marking line.
Then do the same on the other side until the entire horizontal marking line is captured.
At the final stage, guide the saw horizontally.
Cross Lap Knit
Cross lap knitting is a universal splice. The workpiece is placed in the prepared groove. The T-shaped connection of the timber is used for laying the log house during the construction of bridges. Ways to join a cross stitch are:
- Half a Tree;
- In third and quarter wood;
- Notch in one row.
The connection is reinforced with a key, staples, and dowels.
What to consider when joining profiled timber
At the joints of the profiled beams, cracks may appear through which the house will be blown and moisture will pass through. To avoid gaps, the splice areas are leveled and ground. Jute, tow or flax fiber is laid at the joints.
To prevent wood from rotting and the appearance of mold, it is treated with antiseptic agents. Wood moisture content should not exceed 5%. In this case, the places where the workpieces come into contact can be glued. Due to the possibility of shrinkage of a log house before installing doors and windows, it is important for the log house to stand. The longitudinal joints of the profiled timber are arranged in a checkerboard pattern.