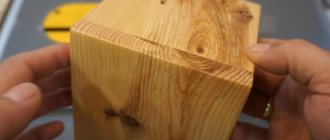
The difference between carpentry and joinery work lies both in the size of the elements being processed (in carpentry they are larger) and in the methods of fastening the mating parts. The connection of elements in carpentry is done by cutting with fixation with nails, staples, bolts, etc., while in carpentry it is carried out mainly with wood glue, which requires more careful and clean processing of the elements, achieved with a more complex tool.
Our task is to familiarize ourselves with the methods of manufacturing, assembling and fixing individual elements of wooden structures.
- Tools and accessories
- Work production methods
- Connections
- Extension cuts
- Splice
- Rally
- Mating
- Cutting corners
- Non-angled joints
- Joinery joints
The tools and devices used for carpentry work are quite diverse. The most important of them is the ax, which is used to carry out most of the carpentry work: hewing, cutting quarters, making cuts, hammering in staples, nails, etc. More careful processing of surfaces hewn with an ax is carried out with a plane, sherhebel, bearer, straight and curved planes . A chisel is used to chisel holes and sockets. A chisel is used to clean up various cuts. Through holes in wood are made using drills with various tips: spoon, feather, screw-shaped.
For sawing along and across the fibers, various saw devices are used: cross-cut, bow, hacksaw. In addition to the listed cutting tools, there are a number of other working tools: hammer, hammer (1–2 kg), sledgehammer (2–8 kg), mallet (wooden hammer), auxiliary tools (plumb line, square, compass, spirit level, level etc.). The following metal products are used to fasten various wooden elements together: wire and forged nails, round or square metal staples, bolts with nuts, screws, square-headed screws, etc.
The main thing in carpentry is working with an ax, which includes three main techniques:
- chopping – the main direction of movement of the ax blade is perpendicular to the wood fibers;
- splitting - the ax blade moves parallel to the fibers;
- ax - the ax blade moves obliquely in relation to the direction of the grain.
Logs are cut by alternating blows of the ax either across or diagonally across the fibers.
Splitting - an ax is driven with force into the end of the log, a wedge is inserted into the gap, the ax is removed, the next blow is struck with an ax, the wedge is driven deeper, as the gap lengthens, a new wedge is driven, etc.
The hew (see Fig. 1) is made along a previously beaten line, and the hewn surface should be vertical and facing the right foot of the carpenter standing over the log. Transverse cuts are made along the entire length of the log, every 30–50 cm, then the heave itself is made.
Fig.1. Teska
Sampling of quarters (see Fig. 2). A quarter is a rectangular longitudinal notch selected along the side edge of a beam or board. To complete this, a series of transverse notches are first made to the lines delimiting the quarter. Then an inclined plane (chamfer) is cut along the notches, after which a quarter is removed with careful blows of the toe of the ax. The quarter is cleaned with an ax or plane and checked with a square.
Rice. 2. Selection of quarters
The removal of a groove or tongue (see Fig. 3), i.e., a rectangular recess located along a beam or board, is done with light blows from the toe of an ax. Cleaning the bottom of the groove is done with a chisel.
Rice. 3. Taking out a groove or tongue
Sharpening of boards and beams is done to give surfaces treated with an ax greater cleanliness. Sharpening is carried out in two stages, first with a sherhebel, then with a bear, or for greater cleanliness with a plane and jointer.
Hollowing out the nests is done with a chisel.
The connection of different wooden parts together is called notching. The basic requirements for cuttings are as follows:
- the notch must be made in such a way that it can absorb the loads transferred to it (compression, tension, shear);
- the contacting parts of the wood must fit tightly to each other along all planes of the connection;
- metal fasteners (brackets, bolts, screws, etc.) used when making notches are designed to withstand random loads for which notches are not designed;
- when constructing cuttings exposed to precipitation, it is necessary to take measures against stagnation of water in them;
- cutting should be as simple as possible to perform.
Based on the relative position of the elements, the following types of connections are distinguished:
- extension - lengthening logs or beams (piles, racks) in the vertical direction. The axes of the connected elements are located on the same vertical line;
- splicing – lengthening in the horizontal direction. The axes of the connected elements are located on the same horizontal straight line;
- consolidation – increase in width. The axes of the connected elements are located parallel;
- knitting - mating at an angle. The axes of the connected elements are located at an angle to each other.
The simplest method is to build up end-to-end (see Fig. 4) with the insertion of a barbed pin that absorbs random lateral loads. Sometimes the pin is replaced with a cast iron shoe with an internal partition, against which the ends of the connected parts rest (see Fig. 5). Such building methods are used when driving piles, and the joint after driving must be at least two meters below ground level.
Rice. 4. End-to-end extensions with a brush
Rice. 5. Extension end-to-end with a shoe
Extension with a tenon - single (see Fig. 6) and double (see Fig. 7) - also protects the connection from the effects of lateral loads. The width and height of a single tenon is about one third of the thickness of the timber. The depth of the tenon socket should be slightly greater than the height of the tenon so that the posts are in contact with their entire plane. To make a double tenon, two mutually perpendicular diameters are marked at the ends of the logs being connected and two mutually opposite sectors with a length of about two log diameters are cut out.
Rice. 6. Single spike extension
Rice. 7. Double spike extensions
Half-tree extension (see Fig. is often used when constructing scaffolding. Both ends of the log are cut to half their thickness by 3–3.5 diameters in length. The entire notch is wrapped in hoop tin.
Rice. 8. Half-tree extension
Tongue extension (see Fig. 9) - a fork is cut out in one rack, into which the appropriately cut end of another rack is inserted. The connection turns into tin. This connection is not very strong and is used for temporary scaffolding.
Rice. 9. Tongue buildup
Butt-to-end (see Fig. 10) - both ends are cut at right angles and aligned with each other. To counteract transverse shear, a bracket is hammered into both logs (timbers) being connected.
Rice. 10. Butt splicing
Oblique butt (see Fig. 11) - the cut is made not at a right angle, but along an inclined plane. The ends of the logs are fastened with a nail or pin.
Rice. 11. Oblique butt
End butt with tongue (see Fig. 12). It is installed when cutting walls and prevents the appearance of gaps between logs (beams).
Fig. 12. End butt with tongue
Straight overlay (see Fig. 13). In contrast to the above methods of splicing, when the parts to be joined lie on a support with their entire plane (beds, wall crowns), logs (beams) connected in this way can be laid on racks. The length of the notch is one and a half, two times the thickness of the log (timber).
Rice. 13. Straight overlay
Oblique overlay . Arranged in the same cases as direct. The markings are shown in Figure 14.
Rice. 14. Oblique overlay
Overlays with an oblique cut (see Fig. 15). To counteract lateral loads, end ridges with a width and length of one third of the thickness of the beam are installed at the ends of the connected parts (see Fig. 16).
Rice. 15. Overlay with an oblique cut
Rice. 16. End ridges
When splicing wooden elements that absorb tensile forces, straight and oblique locks are installed.
A straight lock is made 2.5–3.5 times the thickness of the timber (see Fig. 17).
Rice. 17. Straight lock
A straight lock with tension wedges is arranged in order to tighten the connected elements as tightly as possible (see Fig. 18).
Rice. 18. Straight lock with tension wedges
The oblique lock is longer in length than the straight one (see Fig. 19). If they were the same length, the plane along which the protruding part could chip off would be smaller in an oblique lock than in a straight one. To counteract lateral loads, oblique and straight locks are arranged with a tenon with a width and length of one third of the thickness of the beam (see Fig. 20).
Rice. 19. Diagonal lock
Rice. 20. Straight spike lock
Joining is the joining of elements along their long sides to increase the width of the product. When joining boards, it is necessary to take into account the direction of the annual rings of wood, since when drying, the boards warp in the direction in which the convex part of the annual rings faces. As a result, when rallying, it is necessary to alternate adjacent boards depending on the direction of the annual rings. Various options for joining boards are shown in Figure 21.
a) Back to back . The parts to be welded are hewn and jointed using a square;
Rice. 21 a.
b) Into the tongue . The width and height of the ridge is equal to one third of the thickness of the board;
Rice. 21 b.
c) In a hacksaw . The edges of the boards are hewn at an acute angle to the wide plane of the board;
Rice. 21st century
d) Comb . The height of the ridge is from one third to half the board;
Rice. 21 g
d-1, d-2) In a quarter . The ledge is equal to half the thickness of the board;
Rice. 21 d-1
Rice. 21 d-2
e) Into a tongue and groove with slats . In both boards, grooves are selected into which a strip twice as wide as the depth of the groove is inserted.
Rice. 21st
To fasten together the bonded boards and plates, dowels with beveled edges are used (see Fig. 22). Sometimes the dowels are given a corresponding profile that hides the gap between the dowel and the boards.
Rice. 22. Dowels with beveled edges
If there is a need to unite beams that work in bending (beams), composite beams are made.
Composite timber with dowels (see Fig. 23). In each of the beams to be joined, rectangular recesses are selected, which, when the beams are combined, form rectangular holes. A dowel made of hardwood (oak, beech, hornbeam) is inserted into such a hole. Depending on the thickness of the timber, the insertion depth of the key can be from 2.5 to 3.5 cm, and the width can be four times the insertion depth. The pitch between the keys is four times the width of the key. To give the beam greater strength in the spaces between the keys, the beams are bolted together.
Rice. 23. Composite timber with dowels
Composite timber with spacers (see Fig. 24). If it is necessary to increase the height of the composite beam, spacers are used. They are made from the same wood as the beams, and the fibers are arranged not across the beam (like a dowel), but along it. Bolts are required on both sides of the gaskets to absorb the pushing forces.
Rice. 24. Composite timber with spacers
Composite beam with straight or oblique teeth (see Fig. 25, 26). For a straight tooth, the cutting depth is taken from one fifth to one tenth of the total height of the composite beam, the length is 1.5–2 times the total height. The bolts are installed through the tooth, but always in such a way that the ledges closest to the ends of the beam are tightened with bolts. In beams with oblique teeth, the slopes of the ledges are made from the middle of the span symmetrically towards the ends of the beam. It is mandatory to install bolts in the spaces adjacent to the middle of the span and in the end spaces, and on the rest of the beam - across the space.
If there is no need to install powerful beams, then the joining of the beams is carried out using notches similar to the notches for joining boards.
Rice. 25. Composite beam with straight teeth
Rice. 26. Composite beam with oblique teeth
Into the tongue (see Fig. 27). It is used for the construction of enclosing walls (sheet piles), dense bottoms, doors, etc. The sheet pile and the corresponding ridge can be rectangular or triangular.
Rice. 27. Rallying into a tongue and groove
When cutting log buildings of various log buildings, connections are made by cutting out a semicircular groove with the addition of tenons every two meters. This notch is called a tenon groove (see Fig. 28).
Rice. 28. Cutting into a groove with insert tenons
The need to pair elements located at an angle relative to each other may arise, for example, when cutting a log house. In addition, there are situations in which one beam rests in the middle of another or intersects with another beam.
When joining the ends of logs or beams (knitting rafter legs, corners of log houses, corners of window and door frames), the following joining methods are performed:
Half-tree knitting (see Fig. 29). To counteract the shift of the beams, a hidden spike is installed;
Half-paw knitting (see Fig. 30). It is especially reliable in cases where the beams take a load applied from above (for example, the load from a corner post);
Rice. 29. Half-tree knitting
Rice. 30. Half-paw mating
Slotted tenons , single (see Fig. 31) and double (see Fig. 32). This knitting method ensures reliable connection under pushing forces. It is possible to strengthen this connection with a bolt or bracket;
Rice. 31. Single slotted tenon
Rice. 32. Double slotted tenon
Slotted paw (see Fig. 33). It differs from a slotted tenon in that the side planes of the protruding part are inclined, making the tenon impossible to pull out.
Rice. 33. Slotted foot
Felling with the remainder in the oblo (see Fig. 34) - sampling a semicircular depression (cup) in each of the logs. The cup should be facing down, otherwise water will stagnate in it, which will lead to rotting of the corners.
Rice. 34. Cutting with the remainder in the area
The cutting was cut with the remainder (see Fig. 35). It differs from the previous one in that a protrusion like a secret spike is left in the cup.
Rice. 35. Cutting with the remainder cut
Chopping without residue into the paw (see Fig. 36). Thanks to the wedge-shaped outline of the ends, each log is tightly clamped both above and below. The principle of marking this notch is shown in Figure 37. For one-dimensional logs, marking can be simplified by making an appropriate template. To more thoroughly compact such a cut, the so-called. paw with a root spine .
Rice. 36. Chopping without residue in the paw
Rice. 37 a. Paw marking
Rice. 37 b. Marking a paw with a root spine
Notching with a tenon (see Fig. 38), square or rectangular (notching with a ridge). The shoulders of the log (timber) must be beveled so that water does not stagnate in them. The depth of the socket for the tenon is taken to be slightly greater than the height of the tenon, so that the elements to be connected do not hang on the tenon, but rest on the entire area of the ends.
Rice. 38. Notch with tenon
Notch with tooth . It is installed in cases where one beam rests on another. For example, a strut rests against a pile or beam, a rafter leg rests against a tie, etc. There are notches with a single tooth (see Fig. 39) and, when connecting logs at a small angle, with a double tooth (see Fig. 40) . The depth of the notch is from one quarter to one sixth of the thickness of the timber, but not less than 4 cm. Such notches are reinforced with brackets, clamps or bolts (see Fig. 41). In this case, the following rules must be observed:
- the staple should be directed at right angles to the line dividing the inner corner in half;
- the bracket must pass through the intersection of the internal edges of the connected beams;
- the bracket must be of such length that, if the first two conditions are met, its ends would be opposite the center lines of the axes of the beams being connected.
Rice. 39. Single tooth notch
Rice. 40. Double tooth notch
Rice. 41. Reinforcing the notch with a clamp
Cutting with a frying pan (see Fig. 42). The end of the abutting beam is processed in the form of a dovetail, and the width of the narrow part is from one second to one third of the entire width of the beam. This notch (sometimes called a “dovetail” ) takes well the pulling forces.
Rice. 42. Cutting with a frying pan
Cutting with a half-frying pan (see Fig. 43). The same as the previous one, with the only difference that the sampling in the bars is performed only on one side.
Rice. 43. Cutting with a half-frying pan
Half-tree cutting (see Fig. 44). It is arranged in cases where, for structural reasons, it is required that both beams be in the same plane. To do this, select a part in each of the beams equal to half the thickness of the beam.
Rice. 44. Cutting half a tree
Cutting into a quarter of a tree (see Fig. 45). It is performed when one of the bars must lie higher than the other. The depth of the cut in this case is equal to one quarter of the thickness of the timber. If it is necessary to strengthen the lower beam and at the same time eliminate the danger of the upper beam sliding along it, apply an overlay with a cut (see Fig. 46).
Rice. 45. Cutting a quarter of a tree
Rice. 46. Overlay with a cut
As already mentioned, carpentry work differs from carpentry work only in that the carpentry products are smaller than carpentry products, the thoroughness of processing and the accuracy of fitting of parts is much higher, and carpentry glue is used to fasten the notch elements. To perform such work, an additional set of tools is required.
Features of connections, materials used
What carpentry joints do you know? An experienced master will be able to name several dozen of them. The fact is that there are no universal connections. In each specific case, you need to choose the most suitable option.
In construction, the furniture industry, and in the production of natural wood products, it is often necessary to connect a variety of parts. They can be fixedly connected, but there are also collapsible connections. In the first case, fastening is carried out using glue, nails, screws, staples or other additional means. It is impossible to disassemble such a connection during operation. Permanent types of joints are used in carpentry much more often.
However, in the production of, for example, folding furniture or transforming models, sometimes it is necessary to create collapsible connections. In this case, glue or other fixing elements are not used.
Wood joinery involves combining certain parts in a certain way. They can be bars, boards, shields, etc. These are the primary elements of the product. Parts can consist of one piece, two or several elements that are previously glued together. In some cases, parts are made by veneering.
After connecting two or more parts, a knot is obtained. This could be a shield, box, frame, etc. Using existing connections, a finished product or part of it (unit, plant, etc.) is obtained.
When choosing a connection, you should take into account that the finished product must be durable, strong, functional, and aesthetic. Therefore, the master must not only have theoretical knowledge about the correct choice of the type of joint, but also be able to handle the appropriate tool. Only in this case will he be able to create a connection that meets all modern requirements and standards.
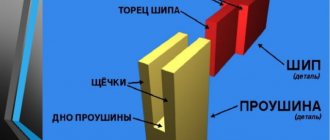
Thorn in socket
A more complex connection is the tenon-to-socket method. It requires more skill, but is much more reliable and durable. The scope of use is the same as in the previous case, namely T-shaped joints. The difference between this method is that the tenon is made at the end of the vertical part, and a socket is cut out in the body of the horizontal part.
This is one of the most common furniture connections. There are connections with a through tenon and with a blind one. The difference is that in the first case a through socket is cut out, in the second the slot is made to a certain depth.
Types of connection
When connecting wooden parts, you need to remember an important point - a thin part is always attached to a thick one, but not vice versa.
According to the relative arrangement of the elements, the following methods of connecting wooden parts are distinguished:
- extension - increasing the height of a part;
- splicing - elongation of the workpiece;
- consolidation—increasing the element’s width;
- knitting - joining at an angle.
The most commonly used methods for joining wooden parts in furniture making are:
Conclusion
Connecting the board correctly and securely means ensuring its maximum strength; it is important to follow all recommendations and use only high-quality materials. The video in this article will show some options for carrying out the work visually, and if you have questions or additions, please leave a comment.
The reliability and aesthetics of complex wooden structures largely depends on the correct choice of the method of connecting its component parts. This is especially true for frame products and load-bearing structures, where safety parameters come to the fore.
High-quality connection of wooden parts is the key to durability, the basis for an attractive appearance of the product, an indicator of the skill and professionalism of the carpenter and joiner.
Varieties
There are different types of joinery joints.
They are regulated by GOST 9330-60 and may belong to one of the groups specified in the standard. Connections can be as follows:
- By lenght. This allows you to combine parts that are adjacent to each other at their ends. This category includes splicing and extension. One of the most commonly used options is the spike type connection. There are several types of such combinations. What carpentry tenon joints do you know? Each carpenter has his own experience in using such joints.
- Along the edge. This type of combination is called cohesion. It is used for two or more workpieces to obtain a wide part.
- Angular end. The principle is similar to carpentry tenon joints. But in this case the parts converge at a certain angle. This technique is used in the creation of furniture.
- Angular medians. When creating such a connection, one part adjoins the other either at its end, or crosses it completely at a certain angle. In the first case, the connection is called adjacency, and in the second - intersection. This technique is used primarily to create shields.
- Box knitting. Used for connecting wide elements. Most often, such joints are made when assembling boxes and crates. This type of connection can also be end or middle.
The joining method is selected in accordance with the purpose of the product.
Forming miter angles
One of the best ways to create corners of various volumetric products is a miter joint. It allows you to create a monolithic structure, hide the fibers of the end, thereby providing an attractive appearance. This method is suitable for a wide variety of products, but is most often used for the manufacture of frames and cabinet furniture parts.
To create a joint, cuts are made in each of the wooden parts at an angle equal to half the angle at which the workpieces meet. Most often, this angle is right, therefore, cuts are made at 45 degrees, however, the angle can vary widely. The work is performed according to the following algorithm.
First, mark out the details. It is important not to forget that the markings are made along the long side, otherwise you may not guess with the dimensions.
On the edges that will be connected, draw a line at the required angle. Using a combination square, the markings are transferred to each side of the workpiece. Then the cut is made, for which it is better to use an electric miter saw, but you can also work with a hand tool. When working with a hacksaw, it is important to control the cutting angle; it would be useful to use a block as a guide.
The finished parts are placed next to each other, checking the accuracy of the fit. Unevenness will have to be smoothed out with a hand plane, and the angle will have to be adjusted using sandpaper. Wood glue is applied to both surfaces, and the product is fixed using clamps. Additional strength can be achieved using nails. When working with a hammer, it is important to control the impact force so that the workpieces do not move.
Particularly critical connections are reinforced with bars that are glued into the inner corner. A joint that will not be visible can be additionally reinforced with a metal square.
The result of quality work will be a perfect seam. If a small gap has formed, it can be hidden by straightening the adjacent wood fibers using a smooth cylindrical surface. The shaft of a regular screwdriver is suitable for this.
Selecting the type of connection
In general, there are a huge number of types of joints of wooden blanks, so we can only talk about some of them, the most common.
One of the easiest ways to extend a wooden part (timber, log, board) and increase its width is an end connection. There are several options for its implementation. A simple and functional half-thickness (half-tree) method is often used. Depending on the expected load on the part, the cut can be straight or oblique. In some cases, the joint is strengthened using figured cutouts - locks. This type of connection prevents stretching, twisting, and bending. This is how the beams are spliced together for the purpose of lengthening.
Creating three-dimensional frames or wooden frames requires reliable connections at various angles. In this case, it is rational to use a tenon-groove or tenon-eye connection. The nodes at the junction of parts can withstand displacement, bending and compression loads. If the structure requires high tensile strength, the cutouts are made trapezoidal.
Additional connections of frame products, which impart rigidity to the structure, are implemented using T-shaped or cross-shaped connections. The main load at the joints is compression, displacement and rupture. In special cases, the structure is additionally reinforced with metal corners, screws or nails.
To connect boards together into box-shaped structures at right angles, it is convenient to use a special box groove. As the name implies, this method is often used to create three-dimensional structures, including furniture boxes. A high-quality box joint looks monolithic, has an attractive appearance and can withstand impressive loads. When creating wooden furniture, dowel, dowel and domino joints are often used (when the groove is oblong, as opposed to a round dowel).
Selection and selection of blanks for joining boards.
The very first step is choosing wood. The selection and selection of boards into panels is important; choosing a straight and even board makes the gluing process much easier; in any case, the workpieces have minor flaws that are not difficult to eliminate. Do not use a twisted board, as it will continue to be subject to deformation in the future. After selecting the lumber, I lay out the boards as they will be arranged in the array.
APPEARANCE.
First, selecting the colors in each piece, move and turn them over until the wood grain patterns match. The straight structure must work next to the straight fibers. The curved grain of the wood should blend with the curved grain of the wood.
FIBER DIRECTION.
Before gluing the array, the workpieces must be leveled using a grinder, jointer or manually with a plane. Determine the direction of the wood grain by looking at the edge of the board joint, see fig. 1, selecting a wood structure with smooth curves, as well as straight ones, also gives a beautiful result. Tip: Draw an arrow on each board in the direction of the grain, see pic. 1. This will be a pointer on the board later on.
FIBERS FROM THE END OF THE BOARD.
There is one more condition in solving this puzzle: how will the panel warp with changes in humidity? For panels whose ends are rigidly fastened with a strip, warping of the array is not a problem. But arrays that do not have rigid fastening of the ends are subject to warping. Those massifs that do not have alternation of growth rings in the opposite direction warp and they take on the shape of a bowl, see fig. 2. You can avoid warping of the array by changing the direction of the growth rings in the bars across the entire width of the array.
MARKS ON THE BOARDS. After the boards are laid out in panels, chalk Roman numerals along the seams, see fig. 3. Roman numerals prevent the possibility of confusing the bars. So, which criteria are most important: appearance, color and grain direction? I try to combine the direction of the grain and the structure of the wood in the panel, but often these are compromise solutions.
Corner connections
There are many other types of joinery joints. Corner joints are included in a separate group.
In this case, knitting occurs at a certain angle. Such connections are divided into box and frame types. The most commonly used joints of this type are:
- Overlay. This is a simple, but less reliable type of combining parts. At the end, choose material up to half the thickness of the workpiece.
- Frame straight tenon. This is the main type of corner joints. The thorn fits into the socket. It can be single, double or triple. The choice is made depending on the strength requirements of the part. The nest may be open on one side. It's called deaf. If the nest is open on both sides, it is called end-to-end. There are holes open on three sides. They are called an eyelet, which is located at the end. The nest may also be in the middle part.
- Oblique dovetail spike. This is a strong connection and is preferable to a straight tenon. A joint of this configuration is not sawed in a direction parallel to the edges. The base of the tenon should be 1/3 of the thickness of the bar. Its end should be 3/5.
- On the dowels. This is knitting on dowels or round insert dowels. The connection is less durable than a tenon connection, but at the same time it is more economical. In this case, there is no need to make an allowance.
- On the mustache. The ends are cut at an angle. This joint is used both for bars of the same and different widths. The angle of the cut may be different.
Adjacency
You may be interested in: Charm is the ability to give a fairy tale
The carpentry connection can be made using an abutment. This is a type of corner joint.
In this case, the end of one bar is adjacent to the middle of another part. This connection is made halfway across the tree (overlay). The tenon can be oblique or straight, semi-secret or through. In some cases, the connection is made on dowels.
Length splicing
This type of joining of wooden parts has some nuances. At its core, this is the elongation of elements in the horizontal direction. Splicing can be:
- Butt-end - the ends are cut at right angles and aligned with each other. A bracket is hammered into both beams (logs).
- Oblique butt - the cuts are made at an angle, and the ends are fastened with a pin or nail.
- End butt with ridge.
- Direct overlay - the length of the cutting is 1.5-2 times greater than the thickness of the timber (log).
- Oblique trim - the ends are cut at an angle and secured with bolts.
- Overlay with an oblique cut - at the ends of the parts, end ridges are made, having a width and length of one third of the thickness of the beam.
READ What is wood marquetry?
Cut folds on the corners of the frame
For frames with 50mm wide pieces, raise the saw blade to a height of 50mm. Check the settings on test joints made from scraps to fine-tune the blade offset and rip fence position. Then secure the frame in the device and check the position of the stop again so that the disk forms a fold on the corner of the frame, the depth of which is equal to the width of the cut (photo at the beginning of the article). During passage, the frame should be pressed tightly against the fixture to minimize chipping. If the overlays stick on both sides, unroll the frame and make a second pass.
Reliable triple corner connection of wooden parts
Hello, dear readers and DIYers! Some of you are engaged in carpentry work, and quite often discover unexpected solutions for yourself. For example, when assembling a frame for a table, one of the most difficult components is connecting the slats and legs. This type of construction also occurs in other types of work.
Materials. - Pine timber. Tools used by the author. — Circular saw — DADO adjustable saw blades — Clamps — Pencil. Manufacturing process. First of all, the master unravels the timber into long slats.
Since this will be a low Japanese table, the legs themselves will be very short.
Since the height of the disk is not enough to process the end of the block, the workpiece has to be turned over and processed on the other side.
For example, these blanks will suffice.
Now both legs are pressed against the stop, and a rail is applied on top. The master marks the legs on one side, then turns them 90 degrees and puts a second mark. Next, the legs are installed in a vertical position, and transverse marks of the slats profile are applied.
This is how the end marking should look like.
Then the master replaces the circular saw blade with a DADO, and sets its height exactly to the width of the rail.
In two passes the author gets an even cut. It is important to move the workpiece very slowly; this blade does not cut very quickly.
So, the first groove is ready, you can check the tightness of the rail.
The workpiece is rotated 90 degrees and the second cut is made. This is how the master treated both legs.
Now the slats are inserted into the grooves, and markings of the edges of the groove are applied to them.
The disk is installed at half the width of the slats, and the first groove is made in two slats at once.
The master also uses a template for precise cutting, the workpieces are turned over, and a second groove is cut.
One rail is turned upside down and connected to the first. There is practically no backlash.
All that remains is to put the corner joint together. Even without screws and glue, everything holds very firmly. You can even make a collapsible table frame design. Thanks to the author for demonstrating a simple but very reliable triple corner joint.
Joining of edges.
When you are preparing to join a board into a panel, there should not be even small compromises. Preparing to join the edges of parts requires precision. If the edges are not smooth, straight, and there is no 90° angle, you will have problems gluing and tightening the array, either the glue will not glue the entire part, or the entire panel may become cup-shaped in width.
SCREED OF PANELS.
A strong tie is not needed when the parts have smooth, straight edges. If the edges do not have a right angle in the bars, then the shape of the bowl in the array is guaranteed to you, see fig. 4 and 4a. To prevent this, make sure your machines are set up correctly. When using a jointer, set the fence at an angle of 90° to the table, using a table, check the angle of the saw blade at 90° to the table.
JOINTER.
Getting a smooth, straight edge is not difficult using a jointer, see fig. 5. The jointer removes one amount of chips and you do not have to adjust the fence with each pass. Slowly feed the workpiece to the cutting head, taking into account the direction of the wood structure, see fig. 5a. After passing, you will get a straight and even edge ready for gluing.
A CIRCULAR SAW.
If you don't have a jointer, you can prepare the connecting edges with a circular saw, see fig. 6. Make a parallel straight board, then cut the board on a circular saw using only half the thickness and height of the saw blade, see fig. 6a. This method does not cause arson and gives clean, smooth edges...
T-shaped connection with overlay
To make such a connection of wooden parts, you need to place one piece on top of another and fasten them to each other using bolts, screws or nails. Wooden blanks can be placed either at a certain angle to each other or along one line.
To ensure that the angle of connection of the parts does not change, use at least 4 nails. If there are only two nails, then they are driven in diagonally. To make the fixation more durable, the nails must pass through both parts, and the protruding ends must be bent and deepened into the wood.
How to make a cross connection
One of the simplest is the cross connection. It is easy to manufacture; even a novice carpenter can master its intricacies. The work is performed in the following order:
- markings are made. The parts to be connected are placed on top of each other. Using a ruler, draw a cutting line. Thickness markings are applied using a thickness gauge;
- the first part is clamped in a vice. Using a hand saw, carefully cut along the lines to the mark left by the surface planer. The workpiece rotates. A second cut is made;
- the workpiece is removed from the vice. Using a sharp chisel and a wooden mallet, remove part of the wood between the cuts;
- the second part is processed;
- The planes are leveled using sandpaper or an abrasive stone.
Types of finger joints
Today, a wide variety of such methods for fastening wooden parts has been developed. All types of tenon joints are classified according to the following criteria:
- number of spines;
- their form;
- eye depth (through or not);
According to the first sign, tenon joints are: single, double, multiple. It determines the number of fasteners produced. The main forms of the spike are:
- rectangular (has different lengths, pitch and apex angle);
- round;
- triangular;
- so-called “dovetail” (one-sided or two-sided);
- gear (with different angles of inclination);
- angular.
The choice of shape and size depends on the material used and the level of load that the entire structure must withstand. A tenon joint with many rectangular tenons has become widespread. Its main advantage is considered to be ease of manufacture and the ability to use it for any wood.
Tongue-Groove connections
As a rule, we are all accustomed to standard connections, for example, permanent tongue-and-groove connections. But even these ordinary connections can be made in a special way that is beautiful and functional!
Flat tenon. A straight tenon can be made in three different ways: 1. With hand tools: using a handsaw and a chisel
We recommend a KIT for making a tenon joint: Classic butt saw Dovetail 20tpi PLUS Veritas thickness planer 150 mm PLUS Flat chisel NAREX PREMIUM 20 mm 05T0505-05N3631-811670-AM
2. Using a power saw Typically, connections of this type are made in a carpentry workshop on a milling machine. However, if you do not have a milling machine or cannot currently use one, you can use a mounting circular saw for this type of work.
Follow the link for an application example: “Making grooves and tenons for corner end joints with a mounting circular saw”
3. Using a router and a special tenoning device
or using a router and a milling template:
There are a great many options for using this type of tongue-and-groove connection:
Hidden spikes, as in the photo below, look so that it is unclear how this structure is made and how it is held in place:
Planing the end part of the tenon with a hand plane (a miter plane or even number 4 or 5 for wide tenons as in the photo) helps to finally form the decorative, attractive appearance of the joint:
The main “feature” of this connection in the photo above is the production of a three-dimensional product from flat elements - plywood. A regular tenon is used, made in different planes.
In the photo above, the decorative element in the form of an X is the simplest tenon joint, which is made elegantly and beautifully, but not hidden, but on the contrary, “open” - the joint is placed on the front surface of the tabletop.
Technologically, a locking connection with a cross-mounted wedge into a tenon is used here. The connection only seems simple: its execution requires high manufacturing precision. Coffee tables with beautiful tongue-and-groove connection options: Curly tenons
Everything about this photo above is mesmerizing! And the beauty of the wood, and the craftsmanship, and the genius and simplicity of the connection itself (tenon and groove).
Imagination and skill are limitless when you have experience working with wood and stone!
Another original example of a combined tongue-and-groove and dowel joint on contrasting wood. The trick is that the table leg is not attached in the classic way from below to the tabletop, but crashes into the solid surface of the tabletop. The base with drawers is completely missing.
Comb tenons or multi-tenon connection
As a rule, the tenons here are sawed on a stationary circular saw or milled on a milling machine (table) using special multi-tenon cutters for splicing
The photo shows a multi-pin joint with pins of different lengths. This connection cannot be made using only a power tool.
Trapezoidal grooves can only be made using chisels.
A round dowel joint can be combined with a tenon joint for gluing as in the photo below and made using a splice cutter. This solution can be applied both for restoration and for the manufacture of a new product. This adhesive connection is stronger and more reliable due to the larger gluing area.
Round spikes
To make round tenons, cork drivers can be used - drill-cutters that are used to drill out a round dowel.
Connections on dowels : The peculiarity of both round and square (rectangular) dowels in cross-section is that they clearly fix the workpieces being connected to each other. And when the wood dries out, its “maintenance” - movement is excluded.
The angular tongue-and-groove joint, fixed with a dowel, allows you to fasten two workpieces with high strength, while the product remains collapsible.
This type of connection, where the dowel is used as a fixing element, is most widespread in wooden house construction.
Dovetail connections:
This type of connection has become widespread due to its strength and beauty:
The photo below shows together all the samples of the Best Dovetail connections according to the popularity of views in our Arsenal Masters: You can find out more in the new special review “Arsenal Masters”
- 50 examples of Dovetail connections, types and applications. NEW 2021!
READ What can you tell by looking at a tree's growth rings?
As well as more complex shaped connections
A variety of shaped tenons can be made using a router and a special tenoning device - a tenon cutter. But such connections can only be made with special templates using a tenoning device - a Leigh tenon cutter:
Connections on flat dowels (dowels) Domino:
Such dowels are also called “Domino”. This type of connection with the use of appropriate tools ensures high production speed, cleanliness and quality of assembly.
Examples of making joints using a Domino router: 1. Joining panels end-to-end 2. Joining panels miter 3. Joining a round profile
Using Domino glued dowels and a Domino DF 700 router, you can assemble powerful frame structures:
and even complex and beautiful miter corner joints:
Dowel joints:
This type of joint looks elegant and is at the same time easy to manufacture.
The diagram suggests connection options using plug-in tenons.
To make a groove for a dovetail key, you will need to make an additional device:
For the uninitiated person, such a connection in the photo is a real puzzle: guess how it was done? But in fact, this is the most common tenon joint, when a flat tenon made from thin scraps of material is inserted into a groove made with a circular saw, perpendicular to both sidewalls, as in the photo. Round elements can be simply decorative (shallow-set) or functionally fixing the tenon - dowels.
On curly dowels
Connections on round dowels:
This type of connection can be made in two ways: Using various jigs and a drill (screwdriver)
Connections on lamellas:
Types of fasteners for timber
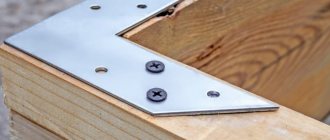
There are many mechanisms for fastening beams together. For this purpose, you can use various kinds of wooden cutouts that interact with each other. You can also use construction fittings made of metal alloys. Such fasteners are created in different shapes and with different numbers of holes, so it is possible to choose a universal option specifically for the required case.
The basis of timber fasteners are corners. This is the most universal way to secure beams. They can be mounted on nails, screws, self-tapping screws. Moreover, they can be made in various shapes and sizes.
In addition to corner fasteners, there are other fittings. Among it you can find flat figures (steel plates) and iron staples, which are driven into the ends of the beams, fastening the crowns in pairs.
The mechanism on screw piles deserves special attention. Its use allows you to save on an expensive and strong foundation when installing on unstable ground without the risk of the building skewing.
Joining wooden parts without nails
Types of connections of wooden structures
Typically, timber products such as beams, planks or planks come in a specific size, but construction often requires materials that are longer, wider or thicker. Therefore, to obtain the required dimensions, there are various types of connections using notches, which are made manually using markings or with special equipment.
Width connections
When joining narrow boards, boards of the required size are obtained.
There are several ways to connect.
1) Joint with a smooth reveal; With this joining method, each strip or board is called a plot, and the seam that is formed as a result of the connection is called a fugue. The quality of jointing is indicated by the absence of gaps between the joints of the edges of adjacent plots. 2) Rail connection; Grooves are selected along the edges of the plots and inserted into their slats, which fasten the plots together. The thickness of the slats and the width of the groove should not exceed 1/3 of the thickness of the board. 3) Quarter connection; In plots that are fastened, quarters are selected along the entire length. In this case, the dimensions of the quarter, as a rule, do not exceed half the thickness of the plot. 3) Tongue and groove connection (rectangular and triangular); This type of connection provides the plot with a groove on one side and a ridge on the other. The comb can be either rectangular or triangular, but the latter is rarely used as its strength is slightly inferior. The tongue and groove joint is quite popular and is often used by parquet manufacturers. The disadvantage of this connection is considered to be lower efficiency, since more boards are used. 4) Dovetail connection;
This type of fastening is a little similar to the previous one, only the comb has a trapezoidal shape. Well, hence the name.
Also, when assembling panels, dowels, tips in a groove and a comb are used with a lath glued into the end. Among the glued slats, there are triangular, rectangular and glued ones, and when using dowels, the dovetail groove is mainly chosen. All this is needed to securely fasten the shield.
Length connection
Popular types of joints along the length include: end-to-end, tongue-and-groove, tongue-and-groove, toothed adhesive joints, quarter joints, and rail joints. The toothed connection is the most popular because it has better strength.
There is also splicing, where longer sections are joined together. This can happen in several ways. For example, half-tree, oblique cut, oblique and straight overlay lock, oblique and straight tension lock and end-to-end. When choosing half-timber splicing, the required joint length should be 2 or 2.5 times the thickness of the timber. For greater reliability, dowels are used, for example, this can be found in the construction of cobblestone houses.
When using an oblique cut with trimming the end, the dimensions are 2.5 - 3 times the thickness of the beam and are also secured with dowels.
A connection with a straight or oblique patch lock is used in structures in which tensile forces are present. A straight rim lock is located on a support, and an oblique lock can be placed near the supports.
If you decide to use an oblique cut with an end trim, then the connection should have 2.5 or 3 times the thickness of the timber. In this case, dowels are also used.
When joining with a straight or oblique tension lock, you don’t have to worry about strength, but such a connection is difficult to manufacture, and when the wood dries out, the wedges weaken, so this joining method is not suitable for serious structures.
A butt splice is when the two ends of a beam are placed on a support and securely connected with staples.
The connection of beams or logs can be found during the construction of walls or in the upper or lower trim in frame houses. The main types of joints include half-tree, half-foot, tenon and corner frying pan. Half-tree cutting is cutting down or cutting off half the thickness at the ends of the beams, after which they are connected at an angle of 90 degrees.
A half-foot joint is formed by cutting inclined planes at the ends of the beams, thanks to which the beams are tightly connected. The size of the slope is determined by the formula. Notching with a corner frying pan is very similar to notching half a tree, but the distinguishing feature is that with such a connection, one of the beams loses a small part in width.
Work options
All events of this kind can be divided into two large groups - joining boards in width and length; we will consider them separately and tell you which techniques are the most popular and how to implement them correctly.
Width connection
Of course, the simplest solution would be a panel splice option, so we will start with it, first present a diagram of the main options, and below we will describe them in detail:
These are the main types of work, if you can use the panel connection option
- The first method involves cutting out a cavity using a milling machine, which has a trapezoidal shape and allows the key to be used as a retainer. The advantage of this solution can be called reliability, and the disadvantage is the need for a milling machine or the presence of a manual milling cutter to carry out the work; you can’t get by with hand tools here;
- Joining using an end block, which is connected to the ends of the board using the tongue-and-groove method, is used for elements of short length, since this option ensures high reliability of small structures. To work, you will again need a router for wooden products. With its help, it will be carried out quickly and efficiently;
- You can make a cutout along the end, fit a strip under it and place it on wood glue, this is also a rather interesting option that is suitable for small-sized structures;
- The last two options involve gluing a triangular strip, only one of them cuts into the end, and the second option involves cutting the end at an angle, you need to choose what is best suited in a given situation.
But if you want to connect the board more securely, then one of the following methods will do:
These options have proven to be the best
- The first option is called a smooth joint, which requires very careful grinding of the ends for a tight fit, after which they are lubricated with glue and connected under a press or using special ties. This solution is suitable in cases where high load-bearing capacity is not needed;
Smooth joints are often used in the manufacture of furniture panels
- The second solution is quarter splicing, for this purpose grooves of approximately half the thickness are selected at the ends, this option is more labor-intensive, but its reliability is noticeably higher than that of the previous one, the instructions for carrying out the work are simple: grooves are selected using a router, after which the ends are lubricated with glue , and the structure is tightly compressed until the composition dries;
This is what the connection looks like in the diagram
- You can cut grooves on both sides and insert a strip inside, which is again lubricated with glue for reliability. This solution has proven itself well on elements of large thickness, since in this case the thickness of the wooden slats will be significant, therefore, it will be able to withstand even heavy loads without any problems. Accurate fit of all elements is important, so milling equipment is used for the work;
Example of a keyed connection
- The tongue-and-groove connection is well known to many from floorboards and finishing materials made of wood; here it is important to cut the connection correctly so that the elements fit together as accurately and tightly as possible; a separate option is the triangular tongue-and-groove, it differs in that one end is made in the shape of an angle, and the second has a recess in the shape of a protrusion;
- The last of the options being considered is a dovetail; this type assumes the presence of a groove that expands in depth; due to this feature, the boards are inserted from the end and slide as if on a slide; they cannot be separated without applying significant force, which is also important.
Length connection
Splicing boards along the length is also used quite often when carrying out work, so we will also pay close attention to this aspect.
- The simplest is overlapping fastening, when the ends are placed on top of each other and twisted with self-tapping screws, knocked down with nails or screwed together. The design is not very attractive, but you can do it yourself in a matter of minutes;
The fastest way to get the job done
- The second solution is joining into a so-called mini-tenon, this is a very durable and reliable option, but to carry out the work you will need a special cutter, the price of which is high, so this method is chosen by those who have to splice elements frequently;
With this cutter, connections are made very quickly.
- If the elements are connected along the length not in one, but in two or more layers, then you can use the end-to-end option, such a connection of boards along the length is well suited for multi-layer systems, in the figure it is under the letter A;
Some ways to connect along the length
- The traditional tongue-and-groove option is often used, here it is important to ensure the optimal configuration of the connection, so the width of the groove and, accordingly, the tongue should not be more than a third of the total thickness of the board, it is important to do the cutting very accurately so that the elements match perfectly, this will significantly increase the strength of the connection;
Important! When working, a milling cutter is most often used, but cutters can have different configurations; you should monitor the condition of their cutting edges and sharpen or replace them in a timely manner, since the quality of the connection largely depends on the cleanliness of the processing.
- You can use the option of cutting at an angle; it is well suited where special strength is not required, but elements that can be used for finishing, etc. need to be well connected;
- The triangular tongue and groove is in many ways similar to a regular one, only the configuration of the ends differs. It is also important here that the elements fit perfectly together, as this will ensure both the accuracy of the pairing and its maximum reliability;
- The quarter connection is simple - cuts are made at half the thickness, the length of the protrusions should not greatly exceed the thickness, the elements are lubricated with glue and compressed until the composition dries, this is a standard procedure for almost all options;
- The last type is keyed joining, it does not differ from the option described above when carrying out work along the width, the requirements are the same.
Methods of joining wooden parts
Wood is widely used in various areas of human economic activity. Wooden structures are especially widely used in construction. However, any wooden structures consist of individual parts that must be joined together in one way or another.
There are several types of connections. But you need to learn one rule: before starting work, you need to carefully mark the future cuts and always follow the markings. In the final product, the parts must fit accurately and tightly.
Methods for connecting boards and bars of short length: 1 - “end-to-end” (butt); 2 - “groove and tongue”; 3 - “on the mustache”; 4, 6 - “toothed” adhesive; 5 - “half-tree”; 7 - “on the rail”; 8 - “straight lock” with overhead lock; 9 - “oblique lock” overhead; 10 - “straight” and “oblique” tension locks.
The simplest and relatively weakest connection is the “butt” connection. For this connection, the ends of the parts to be fastened are made clearly rectangular, and the ends are processed with a plane.
READ Wood burning technique for dummies
The miter joint is similar to the butt joint, but here the ends of the parts are beveled at an angle of 45°. For precise marking, a device called a yarunok is used. This connection is reinforced with a plywood overlay or a metal square. The miter joint is strengthened by fastening it on the inside of a square or triangular beam.
More durable connections include “overlay” connections by making cuts. If the parts to be joined are of the same thickness, then cuts are made on both parts to half their thickness. In the case where one part is thicker than the other, the cut is made only in the thicker part. To enhance strength, the parts are glued together and additionally secured with wooden dowels or screws.
If it is necessary to obtain a T-shaped connection, use a “half-tree” overlay. In this case, both parts are cut off if they are the same thickness, or a thicker part is cut off if the thickness of the elements being fastened is different.
The strongest connections that have come down to the present time from ancient times are those with through tenons, with two inserted round tenons, and with the method of middle knitting with a single tenon. Parts connected by a straight through tenon are additionally secured with dowels and glued together. To make a connection on two round insert tenons, use a template made of plywood or thick cardboard to accurately drill holes for the tenons. Middle knitting with a single tenon can be blind, if you need to hide the end of the tenon on the front side, and through, which is much stronger than blind.
For box joints, tenon joints with straight and oblique (“dovetail”) tenons are used. Despite the higher labor intensity, the connection with oblique tenons is more durable and reliable.
For reliability, all connections can be strengthened with dowels, gluing, nails, screws, bolts and a combination of these methods for strengthening joints.
The dowel is made in the form of a wooden rod with slightly pointed ends from hardwood. If the product will subsequently be painted or varnished, then the outer end of the dowel is recessed and puttied or a blind hole is drilled for the dowel.
Application of glue
Carpentry joints are often made using glue. This is a common technique that is used in the production of furniture and other products. If you connect wood using only glue, you get a completely strong joint. Modern compositions have high strength after hardening. This result can only be achieved if the parts have been correctly fitted and connected correctly.
This method is used not only for panel connection to a smooth reveal. The technique allows you to glue plywood onto the frame and perform cladding. Also, when gluing several thin pieces together, a thick part is obtained.
Which fastening hardware to choose for certain types of material
Modern manufacturers make furniture not only from chipboard, but also from other materials.
Thanks to the wide range of fittings, you can choose fasteners for any type of furniture
Telescopic guides for drawers are modern fittings that allow you to effortlessly open even massive structures. Would you like to learn in detail about the installation of telescopic guides and the correct calculation for their installation?
Connections using nails and fastening brackets
Nail joints are rarely used in furniture production. They are used for fastening parts made of thin sheet materials.
Nails are standard products. They come in different sizes in length and thickness. The cross-sectional shape of nails can be round, rectangular, notched, with a screw or ring thread. Depending on the material, steel, copper, aluminum nails, etc. are distinguished.
The strength of connections on nails is characterized by resistance to pullout. It depends on the size of the nail, the shape of the section and the material of the parts being connected.
Connection with staples is used when fastening parts made of thin sheet materials, fabrics, some polymer parts and springs. Connecting with staples is not labor-intensive, but does not have great strength. When fastening sheet materials, the height of the bracket must be at least three times higher than the thickness of the part.
Connecting the corners of the beam with the remainder
When connected at an angle to the remainder, the workpieces extend beyond the plane of the wall. They are called corners.
Corner connection with remainder
A recess is cut out in one blank - a bowl. For a rounded log it is semicircular, for a profiled log it is rectangular. The second blank is inserted into the bowl either solid or with a cutout corresponding to its shape. Such corners do not allow the cold to pass through. Insulating the log house with careful caulking will not be necessary.
When they are fastened, scraps of wood remain. Therefore, it is necessary to purchase more material and take into account the length of its cuttings. The connection into a bowl also has another name: oblo (obly - round).