What is it, types and functions
Such a device is necessarily included in the design of format-cutting circular saws. This is a movable part of the work table, which, together with the workpiece fixed in it, moves along strict guides of the relative saw blade. Thanks to this, the cut line is perfectly straight.
The cutting itself is easier, since the workpiece moves strictly, does not wobble, and there is less friction between the material and the disk. The workpiece itself does not need to be moved along the work table by hand or pusher. It is easier to move the carriage with the workpiece, especially if it runs on bearings.
Dozens of different carriage designs are used. Let's look at the most popular of them.
Factory designed
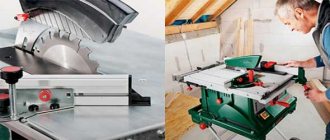
They are installed on stationary general-purpose circular saws and on sizing saws. In the latter case - for cutting large sheets of chipboard, MDF, laminated material, plywood, fiberboard, etc. Therefore, they have a large support area for sheets and a long stroke length, sufficient for cutting long sheets.
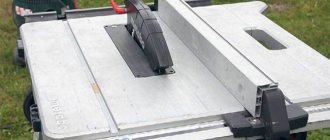
On general-purpose circular saws, the slides are much smaller. Designed for precise cutting of small and medium-sized workpieces made of sheet material and wood (boards, beams, slabs) and other materials.
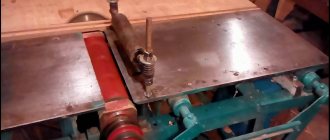
An example of such a circular in the photo:
In practice, such a circular saw works as a small format cutting machine (FRS) for small blanks made of sheet material. And, conversely, on a large FRS, if necessary, you can unravel not only sheet materials, but also wood.
The principle of operation of all carriages is the same - the work table moves along guides. Dimensions and design solutions on different machines differ: round guides in bushings, rail, grooved guides, with and without bearings, etc.
If the machine is sold without a carriage (with a fixed work table), then the manufacturer may offer it additionally as an option for a separate amount. This device fits a specific machine and is easy to install.
If such devices are not produced and sold specifically for a particular model, choosing a suitable design is much more difficult. You can find a more or less suitable option, but you will have to modify the fastenings. This is difficult, since the slide must be located and move exactly parallel to the saw blade, and there is a significant load on the movable work table; the fastening must be strong enough.
For this reason, homemade carriages are often made. Let's look in more detail at how to do it yourself.
Homemade options
Among homemade carriages, no two options are identical; all products are unique. Even if they are made according to the same drawing or sample (example), the material of manufacture, dimensions, etc. differ.
Homemade options can be the simplest from available materials, or more complex, using purchased components (guides, bearings, etc.).
Buying ready-made units can make the task easier. As an example, linear guides LLTHC 30 R T1 P5 (SNC 30 P1 N) SKF in the photo:
The unit has a movable platform with holes provided for attaching the desktop platform. One such guide will not be able to keep the desktop from distortions and, as a result, from breaking the guide profile.
They are used in conjunction with other passive, holding guides, for example, corners along which the table moves and is held, or in pairs: two guides, sometimes with additional support in the form of a longitudinal corner.
Similar units cost from 3 to 6 thousand rubles.
When manufacturing sleds based on such units, as when installing standard ready-made sleds, the problem of accuracy of location relative to the plane of the saw blade arises. And in all planes. The desired horizontal discrepancy (tolerances) is no more than plus/minus 0.1 mm (ten).
If there is a misalignment during installation, then problems will arise when cutting with adjustment of the cutting width along the side parallel stop:
- when narrowing from the beginning to the end of the disk, the workpiece will “wedge” (the disk and the material burn, the engine slows down until it stops);
- when expanding, the cut will not be accurate.
If you cut on a slide along guides installed obliquely at the narrowing without a parallel stop (just by size), the sawn piece will not wedge the disk. It will come off freely, but the cut may not be precise.
Cost of factory-made devices
Pre-assembled factory skids can cost from several thousand to several tens of thousands. Prices for individual units - linear guides from 3 thousand rubles. 1 PC. up to 12 thousand rubles (2 pieces for 6 thousand rubles).
Materials for the table can be purchased or already in stock. The cost depends on the thickness, size, and chosen material, so it is impossible to give an exact amount.
As a result, the cost of making a homemade sled can range from 0 rubles, if a simple design is made from existing plywood, to 3-20 thousand rubles, if ready-made components and other materials for a serious product are purchased.
Step-by-step instruction
Below is a detailed process for making a simple saw carriage.
Marking guides
The grooves for the runner must be clearly parallel to the circular disk. Therefore, the necessary marks are placed on the tabletop with a pencil and a ruler and the central axis is drawn. Accurate marking is the key to a quality tool.
Additionally! If there are no backlashes, the ruler should be pressed against the disk itself.
Milling grooves for runners
When the main line is ready, grooves are made on both sides of it at equal distances using a milling machine. Metal profiles (U-shaped) can be inserted into the grooves so that the grooves last longer and the slides move easily.
Making runners
The slats are cut from wood. Preference is given to hardwoods - maple, oak and others. The slides should fit well into the grooves, but not too tightly, otherwise the carriage will not be able to move. If this step is completed correctly, the base of the sled will easily install on the workbench.
To cut at a non-standard angle, you will need to additionally make a combined square
Mounting the carriage base onto the skids
The runners are glued, then a plywood sheet is placed on them. While the glue is active, a weighting agent is placed on the plywood, or it is fixed with any clamp. It is advisable to sand the plywood first.
Advice! To prevent the glue from leaking and getting onto the surrounding surface, the edges of the guide rails can be limited with tape.
Marking the corners of the carriage
The carriage is installed in the grooves, and the master saws through its front part. From this section 2 angles of 45 degrees are measured. After which the corners are cut off on both sides.
Correction of carriage angles
It is necessary to secure the structure and make several preparations to evaluate the functionality of the carriage. If the angles in the sawn slats are not correct, the circular slide is corrected: its borders are trimmed. Then you need to make a test cut again.
This procedure is carried out until the desired effect appears in the size of the cut, the vibration level and the need to apply effort in the process.
Homemade options
The simplest version does not have bearings, a mounting frame, profile guides and platforms that move along them. A movable table made of sheet material moves along a fixed work table. Left-right movement is prevented by limiters installed on both sides.
A more complex option is that the slide platform moves on bearings that run along grooves in the limiter. The disadvantage of this option is that when the guides are located on top of a fixed work table, the bearings significantly raise the working platform of the slide, which reduces the working diameter of the saw blade (depth of cut).
Other “semi-homemade” options with ready-made linear guides described above. Their moving platform has special sliding bearings built into them.
We also recommend reading an interesting article about guides for circular saws, in which we discussed in detail what they are and how to make them yourself.
How to make a movable carriage for a circular saw with your own hands
The simplest version of the sled is shown in the following video:
Step-by-step manufacturing instructions
The production of such simple options is carried out according to the following sequence.
Size calculation
They must match the size of the work table, taking into account the size of the workpieces that will be sawed. Small workpieces require a small area, and vice versa. In the video shown, the sled is much wider than the desktop; additional supports are used.
Material selection
We use material that is on hand or on sale at an affordable price.
Further:
- Layout of sheet for desktop.
- Sawing material onto a moving table with a jigsaw, hand or electric saw, angle grinder, etc.
- Measuring guide bars (angles, profiles) for longitudinal and rear transverse stops.
- Sawing guides to length.
- Assembly. The main thing is that the guides on both sides are strictly parallel to the disk. To do this, the following order is maintained: One guide is screwed on, the slide is put in place. The second guide is screwed to the actual location of the slider. Then the work table of the sled is cut for the disc using the wood saw blade itself. In this case, the slide is simply moved towards the working disk. If the table is made of metal, it is cut with a metal disc according to the markings.
- Installing the rear thrust bar.
In the version shown in the video, a side stop is used as a cut width regulator - a simple U-shaped metal profile on a clamp.
The main disadvantage of this design is that at the slightest misalignment of the guides, the table will jam. Distortions during movement are quite possible, since the guides move without bearings.
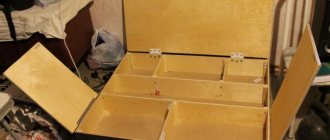
In the photo, the side guides are made in a different way.
Here they are not attached to the sides of the fixed table, but are located below. Sliders are attached to the bottom of the slide; there are grooves for the sliders on the fixed work table.
This option is less prone to warping and jamming.
Homemade slides with factory linear guides and sliding bearings are completely free of this drawback. They are installed on the side of a fixed table, on a special frame. The movable work table can pass either on top of the fixed one or at the same level, as on factory-made machines. In this case, the distance from the moving table to the saw blade should be minimal.
Required materials and tools
To make the simplest sleds, like those shown in the video, you need:
Sheet material. The desktop can be made of different materials:
- plywood with a thickness of 10 mm and above;
- aluminum with a thickness of 5-10 mm;
- ferrous metal with a thickness of 3-5 mm (the larger the area, the thicker so as not to bend), but it is a heavy material;
- any other inflexible and non-fragile, sufficiently durable materials (textolite, fiberglass, plastics with suitable properties, OSB, etc.);
- a block for fixing the workpiece on top of the table;
- stop for limiting the width of the workpiece (corner on a clamp, block on screws, etc.).
The guides can be made of different materials: blocks of dry hardwood, furniture chipboard, metal corners, a special profile for factory-made guides, including those with bearings.
To improve the sliding of guides without bearings, they are polished and waxed.
The tools used for making are different, depending on what the craftsman has and the material. For example, you can cut material with a hand hacksaw, a metal file, an angle grinder cutting disc, an electric circular saw, a reciprocating saw, or a jigsaw.
You can tighten the screws with a screwdriver, an electric drill with a speed controller, a hand screwdriver, etc.
In principle, the design is quite simple and does not require any overly detailed step-by-step instructions.
Multitool Attachments
Novice craftsmen doubt that using a hand-held mechanical tool can make a straight cut. This is true if you cut according to the markings, but you can make the job easier by using a purchased or homemade guide,
Hand-held woodworking tools, especially those of modern design, are sometimes astounding in the number of auxiliary devices that assist in cutting material. The simplest auxiliary device is an ordinary stop on the base of the saw with an indicator of the line along which the cut will be made.
The most popular addition is the short slide with adjustable extension length . More complex designs also have a roller on such a guide so that when it comes into contact with the edge of the material, the movement of the saw does not slow down.
Sometimes indicators are installed to show laser cutting lines and other devices that have the same disadvantages. All these mechanisms serve to provide information that the saw blade has gone beyond the cutting line. All simple mechanisms indicate inaccurate sawing.
Nuances of work and safety precautions
Sleds are used to solve special problems. For example, for precise cutting of sheets, cutting many identical small workpieces to one size using a width stop, cutting at an angle. For the latter, the workpiece itself is placed at the desired angle on the movable table.
Processing of long workpieces is limited by the table stroke length. It will not be possible to cut a wane from an unedged board with a length of, for example, 6 m using such a device.
Safety precautions when working with a sled are the same as when working with a regular circular saw.
- the hand should not come close to the working saw blade;
- the workpiece must not be clamped;
- you cannot work tired, with reduced reaction;
- You should also remember about electrical safety. Exposed contacts and wires, unsuitable cables are not allowed.
In general, working with a carriage is safer, since the hand pushes the slide further from the saw blade than the workpiece on a simple circular saw.
What to consider when choosing a guide for a circular saw
The use of a guide bar for a circular saw requires taking into account the following features:
- parameters of processed wooden blanks;
- technical capabilities of the saw;
- frequency of use of this additional tool.
When choosing a guide bar design, you should evaluate the frequency of use of this unit, that is, how often you are going to use it.
One of the important features when choosing a guide is to evaluate the technical characteristics of the saw used
In this case, special attention should be paid to the following parameters:
- permissible cutting length;
- power of the tool used;
- width of the resulting groove;
- features of the saws used (disk diameter, size of teeth, etc.);
- permitted cutting direction (longitudinal, transverse, arbitrary);
- the ability to cut dense products (strong wood, laminate, laminated veneer lumber);
- the procedure for using the existing system to ensure safe operation for a specific type of circular saw.
Making a guide bar for a circular saw will complement the set of additional accessories. The device will allow for high-quality processing of wooden products. The combined use of a circular saw and a guide bar results in a smooth, high-quality edge that is ready for further processing.