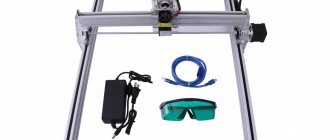
If the master’s tools are in order, then the work moves quickly and easily. No need to look for where the bolts, pliers or hammer are, everything is at hand. Factory-made organizers offer ready-made storage solutions, but they are not always convenient, and the cost of high-quality models is not the cheapest. If you have the desire and leftover materials after repairs, making a tool box with your own hands will not be difficult, and it will cost much less than the factory equivalent.
Why do you need an organizer?
When there are a lot of tools, the question of storing them arises. You can, of course, store everything on a shelf in the closet. But this, to put it mildly, is not entirely convenient. It is much better to have a special box in which you can put everything you need. You can buy a plastic tool organizer at the store. Fortunately, there are many options for every taste. Or you can make a tool box with your own hands according to the drawings. This will allow you to make the organizer as suitable as possible for your own needs, as well as save money on the purchase.
The manufacture of a tool box should be approached with all responsibility and done wisely. Only a well-made organizer will be reliable and last a long time. The production process takes place in several stages.
Before you start working, you need to clearly decide which box you need.
The feasibility of self-production
Buying an organizer is too expensive, and many of their owners find them not convenient enough.
You can solve this problem quite simply - make a tool storage box yourself. Every man should and can cope with this interesting, creative and completely feasible task.
Joiners and carpenters who have their own workshop store their tools by hanging them on special holders on the wall, cabinet, or special cabinet. But most ordinary men do not have such luxury as a workshop and use an ordinary backpack, bag or organizer.
Types of organizers
Depending on your needs, you can make different organizers. The material and complexity of the design depend on the expected load on the box, as well as the number of small parts that will be stored inside. There are several main types of organizers:
simple boxes. They store all the tools and small parts available at home. There are no compartments or complex structures. This type of box is not always convenient, but it is optimal if tools are used infrequently.
- universal organizers. These drawers are spacious and have many compartments for storing small items. Sometimes, for greater convenience, tool boxes are placed on wheels. This move makes moving a heavy organizer more comfortable.
- organizers for a specific tool. Such boxes are suitable for storing a specific tool: electric saws, drills, and so on. Organizers of this type also provide compartments for components. This box is suitable if the factory equipment of the tool does not include a storage box, or the “original” organizer has become unusable.
- organizers with extended functionality. These boxes can perform additional tasks besides storing tools. For example, some organizers can be transformed into a small desk for work. Such designs are the most complex, and their manufacture requires honed skills.
We make a convenient organizer for carpentry tools. Step-by-step instruction
Good day to all.
The glorious summer of 2018 has come to an end. I always feel so sad at the end of summer, but oh well, let’s look for the positive. My son (6 years old) and I spent the last 3 weeks of August in the village with my mother. We were busy with different things and had enough to do. However, I also want to do something like this, besides the routine.
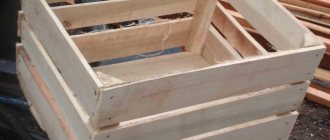
Often, while looking at articles on the Internet on organizing a workplace or space in a workshop, I saw various plywood organizers. But I don’t have a workshop either in the country or in the village. And you need to store and carry the instrument in something. I have a toolbox. Ordinary, a kind of classic, that is, the shape is the same as in the photo above, but the contents are only two pockets for nails. Everything would be fine, but putting a level, an ax, a hacksaw, a nail puller, an edge plane, a construction pencil, a construction angle, and assorted nails into a regular box, we end up with a bunch of little things.
Organizer box for tools I think it’s possible to fit everything in one box, but I didn’t have time to calculate and think through everything (it’s not as easy as it seems), so I decided to leave the nails, hammer and nail puller to my old friend in the box, and the rest of the hand tools transfer to a new one. So, let's make an organizer in a drawer and see what happens.
Where does such a box begin? (dimensions were determined on the knee). From the “cutting board” - the sides of the box. That’s what I did for my first drawer after finishing school: I used a cutting board as a model. 
"Cutting board"
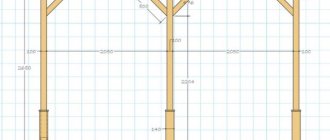
Your sizes may be different, mine are approximately the same as in the picture. I decided on the width simply: I lined up the intended tool and added a bit of clearance for free removal and insertion of the tool. In addition, I took into account the fact that some things can be placed in parallel. The length of the box was also not difficult. By the longest instrument - by level. But for convenience, I decided to place the level at an angle so that I could easily pick it up by the edge with my hand. Consequently, the length of the box has decreased, because part of the level will be located outside.
Determining the length of the box
How much to lower it, at what angle - it is better to determine according to your hand. Just remember about the handle, which will also contribute to our ergonomics. The height of the box should be such that when you carry it at arm's length, it does not touch the ground.
Through trial and error the sidewall came out like this.
A real sidewall with a shelf under the level To prevent the shelf-rail from splitting from the screws (it takes a long time to wait for glue), I gave it such an intricate shape. I used a small piece of plywood to attach a limiter so that the level would not fall into the space of the box.
Ads by
Hacksaw
In the era of power tools, I don’t use it much, but I can’t get away from it completely, just like I can’t get away from a hammer with the advent of a screwdriver.
The hacksaw in the old drawer often blew my mind. Always got in the way. I tried hanging it on nails on the outside of an old box - it fell off at the wrong moment. As a result, it was decided to place it symmetrically to the level. When extracting, they do not catch each other. The level doesn't fall out, but I need a rigid plane to mount the hacksaw on. Perhaps someone, looking at my box, will make perforations in the partitions to reduce weight and more ergonomics, well, I don’t mind, just show me later. It’s trivial to cut out a slab of plywood slightly smaller than the sidewall. And for ease of fastening and reducing the number of reinforcement bars in the sides of the box, I select grooves for fastening the partition.
Groove for the partition I made the groove with a router, and my bit matched the thickness of the plywood. After these operations, the plywood fits into the groove, like factory furniture - I was pleased.
Now the box on three stiffening ribs (two sides and a partition for a hacksaw) is assembled like Lego, and you can select the angles of the tool by trial and error. Very comfortably. With the angle of the hacksaw landing, such tests amounted to three or four attempts. Either the sides were in the way (the saw handle rested against the side), then the angle was inconvenient for removal, and then I remembered that I had not taken the drawer handle into account
Hacksaw pocket
The principle is the same as for the level, only the damper is larger.
The next tool is an edge plane. It is small, so why not make a shelf for it, using the same fastening as with the partition for the hacksaw.
I apply the plane at an angle, outline a line, select a groove. That's it, you can insert a shelf. I tried it and decided to strengthen it, because on the opposite side the shelf would not rest on anything. I had to glue a stop for the plane to the shelf itself.
Edge Planer Position
I also decided to make the limiter on the side smooth.
Planer pocket
Another perspective
The box was not tightly assembled until the very last moment, so that the cells for some tools could be moved relative to other cells, in addition, you cannot select the same grooves on the assembled box.
Next in line was the ax cell. It was decided to make it from a board - for strength, the ax is the heaviest of the tools stored in the box.
Ax partition
We fasten with the side
Well, almost everything. For the pencil and possible pencil handles, I made a board with holes of different shapes. For the construction corner - a rectangular frame.
Frame for construction corner. To begin with, I made a frame with a rectangular hole for the short part of the corner. I started trying it on in the box. The corner unpredictably tipped over - either onto the side wall I needed, or inside the box. No, it didn’t fall, but the tilted corner inside the box didn’t suit me. Then I attached a limiter strip with a small protrusion parallel to the long side of 3 mm (approximately) to the frame. After this, when inserting a corner, it always tilts towards the side wall, as I needed to make.
Frame for construction corner
The entire disassembled box is shown below.
Box in disassembly
Another perspective
Assembled box without bottom and handle
Collected, folded
Pay attention to the handle, it has a curved shape. I saw one like this on the Internet, I also wanted to make one, it’s convenient.
Another perspective
After coating with drying oil.
Ready to use
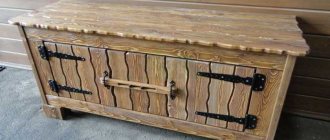
This is the organizer box that came out.
Box
Selection of materials
Once the type of box has been chosen, you should decide on the material from which it will be made. There are several types of material that are most often used in the production of organizers:
- metal – stainless steel, galvanized steel and sheet aluminum. metal tool boxes boast reliability and resistance to mechanical damage;
- wood - plywood, solid boards, chipboard. These materials are not as durable as metal, but wood is easy to process and affordable.
- plastic. It is recommended to make portable tool boxes from PVC. This material is strong enough to withstand loads and temperature changes.
First the body is made
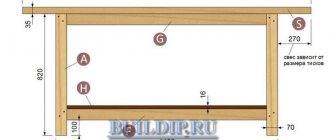
1. From 19 mm plywood, cut out pillars A and panels B of the sidewalls according to the dimensions specified in the “List of Materials”. To enhance the appearance of the entire project, we used premium grade plywood that has no defects on the edges.
2. Having secured a rebating cutter with a bearing into the router collet, select 10x6 mm folds along the rear edges of the posts A on the inside to insert the plywood wall G. Glue the posts to the panels B, placing the folds as shown in Fig. 1.
Glue the sides A/B to the bottom C, secure with clamps and screw in the screws. The mounting square will help avoid distortions.
3. Read the “Expert Tip” below. Then determine the width of the two lids and bottom C by measuring the width of the assembled sides A/B. Saw the lids and bottom to the required width and saw to a length of 1016 mm. Attach the sides to the bottom (Photo A, Fig. 1).
Quick tip! To ensure that the plywood around the screw heads does not split and the surfaces are smooth, the mounting and guide holes for the screws must be countersinked.
Types of organizer designs
Organizers come in different shapes and sizes. Their complexity also differs. You can make a simple tool box, or you can choose a more complex option with additional functions. There are several most common designs:
- portable tool box with handle. This organizer is quite simple to make, it is convenient to carry and can be made spacious.
- case. Boxes of this type are equipped with a lid with a lock. Such organizers are often used to store small-sized tools and consumables.
- container with lid. Organizers of this design are characterized by a large volume and thoughtful organization of the internal space. Large tools are usually placed at the bottom of the box, and containers for storing small parts are located on top.
- drawers with pull-out compartments. Such organizers look like a cabinet. Each compartment is separate, the instruments do not touch each other. organizer on wheels. This is a modification of any volume organizer. Wheels make the box much more convenient for transportation.
Defining a Plan
To make a box for screwdrivers and keys with your own hands, develop a step-by-step plan. To follow the stages of work, prepare a project according to which you perform each action.
Design a homemade organizer using the following algorithm:
- on paper or using a computer program, draw a sketch of the future product;
- draw a diagram of an open drawer with pulled out compartments;
- calculate what size each section and box should be;
- determine the dimensions based on the length of the available tools and the number of devices;
- indicate fastening parts, handles, locks and hinge mechanisms;
- Place the dimensions of each position on the drawing.
Important!
When drawing a tool chest by hand, use graph paper. Large sheets will allow you to draw the details and parts of the organizer on a 1:1 scale, from which you can make patterns.
Using a detailed and understandable drawing, you can calculate the required amount of material, fasteners and accessories.
Preparation of the drawing
After choosing the material for the future organizer and the desired design, it is necessary to design the product. Drawings can be found on the Internet, ordered from specialists, or made yourself.
To make a drawing of a box yourself, you need to use paper, a pencil and drawing supplies. You can also resort to specialized software. It is worth remembering that this process is very painstaking and requires certain knowledge and skill. Therefore, beginners are advised to seek help from specialists.
When the drawing of the tool box is ready, you can start making it.
Drawer guides
Types of guides:
- Roller. This is the cheapest type. Its disadvantages lie in the incomplete removal of most of the box. They also make loud noises when leaving or entering.
- Ball. This is a telescopic type of guide. There are two subtypes: regular and enhanced. The height of regular ones is 35 mm (for light laundry: socks, belts, etc.), reinforced ones are 45 mm (for heavy laundry).
- Metalboxes, or metaboxes. They are installed on the bottom and are characterized by improved load-bearing capacity. They differ from the first two in that they are the sides of drawers.
- Closer and pusher systems. These are complex and expensive designs. Closers are needed for silent operation. Pushers allow you to install a box without handles due to the spring, which, when pressed, automatically pulls out the box.
Expert opinion Alexander Didenko Furniture assembler at Mabax
The system of closers and pushers is a complex design, so it is advisable to entrust its installation to furniture specialists.
How to make an organizer with a lid
A wooden tool box with a lid provides more secure storage. Its contents will not deteriorate from moisture and dust, and rainwater will not fall on it during transportation.
The lid is made removable or attached to the body using hinges. Hinges are a particularly important element, since they take on the entire load when opening.
To make such an organizer you need the following materials:
- plywood.
- Desirable thickness: 12-18 mm for the frame and 6-10 mm for the load-bearing parts;
- wood glue;
- fucking polishing block.
You also need to prepare the following tool:
- self-tapping screws;
- overhead loops;
- finished handle;
- ruler;
- pencil;
- jigsaw;
- screwdriver;
- clamps;
Once everything necessary is prepared, you can begin the manufacturing process:
- Make markings on the material based on the drawings;
- Turn out the elements using a jigsaw;
- Using glue and self-tapping screws, connect the body of the product;
- Use the same method to make removable trays;
- Fix the bars for stops in the organizer;
- Using the method described above, make a lid and attach it with hinges to the body;
- Install locks on the body;
- Attach the handle to the lid;
- Sand the product and varnish it;
- The organizer is ready to use!
Manufacturing of necessary parts
For an accurate and easy process of bending parts, we use a roller cutter in a certain way:
- Place the cardboard on a wooden surface
- Let's draw a path on the cardboard.
- Let's move the bending roller along the length of the track with proper pressure in order to reduce the thickness of the cardboard at the junction.
- Now let's bend the component along the length of the compressed distance.
All this can be done easier and faster with the help of a tool called a rule. We connect the sides and base of the box, insert a strip of cardboard into specially designated holes and get a finished tool box.
DIY metal box
Many beginners are wondering how to make a tool box out of metal with their own hands. This process is much more complicated than making a wooden box. However, the durability of the metal compensates for the effort expended.
To produce a metal organizer you will need:
- Metal sheet. Typically aluminum or tin is used;
- riveting tool;
- scissors for cutting metal;
- loops; lever;
- locks.
The metal tool box consists of the following elements:
- side parts;
- bottom;
- lid.
The manufacturing process is as follows:
- make markings on a metal sheet. It is necessary to take into account an allowance of 1-1.15 cm;
- Using scissors, cut out the elements;
- Fold the allowances along the edges;
- Using a riveter, rivet the joints;
- Connect the compartments with strips;
- Attach the handle and locks.
- The product is ready!
Tool belt
If you do not need to constantly carry many different tools, then for the most necessary ones you can make a belt with a pocket system. It is best to choose dense material. You can even use an old belt, to which pockets for screwdrivers, wrenches and other small items will be attached with rivets. A bandoleer-type belt can help out when it is not possible to constantly return to the work table or stand for the necessary tool.
This bandolier is sewn very quickly and easily; it is best to use a sewing machine and strong silk threads.
You don’t need any special skills - just a little free time and durable material, tarpaulin or jeans are perfect:
- Fold a piece of fabric in half;
- Leave a couple of cm at the top to connect to the belt;
- We sew the pocket on the sides using a regular lower stitch;
- We divide the large pocket into several narrow ones using a vertical seam.
This way you can make as many pockets as you need. You can attach it to the belt either with rivets or simply sew it on if the belt is made of fabric.
Design principle and materials of manufacture
Before making a structure, you need to clearly decide for yourself several questions about the future product. By choosing your own option at each point, you can get the design principle.
- The first question is the composition of the tools. If there is a large amount of fastening materials available, then it is worth making a separate department for them. This immediately discards the option with a fabric organizer, since the fasteners will simply break through the walls. It is important to have a power tool. If the tools include a drill, screwdriver, hammer drill and other tools of this kind, then a single box will not work. For such an organizer you will have to make a large number of compartments for each of the tools.
- The second criterion is the ability to move the organizer. He comes out of the first one. If the tools include only the most basic set, then it is better to make the box portable. This will allow you to keep the instrument in your apartment. In addition, it is convenient to bring the tools directly to the place of work. The stationary organizer is convenient due to its spaciousness. Here you can place everything you need, from simple tools to a grinder and an electric saw.
- The next and final question is the materials used. Plywood cannot support the weight of heavy tools, but it is suitable for creating the top shelves of a stationary organizer. It is best to use boards. This is a material that is fairly easy to fasten and is strong enough to withstand the weight of heavy tools. To give additional rigidity to the box, metal corners are used. Using a metal frame, you can create a fairly stable structure and even put it on wheels for easy movement in space.
Drawer handles
Furniture handles for a closet can be made in three ways:
- Cut-out. Oval cutout at the top of the drawer front. Cover the cut with melamine edge.
- Railing. For facades longer than 450 mm. Attach them with screws to the facade. When determining the length of the drawer walls and the front, take into account the distance between the front and the handle so that it does not stick out and allows the cabinet door to close.
- Mortise. Save useful cabinet space. Installation: make a cutout in the facade with a milling cutter. Insert the handle into the groove and secure it from the inside.
On the left in the photo are cut-out handles.
If you don’t want to bother with decorative cutting, you can make indents between the drawers and thus the top edge will be the handle. Instructions for manufacturing a vertical retractable module:
- Determine the dimensions based on the interior niche of the cabinet. The height of the structure can be from 1 to 1.5 meters. Depth up to 50 cm. Now you can attach drawers to it.
- When making boxes, take into account the dimensions of the chipboard board, so make the length of one box less than the entire finished structure by 3.2 cm (1.6 cm on each side). The shelf width varies from 30 to 50 cm.
- Screw the wheels to the bottom.
- Make the back wall and sides. Drill grooves for future shelves. At the same time, fix the wheels so that they do not move while working on the walls.
- Attach the shelves to the structure using nails or use two timbers on either side of the structure on which to install the shelves. Now take it off, clean it from dust and put it back on.
You can make such a box with or without wheels