Types of pergolas
Do-it-yourself garden pergolas can be free-standing structures, connect two buildings, or be adjacent to a house or fence. If you choose the latter option, then it is enough to build two supports and a canopy.
Pergolas differ in purpose and design features:
- carport;
- alcove;
- with a swing;
- crate for climbing plants;
- screen - used to decorate the entrance, zoning;
- tunnel - creating a beautiful passage between buildings;
- pergola with benches to organize a recreation area;
- canopy for shading windows;
- arch to highlight the entrance area, connecting buildings.
Wooden pergolas are often made in the shape of a rectangle or square. It is easier to do such configurations yourself. Less common are round and triangular structures and complex shapes.
Projects with drawings and dimensions of wooden pergolas
An important point in making a wooden pergola with your own hands is to determine the dimensions of the structure. Standard width 1.5 m, length 2.5 m.
Comment! When drawing up a project, it is important to include other structures in it. This is done in order not to disturb the harmony of the site.
You can create a project with a drawing yourself or use ready-made options. To translate complex decisions on paper, it is better to turn to specialists.
The simplest option is a classic wooden pergola on four supports.
For a classic wooden pergola you need 4-6 support beams measuring 100×100 mm
If desired, the design can be supplemented with a wooden trellis for climbing plants on one or more sides
Another popular option is an arched pergola. Its dimensions can be adjusted depending on the characteristics of the climbing plants that will decorate the structure.
Arched pergolas are good to build at the entrance, on the lawn, to separate different zones
Pergolas with swings are also in demand. They are perfect for creating a romantic atmosphere and children of any age adore them.
The depth of the structure is made at your discretion; on the sides you can install sheathing for climbing plants
You can make a pergola-arch according to a simple drawing, increasing the depth, or make a tunnel from several segments
What can you build a pergola from?
Pergolas are made from different materials. It is important to consider not only the desired appearance and functionality of the structure, but also the expected service life. Supports are usually made of logs, beams, or several boards fastened together. You can make the sheathing from a picket fence.
Wood is sensitive to moisture, so you should choose the most rot-resistant species - oak, larch, pine. Willow is suitable for a canopy.
The service life of a structure largely depends on the hardness of the wood used. For aesthetics and increased resistance to adverse conditions, a decorative coating should be made. Stain, varnish, and paint are suitable for this. Resistance to moisture and decay will be enhanced by treatment with special antiseptics.
Wood can be combined with other materials to increase the strength of a structure or reduce construction costs. It is good to use metal pipes as supports.
Requirements for the structure being built
In order for a decorative structure not only to have an attractive appearance, but also to last for many years, it is important to build it correctly. This is only possible if all requirements are met at the stage of planning and designing a wooden canopy. A competent choice of pergola location that meets all the criteria will allow you to create a durable and beautiful structure.
List of requirements:
- high-strength raw materials - the use of dilapidated and cheap building materials that have visible damage or signs of rotting is excluded;
- wood must undergo preliminary preparation, treatment with antiseptics and other solutions that protect it from external factors;
- the erected pergola must be strong and stable.
Where is the best place to place a pergola?
There are many options for placing a wooden pergola on the site. To create the ideal place to relax, you should pay attention to the following options:
- canopy near a natural or artificial reservoir, fountain;
- construction in the barbecue area;
- location near a gazebo or terrace or an extension to them;
- placement in the middle of the garden, next to the trees.
If the area is small, then saving space is important. In this case, a wooden pergola can be built close to a fence, house or other structure. If the entrance to the building is located close to a fence or gate, then it is appropriate to connect them with a canopy.
How to make a foundation for a pergola
If you build a light wooden pergola and do not overload it with climbing plants, then a foundation is not necessary. It is enough to bury the pillars firmly in the ground. In other cases, a strip or column base is made.
Comment! You can immediately install the supports by covering them at the bottom with resin and wrapping them with roofing felt. All that remains is to pour the concrete and wait for it to harden.
Strip foundations are suitable for permanent structures. The algorithm is simple:
- Make markings.
- Dig a trench. Orient the depth according to the type of soil and topography, but do not exceed 0.4 m.
- Lay crushed stone and compact it.
- Make formwork.
- Pour concrete.
- Wait until it hardens completely.
The foundation for a wooden pergola with your own hands, as in the photo, is also suitable for a gazebo. You can build both structures by combining them into a single composition.
When pouring a strip foundation, it is better to use reinforcement that increases its strength
The columnar foundation is simple, reliable, and requires lower costs. There are 2-6 reference points depending on the type of structure. The algorithm is simple:
- Make indentations. It is more convenient to use a drill, or a shovel.
- Pour in crushed stone.
- Pour concrete.
- Install the rack mounts.
(3 methods to choose from)
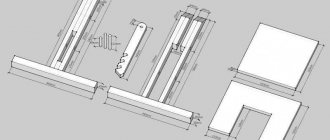
Method one (on the ground) - FORMWORK + FLOOR SUPPORT
The essence of the work:
into the concrete formwork we insert special metal
PUSH REARS (which, on one side, are U-shaped for inserting timber
- and on the other side,
curved EMBEDDINGS
for immersion into the concrete of the formwork)
We buy a form for formwork (or we make it ourselves from boards). We cut a piece from the purchased mold so that it fits into the hole like a club of 80 cm.
Use a heavy beam and trample down the bottom of the hole
so that the surface becomes flat. I’ve seen something where you can throw water into a hole and sprinkle cement... and trample this mixture...
And on this flat base we place our formwork (purchased or homemade).
We check with a level that our formwork at the top has a strictly horizontal position...
Fill with concrete mortar - mix each portion thoroughly (with a spatula or iron crowbar) so that the mass lies uniformly without voids.
We level the surface of the formwork and immediately carefully and slowly insert the lower part of our U-shaped thrust bearing into it.
Leave it like this until it hardens completely.
We wait a few days for this concrete structure to set... And then we insert and screw our beam to the thrust bearing with screws.
Here is a link to another article of mine - where I looked at other options for installing SUPPORT POSTS - “Do-it-yourself dacha gazebos (20 options)”.
I also found this kind of thrust bearing with a long point - they are immediately driven into the ground (without pouring the foundation).
This was the first way... now let's move on...
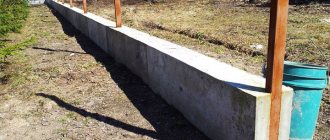
Method two (on the ground) - BEAM directly into the FORMWORK.
This method has long been used by our grandfathers and great-grandfathers... Just don’t forget to wrap the timber with a piece of roofing material - this will at least provide a little waterproofing in the foundation.
That is, we dig a hole (80-90 cm deep
) – we cover the beam-post with roofing material and insert it into the hole. Fill it with concrete and level it strictly vertically. And so on for all 4 pillars (or more if you have a large pergola). We align each post vertically (supporting it with boards) so that it remains vertical. Or you can not prop it up - but connect the pillars together with boards - so they will hold on to each other.
Method three (on a concrete or wooden porch).
Here you will also need a metal thrust bearing - we screw it into the place where the pole is installed. We insert our support beam and screw the beam with screws to the thrust bearing.
Or the bearings may have a different shape. Like this...
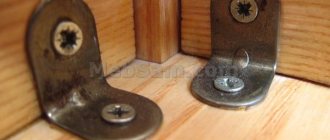
Or you can use 4 corners - screwing them on four sides of the base of the beam.
So... we installed the support pillars... now let's move on to the roof...
How to make a pergola for climbing plants from wood with your own hands
A wooden pergola for climbing plants can be built in different ways. For a simple DIY design you will need:
- four massive beams for racks;
- two boards for horizontal beams;
- boards or bars for crossbars;
- fasteners - screws, nails, staples;
- slats for the sides (optional);
- tools.
Step-by-step instructions for a do-it-yourself wooden pergola:
- Make markings.
- Install supports and secure with concrete.
- Secure the horizontal beams. For strength, fix them with staples.
- Secure the crossbars. Place the boards on edge and make grooves in them for better fixation with the beams.
If you plan to cover not only the canopy, but also the sides of the pergola with climbing plants, install ready-made trellis panels or make them yourself from slats. Instead or additionally, you can make several horizontal crossbars for hanging flower pots.
How to make a wooden pergola arch with your own hands
Making a pergola in the form of an arch with your own hands involves many options. Among the variety of shapes, it is easier to build a portal or trapezoidal structure. It is more difficult to make a classic arch in the form of a semicircle or ellipse. For this you will need:
- four beams 100×100 mm;
- two boards for the roof;
- slats for forming side trellises;
- thick cardboard or fiberboard;
- fasteners;
- jigsaw
You can build a wooden pergola in the form of a classic arch with your own hands like this:
- Install supports.
- Make a template. For a semicircular arch it will resemble a protractor.
- Cut the boards into pieces.
- Using fasteners, make two blanks (each of four parts), shaped as close as possible to a semicircle.
- Use a jigsaw to give both workpieces an even, rounded shape using a template.
- Make crossbars from slats or bars between the arches.
- Install the resulting canopy on the supports.
- Make a lathing between the supports from slats, creating a trellis for plants.
If a slight bend is enough, then the arches can be made solid by cutting out boards of sufficient width. This option is much stronger.
A wooden pergola-arch can be made from scrap materials if you use your imagination
It is much easier to build a pergola-arch in the shape of a trapezoid or portal with your own hands. In the second case, the algorithm resembles the production of a classical type structure. You can use bars to create a trapezoid.
Required tools and materials
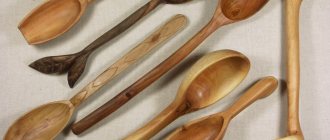
Since the pergola will be made entirely of wood, you will need a regular carpenter's tool for the job. The main things you definitely can’t do without:
- hand saw or power saw;
- plane (manual or electric);
- set of chisels;
- electric drill;
- hammer and nails;
- screwdriver and screws;
- varnish or paint and several brushes;
- tape measure, carpenter's square, level.
If the pergola is installed on piles or a foundation, you additionally need to prepare an entrenching tool (bayonet and shovel), and it is convenient to make holes in the ground for the piles using a drill.
The first material you need is lumber. For the manufacture of racks, a beam with a cross-section of at least 80 x 80 mm is suitable; for creating lintels and sheathing, a lath or thin board is suitable. Metal brackets are needed for fasteners; butt joints can be strengthened using steel angles.
When choosing lumber for a pergola, you should not buy planed boards and beams; it is much cheaper to take the material immediately after cutting; you can give the workpieces an attractive look yourself using a plane. This will take a little time, but the price gain is guaranteed.
How to make a pergola with a swing with your own hands
A wooden pergola with a swing is multifunctional - it can be built as a place to relax, or a support for climbing plants. The structure can be permanent or collapsible. In the first case, it is necessary to make a foundation or dig supports into the ground. This design is more reliable.
Comment! To make a pergola with a swing, you need high-quality materials with a sufficient cross-section. If the structure cannot withstand the load, injury may occur.
Collapsible structures mean that you can divide the entire structure into components or just disconnect the swing. In the first case, the service life is extended, since individual segments can be easily stored for storage so as not to be exposed to temperature changes or high humidity.
Algorithm for making a pergola with a swing:
- Build racks. For greater strength, each element can be made from 2-3 glued boards.
- Secure the cross beams. At the bottom, connect only the sidewalls, at the top along the entire perimeter.
- For stability, fasten the crossbars and racks with metal corners or wooden jibs.
- Place the middle beam on top. It is to this that the swing will be attached. It should be as strong as possible, like the crossbars on which it is fixed. For reliability, it is better to make a tongue-and-groove connection.
- Make a frame for a swing. The bottom and back should form an obtuse angle, otherwise it will be uncomfortable to sit.
- Cover the frame with planks. You can place them close together or at a distance.
- Secure the swing.
For climbing plants, you should make a crate of wooden slats on the sides. It will give the structure additional strength.
The swing can be attached to the pergola in different ways. Most often they use ropes, chains, and metal pipes. The latter option implies the need for welding.
The swing must be safe. Contact areas must be sanded, if desired, painted, varnished or stained. You can sew a cover or pillows.
Comment! If the seat is designed for two or more people, then it and the back must be additionally reinforced with crossbars.
You can make a pergola with a swing with your own hands for comfortable relaxation and even sleep
What are there
In ancient times, pergolas were not only found in vineyards. Similar structures, only on a larger scale, were made in courtyards to protect from the scorching sun. The hottest midday hours were spent under them. They were more like canopies, one part of which rested on the wall. Their design remains the same, the materials have changed: now a pergola can be not only wooden, but also metal, concrete and even plastic.
In addition to being a useful structure - supporting vines and creating shade - it is also beautiful. The architects appreciated this. Gradually, pergolas migrated to the gardens of the nobility. Only there they had a more refined shape, expensive materials were used, including marble columns, and beams were made in elaborate shapes. Not only and not so much grapes were climbing over them, but also ornamental plants, roses, bindweeds and vines.
This is also a pergola, but the appearance and design are completely different, although the construction principle is the same
They also make it in the form of a gallery, blocking it from the sun all the way from one building to another. These arcades serve as a support for perennial vines and climbing roses. Where they cannot survive due to the harsh climate, annual bindweeds can be used; they are no less decorative; the flowering period can be selected so that flowering continues throughout the warm season.
An entire gallery of arches can cover the path from one building to another or to a recreation area
In the modern sense, it is more like a canopy or an open summer gazebo, which instead of a roof has a network of beams along which plants climb. Concrete pergolas require careful calculation
And this too. This is more like a summer gazebo for a pleasant pastime
Non-standard design. However, this is also a type of pergola
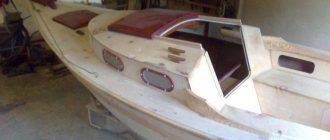
So, with the help of a pergola, you can decorate the entrance to the house - this is a canopy that looks good even without plants, and when they grow it will be even more comfortable
A modified pergola is also an arch on which flowers or grapes rest. If we say “arch,” then most often we mean a metal product with a rounded upper part.
An arch for grapes is also a pergola, only with a modified shape of the upper part
An arch under a climbing rose is the same pergola. But the mass of a rose is less than that of a grapevine and wooden structures are also made for it
Hang flowerpots with hanging plants on top - and the arch will become even more elegant
Powerful columns entwined with vines - a protected garden
Blooming honeysuckle on a pergola arch
How to make a pergola with lathing yourself
You can build a pergola with a lattice out of wood with your own hands in different ways. Often a trellis is made separately on a frame, then attached to the main structure. It can be a classic pergola, arched, with a swing or a bench. Sizes don't matter.
Another option is to incorporate wood sheathing during the construction of the pergola. The sides of the trellis can be secured between boards or beams, which will also serve as supports.
Less often, the lathing is made not as part of the pergola, but as a continuation of its wall. This trellis plays the role of a fence or partition for zoning.
Making a wooden sheathing is easy:
- Build a frame of four slats in the form of a rectangle or square. Use screws to secure the ends.
- Attach slats diagonally at equal intervals.
- Turn the frame over.
- Fasten the slats diagonally, laying them perpendicular to the already fixed slats.
Using this algorithm, a wooden sheathing with diagonal cells is made. The slats can be fixed strictly horizontally or vertically. The cells in this case will be square or rectangular.
You can make various lathing from wood with your own hands. A combination of slats of different thicknesses and even colors will look original. The frame can be filled not symmetrically, but chaotically, in the form of a classic or inverted trapezoid or triangle.
The lathing is made as the back wall of the pergola, its sides, or arranged on three sides
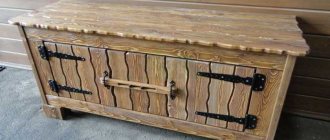
How to build a wooden pergola with a bench in your country house with your own hands
With your own hands, you can build a pergola from wood with 1-3 benches, on two, four or six supports, classic or corner. Manufacturing algorithm:
- Install four racks.
- Connect the racks at the top with boards or timber.
- Make a sheathing or other desired canopy.
- On the sides, horizontally attach a block to the posts - supports for the future bench. The height should be oriented towards convenience for primary users.
- Make a rectangular frame for the seat from 40x40 mm timber.
- Secure 1-2 cross boards to strengthen the frame.
- Upholster the seat with boards. You can place them lengthwise or crosswise.
- Install the seat and secure it.
- Attach two beams horizontally to the rear posts of the pergola - the basis for the back of the bench.
- Cover the base with boards.
Comment! Boards on the seat and back can be attached closely or at a distance. Be sure to sand all contact surfaces and decorate if desired.
The sides and (or) back of the pergola can be supplemented with lathing
How to make a corner pergola yourself
Pergolas of this type are conveniently placed in the corner of the site and used for zoning. You can build a structure on seven supports with trellises for climbing plants with your own hands using the following algorithm:
- Make four rectangular frames with sheathing.
- Secure two frames between the beams, which will be the supports of the pergola.
- Attach two more frames to one beam, creating a right angle. The free sides should also be secured with supports.
- Connect the supports at the top with boards.
- Make a canopy from boards, lattice or other means.
A canopy can be built by connecting the outer supports to form a rectangle. This option will provide better shading.
A corner pergola can be supplemented with 1-2 benches. If you put a table in front of them, you will get an excellent area for relaxing and eating.
The foundation is optional, the pergola can be installed on a platform made of wood or concrete, a base lined with tiles or paving stones
What is a pergola
The pergola performs two functions at once. First of all, it is a support, an arch that supports climbing plants. It allows flowering vines to grow normally, makes them easier to care for, and in the case of fruit-bearing plants, like grapes, makes harvesting easier.
Among other things, the pergola has a three-dimensional structure, the space under the living canopy can be used for relaxation; by and large, it is a ready-made gazebo, only its roof is assembled from plant leaves. Thanks to this feature, the pergola provides pleasant coolness, and its striking decoration is the amazing changing pattern from the shadow of swaying leaves.