The ax is actually a very important tool. Of course, if you are a real carpenter, you should definitely know how to make an ax that is perfect for certain tasks. Professional carpenters usually use several axes at once. However, this type of tool is also necessary for people living outside the city, or simply for city residents who occasionally go to their summer cottages. After all, the bathhouse needs to be heated with wood, and you can chop it only with an axe. And so that no misunderstandings arise in the process, and the tool does not let you down, you should know all the subtleties of how to make an ax with your own hands, as well as how to prepare it for work. The ax itself can be completely different in shape. But the ax must be properly mounted, wedged, and sharpened at a certain angle.
Classification of axes
Axes come in the following types:
- Carpentry. Light, small axes must have a sharp blade. Designed for trimming and precision woodworking.
- Carpentry universal. Axes of different weights. They don't have a big handle. They are used for imprecise wood processing.
- Lumberjack's axe. Used for cutting wood, it has a wide blade and a long handle.
- Ice ax Used in mountaineering. It consists of a spike, a head, a blade and a handle sharpened at the base. Outwardly it looks like a pickaxe.
- Cleaver. A cone-shaped ax with a lot of weight. The shape and weight help to split hard wood.
- Kuznechny. This ax can be used to chop off metal materials. They apply the ax to the place where they need to chop off and hit the butt with a hammer.
- Potes. It is used to trim wood. For efficient operation, the ax has a rounded blade.
- Povarskaya. An ax with a short handle and a heavy, sharp cutting surface.
- Paznik. Used for cutting grooves using an edge on the blade. The cutting part is perpendicular to the ax handle.
- Firefighter. An ax with a metal handle that is insulated to withstand a voltage of 1000W. Its peculiarity is that there is a spike on the butt, which is used to cut a passage through the rubble.
- Assault firefighter. A massive ax with a long handle. In case of fire, it is used to break down heavy structures.
- Tourist. A small ax with a short shaft. It happens in combination with a knife or saw. For safety, it comes with a cover.
- Tsalda. The ax blade, shaped like a sickle, is used to clear small bushes from the area.
Handle with your own hands
It is not always possible to use a factory-made ax handle. In this case, you can make an ax handle with your own hands according to the drawings. In this case, you need to start by choosing the type of wood. Birch is considered the best option for such a tool, but maple or ash can be used.
When making a handle, you need to immediately adjust it to the dimensions of the butt of the existing blade. The main criterion should be the ease of working with the future tool. Therefore, special attention should be focused on compliance with the dimensions indicated in the drawings.
On a block of suitable dimensions that does not have knots or cracks, a sketch of the handle is made. Then the excess parts are sawed off and cut off with a knife. The place for planting under the butt must be trimmed and the entire product sanded to perfect condition.
Originally posted 2018-03-28 15:13:22.
Self-production
The order of work is as follows:
- Ax material. The length of the ax and its shape affect performance. For convenience, the ax handle is made in a curved shape; the cross-section should be oval. For reliability, its rear part is made wider and slightly inclined. The wood for the handle must be chosen to withstand vibrations.
Recommended tree species for ax handles:
- birch;
oak;
- maple;
- ash.
- Making a template. The required design must be applied to the cardboard and transferred to the workpiece. This will help to produce a more accurate part of the required size.
- Blank for an ax handle. We use a block of dried material. The cutting is carried out exclusively along the direction of the fibers. The workpiece must be longer than the planned dimensions. The part into which the eyelet is inserted is made slightly wider than the eyelet itself. A drawing is attached to both sides of the workpiece. All contours are redrawn onto the wood, and an allowance should be left on both sides.
The indentation in the tail section is needed to prevent the handle from breaking off during insertion. After completing the collection of the instrument, the excess is trimmed off.
Wood is harvested in the fall.
The selected breed must be dried in a dry and shaded place. You need to store it for one year, but five is better. Important to know: fresh wood is not recommended to be used. It will dry out over time and hang loosely in the eyelet. Such an ax cannot be used.
Drawing of an ax
The importance of the handle
You can choose the optimal length of the ax based on the height of the master and the force of the blow. Strength, in turn, directly depends on the length, so when working with a large ax, it will be easier to chop logs of firewood.
Before making a choice, you should decide on the desired result:
- heavy version of the tool (total weight 1 kg - 1.4 kg, handle length from 55 to 65 cm);
- lightweight version (weight 0.8 kg-1 kg, with a length from 40 to 60 cm).
The quality of the wood from which the ax handle will be made is of great importance. Not every type of wood is suitable for manufacturing. Often, birch is used for these purposes (parts located near the roots or stem growths).
There are also handles made of oak, acacia, maple and other hardwoods. All selected workpieces require long-term drying.
After the wooden blank has dried well, the contours of the handle are drawn on it, according to a pre-made template. To avoid hand slipping during operation and to increase the convenience of the ax, it is necessary to provide a thickening at the end of the handle.
A knife, chisel, or electric jigsaw will help you cut out the outline.
After trying on the ax head and not finding any signs of a loose fit of the parts, you can safely continue improving the ax handle. Glass will help you scrape the tool, and sandpaper will be useful for grinding.
Work on cutting out an ax handle
Before starting work, it is necessary to make transverse cuts at the top and bottom of the beam. The depth of the cuts should not reach the line of the ax by 2-3 mm. Use a chisel to remove the excess layer of wood. Use a rasp to cut out places where corners and transitions are needed. Finally, the ax handle is sanded using sandpaper.
Finished ax handle
Experts recommend: impregnate the wood used to make the ax handle with waterproof agents.
Drying oil or linseed oil are suitable for this purpose. It is recommended to impregnate in several layers.
Choosing the piercing part
You can’t make a metal sheet at home, so you need to know what to look for when choosing it in a construction market:
- ideally, steel should be marked according to GOST;
- the eye should have the shape of a cone;
- the blade should not have dents, bends or nicks;
- If you look at the butt, its ends should be perpendicular to the blade.
You may also be interested in the article on how to make a hand cultivator. Troubleshooting guide for the Shtil 180 chainsaw - the content of our next article.
And in this article you can learn how to make a potato digger with your own hands.
Blade sharpening
GOST establishes that the sharpening angle of an ax can vary from 20° to 30°, and of a tool for carpentry - up to 35°. If you violate this requirement, the blade will get stuck in the wood, and additional effort will be required to pull it out. Such a tool may simply break if it gets on a knot. The sharpening angle of 35° ensures the separation of wood chips and prevents them from getting stuck in the wood.
Initially, a rough sharpening of the cutting edge is done with a sharpening wheel. During the processing process, it is necessary to remove all defects from the metal surface - chips, potholes. At the same time, the cutting edge is formed.
Finishing the blade - grinding with a fine-grained stone along the entire length of the cutting edge. It will remove all burrs.
The absence of the smallest defects and a perfectly even shine of the cutting edge indicates the correct processing.
Placing an ax on an ax handle
This can be done by performing these simple operations:
- Transverse and longitudinal cuts are made on the ax handle in the upper part.
- Cut 5 wedges from hardwood.
- Gauze soaked in resin is wound over the ax handle to fit more tightly into the eyelet.
- Hammer the ax handle into the eye of the ax.
- Drive wedges into the cuts.
- After drying, the protruding parts of the wedges are cut off.
I always wanted a normal axe, but historically I used cheap axes, the last of which was “vacha labor”, the quality of which left much to be desired. I especially liked the shape of the Husqvarna axes.
But sometimes there was no extra money, sometimes it appeared and was spent on knives and other cravings. So I toiled. Many times, after reading articles by handy guys, a crazy thought arose to make an ax myself from some old one, but there were no such people in mind. And there were doubts about the straightness of my hands.
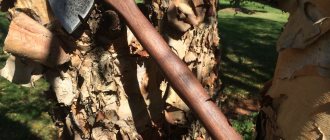
One day, by the will of fate, I came across an old rusty ax (without an ax handle), which for many years lived out its life stuck in a window frame on the street side of relatives. The piece of iron rang loudly and in general, I felt a kinship with it or something. Despite the fact that I had no such experience, I decided that I should try and give it a second life. I asked permission to take it and started work on the same day. 1. Removing rust . First of all, I started by removing the rust. I cleaned off the top layer using a drill with a wire brush attachment. Then I treated it with gel like this AND a manual metal brush
It took several passes to remove the rust from the rather deep cavities.
Because I didn’t have a grinder on hand to cut the blade, so the next step was to use the axe.
2. Processing of the ax handle.
I decided not to reinvent the wheel and bought a birch ax handle at a hardware store. It cost 150 rubles. You need to choose carefully so that there are no cracks, as well as the size of the eye (the upper part of the ax handle should fit the hole in the ax as much as possible).
Then I started processing. Everything is simple here, manually using fine sandpaper until it is smooth and comfortable to grip. I had a water-based stain, like mahogany. It costs a penny, about 70 rubles.
I applied it in 2 layers and it turned out to be a very interesting color.
Next, I started waterproofing. I had regular edible linseed oil in stock, so I decided to soak the ax handle with it. I applied it in 5 layers. The oil absorbs very well into the wood. There was a characteristic smell for some time, but it disappeared quite quickly.
When impregnating the ax handle, it is important to pay careful attention to the upper part of the ax handle, which will be inserted into the eye and the cut under the wedge. 3. Giving the required geometry to the blade.
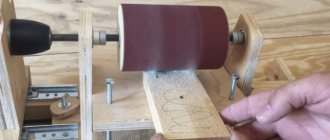
I didn’t have a photo of the ax before work, so I took it from the net, with a similar geometry. To cut the blade, I needed a grinder. I marked the silhouette with a marker and began to cut off the upper part. I had to stop every 3 minutes and cool the metal. It should not be overheated. I ground the lower part on a grindstone.
I decided to wedge the ax handle with a metal wedge. I couldn’t find a suitable one in the store, so I cut it out of a triangle that I had left over from the top of the blade. A wide piece for the middle and a smaller one for the back of the eye. 4. Landing the ax on the ax handle .
For tight fixation I used epoxy resin and wedges cut from the remains of an ax. We dilute the epoxy, wrap the ax handle with gauze or a bandage and soak it in resin, then plant the ax. You need to make sure that the gauze does not slide down when attaching it. Lubricate the cut well with epoxy and drive the wedge in. Because in the back part there was a space left in the eye, so I started driving a smaller wedge into it. It was very tight, so I had to hammer it in with quite a lot of force, but it wedged tightly.
At the bottom of the central wedge this gauze came out, then I cut it off.
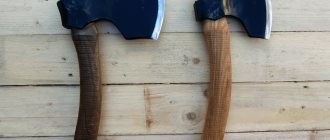
Next, I polished the ax and started sharpening. First, use a rough sandpaper on a sharpener, then use sandpaper with a small grit until it is well sharp. The result is this compact ax.
Several months passed before we managed to escape to the forest for a test. Looking ahead, I will say that I was very, very pleased with the result. It also warms my soul that it came out of my own hands.
I started the test with branches as thick as my hand, here everything fell apart in one blow. Then I decided to chop a thicker tree, the trunk was probably about 30-35 cm. I cut it quite quickly, the ax bites into the tree like an animal. The sharpening also remained in its original form. I don’t know what kind of ax this is, the mark is practically unreadable, only the year 1968 or 1960 is visible, but it is steel and hardened by fire. For example, the previous ax “Trud Vacha”, during a similar test, chipped on the blade (maybe from a knot) in the first use, apparently it was overheated.
Below are a few photos. Why am I doing all this? Moreover, with a minimum of tools and money, you can make yourself an excellent ax. There is nothing complicated either, the main thing is to read the information before you start making it.
Good luck to everyone who is going to make it, everything will work out!