When working with wood products, there comes a time when you need to make the surface perfectly smooth and remove some defects. For this, special grinding machines are used. For non-professional use, you can make a grinding machine yourself. A tool for a tree of this type can have diverse designs that can be formed independently. Moreover, each design involves working with certain types (length, density, shape) of wooden parts.
Do-it-yourself grinding grinder: drawings with dimensions of components and assembly algorithm
A grinder is a grinding machine that has an electric drive and an abrasive coated belt. This machine is used for finishing metal, wood, and polymer surfaces. The main thing you need to pay attention to when assembling a grinding grinder with your own hands is the choice of suitable materials.
The grinder allows you to grind products made of wood, plastic, metal, as well as process any surface.
Making a drum machine for sanding boards
To make a drum machine, a frame is assembled. You will need hardwood timber. An electric motor with a pulley is attached to the bottom of the frame. A drum with bearings will come from a used conveyor. The sandpaper is cut into strips and wound tightly end-to-end on the work roller. Along the edges of the drum, the paper is secured with clamps.
The work roller is attached to the frame from above. The machine table top will be located under it. A pulley is mounted on the drum shaft and a belt drive with a motor is created. The tabletop is made adjustable with screws so that you can sand boards of different thicknesses. To avoid vibrations of the machine, it is advisable to fix the legs of the bed to the floor.
If you try and make an effort, then any unit considered will work no worse than a factory-made grinding machine.
Do-it-yourself belt sanding machine: operating principle
A distinctive feature of this device is that it has a simple design that anyone can replicate at home. This grinding unit includes an electric motor, rollers and the working tool itself – a belt with an abrasive coating. The strip may have different grain sizes. This indicator is selected in accordance with the purpose of the instrument.
The grinder, unlike the usual stationary machine, is a more versatile tool.
When assembling a grinder with your own hands at home, you should prepare and study the principle of its operation. When the unit is turned on, the engine starts. It has a shaft that connects to the main (drive) roller. The roller begins to rotate around its axis, acting through the abrasive belt on the secondary (driven) rollers.
Sanding is quite simple when the device is turned on. To do this, you need to attach the workpiece to a moving abrasive belt. During work, you need to focus on the position of the working strip.
A self-made grinding machine will allow you to process workpieces made of different materials. Such a unit has the ability to eliminate defects on the surface of metal, wood, and glass. Using grinders, rollers are often adjusted, which makes it possible to process defects of different depths.
It is worth remembering that with prolonged use, the sanding strip wears out, which leads to its stretching. In such units this problem is solved very simply. One of the device's rollers contains a special mechanism that allows you to tension the tape. Most often, such a device is installed on a roller located between the main and secondary roller of the device.
A grinder can easily remove rust from the surface and sharpen a knife.
Safety precautions when working on a sanding grinder
Like any other work on any other machines, grinding on a homemade belt sanding machine is subject to fairly strict safety rules that must be strictly adhered to.
The principle of operation of the grinder.
These rules are as follows:
- It is strictly forbidden to touch anything that moves with your hands while the machine and working surface are operating.
- Wear safety glasses while working to protect against hot abrasive particles.
- Carefully check that the connections and fastenings of all moving parts of the grinder are tight.
- Monitor the condition of the braiding of electrical wires.
- A protective casing is a must, even though it slightly narrows the viewing angle.
Grinder design features
It is recommended to take into account all the design nuances of factory devices. This will allow us to produce the most efficient tabletop grinding machine. The standard equipment of this type of device includes a support table. In addition to its main purpose, this surface performs another auxiliary function: it is used to fix the workpiece being processed.
In factory devices, such a table can be rotated about one axis. The rotation angle is usually 90°. This makes it possible to grind two planes of the workpiece (located perpendicularly) without changing the position of the part fixed on the rotating surface. When assembling a simple grinder with your own hands, you can make a static table. This will greatly simplify assembly, but the finished unit will have less functionality.
There are other, equally important parts that are included in the design of such machines. Let's consider what other structural elements any grinder used for grinding workpieces made of different materials must have:
- skating rinks;
- base;
The main task in making a grinder is to find a powerful motor that will need to be equipped with a drive.
- ribbon;
- tension mechanism;
- protective wall.
All these parts are quite easy to make with your own hands. The belt sander may produce dust or sparks during operation. This depends on the material of the part processed on such a machine. Because of this, experienced professionals strongly recommend using special glasses. In addition, it is recommended to organize a protective wall, for the manufacture of which acrylic glass is used.
Portable units are equipped with a housing made of steel. The grinder stand must have holes that are necessary to fix the machine on a wooden surface (using bolts). When choosing a tape, it is worth considering that its length depends on the power of the unit (and vice versa). The higher this indicator, the correspondingly more powerful the drive should be.
How to make a grinder with your own hands: assembly rules
Before you start independently constructing a grinding unit of this type, you must carefully study the sequence of actions and also take into account some rules. The first and most important step is preparing to assemble the grinder. Let's consider what actions this item includes.
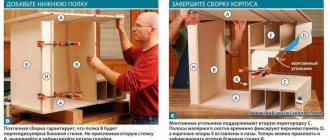
A drawing with the dimensions of the grinder is an important document on which the performance and technical characteristics of the unit will depend.
The first step is to draw up a suitable drawing. It should be remembered that the circuit must correspond to specific operating conditions. You can draw up the drawing yourself. The second option is to download the finished circuit from the Internet. On specialized websites and forums you can find many modifications of such devices, the design of which is most suitable for home assembly.
The more detailed the drawing, the better. The diagram must contain a detailed description of all individual structural elements with their dimensions. A drawing with dimensions is a very important document on which the performance and technical characteristics of the future machine will depend. Therefore, it is worth approaching its preparation with all seriousness.
You can make different versions of grinding grinders yourself. In addition to stationary devices, there are also simpler types (for example, a do-it-yourself grinder made from an angle grinder). A drawing and video for assembling such a device can also be easily found on the World Wide Web.
The next point worth considering is preparing all the necessary parts and tools for assembling the unit.
To construct a grinder at home, you will need the following equipment:
- jigsaw;
In order to make a grinder, you need to understand the principle of operation of the machine.
- drill;
- Bulgarian.
On a note! When selecting tools, it is necessary to take into account that the design of the grinder involves the use of metal parts, as well as their processing.
Many parts of this grinding equipment are difficult to make for a beginner. Therefore, it is recommended to study in detail the various structural elements and their features. It also wouldn’t hurt to look at the drawings and videos. Making a grinder with your own hands is much easier if you have the opportunity to consult with a qualified craftsman who can give valuable recommendations on this issue.
Some structural elements cannot be created with your own hands without the use of turning equipment. You don't have to do this kind of work yourself. To perform complex parts, you can use the services of a professional turner.
When making a grinder with your own hands, it is advisable to take into account one more important point. The most effective are devices that can be used to process not only horizontal, but also vertical surfaces. Experts recommend choosing a drawing that allows you to grind workpieces at different angles.
You can make different versions of grinding grinders with your own hands.
Do-it-yourself grinding grinder: drawings with dimensions of structural elements
The development of an appropriate scheme is the most important preparatory stage. The drawing can be ordered from a qualified craftsman. In this case, it will be as accurate as possible and will allow us to produce equipment that will last for many years.
How to make a grinder with your own hands? Drawings, videos, as well as photos of grinders at various stages of assembly - all this makes it possible to independently produce a high-quality unit.
The second option is to download the diagram from the World Wide Web. In this case, it is worth knowing that some drawings located on the Internet are not effective. Therefore, before downloading this or that diagram, it is recommended to read the reviews of real people who have already used it to assemble belt grinding equipment.
It is also recommended to compare the diagram drawn up yourself with other drawings with the dimensions of the grinder yourself. Videos with relevant topics allow you to quickly understand all the nuances of manufacturing such a unit. There are a huge number of them on the Internet.
In order for the machine to serve for a long time, you need to order a drawing of the grinder from a qualified craftsman.
The diagram must be accurate and contain sketches of all structural elements of the structure. The dimensions of individual parts must be indicated. And finally, you can post the finished diagram on a specialized forum and ask what inaccuracies it contains. It is possible that in this case it will be possible to obtain valuable advice on its improvement.
Do-it-yourself homemade grinder grinder: choosing a suitable drive
Before you begin assembling such a grinding unit, you need to prepare a suitable motor. Most often, a drive with a power of at least 1 kW is used for these purposes. There are several factors to consider when choosing an engine. Let's look at them in more detail.
First of all, you need to understand that devices that operate on a standard network are suitable for use at home. The voltage in such a network is traditionally 220 V. Higher voltage is necessary for the use of professional equipment, which is found in small enterprises, but not for a home-made device. The grinder grinder must be created in accordance with a pre-prepared drawing.
Another important point is the number of drive revolutions. The accuracy of workpiece processing depends on this parameter. A certain pattern can be traced here. The higher the engine power, the more revolutions it can produce.
For a grinder, a drive with a power of at least 1 kW is most often used.
The most suitable drive option includes special blades in its design. Their function is to neutralize overheating that occurs during engine operation. It is easy to make such a device yourself in a home workshop.
Most often, a simple motor from a washing machine is used to assemble such grinding equipment. A do-it-yourself grinder of this type fully meets all operational requirements and is used for processing small workpieces made of metal, wood, and plastic.
Types of grinding machines
Wood sanding machines are divided into the following types:
- design features;
- the nature of the tasks being solved;
- processing accuracy;
- permissible geometric dimensions of processed parts;
- power of installed engines;
- manufacturer ratings;
- cost with a set of attached equipment.
Modern manufacturers present three types of design of such machines: disk, belt, cylinder. Each of these species has its own highly specific subspecies. For example, belt sanding machines are available in the following versions:
- narrow-belt (allow grinding of wooden structures with complex geometric shapes);
- units equipped with a fixed table (capable of processing only wooden workpieces with flat rectangular surfaces);
- machines equipped with a freely moving table (they are used for grinding large-sized wooden structures - doors, panels, door slopes).
Belt Sanding Machine
The nature of the tasks to be solved determines the classes of this equipment. The main classes (sometimes called models) are:
- belt grinding machines;
- vibrating tools such as delta grinders;
- disc-type grinding machines (orbital and eccentric);
- specialized angle grinders;
- combined type grinding systems.
Despite such a variety of ready-made factory tools, home craftsmen prefer to develop and assemble a wood grinding machine with their own hands to carry out simple grinding operations.
Features of making a grinder from a washing machine with your own hands
The engine power is selected depending on the size of other structural elements. First of all, this concerns the dimensions of the main (drive) pulley. If the size of this element is the standard 150 mm, then you need an engine with power that can produce up to 3000 rpm.
Of course, you can purchase a ready-made engine, but this will cost extra money. The best option for assembly at home is to use an unnecessary motor from a washing machine. The grinder, which is based on such a device, is certainly not able to compare with the factory one, but it is quite suitable for simple everyday work.
To make a grinder, you can use a regular commutator motor from an old washing machine.
The motor, removed from an old automatic washing machine, has low power (below 300 W). It is distinguished by good reliability and is unpretentious in operation. The popularity of using just such a drive is due to its wide distribution.
The drive from the washing machine must be included in the preliminary drawing. A do-it-yourself grinder at home requires a motor with an output shaft. In this case, the shaft has a threaded connection, the design of which allows it to be connected to the pulley without much difficulty.
On a note! For assembling grinding units, engines not only from old automatic machines are suitable, but also new generation drives. When using devices of the second type, you must remember that they need a device that will regulate the speed. This is due to the fact that the maximum rotation speed of such drives can reach up to 18 thousand rpm.
New generation drives have one significant drawback. With the active use of grinding equipment, quite rapid wear of the motor brushes occurs.
The grinder, which is based on a motor from a washing machine, cannot compare with the factory unit.
When constructing a grinder with your own hands from a washing machine engine, you must also take into account that such a drive is best suited for a small unit. Therefore, it is worth choosing in advance the optimal dimensions of the leading and secondary rollers.
Design - initial stage
Different models of sanding devices allow you to process all kinds of wooden materials.
Wood disc sander
Before you start making a homemade wood sanding machine, it is important to decide for what purposes it will be needed.
The technical parameters of the tool will depend on this:
- The performance of the device is affected by its power. For home use, 400 W will be enough. High performance is ensured by machines with power up to 1 kW.
- The quality of grinding is affected by the rotation speed of the working tool. The maximum value is 3 thousand revolutions per minute.
- Depending on the type of surface being processed, the working area is calculated. The width of the machine drums depends on it.
- The dimensions of the machine are an important indicator of where the equipment will be used: in workshops or in a small home workshop.
Simple homemade grinding machine
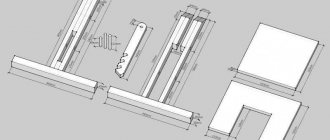
Making grinder rollers with your own hands: drawings
Designing rollers for a grinding unit of this type is a serious step that requires care and precision. One of the most important elements of a grinder is the main skating rink. It must be remembered that its dimensions must be larger than the dimensions of the remaining rollers.
It is no coincidence that the leading roller has similar geometric parameters. Such dimensions allow you to avoid unwanted jerk that occurs during the starting moment. It is also important to understand that for the manufacture of this structural element, in no case should you use materials that have a large mass. Such materials include:
- steel;
- cast iron.
Before you start creating the rollers, you need to prepare the appropriate drawings with dimensions. A do-it-yourself belt grinder should have light and convenient rollers of small dimensions. As a rule, this is quite enough to carry out simple sanding work.
When assembling the grinder yourself, it is important to place the rollers perpendicular to each other to avoid belt distortions.
To reduce the weight of the drive roller, a steel part with a cavity can be designed. There are special reference books that allow you to carry out the calculations necessary for this procedure.
The second option, which is most often used by home craftsmen, is the use of duralumin. This material is lightweight and ideal for this purpose. It contains impurities of copper and magnesium, which provide increased strength to the alloy. To assemble the grinder, it is customary to use duralumin grade D16 and higher.
How to make grinder rollers with your own hands? Experts recommend making a groove on the pulley located at the end. Its dimensions are selected taking into account the size of the abrasive belt that will be used in the machine. This measure is aimed at preventing the tape from falling off during equipment operation. It is advisable to do the same manipulation with the remaining rollers.
The degree of roughness of the rollers is very important. The surface of the rollers may have different levels of roughness. When assembling a grinder, it is recommended to use rollers in which this indicator ranges from 1.25 to 2.5. A table containing information on the degree of roughness of parts can be easily found on the Internet. The pulley for the grinder is mounted on the equipment with your own hands using bearing units.
Duralumin is often used to make grinder rollers.
In this case, closed type bearings are used, which have a static outer ring and are classified as self-aligning. Installing such elements eliminates the possibility of abrasive or any other foreign particles getting onto the roller shaft.
When choosing bearings, it is necessary to take into account their load-bearing parameters. These indicators determine how much load the part can withstand. The higher the unit speed, the more reliable the bearings should be. During work, it is not recommended to deviate from the dimensional drawings. A belt grinder made in accordance with the scheme will be characterized by higher efficiency, as well as a long service life.
How to fix the video in the device? The easiest way to secure the roller at home is to use standard cotter pins. Another fastening option is to use a collar (at one end of the axle).
Characteristics that a sanding machine belt must meet
Selecting an abrasive strip is an important step when assembling a mini-grinder with your own hands. First of all, you need to decide on the length of the tape and its width. The geometric parameters of the strip are influenced by two main factors:
- grinder dimensions;
- purpose of the unit.
The fabric base better withstands surface tension.
Endless abrasive strips are also classified into grit types. The length of the sanding strips can be different (from 610 to 1830 mm). Such tapes have a width of 50 or 100 mm. The first option is most often found in units assembled by hand at home.
A high-quality abrasive strip must have an elastic fabric base. When choosing the right tool, you also need to pay attention to how many revolutions the strip can withstand. It is recommended to purchase products that can operate at 1500 rpm. This option is best suited for making a belt grinder with your own hands. The drawing drawn up earlier must contain information about the dimensions of the abrasive strip and its other characteristics.
A good tape must have high abrasive resistance. The wear resistance of the tape depends on this indicator. For homemade machines, it is recommended to use belts whose length is no more than 123 cm. The abrasive strip must not only be resistant to wear, but also have good resistance to high temperatures generated during friction against the workpiece during operation.
It is worth noting that short length tapes are much more susceptible to wear than longer length products. Experts advise paying attention to pictures depicting finished products. Photos of the machines allow us to answer the question of how to make a grinder with your own hands. The design of the device can be significantly simplified if ready-made elements purchased separately are used in its assembly.
The speed and quality of product processing depends on the choice of tape.
And finally, special attention must be paid to the place where the abrasive tape is glued. The junction of the two ends of the strip should be as neat as possible, without any defects or protrusions.
How to make a belt sander
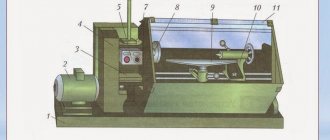
The basis of the machine is a powerful frame that can withstand the weight of all equipment and perform the function of damping the resulting vibration. The frame of the bed is best fastened by welding. A plate is attached to the top. Chipboard with a thickness of at least 22 mm is chosen as such a plate.
An electric motor is mounted on the frame. The engine power must be no lower than the calculated one. The number of revolutions must be at least 1500 rpm. A gearbox is attached to the anchor to transmit rotation to the drive drum. The required diameter directly depends on the engine speed. It determines the speed of the belt at the moment of friction against the surface of the part.
The following relationships can be given as an example. When the belt speed is 20 m/sec, the diameter should be 20 cm. To prevent the slipping effect, rubber covers are placed on the drums. It is more expedient to make the platform for installing the drums at a slight slope. This will create smooth contact of the tape with the surface being treated while moving.
If you plan to process parts made of different types of wood, it is advisable to provide the possibility of changing the rotation speed of the drum. The above technique shows that it is quite easy to assemble a grinding machine with your own hands.
What to make the bed out of
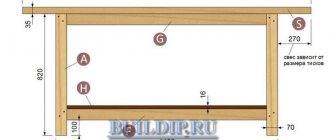
The frame to which all other elements of the machine are attached is a powerful bed. It must have a large margin of safety and have good weight and size characteristics. It is made from sheet steel more than 5 mm thick.
The most acceptable dimensions of a homemade frame are considered to be the following dimensions: 500x180x20 millimeters. For a bed of this size, the optimal dimensions of the working platform are 180x160x10 millimeters.
For the convenience of further work, it is necessary to mark the work site. Three holes are made for its fastening. Then it is secured to the frame with three bolts.
Selecting and installing a motor for the machine
Calculations and operating experience of this type of units show that the engine must have a power of at least 2.5 kW. The shaft rotation speed must be 1500 rpm or more. The speed of movement of the abrasive belt largely depends on the engine rotation speed. This seriously affects the quality of processing. In turn, the speed of the belt affects the diameter of the drums.
Motor for grinding machine
As a finished device, you can use the motor that is installed on washing machines. You can also select an engine from other household units, for example, a powerful pump or other device suitable in terms of power and speed.
Master and slave drums
The drive drum is firmly fixed to the electric motor pulley. The driven drum is fixed on a separate axis. To ensure its free rotation, bearings are attached between the shaft and the drum.
DIY sanding belt
Abrasive belts for such machines have a fabric base. Calico or a fabric of similar density is used as a base. Abrasive chips are applied to the surface of the material on one side using special glue. Depending on the grain size of this crumb, it is divided into large, medium, small and zero.
In principle, such a tape can be made independently. Select the required fabric and apply abrasive powder of the required fraction to it. By applying glue to the surface of the material and sprinkling it with this powder, you can obtain a sanding belt of the required size. However, it should be recognized that modern industry produces such a wide range of such consumables that it is better to use the factory one.
How to glue sanding grinder tape yourself
Belt grinders contain a spring, which performs a very important function: it tensions the belt that has sagged due to wear. The belt is changed several times even when processing a small workpiece. This should be remembered.
When assembling a grinder with your own hands from plywood or metal, you can make an abrasive strip yourself. Gluing such tape is a complex undertaking that does not tolerate mistakes. There is a lot of advice on the Internet on how to properly glue tape, but many of them are incorrect.
The gluing process is as follows. First you need to select a fabric-based sanding material. Then you should prepare both ends of the abrasive strip. To do this, they are cleaned. The seam on the strip is made exclusively using the butt method. Experts definitely recommend reinforcing the glued tape from the inside with a thick strip of fabric, which is fixed with a special adhesive composition.
Gluing tape is a complex process that does not tolerate mistakes.
On a note! Under no circumstances should you use Moment glue to glue the tape.
In order to connect the ends of the abrasive strip, you need to purchase a special adhesive composition. The best option is to use elastic glue. There is no point in saving money, since cheap products, as a rule, are not of good quality.
Before gluing, it is necessary to prepare a strip for sanding tape. A do-it-yourself grinder (from scrap materials) needs a reliable abrasive strip, which is difficult to do at home. The process is carried out using a glue stick, which is installed on hot-melt guns. First, the composition is heated. To do this, you can use a regular hairdryer, which is found in every home.
Selecting a feed
A machine with a tape is more versatile in terms of functionality: it does everything that disk models do, plus much more. Let us immediately note that there are a great many options for amateur models of belt sanding machines.
The fact is that the nature of this machine is very flexible, allowing you to use a variety of available materials, including finds in scrap metal dumps.
The main thing is to know and adhere to three rules:
- The abrasive side of the belt must be adjusted very precisely so that only the workpiece that is being sanded touches it.
- The tape must be evenly tensioned at any time and regardless of the type of work.
- The speed of movement of the machine should be different and should depend only on one thing: the type of part and the nature of the grinding.
Homemade grinder: drawings with turntable dimensions and assembly tips
At home, you can design both a simple version of the machine and a more functional device. In order to expand the operational capabilities of the unit and ensure ease of operation, a rotary-type support table is manufactured. This surface is installed on the side of the largest pulley.
The drawing of the machine is prepared in accordance with its design features.
The advantages of using a rotary table are obvious. First of all, this will allow you to fix the part in a certain position, which will simplify its processing. When assembling a rotary grinder with your own hands, it is worth considering the possibility of changing the direction of the abrasive strip. The emery must necessarily move in the direction where the working surface was turned.
The table must be equipped with a movable locking element - a bracket. This part must implement the function of rotation relative to a horizontal axis at fixed angles.
Most often, for simple machines created at home, a table made of duralumin is used. A wooden option is also available. The drawing of the machine is prepared in accordance with its design features. The thickness of the surface for the manufacture of which duralumin is used must be at least 15 mm. This is very important as a thinner table may not be able to withstand workloads.
The function of the pressure plane in this case is performed by the frame of the unit. To do this, it is necessary to prepare the frame. It is enough to simply grind one of the surfaces of the frame - the one located near the object stage.
For the manufacture of simple machines created at home, a table made of duralumin is used.
Do-it-yourself grinding grinder at home from a drill: assembly features
Such a grinding device can be made in a simpler way. Of course, assembling a stationary unit, which is designed to be installed on a table, is the best option, allowing you to grind various parts on an ongoing basis. There are other, less complicated options for creating a do-it-yourself grinding device.
If you wish, you can make your own grinder from a grinder or drill. The drill is an electric tool, so you must follow safety rules when working with such a device.
The need to process metal and wooden workpieces arises quite often in everyday life. Purchasing a factory-made unit for small volumes of work is not the best solution. The easiest way to make a simple grinder is to use a drill.
Most often, improvised materials such as wood, plastic, and plywood are used to assemble such a grinding attachment. Before starting work, it is recommended to prepare a nozzle diagram, which will allow you to make a grinder with your own hands. Videos on this topic are also recommended by experts for viewing, as they cover all the nuances associated with the assembly.
Stationary grinder made from a drill on a wooden base.
It is worth saying that when working with small workpieces made of plastic and wood, this grinding machine performs almost no worse than stationary equipment.
Another advantage of this solution is that modern drill models have a special controller. Its function is to regulate the drive speed. Structural simplicity and high efficiency are reflected in the popularity of this solution.
Necessity at work and at home
Today, grinding machines are used constantly in production shops. Depending on the scale of production, either one machine or all its varieties in complexity and size can be installed.
However, there is always a use for this equipment in everyday life. Some people have a bench sanding machine for metal processing in their garage. Others have several wood grinding machines of different designs installed in their workshop. Still others own a universal, combined machine. There are power tools for manual grinding: drum type, belt grinder, band saw, small machines or large machines. And they are all in demand.
The market offers a fairly wide range of all kinds of similar equipment from many manufacturers. And their prices are quite reasonable. But these are general purpose machines. And if a person runs his own business , or has a hobby, then he needs a specially specialized machine. Here the price has already increased several times.
For this reason, or based on their own desires, many craftsmen make homemade products. Mainly for processing wood, plastic and metal, less often for cutting and grinding stone. And, in general, this is correct. After all, even simple sharpening of kitchen knives is easier and faster to do on a machine than by hand using a whetstone. Fortunately, its very simple design allows you to create a homemade machine for wood with your own hands.
Do-it-yourself grinder at home: video and instructions for assembling from an angle grinder
In terms of its purpose, a stationary grinder for home use resembles a device made from a drill. Devices based on an angle grinder or, as it is also called, an angle grinder, have their own characteristics. The main distinguishing feature of angle grinders is that their drive has a high rotation speed.
Thus, to make a grinder from an angle grinder, you may need a device that controls drive speed. Angle grinders are often used as electronic files.
For this purpose, there are special belt sanding attachments on sale, namely:
- narrow;
- long.
Grinder constructions are often used for grouting welding seams and sharpening small parts.
Such attachments are quite popular among craftsmen. With their help you can easily process various hard-to-reach places (for example, holes). It’s not difficult to make a grinder from an angle grinder with your own hands. To do this, you need to independently design an abrasive attachment, which is based on a tape of the required size. However, it is much easier to purchase a ready-made tool.
The main design difference between an angle grinder and other equipment operating from the mains is the location of the angle grinder’s output shaft. This element is deployed at right angles to the body. As a result, this design is very convenient and helps ensure easy fixation of the drive roller and abrasive cloth.
Thus, such a nozzle is not difficult to do with your own hands. A drawing of a grinder made from an angle grinder can be found on one of the specialized forums dedicated to this topic. This type of tool is quite comfortable to use. The elongated body of the nozzle facilitates various types of grinding work.
Grinders made from an angle grinder often appear in the everyday life of home craftsmen, because the grinder itself is already a mini-machine for grinding.
Making a simple grinder at home is not a difficult task if you approach the matter competently. Of course, you can design more functional equipment with your own hands, but such work requires more time, materials and effort. The choice of a suitable drawing must be made based on individual needs.
Do-it-yourself vibrating plate: (read more)