Do-it-yourself unedged board fence: photo
It is important for owners of country houses or dachas to know that their territory will be under reliable protection. One of the best options for this purpose is the construction of a strong fence
But for many years, fences have been not only a means to prevent unauthorized persons from entering your territory, but also part of the decor, which can affect both negatively and positively the reputation of residents.
Available funds do not always allow the use of expensive imported materials during construction, be it brick, concrete or metal. At this point, resourcefulness and ingenuity come into play. In this article, we propose to study in detail step-by-step instructions on how to build a fence from unedged boards with your own hands, cheaply and cheerfully, but no less beautiful and attractive, and we will also give you some tips and recommendations, following which you can create your own interesting and very functional hedge.
A beautiful combination of unedged boards, bricks and strip foundations
Interesting wooden fences: photos and design features
Fences made of wood have a certain design. The photo shows individual elements of the device. The fence is made from certain components: transverse logs, supporting elements and a picket fence.
Fences can be made in a variety of configurations
You can install the fence yourself. To do this, you need to select the right materials and install supporting elements. For strong racks of the structure, profiled metal pipes or wooden beams are used. Wooden parts require additional processing. The part that is dug into the ground must be covered with bitumen mastic. In addition, the beam is additionally treated with antiseptic agents. To protect iron parts, you need to remove rust, prime the surface and paint it with frost-resistant paint.
Unusual designs, as a rule, are difficult to manufacture and high in price.
Photos of wooden picket fences: design features
To choose a suitable design, you can look at photos of wooden picket fences. Such designs have the following advantages:
- made from different types of wood;
- such designs are distinguished by their originality and attractive appearance;
- combine with any type of landscape design;
- combined with various bases: stone, brick, metal or concrete;
- characterized by durability and strength;
- installation work is simple.
The picket fence is a universal solution for all cases
Picket fence products require simple care. They require quality painting every year.
Construction of a simple picket fence
Board fences: photos and advantages
Fences made of boards are especially in demand. The photo allows you to see the most interesting options. They have the following advantages:
- goes well with any setting;
- environmental friendliness of materials;
- affordable price;
- ease of installation;
- durability and strength;
- large selection of original models.
Any fencing designs can be created from boards
You can make such a fence yourself. To do this, take several pegs that are driven into the ground around the perimeter of the site. Then the boards are prepared. These elements can be made in any convenient shape. In place of the pegs, recesses are drilled into which supports for the fence are placed. The racks are made of beams. They are placed in prepared holes and covered with earth. The veins are nailed down using nails. Then the boards are installed tightly to each other. Then the surface of the structure is covered with drying oil or paint.
Unedged boards are used to decorate a rustic exterior
Video: decorative fencing made of unedged boards
https://youtube.com/watch?v=1rpmP8eZUrw
https://youtube.com/watch?v=1rpmP8eZUrw
https://youtube.com/watch?v=1rpmP8eZUrw
How to make wooden fences on metal posts correctly
High wooden fences on metal posts are especially durable. Wood of such structures is treated with special impregnations. Metal poles are easy to install and have a long service life. For their manufacture, pipes of various profiles are selected.
Construction of a structure on metal poles
Metal supports can be installed in different ways:
- the pipes are driven into the ground, while the verticality of the element is checked;
- a well is drilled in the soil and supports are installed into it, which are well compacted;
- Concreting of each pillar is carried out;
- a concrete base is installed into which metal racks are installed.
Methods for installing metal poles
An example of the simplest design on metal supports
How to build correctly?
The entire construction process is conditionally divided into the following stages:
- Calculation of the fence area and the amount of material required.
- Preparation and marking of the site.
- Preparation (purchase, processing) of material.
- Installation of the base and support columns.
- Secure the slab to the base.
Let's look at some in more detail.
Preparation
Then we will calculate to what depth the posts need to be buried in order to find out how long the material is required. To obtain a strong fence that will not fall from sudden wind gusts, the depth of the hole should be at least 0.6 meters. A slab fence does not need a foundation. But the metal supports must be secured, and for this they are concreted. Wooden columns should be covered with a layer of bitumen mastic or charred. If the site has soft soil, then you should drive the posts into previously prepared holes.
Instructions for creating a fence
A slab fence (photo below) is made like this:
- Prepare the wood for work - debarking the material is extremely important, and it should be done with an ax or a simple shovel. Afterwards, the croaker is marked, filed and finally sanded. When grinding diligently, protective substances should be applied to the slab, and a spray or brush is used for this.
- While the croakers are drying, it is worth placing the holes and installing support columns - the interval between them should be about 2.5 meters. The material can be attached to wooden/metal posts, and the latter are dug into the ground to a depth of 0.5 meters, and then filled with concrete. Wood supports should be coated with bitumen mastic. Do not forget that crushed stone drainage is required. Backfilling is done in parts, and then compacted. All columns should be level.
- Fastening the slabs - even before starting the fixation process, decide exactly what the future fence will look like. If you fasten the material perpendicularly, you will need wood planks. For fixation, use a screw or nails that have been treated with a layer of machine oil or drying oil. When installed horizontally, no boards are needed, since the slabs are secured to support posts or pads. You should place the boards one after another, and this will help you install the product without gaps. Gorbylin is a heterogeneous lumber, but this property gives it originality. A canopy should be secured over the dies, which protects the fence from the negative effects of precipitation.
- Decorating the fence.
Let's look at the last point in more detail.
Decoration methods
There are a large number of ways to decorate a regular fence:
- Artistic cutting of slabs from the end.
- Painting, tinting and varnishing.
- Firing, with further varnishing of the wood.
- Artificial aging of wood - tearing out soft fibers from wood with a brush and future tinting of the product. Before the brushing process, the wood can be burned - as a result, you will get a beautiful fence.
Staining a wood fence is important, and this type of decoration is essential because unfinished wood will not look new for a long time. The ideal option would be to preserve the natural shade of the wood - if it should simply be treated with special substances
They significantly extend the life of a wooden fence, and you can even make paints for painting with your own hands. This will help you save a little. You can easily find everything you need for your work in every specialized hardware store. It is more difficult to buy vitriol and red lead, but they can be found on the construction market. The recipe for making it is simple - you should dilute the flour in 1 liter of water, and then make a paste. Do not remove it from the heat, you should add a little iron sulfate and salt. It is worth mixing everything until the particles are perfectly dissolved. Add red lead and mix the resulting substance. Then add drying oil and mix until smooth. Pour 0.5 liters of water into the finished paintwork material, and you will get a paint consistency. Afterwards the paint will be ready for use and you can immediately use it for painting.
Recommendations for self-building
The generally accepted fence height ranges from 1.5 to 2.5 m.
When erecting a fence yourself, it is worth considering several subtleties:
- Vertical pillars are installed in increments of 2.5 – 3 m.
- The evenness of the attached elements must be checked with a level.
- To increase the supporting area and improve the rigidity of the structure, special shoes are attached to the supports.
- All wood needs to be pre-treated with antiseptics, fire retardants and other protective agents before assembly.
- Only thoroughly dried raw materials can be painted.
- There are many oil-based paints and varnishes on sale. It is not recommended to buy them, as they quickly crack under the influence of external factors.
- If nails are used for fastening, then they should be taken with a galvanized coating, which is less susceptible to corrosion.
If you want to leave the natural look of wood, you can impregnate the boards with stain, wax or varnish.
Peculiarities
In central Russia, wood has always been considered the most popular building material. Its availability allowed even very poor people to build huts and baths, make furniture and dishes. Another thing is places where wood is a luxury. In this case, a wooden fence is a sign of the wealth of the home owner:
- Thus, the first feature of using wood when creating a fence can be called a tradition based on accessibility.
- The second feature is a demonstration of wealth or one’s own skills and abilities.
- An important factor in the use of such fences is practicality: for example, you can install the simplest fence to protect livestock, and if necessary, dismantle it and move it to a new pasture.
- Eco-friendliness is another feature. A bench placed under the fence will allow you to enjoy the aroma of essential oils emitted by the boards or slats. Wood will never be hot or cold like metal. It will perfectly absorb, unlike stone, most of the street sounds.
- If necessary, in most cases you can replace a fragment of the fence or repair the existing one.
- Restricting a large perimeter (for example, a private house with a vegetable garden) is a costly matter if you install a stone or metal fence. But a do-it-yourself braid can cost free.
Summarizing all of the above, we can name two main functions of a wooden fence:
- protection of territory and households;
- decorative design.
At the same time, he can protect:
- the house and the entire garden plot;
- only courtyard buildings with a pen for animals;
- front garden only;
- flowerbed or flower garden.
According to the degree of penetration of the gaze, a wooden fence can be:
- deaf;
- translucent;
- transparent.
What can be made from old wood
Crafts, Vintage, Tips, Decor, Workshop, Furniture, Cheap, Accessories, Interior
| Click "Like" to follow Make-Self.net on Facebook |
Have you ever noticed how beautiful materials made by nature itself are for decoration? Old stumps with thick bark, rotten boards or wood logs. All this fills the interior of the apartment with a special spirit.
INTERESTING: How to transfer a photo to wood
INTERESTING: New life of wooden boxes
Even an ordinary tree trunk that has fallen in the forest looks amazing. Why not decorate your home with wooden elements that can be found in forest plantations? With such decor you will save good money, and the results will be worth it. Everything here will depend on your wild imagination. And in order to make it brighter, look at the photo gallery of such decorative products.
| Click "Like" to follow Make-Self.net on Facebook |
Manufacturing
The construction stage of the board fencing must begin with assessment work. First you need to decide on the height and length of the future structure. It is necessary to ensure that the vegetation behind the fence receives enough sunlight.
After this, you need to decide on the material itself and decide whether the fence will be completely wooden or mixed, that is, it will contain metal elements. Right now it is necessary to decide on the number of cubic meters of wood that will be used to create the fence. It is worth considering that one cubic meter contains from 15 to 80 boards. Their exact number will depend on the manufacturer and the cross-section of the material. More accurate information can be obtained from the seller.
It is also necessary to purchase poles. Their number should be equal to the number of stakes driven in during marking. If such a structure will be made and installed with your own hands for the first time, then it is better to make a vertical fence from planed wood. So, the procedure will be as follows:
- it is necessary to prepare tools and materials for work. These primarily include brushes, pegs, cord, tape measure and hacksaw, shovel, screws and screwdriver.
- Now you need to mark the area. To do this, it is necessary to install pegs along its entire perimeter with a cord stretched tightly between them. The distance between stakes should not exceed 2 m.
- At this stage, if necessary, you can change the height of the board and round its top.
- Now it's time for excavation work. Dig pits for support pillars. Their depth should be about a meter. The pillars are installed in the hole and reinforced. This can be done by compacting the soil, but for reliability it is better to fill them with concrete. A nail is knocked out at the top of each post, onto which the cord is pulled again. This is necessary in order to determine the evenness of all the pillars, lining them up in one line.
- If everything is in order, then you can proceed to the next stage, but if not, then you need to level the pillars by deepening some of them, or sawing off a small upper part.
- It is necessary to install veins. The first board is fixed with a nail at a height of 25 cm from the ground. This must be done so that the nail sticks out on the other side of the board by 2-3 cm. These protruding ends must then be bent. After another 25 cm upward, the next vein is installed in the same way. This operation is performed at all intervals, along the entire height of the pillars.
- Now, using nails or self-tapping screws, vertically prepared boards are attached to the veins, and you can connect them closely, creating a solid fence, or you can leave gaps of no more than 5 cm between them.
- The final stage of work is painting the finished fence. First, the wood is treated with drying oil, and then either paint of the selected color or a special wood varnish is applied in two layers.
Selecting a tree for future fencing of the site
Various manufacturers produce a range of fencing materials. By choosing the right lumber, you will get the perfect accent in the landscape. The choice of wood is based on the purpose of the fence. For seasonal fencing, use blanks made from alder, ash or birch. Do you need a strong fence that will stand for many years and serve “faithfully”? We recommend using a board made of pine, aspen or larch. Consider the benefits of wood:
- A pine board is ideal for constructing a protective shield. The material needs special care, regular treatment with antiseptic drugs, protection from insects and moisture concentration.
- Aspen board is a durable raw material for the enclosing element. Lumber is not afraid of high humidity, it has protective properties against damage by insects, and is not subject to splitting or deformation during operation.
- larch board. Of all the options listed, this is the most durable. Fences made of deciduous wood are distinguished by their durable construction, which pleases the eye for decades.
The stability of the fence can be achieved if high-quality tree species are used for its construction.
Kinds
Fences made of boards are divided into several types depending on the type of material they are made of. The board also has several varieties:
- Unedged board, that is, one that has not undergone any pre-treatment. Essentially, it's just sawn wood. It is characterized by the presence of raw and uneven edges, and is sometimes sold with bark elements.
- Gorbyl. This type of board was previously considered waste material. It has the appearance and shape of a log sawn lengthwise. One side is flat and smooth, the other is convex. Croaker is a type of unedged board.
- Planed is a board with a rectangular cross-section that does not have any grooves for fastening together. This option is most often used to create wooden floors.
- Fences are made from brushed boards, in which the top layer of boards is raised with a special brush. As a result, such a fence has an interesting and unusual texture, and the growth rings of the tree itself are clearly visible on its surface.
- Fences are made from deck boards, the upper part of which has rounded edges. Due to the absence of tongues and unusual shape, the gaps between the boards in the fence are practically invisible. Deck board is a hybrid of unedged board and various polymers, which is why it is often called polymer or plastic board.
- American is a type of lining that is often used in the construction of fences. Typically, such boards are used to create small fences.
- Until recently, only wooden decking on verandas was made from decking boards or decking, however, due to its unusual shape and appearance, it has recently been often used to create wooden fencing. Essentially, these are wooden planks that are joined closely to each other. Their surface can be either corrugated or absolutely smooth.
- WPC is a type of wood board. It is a mixture of wood and various monomers that are mixed with each other through polymerization. As a result, you can get a wood board that has certain qualities: for example, increased strength or resistance to fungi.
Despite such an abundance of types of boards for creating a wooden fence, it itself can be of only two main types:
- vertical fencing. In this case, the boards in the fence are installed vertically. This option is the most familiar for most people.
- Horizontal fence. The boards are laid and connected to each other in a horizontal position. This type of fencing looks stylish and unusual.
Do-it-yourself slab products: use in design, crafts
Manufacturing furniture, household items, facade cladding, and interior wood finishing has many advantages. The material is environmentally friendly, has a fairly high resistance to stress and durability.
Thanks to the wide range of finishing options, it can be used in almost any interior. The only significant drawback can be considered the relatively high cost, but this is completely eliminated if you use recycled woodworking materials.
A striking example is furniture made from slabs, made by hand.
Features of use
A small wood slab is suitable for fuel chips. No further benefit can be derived from this species, as it is heterogeneous and has defects.
Business croaker is often used for agricultural and construction purposes. It is much larger, thicker and wider than a wood-burning one, and it has almost no defects.
Compared to boards, logs or beams, slabs have a large number of advantages. It is inexpensive, can be used almost anywhere you need to build something, and is lightweight. You can make a decorative finish from the slab, which is really inexpensive.
Of course, this material is not without its drawbacks: it has an ugly appearance. You need to work hard to make something aesthetic out of it.
Table
Place pallets on top of each other and you get a spacious table. Screw the roller wheels to the pallet - and now you have a mobile design table. Cover it on top with a sheet of plexiglass or glass - dirt will not be absorbed into the wood, and nothing will fall through the cracks.
Photo from the site Houzz.ru, author ECOdECO Mobiliario But you don’t have to go for pallets specifically for the table - you can make one from an old door. The more worn the canvas, the more colorful the tabletop will be. If you are happy with a small table, then there is no need to look for legs for it - just cut the door leaf into three parts and fasten it with corners from the inside.
Photo from Houzz.ru An old suitcase living out its life in the attic will also make an excellent coffee table with decent capacity. And two or three suitcases will make a chest of drawers or a bedside table.
Photo from Houzz.ru, by Mina Brinkey
A table can be made from a woodpile, having previously treated each log so that the gluing area is sufficient.
Photo from Houzz.ru From this point of view, timber is a much more convenient material. We clean and fasten the parts with wood glue.
Photo from Houzz.ru, by Cartoloji
If there are a couple of stumps on the site, consider yourself lucky - this is already a table and a chair. Or a chair and a cabinet.
Photo from Houzz.ru, author KRAUZEarchitects
Found unnecessary plywood or wood boxes? Let's make a coffee table out of them. You can store an entire library in this table.
Photo from Houzz.ru, by Holy Funk
In addition to the drawers, we will need furniture wheels, corners, screws and wood glue. For structural stability, the boxes can be mounted on a frame made of boards or plywood. Paint, stain, varnish - optional.
Introduction! What is formed after sawing a log?
At any sawmill, after sawing a log, the following positions are usually formed:
- High quality lumber.
- Lumber of low quality varieties.
- Business croaker.
- Wood croaker.
- Sawdust.
- Process chips are obtained only in cases where additional equipment is available.
Lumber is used for sale, wood chips and sawdust are used for heating or processed to produce products. Fortunately, the volumes of wood chips and sawdust can be so huge that they cannot be hidden from environmentalists or simply stored until better times, because this is very dangerous (chips and sawdust are self-igniting).
But slabs can often be stored and lie there for years, they are not self-igniting, very small volumes of them are formed, and that’s why it turns out that way—the slab lies like a “dead” load. On average, about 2 - 4% of slabs are produced from a sawmill line, depending on the sawing technology.
Functions and stages of operation of a waste recycling plant
Some of the information is taken from my new book “Organization of sawmilling in a modern enterprise.” The book provides very powerful information about sawmilling in a modern enterprise and is based on personal experience. More details about it in the “My Books” section.
Online calculator for obtaining slabs from round timber:
Do-it-yourself unedged board fence: photo
It is important for owners of country houses or dachas to know that their territory will be under reliable protection. One of the best options for this purpose is the construction of a strong fence
But for many years, fences have been not only a means to prevent unauthorized persons from entering your territory, but also part of the decor, which can affect both negatively and positively the reputation of residents.
Available funds do not always allow the use of expensive imported materials during construction, be it brick, concrete or metal. At this point, resourcefulness and ingenuity come into play. In this article, we propose to study in detail step-by-step instructions on how to build a fence from unedged boards with your own hands, cheaply and cheerfully, but no less beautiful and attractive, and we will also give you some tips and recommendations, following which you can create your own interesting and very functional hedge.
A beautiful combination of unedged boards, bricks and strip foundations
conclusions
- Fencing made from wood waste is always a budget saver, and a significant one at that!
- Gorbyl is primarily an alternative to expensive modern building materials.
- Storage of lumber does not require special conditions during construction.
- An important point for using such lumber is ease of installation and the absence of difficulties during facing work.
- The naturalness and environmental friendliness of the surrounding space are the main advantages for using slabs in the construction.
- The use of such natural materials, when using the right technology, will bring joy and satisfaction to its owners.
- You can install such a fence yourself.
Horizontal fence without crossbars. Gorbylins are attached horizontally, with or without gaps.
Types of wooden fences made of round timber
To fence off your dacha or estate plot, you can use one of the following types of log buildings:
A traditional palisade is an ancient structure, built with your own hands from vertical trunks going into the ground.
Fence palisade made of large logs
A palisade made of round timber of small diameter, built in the usual way - with fastening to the crossbars.
Solid fence palisade made of small diameter logs
Structures with horizontal arrangement of logs. They are made solid or with gaps of certain sizes.
Fence made of horizontal logs with gaps
A fence made of siding imitating horizontally laid and processed tree trunks.
Fence made of siding imitating a log Since the traditional palisade rests mostly on the ground, the support pillars serve only to maintain it in an upright position and reflect lateral loads from gusts of wind
Here it is important to properly strengthen the posts and vertical logs in the ground
The design of the following options for log fences assumes that the supporting elements (pillars and foundations) will carry the entire mass of the spans. Therefore, they will have to be made as reliable as possible, for which we use brick, steel or solid wooden pillars on a concrete foundation.
An exception is a siding fence, which is light in weight and built using generally accepted technology - on metal or brick pillars mounted on horizontal lintels.
How to do it yourself?
It happens that the owner does not want to resort to the services of professionals, wanting to independently build a wooden fence in his garden. This is quite possible if you calculate the amount of materials and meticulously follow the steps of the step-by-step instructions. Moreover, installing a fence yourself can turn into a fun activity for one person or for the whole family.
Before starting work, you need to calculate how many boards you will need. It is not difficult. You need to divide the length of the proposed fence by the width of the board - if you plan, for example, to build a picket fence. If the fence is not continuous, then the width of the board is added to the width of the gap, then divide the length of the fence by this number.
However, an experienced summer resident knows that the store sells not boards, but cubic meters of wood. But it doesn't matter. To find out how many cubic meters of wood will be needed for a structure, you must first multiply the length, width and thickness of one board. After this, we multiply the resulting number by the previously calculated number of boards. Everything is ready, the cubic meters have been calculated.
The easiest one to make is a picket fence with gaps. To construct it, you cannot do without drawing accessories - a ruler, a square, a pencil. In addition, you need a hacksaw for wood and, if you plan to cut out shaped elements, a jigsaw. To dig, you need a shovel; to drill, you need a drill. It is obvious.
- The beginning of any construction is marking the territory and determining the line where the fence will go. This area needs to be cleared and the old building, if any, must be dismantled.
- When the length and location are determined, you need to drive pegs along the entire length of the future fence. Once the location for the wicket (or gate, or both) is determined, the points of the support pillars are marked at a distance of 2 to 3 m between each.
- Next is time to install the base. This may be the foundation or the installation of support pillars. The pillars can be driven in or placed on a concrete base. The depth to which the supports are dug should not be less than 0.7 m. At this stage, you need to control the height of the supports.
- It is recommended to treat the part of the supports that goes into the ground with liquid bitumen; this will significantly strengthen the base and also extend the life of the fence as a whole.
- The safest thing to do is fill the hole where the support is installed with liquid concrete. Then the supports will definitely not become loose.
- Two crossbars (upper and lower) are attached to the support posts using nails or self-tapping screws. If the fence is high, you can attach a third one in the middle.
- Form the body of the fence by attaching boards. The choice of method of fastening the boards depends on the selected type of fence and the desire of the owner. If you wish, you can not limit yourself to a simple horizontal or vertical layout by forming an ornament (after thinking through how to do this).
- To add additional strength to the structure, it is recommended to attach the boards to pre-installed metal corners.
- After this, all that remains is to treat the fence with protective compounds, for example, impregnation against moisture.
- To make a wicket, the canvas is assembled separately.
How to find out how much slab and other materials you need
The first thing you need to decide is exactly how many pillars you will need and the approximate number of slabs. To do this, you can manually measure the length of the boundaries on the site or calculate them based on the area indicated in the land documents. The last option is not very convenient: it is suitable for strictly square-shaped areas with perfectly smooth boundaries, and this is rare.
It’s good if the documents for the plot also indicate the length of its boundaries, in this case there will be no need to carry out any calculations or measurements at all.
To calculate the amount of materials you need to know the following points:
- The height of a slab fence is usually 1.7 m.
- The standard distance between posts is 2.5 m.
- The length of the pillars is 3 m.
To calculate the number of support posts, divide the length of the fence by 2.5 m. The length of the crossbars is determined by doubling the length of the fence and adding another 10% to the resulting number (adjustment for trimming and defects).
Calculations with the number of slabs will be more difficult: usually they have different widths. You can ask the manufacturer for the average width of the cuttings; if this data is known, then divide the total length of the fence by the average width of the slab. With this approach, there may not be enough material or there may be excess scraps left. You need to be prepared for this.
In addition to lumber, you will need Biosept antiseptic or its equivalent, and nails. For concreting the supports you will need crushed stone, sand and M-400 cement.
Bituminous mastic for treating the lower part of the fence will not hurt.
Installation of a slab fence
To impart the necessary rigidity, slab fences must be installed on supports. Wooden posts made of oak or larch are usually used. It is less common to see metal poles used as supports for them. because in this case the installation process becomes more difficult.
Metal supports must provide special fastenings for logs in the form of plates. It is worth noting that even on metal supports, a fence made of slabs that is too high will not be stable. Therefore, it is not recommended to build a structure higher than two meters.
Installation of poles
- First, they are processed. For metal structures - with mastic that prevents the formation of corrosion, for wooden ones - with antiseptic and water-repellent compounds;
- For untreated pillars, the following procedure is performed: the bark is removed from them and burned. After several days, resin is applied to the part that will be located in the ground and left to dry;
- Then work must be done on marking the future structure, with the placement of pegs and a cord between them;
- Before installing the pillars, holes must be made in the ground for them with a depth of about 600 mm. Their number will depend on the gap between the pillars, which are usually 2–2.5 meters. At the bottom of the resulting well, a gravel-sand cushion about 200 millimeters thick is installed;
- To ensure waterproofing, the pillars must be wrapped in roofing felt. Wooden - to prevent rotting, metal - to prevent corrosion and rust;
- When installing poles in prepared holes, it is necessary to use a building level to accurately maintain verticality in relation to the ground. The installed pillars are filled with concrete and left to dry. The installation depth of the pillars should be about half a meter.
For steppe terrain or regions with strong gusts of wind, it is possible to provide a deeper location of the pillars, thereby making the structure more reliable.
Installation of slab
The slab can be placed on the fence either vertically or horizontally. For a horizontal arrangement, there is no need to install logs, since the slab will be attached directly to the posts. In such cases, it is preferable to use wooden supports, because for metal ones it will be necessary to provide a fastening system.
For the vertical arrangement of wooden elements that is familiar to the eye, it is necessary to provide logs, for which you can use the same slab. Individual elements will be attached to them.
A slab fence can be either continuous or with gaps. In order to make a solid fence, it is necessary to adjust all the elements to each other, which is very problematic. Therefore, the overlapping slab laying method is usually used. A fence with gaps is much easier to install, however, it does not look as aesthetically pleasing. Here are some recommendations that may be useful to inexperienced builders:
When laying the slab overlapping, you should leave some margin. Since the boards can dry out, gaps may appear over time. Even if the material has been well dried beforehand, this rule should be followed;
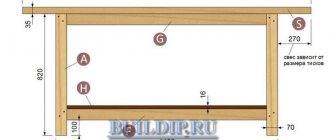
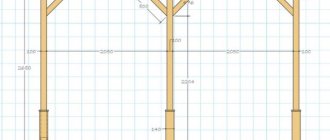
Structural fence design diagram
If you prepare the fence paint yourself, you can significantly reduce construction costs. First you need to dilute the flour in a liter of water and put this mixture on low heat. Then salt, iron sulfate and red lead should be added to this composition. At the end, you need to pour drying oil into the brew, and for those who want to save money, add sunflower oil. The resulting paint is diluted with water if necessary; To strengthen the structure, the pillars can be installed not at half a meter, but at 700 millimeters; To drill holes in the ground. You can use an ice ax.
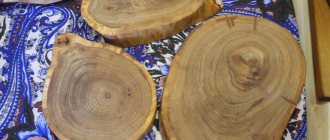
What is a croaker
This material is considered a waste product from the woodworking industry, which is obtained during the process of sawing logs into boards. This is the side of a rounded log. One side of the slab is smooth, as the sawing was carried out along it. The second side is rounded and covered with bark. In practice, such residues are simply used for heating. However, they can make an excellent fence - croaker is perfect as a filler.
Croaker - appearance in a pack
Such waste can easily be ordered at any sawmill where logs are processed. When ordering material, take a little more than the required quantity, as some of the material will be rejected, or some boards may break during installation.
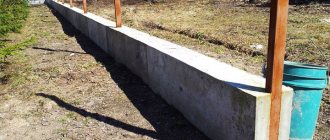
Brick fence
The construction of a brick fence is a responsible job and requires compliance with certain rules. But the owner receives for his efforts a high-strength, beautiful fence with a long service life. A rich assortment of bricks allows you to create a fence that organically complements any exterior.
A properly constructed brick fence can withstand even a hurricane!
We build a brick fence at the dacha as follows:
- We measure the length of the future structure and create an estimate for materials.
- We mark the territory and dig holes for the strip foundation.
- We fill the base as soon as the support pillars are installed.
- To avoid the formation of joints and increase the strength of the structure, we make the foundation in one approach.
- We are laying bricks on the frozen foundation. We arrange them in one row, but if you want to show creativity, we use combined or openwork variations. For a high fence we make double-row masonry.
If you have never worked with brick, hire a specialist to build a fence, since laying the material requires meticulousness and control of the evenness and thickness of the seams. In the absence of sufficient experience, the design may turn out to be sloppy and weakly stable.
Suitable material for construction
For the fence, not only new elements are taken, but also any available wooden parts.
Board (edged, unedged)
The most popular and affordable type of lumber. An unedged board costs less and is not cleared of bark on the sides. To make the structure last longer, it is recommended to remove the bark and sand it thoroughly before fastening it.
Edged boards are sold cleaned, with a smooth surface, sometimes already treated with protective agents.
The designs are more accurate. It’s easy to make a fence from these boards yourself.
Ready-made fences are installed around country houses, in villages, and in dachas.
Construction costs are minimal; there is no need to build a massive foundation.
Users often search for:
- Construction of a fence from unedged boards
- Planed board fence
Fence
This name was given to polished planks of the same width and height. They are nailed to the joists vertically or horizontally. The top of the picket can be different (regular cut, carved). Depends on the preferences of the owners and their budget. This type of fence is inexpensive.
A structure made of slats painted white, with flowers, shrubs or flower beds planted around the perimeter, looks beautiful.
An unusual version of the fence with elements of artistic forging is shown in the photo above.
Read the article: “How to build a wooden picket fence step by step.”
timber
Timber is a durable raw material. Obtained from hard rocks. Under such sectional material you need strong racks made of logs, bricks, and metal.
The beam happens:
- profiled;
- whole;
- glued;
- double;
- spliced.
Interesting fence structures are assembled from it: blinds, herringbone, checkerboard.
Detailed articles:
- Fence made of timber from boards
- Wooden fence shutters
Reiki
A type of lumber. They are thin strips. They make simple but original hedges.
Slat fences are created with gaps, so they are well suited for garden zoning and decorative fencing around the front garden.
The disadvantage is that such a fence does not protect the site, but is made for decorative purposes.
Article on the topic: “How to build a fence from slats with your own hands.”
Log
Cleaned and sanded tree trunk. The material is durable and lasts a long time. It weighs a lot, which complicates installation and transportation.
The logs are laid horizontally or dug in vertically.
The finished fence looks original and performs its protective function well.
Detailed material: “Construction of a log fence.”
Pallets
Budget-friendly raw materials for fencing at the dacha. They are bought new or used second-hand. They can be mounted assembled or disassembled into planks.
Pallets are used for fencing beds, zoning areas, and on the border of two estates.
Such fences look original. They are decorated with pots of flowers and painted in contrasting colors.
tree branches
A fence made from branches is called a wicker fence. It looks more like a partition than a fence. Used for decorative purposes.
Wooden stakes are driven into the ground, and twigs are alternately intertwined between them. The raw materials are hazel branches or vines. You can take other rocks, but the strength will be much lower.
Before weaving, the material must be soaked in water for a day.
The fence can be placed both inside the estate and on the street side.
Disadvantage: short service life.
Gorbyl
It is considered a waste from the wood processing industry.
Croaker - side cut of a log. One side is sawn off, the other is covered with bark.
To prevent insect pests from infesting the bark, before creating the fence, the material is cleaned, sanded, and treated with antiseptics.
An antique fence looks unusual. Externally, it complements houses made of stone and logs well.
Photo: slab fence – sanded and varnished
The method of installation of elements is selected individually.
Pros and cons of the material
The advantages of raw materials are:
- Low purchase cost. Even in comparison with a fence made of chain-link or other mesh, this wood material is several times cheaper.
- Fast construction speed. A structure with a small area can be assembled in a day.
- Easy to install. There is no need to use special tools or involve technology. The construction can be done independently.
- Can be repaired. If one of the elements is damaged, it is easy to replace it with a new one without harm to the entire fence.
- Does not require a capital foundation. The finished fence weighs little, so it does not create a load, except when the slab is combined with stone or brick. Then pouring the base is required.
- Of no value to attackers. This is an excellent fence for a dacha, where the owners visit for seasons.
- Externally, it complements a rustic or country style home well.
Disadvantages include:
- Short service life, up to 10 years.
- The need for periodic maintenance - treatment with antiseptics, painting. Otherwise, use will be reduced to 5 years.
- Each board will have to be selected according to width and height. This leaves a lot of unsuitable elements.
- The wood-burning floor is unattractive in appearance, so it is not suitable for areas decorated in modern styles.
The quality of the finished fence depends on the type of wood. Oak and maple trimmings are more expensive, but they also last longer. Obafloor made from pine is popular. It is cheaper, but quickly becomes unusable.
Croaker - what are its advantages and disadvantages as a material for a fence
In addition to the fact that the fence has its own special attractiveness and, in some ways, primitiveness, it also has many advantages.
- Croaker, like shavings or chips, is a waste product from sawmill production. Therefore, price is its main advantage. The cost of such waste is so low that you can even say that the fence will cost you “for nothing.” If the sawmill has not found a use for this material, then it will be an excellent solution for a country fence.
- Your expenses will mainly consist only of ordering transport (if you do not have your own truck) and loading and unloading operations. And this is if you don’t have your own family movers. Often, sawmills simply do not know what to do with the slab and therefore sell it at a bargain price.
- Easy to install the fence using a minimum amount of additional materials and various tools.
- High degree of strength. The slab is much stronger than expensive foreign-made corrugated sheeting.
- Fits perfectly into the country landscape and harmoniously combines with the environment, that is, nature.
- Long service life. Such a fence will last more than 25 years, even if it is constantly exposed to various precipitation and solar radiation.
- Unique appearance. The slab fence looks really special.
But the croaker also has some disadvantages, which for many people are not an obstacle to its use.
- Each board must be processed individually, since it is impossible to supply the entire forest for flow.
- Low level of fire resistance.
- In terms of service life, it is inferior to concrete and modular fencing.
Preparing for construction: calculating the area for a wooden fence
Remember that the cheaper the croaker, the worse it is. Therefore, you must immediately prepare yourself for a long processing process.
The bark must be removed immediately, since various pests can settle in it, including the bark beetle, which will quickly “eat” your fence and all that will be left of it is dust. To remove bark, you can use a hatchet, a sharpened shovel, a scraper and a grinder.
After this, the boards should dry well in the sun. In the meantime, they are drying, it is necessary to mark the territory, and for this you will need to decide where the pillars will stand, at what distance from each other. You also need to think about where the gate or gate will be located.
Having marked the area, holes are dug in the ground, 1 meter deep at a distance of 2.5 meters from each other. The shorter the distance between the posts (2 m), the stronger and more reliable the future fence will be
This is especially important in regions where strong winds often blow and there are hurricanes that can simply tear out the support
Holes for fence support
Choosing a croaker, tips for choosing
There are two types of croaker: business and wood. The second type is used as fuel and this is evident from its name. Such a slab is either too uneven in length, width and thickness or is made from unstable wood species.
Business croaker is perfect for building a high fence around a summer cottage or country house.
Very often, during sawing, sawmill workers sort only the commercial slab, and give the rest for free. Therefore, you need to think carefully before buying business material. Maybe you can sort your own wood scraps and have a great free fence.
If the owner of the house decides to build a fence from a slab, then it does not matter which one he chooses. There will simply be fewer problems with business material, which is why it is sold at a low price.
The type of wood doesn't really matter. Only poplar and birch have significant disadvantages. A fence made of poplar slab will rot very quickly, but it will be difficult to install one made of birch, since after drying it you will only have to work with a drill and a powerful drill.
What is a croaker?
In fact, croaker is a waste product from wood production. It is a board sawn on one side, the other side retains its original appearance and texture of an untreated log. Previously, it was used only as firewood and for finishing temporary or rough projects. But over time, summer residents learned to build strong and original fences from the material. Its cost depends on the type of wood, type of processing and size.
Edged board or slab
Advantages of a fence made of this material at the dacha
- Availability and low price
- Easy to install
- Durability and reliability
- Aesthetic appearance
- Weather resistance
- Distinctiveness and originality
- Naturalness
- Versatility
The slab also has disadvantages. Firstly, the raw material processing process itself is complicated—every die must be polished and processed. This will take a lot of time. Secondly, any wood material has low fire resistance.
Decor
In addition to paints and varnishes, there are many other ways to decorate wooden fences. Before settling on any decor option, you can look at 3D samples on the Internet to see the fence “live” from different angles and in different materials:
- Some types of fencing are themselves decorative elements of the fence. For example, a lattice or wicker, checkerboard or log picket fence.
- Pickets, burned over a fire or with a burner, will not only get rid of insects and their larvae, but will also become a real design find in the design of a Russian estate, a robber haven or the kingdom of Berendey.
- The use of stone and brick will add solidity and durability to the entire structure. But this is also a wonderful decorative technique, since such fences look very beautiful.
- Metal is not only reliable protection for the fence itself, but also a beautiful decorative element. Forged elements will give an aesthetically attractive appearance and reliability to the wooden panel.
- An old fence can be updated in a non-standard way. If it has not been varnished for a long time, then this will be difficult to do: it will absorb an incredible amount of paint and varnish materials, but at the same time it will no longer have the proper appearance. This significant drawback can be hidden by using overhead decorative elements: flower pots, climbing vertical greenery, birdhouses, old waste materials in the form of flat toys, pictures, etc. This, of course, will not save the fence itself, but it will push it aside for a while dismantling it and installing a new fence.
- A photo grid will also help transform an old fence. This modern decorative material will help hide the shortcomings of any fence. You just need to choose the right material and photo grid design.
- Log cuts are a very beautiful decorative option. With its help, you can turn a transparent fence into a blank one, and hide holes in the place of damaged pickets.
- A fence can zone a vacation spot in a country house. If you weave climbing plants or artificial sunflowers into it, then such a place will be stylized as a Ukrainian welcoming hut.