Why make a carpentry shop at all? I don't have a definite answer. If you just want to make something with your hands from wood, then there are workshops where you can come, pay money to rent machines and a workplace, and do everything there. It is not necessary to have your own premises and your own equipment. If you want to engage in woodworking as a business, then the competition here is high, and it’s difficult to find your niche. So I'll start by explaining my own motives. It all started in 2015, when I realized that my old shed at the dacha would soon fall apart and I needed to build a new one. I calculated the required area, amount of materials, estimated costs and construction time. I poured the foundation, bought wood the next year and started building with a friend. Initially, I did not intend to make a workshop. I was just building a new shed to replace the old one to store tools and equipment.
Naturally, everything went wrong during the construction process. A friend said: “We have such cool six-meter beams, why are we going to cut them?” And he suggested building a two-story barn. If you've ever built a frame structure, you can see that we've made a ton of mistakes. Now I am gradually strengthening and remodeling the barn. The next catch was the desire to make a basement: “We haven’t sewed it up yet, let’s dig it up and pour concrete?” In general, I spent a total of two calendar years on the basement. Because of it, I could not cover the floor on the first floor, although I already had a sheathed, fully finished barn. Only there was a floor on the second floor, and a pit on the first floor. It got flooded a couple of times, overall it was a lot of fun. So my advice is: don't make basements if you don't need them. There are now two boxes of apples in my basement; I don’t actually use it.
The area of the barn turned out to be about 80 m2. I began to wonder why I need such a large room? I would like to organize some kind of workshop, but what kind? I started to think. Then I remembered that I inherited an excellent universal woodworking machine from my grandfather. We took it out, assembled it and thought that now we will start making furniture, watch out Ikea! Now we’ll buy more machines, we’ll come and do something for our pleasure.
We wanted to make furniture, and this became the first obstacle that was not obvious to me. Woodworking is a rather difficult task. Here you need a lot of specific knowledge, which, on a whim, can take a very long time to acquire. Therefore, I advise you to read specialized literature or study somewhere. And then I didn’t understand this at all: “I have a machine, I have some money, I’ll buy other machines and do everything.” Naturally, it didn't work out that way.
I began to figure out what manipulations with wood I needed to do and what I needed to buy for this.
All the design details
Now you can move directly to the design itself.
Its result does not necessarily have to be a set of drawings made according to all the rules; it is enough to make a few sketches with your own hands without observing scale. The main thing is that they be as detailed as possible. On the sketches you need to draw all the elements of the building, including small and small details. And, of course, they must indicate all the dimensions - external and internal of the workshop, as well as its elements. Several sketches are necessary for the reason that on one or even two it is impossible to display the structure of the building, and even its elements, in all projections and details. A simple, fast, but at the same time very inaccurate method of calculation is to multiply the sum of the areas of all objects placed in the workshop by an approximate factor of 1.5–2. It is believed that this method should provide the necessary free space for work and movement between the equipment placed in the already built workshop. However, in reality, this approach can cause many difficulties, especially if there are many objects being placed and their dimensions are very different or large. Most likely, when arranging the equipment, you will have to rearrange everything again several times, while taking something back outside, and then dragging it back into the workshop. And it’s not a fact that as a result of such long ordeals everything will turn out perfect - it will be convenient to move and work everywhere.
Calculation of the area of the room for the workshop
In order to accurately determine not only the area, but also the internal dimensions of the workshop (length and width), you need to make your own diagram of the arrangement of all placed objects. Its preparation is best done using two sheets of graph paper. From one we cut out on a scale of 1:20 (or another, but so that it is a multiple of 10) rectangles and squares of the dimensions of the objects to be placed. We sign them in accordance with what equipment or equipment they relate to. On the second sheet of graph paper we lay it all out, trying to arrange it within the boundaries of a rectangular or square perimeter. We take into account the space and gaps between objects that are required for convenient and free performance of work, as well as our own and movement of tools, materials and other things.
Do not forget that this arrangement is carried out on the scale chosen for the equipment - it is necessary to periodically convert the distances on paper into real ones in order to prevent mistakes. The following order of design using this method is recommended. First, draw 2 perpendicular lines on paper. These will be 2 walls and a corner of the future workshop room. Mark the front door on one of the lines. We indicate its width. It must be no less than standard or equal to the width of the largest machine (equipment) or its largest part, if it has to be brought in parts disassembled. Now, relatively and starting from the existing corner and door, we arrange on paper all the equipment of the workshop. Each machine and workplace must be provided with unobstructed access from all sides, which are provided for by the operations performed on them. Finally, we finish painting the remaining 2 walls.
We indicate where the windows will be located. It is better to place them in the eastern and/or eastern walls. There is more light and it is warmer in winter. Then, if the arrangement diagram was drawn up on graph paper, we measure all dimensions on it (including the distances between equipment). We convert them according to the selected scale into real values, which we indicate in the appropriate places on the diagram. If the diagram was drawn up on plain paper, we indicate the desired dimensions during its development.
Do-it-yourself home carpentry workshop in the garage, at the dacha - we describe it in detail
This article presents an overview photo gallery, which contains a variety of ideas and options for realizing a dream: My ideal Workshop. The information is structured, supplemented with explanations and many diagrams and photographs.
What amateur or Master does not dream of his own secluded corner in which he could realize his dreams and ideas? And our Russian people have the Kulibin vein embedded in their genes. Just give us time, a place and tools in our hands and oh, we’ll turn around and our soul will sing...
In this photo gallery article, we have collected a variety of ideas and options for realizing your Dream: from a tool box and workbench in an apartment (house, shed) to a full-fledged, free-standing Workshop, equipped with a full range of equipment and tools that you may need.
There is also a photo of the Workshop from a historical point of view - how carpenters did it in past centuries. Of course, modern solutions have also been added.
Everyone has their own path to their Dream Workshop, but as in any other business, the solution options and the result depend on the approach and experience. You can do it yourself as simply as possible. Often this is exactly what we are used to: doing it quickly and cheaply, without embellishment or convenience. Because there is always not enough money or time, and therefore we have what we have. But still, using examples of other solutions - with imagination, a thorough approach and creative hands - we will show how you can create your own Dream Workshop.
Workplace: table with work surface or workbench
Let's immediately look at examples of work surfaces.
The working surface and its design strongly depend on the direction of your activity: model making, carpentry or some other craft. It also depends on the accommodation conditions and your capabilities.
Let us consider in general the options for working surfaces depending on the area of activity.
The modeller's workplace looks like this:
An important note: for a sedentary workplace, the coverage area must be taken into account. The diagram shows the minimum acceptable dimensions:
A workbench can come in a variety of sizes and shapes.
Mini workbench:
It can be like a desktop version:
And like a mini workbench bench
Folding carpentry workbench:
Desktop with workbench capabilities:
Examples of a full-fledged carpentry workbench might look like this:
Here's what the industry standard recommends for woodworking benches.
“... In a carpentry workshop, workbenches are positioned perpendicular to the windows so that the light falls from the left. It is advisable to arrange workbenches in 4-5 rows of 4 workbenches in each row with a distance between rows of at least 100 cm. Area per carpenter: 4.5 sq. m.
The industry standard for carpentry workbenches with a wooden base provides the following requirements:
- The height of the workbench can be in three positions: 700+15, 790+15, 900+15 mm; tabletop dimensions: length - no less than 800, width - no less than 450 mm; the moisture content of wood for the manufacture of workbench parts should not be more than 12%; all wooden parts must be made of hardwood (Lumber. GOST 2695-71) or softwood (GOST SEV 2369-80), provided that the main working surfaces are covered with plywood in accordance with GOST 3916-69; the height of the stool should be fixed in the range from 700 to 750 mm, the shape of the seat is round, with a diameter of 350+5 mm or square with a side of 350+5 mm; the average service life of carpentry workbenches should be at least 6 years (for the highest quality categories - at least 8 years) ... "
What experienced Masters recommend: the height of the working surface of the table should be at the level of the phalanx of the thumb.
Regarding the height of the working surface when working while standing, there are the following recommendations in ergonomics: in the picture, the first figure is for precision work, the second figure is for light work, the third figure is for heavy work:
More good examples of carpentry workbenches:
An assembly table is of great importance in the workshop, where products can be assembled.
But in many cases it is replaced by either a workbench or a multifunctional table.
In this regard, an excellent ready-made solution is the MFT-3 table from Festool:
and its smaller brothers who took this idea into service. For example, the KREG workbench
The DIYers went further and improved this idea in their own way:
Mobile folding table
Or a stationary table in addition to the MFT-3 table itself
A large work surface is often necessary in the Workshop, where it is necessary to work with large workpieces, and therefore, often, in order to save space, a table or workbench can be combined with machines into a large single work surface:
You can see a more detailed review of workbenches on the page “Carpentry workbenches and tables for carpentry work: options and design”
Storage systems: from shelves to cabinets
Typically, a storage system starts with the simplest nails and hooks.
But you can approach this creatively and tastefully. And even jars of lightly salted cucumbers will look appropriate.
Many people start with simple shelves and gradually expand to a tool cabinet.
A simple, easily repeatable, but at the same time beautiful and convenient way to place tools. Everything is open access and at hand.
And here is the Japanese option for placing carpentry tools (now it’s clear why all Japanese planes are approximately the same height): Deeper shelves are needed for European tools:
An equally important question: how to store clamps. This could be a hanging shelf with supports:
Or on a movable cart, you can make it yourself or buy, for example Piher Wheel Stand
Don’t forget about the storage location of the material.
Moreover, the option in the photo on the right is preferable, as it provides good ventilation for almost every board.
Boxes, chests and chests of drawers for tools
Next, we usually think that it wouldn’t be a bad idea to hide what we have accumulated in at least some kind of drawer to protect it from dust and moisture.
In past centuries they looked like this:
And each of them was valued no less than the contents themselves.
Modern solutions look less monumental, but are more inventive:
Boxes, Systainers and organizers are available and factory-made:
A special place in tool storage systems is occupied by Systainers, Sorttainers and other tool boxes from Festool.
Their main advantage is docking with each other, with vacuum cleaners (on top). and in addition they can withstand a weight of 120 kg. That is, a person of heavy build can stand on them without fear of breaking them.
Box chest. This is how they did it before:
And this is what they do now:
They still make chest of drawers
Combination of a workbench built into a chest of drawers from the old Hammacher-Schlemmer company:
You can buy a plan with drawings and build your own version of this versatile and self-sufficient workplace:
Wall mounted tool boxes
In past centuries, such boxes were often made portable, so they used to try to fit as much as possible into them.
Particularly successful in this was Henry O. Studley, a carpenter and piano maker from Massachusetts who spent 30 years creating a set of tools for repairing, tuning, and even assembling grand pianos, pianos, and organs from scratch. The suitcase measures 99x46x23 cm (when closed) and holds more than 300 unique handmade tools and accessories.
Video review of Henry O. Studley's carpentry tool chest
The main thing when placing a tool is to take into account the division into zones with similar functional purposes: saws in one place, planes in another, measuring tools in a third, and so on.
Hand Tool Storage Cabinets
In past centuries, a carpenter's workplace - a table - a workbench - was combined with a chest of drawers for storing tools.
Setting up the Workshop
There is a work surface. There is a tool and there is a place to store it. And now our home Workshop is born. At the same time, of course, we value more what we have created with our own hands - a home-made home Workshop.
With the accumulation of tools, the Workshop acquires a variety of tool cabinets, convenient shelves and, as we have already noted, at least one large table, workbench (whatever you need). And then the storage system. begins to expand to its “wall”, corner, room.
It is necessary to consider how conveniently everything is placed. In this case, ergonomics advises the following:
The photo below on the left shows the recommended heights for placing shelves.
On the right - minimum opening dimensions in inches (25.4 cm)
In search of his own style, the Master arranges the Workshop premises at his personal discretion, from which a lot can be said about its owner.
For example, the Carpentry Workshop is difficult to confuse with something else. This is how it looked mostly in past centuries:
We can often find echoes of this approach in our time. This Workshop looks like a museum.
But here is a solution where everything “revolves” around the Master himself. It is immediately clear that the main working position here is sitting.
Adding a little decoration can add to the appeal of the Workshop.
And this is what a modern home carpentry workshop looks like:
You can’t confuse a home forge with anything else either. This is how it looked not only in past centuries, but even now it is not uncommon to see such forges:
And this is what a modern full-fledged forging factory might look like:
Arranging everything compactly, conveniently, and even beautifully, tastefully - isn’t this the aerobatics!
But over time, the room becomes small over time. And we are setting up a garage as a Workshop and we are also having fun as best we can. Here, too, a lot depends on the direction of the hobby. Some people gravitate toward metal and set up a metalworking workshop with the appropriate equipment.
At the same time, the most modern materials, equipment and devices can be used to manufacture a car mechanic workshop:
Someone is turning a garage into a carpentry workshop:
Below are examples of how the Workshop was set up and how it was equipped with a variety of tools and machines.
Some Masters are fans of a particular brand.
This is what a Workshop with a Festool tool might look like:
Acquiring all sorts of useful equipment, the Workshop acquires its own individuality:
In the end, your workshop may simply be your “den”:
But, with special desire...
In fact, you may end up with a ready-made furniture workshop or even a mini factory. For example, an ideal studio or an ideal workplace where you want to spend more time.
*- regarding the supply of Hammer machines, you can contact the managers of our company.
View of a similar Workshop from the left and right rear corner.
And this is what a full-fledged furniture workshop might look like
However, this may not be a purely carpentry workshop, but a universal Workshop in which you can realize your wildest ideas.
Photo example of a Russian Master
Carpentry equipment: Combined Belgian machine Robland HX 310 PRO (we will supply you upon request), miter saw Festool Kapex 120, hand router Festool OF 1400, dowel router Festool DOMINO DF 500, tenon saw Leigh D4R Pro 600mm with dust removal device and router support, grinder tape Festool BS 75 E-Set, Mirka DEROS 5650CV sander, Festool CLEANTEX CTL 26 E vacuum cleaner and FESTOOL CLEANTEC CT 17 E vacuum cleaner.
Look at the photos of the Workshop of one of our regular Customers
Prefabricated racks from standard elements.
All wooden furniture in the Workshop is made in-house.
This workbench is homemade. Welded frame from a box-section profile. The screws for the vice are also made in-house. The tabletop is made of laminated birch bars, coated with OSMO 3062 oil. Regarding the material, this is an unusual solution, but almost a year of use has not revealed any shortcomings.
He makes such products in his Workshop:
In addition to furniture, he also deals with interior wood finishing. The walls and ceiling in this room are made of self-made glued panels.
Once again we invite everyone to share their experiences and successes!
Exterior of the Workshop
The decision on how the Workshop will look from the outside depends on your taste and capabilities:
Planning: diagrams of the Workshop and options for placing equipment in it
And finally it comes to having his own separate Workshop. Often it is made (built) with one’s own hands from the foundation to the full equipment.
But in order to make a full-fledged Workshop, having laid down both convenience and expediency in it from the very project, you need to understand how to correctly arrange and place everything
Having looked for what requirements apply to these premises, we found the following information:
“... The area of the workshop depends on the number of workers, the composition and complexity of the work performed.
The workshop is equipped with: a technological room; instrumental; procurement
Ceiling height is a minimum of 3.3 m, entrance and passage openings are at least 90 cm wide and at least 2 m high.
The technological requirements for the occupancy of a carpentry workshop must comply with (GOST).
All employees must be provided with personal space of at least 4.5 square meters and individual working tools.
Pay attention to these recommendations!
When designing a Workshop, an important role is played by the initial correct planning of the internal space of the Workshop. Eskikh Workshops should be done “from the inside” - from filling. Naturally, not forgetting the limitations of the site on which it will be located.
Garage layout:
If you are making a plan - a sketch of a carpenter’s home workshop with different placement options yourself, then it is better to draw it on paper marked in advance.
A step of 0.5 meters is quite convenient. But of course, for convenience, you can make a more frequent cage.
Of course, you can also puzzle a professional draftsman:
Proper zoning of space will save resources in your work.
Here's what garage placement might look like:
When designing, you need to think in advance about the ventilation scheme and the layout of the dust removal system in the Workshop. This is especially true when working with harmful dust (wood dust is one of them).
If the space allows, then it is better to immediately take into account the possibility of convenient movement and freedom of action. Especially if several people will work in the workshop. In this case, everyone should have their own workplace.
It is advisable to consider options for the location of equipment, taking into account the route of movement of both material and worker(s) during operations. This will save time in the process of making products and will not allow you to “lose your head”, circling between machines and tables.
In any case, there are now a great many opportunities to fulfill your Dream. There are as many options as there are Masters. And we will be glad if our selection is useful to you!
We set aside a corner for storage
When arranging a garage, it is recommended to designate separate areas for storing certain items.
Fishing rods and tackle
The rod rack is made in two stages. First, a PVC pipe is attached to the wall below, inside which holes for handles are formed every 10 centimeters. Then foam rubber (or other similar material) with slots for fixing the rod is mounted on top.
It is recommended to use organizers to store gear.
Canisters and other containers
Cans and other similar containers are usually stored in a corner of the garage. But there is another, more interesting solution for storing such items. Under the canisters, you can organize a hanging shelf located above the level of the car owner’s head. This approach to arrangement will free up space inside the garage.
Construction materials
It is optimal if building materials are stored upstairs. Thanks to this, free space is not cluttered. To quickly organize a place to store building materials, just attach several metal beams or PVC pipes to the ceiling.
What sets you up for your work process?
Irina V.
Browse books on art, decor and design while enjoying a cup of coffee.
Marie V.:
Solitude and silence are my everything.
Elena Z.
: Audiobooks tune me into my work process, preferably fantasy or something similar. Harry Potter, The Lord of the Rings and The Hobbit have already been listened to in Russian and English a great many times. I’m thinking of downloading them in French, which I once studied at school.
Ekaterina K.:
But, oddly enough, cleaning gets me into the work process. Cleaned up, meditated, “cleared” my brain - and you can create! And of course, my favorite books are books on ornaments.
Arrangement
To provide yourself with a place to work that is comfortable, safe and provides a positive environment, you need to fulfill the following requirements.
Electricity supply
Due to the fact that the workshop is, so to speak, not professional, the voltage in the network will be 220 volts. Sockets should be in conveniently accessible places near the workbench and tables, that is, at hand. All electrical wiring needs to be checked and, if possible, repaired.
Shelves
The placement of wall shelves should be such that any jar can be easily reached. It is advisable to have transparent jars, so that at first glance you can immediately see what is in them and what size it is. This saves time when working. There will be no need to climb through banks and look for the right size screw.
Tool storage
We are talking about hand tools. It should be located in close proximity to the workplace. Hang it on the wall.
Lighting
For workshop lighting, it is recommended to choose fluorescent lamps, that is, fluorescent lamps. The lighting of such lamps allows you to better choose the tones and colors of the material when processing workpieces.
Walls and ceilings should be painted with light colors to make the lighting brighter.
Daylight
For better lighting in the workshop, it is advisable to have windows. The location of the workplace or workbench should be close to the window.
Hood
When working with wood, a lot of fine dust is produced, which is very dangerous to human health. In addition to personal protective equipment, a main exhaust hood must also be present. You can read about personal protective equipment in the article.
There are a lot of options; the simplest and least expensive is an exhaust fan installed in a window.
It is also recommended to install dust collectors if you have a stationary machine installed in your workshop. Small portable dust collectors come with hand-held power tools.
Setting up a workshop in a garage - important nuances
When organizing a carpenter's workplace in an existing car bay, it is necessary to take into account the features of this room. In such situations, the workbench, machines, cabinets and racks are located along the walls at a distance of at least 1–2 m from the machine.
In garages with standard sizes, it is advisable to replace a stationary workbench with a hanging table with a folding tabletop. If it is necessary to carry out any work, it unfolds, and after completion, it folds up and is fixed to the wall with clamps.
If the dimensions of the autobox do not allow the installation of shelving structures or cabinets, working tools are placed on hooks, special cassettes and trays. All these devices are mounted on the walls.
Last recommendation. Setting up a workshop in a garage used for storing a car should only be done as a last resort, as the likelihood of damage to the car when performing carpentry work is very high. It is better to organize your own repair shop in any other unused premises.
Work safety - how to ensure
Keeping your work area clean and tidy not only creates a pleasant work environment, but also ensures safety and health.
Always follow good work practices, such as wearing appropriate work clothing and protective equipment and using tools for the purpose for which they are intended. Be careful and protect yourself, your family, friends and anyone else who may have reason to enter your workshop.
Eye protection must be worn whenever necessary, such as when using a milling machine, drill, power saw, lathe or any tool with a fast moving part.
Noise-reducing headphones or earplugs are very important when working with loud equipment; Hearing damage often goes undetected for several years after it occurs.
Safe, comfortable footwear is a necessity, and protective work clothing such as overalls or overalls is essential when conditions are or will be contaminated with dust or other contaminants.
Close-fitting clothing and a hairnet will help prevent loose clothing or hair from getting caught in the machinery.
Machine tools and stationary machinery must have safety switches, such as circuit breakers and emergency switches. Automatic disconnectors automatically turn off the machine when the supply of electricity from the network stops, making it impossible for it to accidentally turn on when the power supply is suddenly restored.
Emergency stop button
The kill switch is usually a large red button that, when pressed, turns off the machine. As an added safety feature, many of these devices must be manually reset before the machine can be turned on again. Check these devices regularly to ensure they do not fail you in an emergency.
Disposable face shields/respirators provide adequate protection against normal dust, but if you work in environments with toxic fumes or very fine dust, respirators with replaceable cartridges should be used.
When using a mask/respirator, carefully follow the manufacturer's recommendations and, if the work requires the use of toxic substances, carefully read the description of the substance to comply with the necessary precautions
If your work produces a lot of dust, it would be wise to invest in a dust extraction system. All wood dust is potentially hazardous, especially from fiberboard (MDF, PSP) and chipboard. The simplest solution for a small workshop can be a household vacuum cleaner, but if there is a lot of dust or the work is carried out over a large area, then a system with dust removal pipes connected to each type of equipment would be best, or you can use a mobile dust collector that can be transported around the workshop to those places where where it is needed. For emergencies, keep a fire extinguisher and first aid kit on hand.
Garage cleaning
Don't forget about cleaning the room. To make this job easier, I use a vacuum cleaner that is located on the top shelf above the workbench. The flexible hose of the vacuum cleaner easily reaches anywhere on the workbench and is always at hand. It is better to immediately collect sawdust and shavings with a vacuum cleaner. For final cleaning of the workplace, you need: a long-handled brush, a dustpan and a waste container.
The vacuum cleaner was placed on the top shelf of the rack above the workbench. Turning it on and off using a standard switch is not always convenient. For this, there is a special socket with a switch, which is located in a convenient place at a low height.
In my garage I always have soap, hand washing paste, a fresh towel and a washbasin, which can be replaced by a plastic bottle with a stopper in which several holes are drilled.
In the workshop you need to have a first aid kit with a minimum set of medications (you can use a car first aid kit for this), a fire extinguisher and a piece of fiberglass in case of an unexpected fire.
In the garage basement the temperature does not drop below 0 degrees. So I planned to place a small water tank, an electric heater and a sink with faucet there.
ADDITIONAL WAYS TO MAKE THE MOST OUT OF YOUR BUDGET
How to save on clamps
A pneumatic nailer secures joints with pins without splitting the wood. The pins hold the pieces in place while the glue sets.
Want to reduce the need for clamps? Try replacing them with several hairpin nails when gluing.
A small compressor and pneumatic nailer will cost about $200, which is no more expensive than a few good rack clamps. If you already have a compressor, purchasing a nailer will only cost $40-50.
Buy boards by the cubic meter
Purchasing lumber is not part of setting up a workshop. But all the work in a carpentry shop involves boards. Why not save on this too by buying them in bulk? If the professionals do this, then you can do it too by teaming up with a group of friends and buying boards together. You may be lucky and be able to get an additional discount.
Basic requirements for a carpenter's workshop
It is not enough to understand how to build a carpentry workshop or how to choose a suitable premises. When setting up a carpentry workshop, you need to remember five important factors, the presence of which guarantees convenience and safety while working inside the future premises:
- fire safety;
- effective sound insulation;
- high-quality lighting;
- proper ventilation;
- efficient and safe heating.
Let's talk about all this in more detail.
Ventilation
Even the simplest forced ventilation installed in a carpentry workshop will make your work much more comfortable and safer. Thanks to ventilation, you will not have to inhale wood dust, which can cause irritation of the respiratory tract and even diseases.
If you plan to install woodworking machines in the workshop, then installing a suitable chip ejector is an issue that requires a mandatory solution. Otherwise, the room will always be a mess, and all efforts aimed at ensuring fire safety will not have the desired effect. After all, wood dust, scattered in large quantities in the air, can ignite like gunpowder from the slightest spark.
Sawing
First of all, the workpieces need to be trimmed
- make even cuts
perpendicular
to the workpiece. It doesn’t matter what kind of furniture you make, stools or cabinet sets. It is important to be able to cut accurately, ideally also at certain angles.
If you are a serious enthusiast, you can do this manually using a miter box. But still, a miter saw is a must-have in a carpentry workshop. It will be difficult without her.
It is desirable that the saw has a broach, that is, it allows cutting fairly wide workpieces. The tool is good and not particularly expensive. The main thing, as with any other tool, is that there are no backlashes and you can set the angles you need.
The tree also needs to be dissolved or trimmed
, that is, sawing
along
. To do this, you need a circular saw, preferably installed in a cutting table. You can also unravel using a manual circular saw with a parallel stop or along a guide rail, but it is much more convenient and productive to do this on a table.
With planing
For wood, the situation is more complicated, because it is not easy to plan a wide enough workpiece with a hand plane. To do this, you need to develop skill for a long time, remove wood in different directions, taking into account the location of the fibers, constantly monitoring the uniformity of removal across the entire width and length of the workpiece. Simplify your life - but do not improve the quality of processing! - can be done using jointing and thicknessing machines.
Important: a thickness planer does not replace a jointer, but complements it!
The jointer allows you to first obtain
one flat plane
of the workpiece, and the thicknesser,
based on this plane,
levels the opposite side. For beginners, this combination of two machines makes it easy to obtain even workpieces of relatively large length and width, uniform in thickness. This is very important when making furniture. But buying two machines is very expensive and often redundant for an amateur. Therefore, there are a lot of tutorials on the Internet on how to make a surface planer or jointer from an ordinary hand plane and two blocks.
Pneumatic and electric tools
In Canada there is a settlement of Old Believers who live by their own laws: they do not use electricity, do not ride bicycles or cars. But this does not prevent them from having a carpentry workshop and using compressed air instead of electricity. To achieve this, all rooms are equipped with air ducts from a huge compressor; each workbench has a connection point for pneumatic tools. Using various carpentry tools, Canadian craftsmen are quite capable of making furniture without electricity.
The workshop has huge windows, as electric lighting is not used. All machines operate from compressed air. The external design of the machines does not change, only a pneumatic motor is installed instead of an electric motor. The workstation provides operation of pneumatic screwdrivers, drills, and milling cutters.
Sawing machine
The high speed of the grinder allows it to be used with a saw blade for wood processing. Without some protection this is very dangerous. The craftsmen have come up with a very useful and original homemade device for do-it-yourself carpentry, which allows you to safely use an angle grinder as a sawing machine.
For this purpose, special protection is made, similar to the standard casing that comes with the tool. It has a slide, two handles and a rotating device. The slide looks like a plate measuring 200 x 120 millimeters, with a slot for the saw blade to exit.
Two handles are welded to the casing to hold the sawing machine during operation. It is very convenient to cut and saw thin lumber, and the high speed of the machine on the joiner makes it easy to cut material up to 30 millimeters thick.
Vertical drilling model
The frame can be made from pieces of angle 50x50 millimeters and a steel sheet 5 millimeters thick. To do this, weld two corners along the edges of the sheet along the entire length; they will serve as legs. Table size 350 x 200 millimeters. Weld a bracket from a square pipe 80 millimeters high on top to attach the rack.
The stand or guide for the drill is made of a square pipe three millimeters thick. A section of water pipe eight millimeters long is welded into the upper hole. A cable tensioning mechanism is inserted into it. The height of the stand is 700 millimeters. The stand is inserted into the bracket and crimped with four bolts - two on two sides of the square pipe.
The carriage is a movable unit on which the drill is attached. It is made of 50x50 corners welded together, the height is 170 millimeters, the eyes are made of strip three millimeters thick. An axle is inserted into the eyes, around which the cable is wound.
The carriage drive consists of an axis on which a cable and a handle are wound. One end of the cable is fixed to the bottom bracket. The upper end of the cable is fixed in the pipe at the upper end of the rack. A special bracket with a seat for an electric drill is attached to the carriage. The drill itself is tightened with a special clamp made from a strip 2 mm thick and 40 mm wide.
Homemade turning device
- drive unit;
- bed;
- tailstock;
- handyman
The only difference is in the choice of drive. Whoever has any electromechanical devices is installed on the product:
- electric drill;
- Bulgarian;
- milling cutter;
- electric motor from a washing machine.
You can improve an already made metal-cutting structure by adding additional functions to it. For example, you can place a drill press horizontally on a workbench or table. The drive is an electric drill. The tailstock will be a work table in which a hole is drilled along the axis of the drill in the chuck and a thread is cut for screwing the fixed center.
Additionally, install a hand rest, securing it to the movable bracket of the rack. The workpiece is fastened with one end in a trident clamped in a drill chuck, and the other end in a fixed center. For a small number of simple parts - a quite good homemade woodworking machine with devices and equipment for the manufacture of shaped parts obtained by turning.
The list of tools and mechanisms for a workshop or garage is limited only by the area of the room and the financial capabilities of the owner. Despite the fact that many products are made from waste, the costs of purchasing parts and tools required for assembly are quite significant.
Floors
Setting up a garage becomes more difficult when it comes to its most important component - the floor. The floor must be able to support the weight of the car and other items stored in the garage. Just like the walls, it must be moisture and fire resistant.
When choosing a material that will cover the foundation of a building, it is recommended to give preference to concrete, since it is the simplest and cheapest method.
The method of finishing the floor depends on the foundation itself. If the foundation is cast, then concrete is the most preferable simple option. An alternative to concrete can be acrylic or polyurethane mixtures. It is also recommended to cover the floor with a special solution - asphalt mastic.
It helps protect the floor from external threats in the form of chemicals that corrode the coating.
Installing a floor in a garage.
An important problem in the garage is the formation of snow puddles in winter. To eliminate this factor, it is recommended to make a gutter that will lie across the gate and go out onto the street
The floor itself will need to have a slight slope so that water does not collect in the room. By the way, this same problem can be solved by properly installing the roof.
A good finishing option would be to lay the floor with paving stones or paving slabs, which will be more expensive than concrete and its alternatives. In addition, laying shockproof tiles is considered as an option if constant work with heavy tools is expected. The tiles should be rough for safety reasons.
Before choosing a finishing method, it is recommended to calculate the required list of materials for the work using drawings. Based on the price and requirements for the premises, you can choose the most appropriate option.
Briefly about the main thing
Building a workshop on a summer cottage is not advisable if it will be used only during the season and only for rare repair work as needed. In such cases, it is enough to equip a place in the house, garage or utility room. But those who love carpentry, plumbing or blacksmithing need a spacious and well-equipped room. Everything in it should be thought out to the smallest detail, from the material of the walls and the location of windows to the arrangement of equipment and its connection to the electrical network, storage of material and finished products.
Ratings 0
Where to begin
Initially, I considered 3 options: a house, a bathhouse, a trailer.
1. A trailer or cabin. Most often they start with this. You can store some things, tools in it and live for the first time. It is cheap.
But I don’t like this temporary structure. All communications will have to be carried out there, and then all this will have to be redone. In general, I don’t like wasting time on something temporary. But I don’t rule out that something like this will still have to be installed.
2. Home. After installing the trailer, a house or guest house is usually built. I don't want to build a house in the first place for 2 reasons.
First. I have no experience and there will be a lot of mistakes in space planning. As always happens when you do something for the first time. I’d rather build something else for now and plan the house more carefully.
Second. If you build something normal, it will be expensive. But it’s expensive to build and there’s no desire to mess up by building in the wrong place or in the wrong way.
They build a house first because they want to move quickly so as not to spend money on temporary rent. I’m in no hurry on this issue, I have a place to live.
3. Bathhouse. The bathhouse can also perform all the functions listed above + you can relax in it. I don’t yet understand 100% what kind of bathhouse I want and where it is best to place it, so this option is not suitable.
Eventually. Having ruled out these options, I decided to build, first of all, not a temporary shed, but a multifunctional building, which will also serve as the original housing, warehouse, workshop and communications center.
A warehouse and a workshop are two essential things for life on earth. My grandmothers had plots with houses, my parents had a garden with a house, and then a dacha appeared. Everywhere everything was constantly littered with some necessary things, building materials and various rubbish. Therefore, it is better to immediately build a large warehouse and not build additional sheds and storage rooms.
I believe that if such a building is located approximately in the center, then it will be as convenient as possible to use it in the future and draw communications from it.
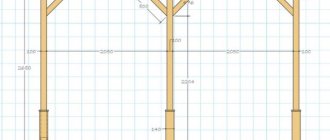
Here is the first sketch of the site plan, so far I have placed only 3 objects: a road with an entrance, a pond and a warehouse-workshop.
I don’t know the exact dimensions of the sides of the plot yet. I measured it using Yandex Maps and it turned out to be approximately 120 x 80.
The site is not located on the cardinal points. North is in the upper right corner.
How to convert a garage into living space
Not a garage, but a full-fledged home!
A residential garage is beneficial in all respects, since you can spend time in it with the greatest comfort. But there are special requirements for such a room. First of all, you need to take care of installing a groundwater drainage system from the walls and floor of the garage.
For this purpose, wall or ring drainage is made. In the first case, perforated pipes are laid at a distance of 50-60 cm from the building, in the second - along the perimeter of the area on which it is located. The water is discharged into a septic tank, storm drain, or the nearest body of water.
Insulation
Walls and ceilings are insulated with a 5-20 cm layer of insulation. These can be mineral wool slabs or rolls, polystyrene foam. The method of performing the task depends on the material from which the garage is built. If it is a frame type, the insulation is laid between the studs and the internal and external walls are sheathed with OSB.
For premises made of brick, concrete, foam and gas blocks, plasterboard structures are built, the basis of which is a frame made of metal profiles. In this case, the insulation is laid between the vertical posts and they are sewn with plasterboard.
Network engineering
In a residential garage, life support systems are required:
- circuit;
- water pipes;
- sewerage;
- ventilation;
- heating.
Each of them can be installed in different ways and from different materials. The best option is to connect the water supply and sewerage to centralized networks, but there is not always a chance to implement this method. Therefore, most often, an autonomous septic tank is built for the sewerage system, and water is taken from a well or using storage tanks.
Interior arrangement of a residential garage
Everything you need is at hand
The interior space of a residential garage should have:
- place for cooking;
- bathroom;
- bath or shower;
- sleeping area.
If the room is small, you can save space by building a canopy under the ceiling. A sleeping place is arranged on it, a TV or stereo is installed. In this way, they create a kind of second floor, the height of which is only enough to accommodate a bed and small-sized equipment.
For small residential garages, such a method of arranging a sleeping place as a folding shelf is also suitable. Its design can correspond to railway analogues or be developed independently.
Workplace: table with work surface or workbench
Let's immediately look at examples of work surfaces. The working surface and its design strongly depend on the direction of your activity: model making, carpentry or some other craft. It also depends on the accommodation conditions and your capabilities.
Let us consider in general the options for working surfaces depending on the area of activity.
The modeller's workplace looks like this:
Popular photo!
The photo above shows the modeler’s workplace. Many Craftsmen also have for work - just a part of the wall and a desktop. But not everyone will have such an organized space that order will appear on its own, as a result of placing tools and painting materials in abundance in open, structured access on the walls within arm’s length. The desktop is completely free, there is only a protective mat with markings. On the left, on magnetic holders, the tools necessary for work are located. Local lighting completes the idea of the Ideal Mini Workshop. Jeweler's workplace and table:
Popular photo! In the photo above there is a non-standard, but convenient solution - a semicircular workbench for precise small work - suitable for a jeweler and for any Craftsman working with small-sized products - everything is within reach. Popular photo! Despite its antiquity, even now such a table-bureau is attractive for a hobbyist, with original rotating drawers:
In the photo below is another “folding” workplace (transformer) of the Hobbyist: The Magic Box - “The Magic Box,” so named because of its versatility, was made in Switzerland in the 1950s by Mummenthaler & Meier. A fully foldable, multifunctional desk or compact home office that lets you get rid of any work clutter by simply closing the doors. Has built-in lighting above the tabletop. Dimensions when open: 167 cm x 73 cm x 113 cm, when closed: 83 cm x 53 cm x 113 cm.
And then there's Mummenthaler & Meier's take on the rare The Magic Box: a tall cabinet crafted from teak in the 1950s and featuring a hidden work desk surrounded by convenient drawers and adjustable shelves.
An important note: for a sedentary workplace, the coverage area must be taken into account. The diagram shows the minimum acceptable dimensions:
A workbench can come in a variety of sizes and shapes. You can look at this topic in more detail in our photo review on workbenches . Mini workbench: Can be as a tabletop version: And as a mini workbench bench
Folding carpentry workbench:
Workbench with workbench capabilities: Examples of a full-fledged carpenter's workbench might look like this:
Here's what the industry standard recommends for woodworking benches.
“... In a carpentry workshop, workbenches are positioned perpendicular to the windows so that the light falls from the left. It is advisable to arrange workbenches in 4-5 rows of 4 workbenches in each row with a distance between rows of at least 100 cm. Area per carpenter: 4.5 sq. m.
The industry standard for carpentry workbenches with a wooden base provides the following requirements:
- The height of the workbench can be in three positions: 700+15, 790+15, 900+15 mm; tabletop dimensions: length - no less than 800, width - no less than 450 mm; the moisture content of wood for the manufacture of workbench parts should not be more than 12%; all wooden parts must be made of hardwood (Lumber. GOST 2695-71) or softwood (GOST SEV 2369-80), provided that the main working surfaces are covered with plywood in accordance with GOST 3916-69; the height of the stool should be fixed in the range from 700 to 750 mm, the shape of the seat is round, with a diameter of 350+5 mm or square with a side of 350+5 mm; The average service life of carpentry workbenches should be at least 6 years (for the highest quality categories - at least 8 years) ... "
What experienced Masters recommend: the height of the working surface of the table should be at the level of the phalanx of the thumb.
Regarding the height of the working surface when working while standing, there are the following recommendations in ergonomics: in the picture, the first figure is for precision work, the second figure is for light work, the third figure is for heavy work:
More good examples of carpentry workbenches:
An assembly table is of great importance in the workshop, where products can be assembled. But in many cases it is replaced by either a workbench or a multifunctional table. In this regard, an excellent ready-made solution is the MFT-3 table from Festool: and its smaller brothers, which have adopted this idea. For example, the KREG workbench DIYers went further and improved this idea in their own way: Folding table a la Festul in a mobile version Or a stationary table in addition to the MFT-3 table itself
All homemade improvements and options are in the 2021 update reviews
- Development of Festool ideas and homemade solutions 2.0
- Variations on the theme of the multifunctional table Festool MFT 3
A large work surface is often necessary in the Workshop, where it is necessary to work with large workpieces, and therefore often, in order to save space, a table or workbench can be combined with machines into a large single work surface:
Popular photo! When a Workshop is located in the garage, you want to have a mobile workplace, a table, a workbench, a machine (and more than one), a storage system - in one “bottle”. As they say: “everything to the maximum.” You can see a more detailed overview of workbenches on the page “Carpentry workbenches and tables for carpentry work”
How to choose the right place for a workshop
It is advisable to choose a place on the site for the workshop in an open space so that shadows from trees or other buildings do not fall on it. Due to this, in winter it is possible to save a little on heating or it will simply be warmer to work, since on fine days the sun will help with heating. And all year round during daylight hours you won’t need to turn on the lighting fixtures or you can use them minimally, since there will be quite good natural lighting, which, by the way, is better for the eyes. In addition, this will save on electricity.
If possible, the workshop should be built away from the house and buildings with pets, since even if it is not intended to house too noisy equipment, almost any work will still be accompanied by sounds that are not the most pleasant for any ear. True, the farther from the house, the more extensive the supplied communications (electricity, heating and plumbing) are, as a rule, and these are additional costs.
Place for building a workshop
It is also recommended that the workshop is not in a low area. As a rule, rainwater and melted snow water accumulate there. Even if the workshop is not flooded, then excess humidity will become a serious test for the building itself, the tools of the machines and the supplied communications. All this will quickly become unusable. Even emergency situations, for example, short circuits in wiring or equipment, cannot be excluded. You can, of course, take protective measures against flooding and humidity. When building a workshop with your own hands, make the foundation higher and waterproofed, provide for drainage from it if possible, take care to strengthen the moisture insulation of the entire structure, and the like. However, all this will require additional financial costs, as well as effort and time for arrangement.
It is desirable that the chosen location has easy access to the workshop at any time of the year. So that in winter it is not too swept away, otherwise you will have to put a lot of effort into periodically clearing the path and the approach to the entrance doors, and in the spring you will have to push a much larger volume of snow away from the walls to prevent them from flooding. And finally, if there are places on the site that are not at all suitable or are of little use for growing any plants, then it is recommended to choose one of them for a workshop.
Subtleties in drafting projects
When all preparations are completed, it is time to design. The result of your efforts should be a document that is a project for the future workshop. For construction, there is no need to draw up construction drawings according to all the rules; detailed sketches indicating the actual dimensions of the future premises and the dimensions of the main and auxiliary equipment specified in the second list are sufficient.
There should be several sketches. It is difficult to indicate all the elements of a structure on one projection. Therefore, your sketches should include all the details down to the smallest detail. External and internal dimensions of the room and its elements are indicated without observing scale, but must reflect the actual position of objects and building elements.
An approximate calculation of the required area for a workshop will be the product of the area of all equipment, shelving and cabinets and a coefficient equal to 1.5-2. Still, if computer graphics looks like unplowed virgin soil to you, then the visual layout of the carpentry can be done using the old-fashioned method. Take a sheet of graph paper, draw on it the premises of the future carpentry on a scale of 1:20, agreeing with the approximate calculation and pre-made drawings.
From the same paper, cut out rectangles of equipment and auxiliary structures to scale, but according to real dimensions. This will make it possible to correctly place them in the workshop, taking into account workplaces and aisles. If necessary, you can move the rectangular layouts to determine the perfect workshop layout:
- On a sheet of graph paper, draw two lines perpendicularly, indicating the walls.
- We draw the door of the room. The size of the doorway should be slightly larger than the largest equipment. Then there will be no problems during its transportation. We arrange the equipment;
- We draw the remaining walls;
- We determine the location of the window openings and put them on the drawing. It is advisable to equip the eastern and southern walls with windows. This will allow you to get more sunlight and heat;
- Measure all dimensions and, taking into account the scale, apply them to the workshop layout.
This will be your guide to further actions.
Planning: diagrams of the Workshop and options for placing equipment in it
And finally it comes to having his own separate Workshop. Often it is made (built) with one’s own hands from the foundation to the full equipment. Stylish Workshop in Kharkov, more about it in the review Business idea: Creative carpentry workshop without compromises But in order to create a full-fledged Workshop, laying down both convenience and expediency from the project itself, you need to understand how to correctly arrange and place everything. Having searched, what are the requirements? for these premises, we found the following information: “... The area of the workshop depends on the number of workers, the composition and complexity of the work performed. The workshop is equipped with: a technological room; instrumental; procurement Ceiling height is a minimum of 3.3 m, entrance and passage openings are at least 90 cm wide, and at least 2 m high. The technological requirements for the occupancy of a carpentry workshop must comply with (GOST). All employees must be provided with personal space of at least 4.5 square meters and individual working tools.
Pay attention to these recommendations! When designing a Workshop, an important role is played by the initial correct planning of the internal space of the Workshop. The sketch of the Workshop should be done “from the inside” - from the filling. Naturally, not forgetting the limitations of the site on which it will be located. Popular photo This photo also suggests that interest in our craft is determined by the depth of thought, simplicity of the idea, and most importantly, practicality and ease of implementation. Repeat this at home and implement, if not everyone, then most - for sure. Garage layout: If you are making a plan - a sketch of a carpenter's home workshop with different placement options yourself, then it is better to draw it on paper marked in advance. A step of 0.5 meters is quite convenient. But of course, for convenience, you can make a more frequent cage. Of course, you can also puzzle a professional draftsman: Proper zoning of space will save resources in your work.
Here's what garage placement might look like:
When designing, you need to think in advance about the ventilation scheme and the layout of the dust removal system in the Workshop. This is especially true when working with harmful dust (wood dust is one of them - useful link Selecting an industrial / construction vacuum cleaner for a power tool). If the space allows, then it is better to immediately take into account the possibility of convenient movement and freedom of action. Especially if several people will work in the workshop. In this case, everyone should have their own workplace. It is advisable to consider options for the location of equipment, taking into account the route of movement of both material and worker(s) during operations. This will save time in the process of making products and will not allow you to “lose your head”, circling between machines and tables. Popular photo
How to arrange everything “wisely” in the Mater’s room or garage-workshop? Moreover, as always, there is not enough space and minimal equipment. In this sketch, the placement of machines, workplaces and storage areas is also justified by the manufacturing production cycle. And this is the right approach: to go not from forced restrictions, but from the original idea - that is, constructing a diagram of the production process for making a product. This immediately allows you to avoid many production losses in the future.
Choosing a location for a workshop: good advice
Place for building a workshop
When determining a location for a future carpentry workshop, it is necessary to take into account some axioms of its placement:
- As far as possible from residential areas and buildings with domestic animals, if any. The noise produced by work equipment will have an adverse effect on the nervous system of your household.
- It is advisable to choose an open space. The absence of shadows will allow you to save a little on heating the workshop in winter and on lighting throughout the year. Solar radiation will heat and illuminate the room.
- To avoid flooding of the building during rains and snowmelt, there is no need to build it in places with a low general level. This can lead to problems with the building itself and even to emergency situations, such as electrical short circuits.
- It is advisable to ensure ease of access in all weather conditions in order to avoid constant snow clearing in winter, and to prevent flooding of the building during spring snowmelt.
- A plot of soil not suitable for farming will be an excellent place for a future builder
Drying
The wood needs to be dried
, and dried
according to a certain method
. Wood is usually sold at “natural moisture content,” meaning it contains about 25–40% moisture. If you make something from such wood, then as it dries the product will warp and crack. Regardless of how many layers of varnish you apply to it. Generally speaking, wood is a living material and subject to seasonal changes in air humidity, which is why its linear dimensions fluctuate throughout the year: in length (along the fibers) the fluctuations are extremely insignificant, and in width a wood piece can swell and shrink by tens of millimeters, in depending on the overall size of the product.
Therefore, the main rule is that the wood must first be dried to 8 - 12% humidity, only after which it can be used.
How to dry wood in an apartment? Carefully fold the boards as far away from the radiators as possible, arrange the layers with bars of the same width and press something on top. It is advisable to coat the ends with paint, since this is where moisture evaporates most intensively and cracks may appear along the boards. It’s great if you can buy chamber-dried wood that has already been dried; this will help you avoid numerous defects if you start drying it yourself.
Market and target audience analysis
15 years ago, plastic windows and doors stamped from PVC and rolled steel flooded into the Russian building materials market, ruining numerous carpenters. However, recently the production index of wood products has been steadily increasing, not only in our country, but also abroad.
Today wooden window blocks are in demand. According to this indicator, the level of 700 thousand square meters has been exceeded in the Russian Federation. meters. For other carpentry products, more than 1 million cubic meters were produced and sold. meters. Consumers are striving for environmental standards and are increasingly trusting plastic products. If in 2010 87% of residents called metal-plastic windows a good choice, then in 2021 this figure dropped to 74%. That is, now the halo of potential customers for carpentry products makes up a quarter of the adult population and continues to grow.
How to choose the right place for construction or arrangement of a workshop
It often turns out that there is simply nowhere to put woodworking tools - as a rule, they bring in the majority of the income, requiring almost a separate room for their placement. This trend is especially noticeable with regard to machines and tools that require a significant amount of space.
The best ones for this purpose are:
- summer dining room, not used for its intended purpose;
- ordinary country veranda;
- a barn or garage equipped with electricity (your own or rented);
- semi-basement premises;
- attic;
- premises attached to the house;
- a certain room in a large private house (a separate entrance is required).
Setting up a “pit”
The issue of building a “pit” is very individual, but for minimal maintenance of the machine it is simply necessary. If you decide to do it, you can use several recommendations:
It is best to make the walls and floor concrete. The edges of the “pit” need to be strengthened with iron corners. It is necessary to think about how to cover the “pit” when it is not in use
As an option, use a base made of strong boards fastened together. In the walls of the “pit” you can provide special niches for tools. It is important to think through the “pit” lighting system in advance; https://www.youtube.com/embed/_Jpzw7v8MkY
The importance of arranging a “pit” is that it can be used to diagnose faults in the vehicle’s chassis, as well as replace some of its parts and change the oil. Having a “pit” and shelving in the garage, we can already talk about partial arrangement of the workshop
Video description
Many interesting ideas for the workshop can be seen in this video:
A drill, screwdriver, circular saw and other frequently used hand-held power tools can be conveniently stored on an open shelf located under the workbench. It is advisable to keep the rest in closed cabinets, especially if the work involves the formation of a large amount of dust.
Advice! The space under cabinets and shelving should be covered with a plinth or made high enough for easy cleaning and searching for rolled-up small parts.