The secret to the popularity of brushing
The name of the technology is of English origin and means “brushing”. Brushing wood with your own hands is something that not only experienced craftsmen can do: with the right approach, anyone can master the craft of brushing.
Aged wood has not gone out of fashion for many years. Thanks to artificial aging, you can change the appearance and color of a particular type of wood, bringing a new personality to the room. Using brushing, they create a rustic, classic, vintage interior.
Artificially aged wood looks noble, a house with “antique” window frames and doors and patinated wall panels seems to have its own history. Today, aged wood is widely used not only in country houses, but also in city apartments.
Facade cladding with brushed clapboard
Cladding the facade with clapboard is a long and labor-intensive process that requires preliminary preparation. To install this finishing material, a sheathing is required, which should follow the contours of window and door openings. Therefore, you need to make sure that the load-bearing surface is sufficiently reliable and strengthen all loose bricks and window and door trim elements.
Example of a façade before finishing work
It is necessary to choose in advance the method of fastening the lining. There are several of them:
- on self-tapping screws;
- on staples;
- on nails;
- on clamps.
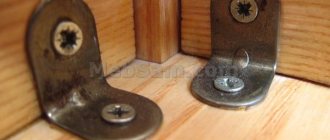
Claymer for fastening lining
To fasten with self-tapping screws, you will need a drill or screwdriver. A battery-powered screwdriver is preferable, as it is much more convenient to work with.
Screwdrivers
For fastening with nails, use a pneumatic gun; for fastening with staples, use a construction stapler. Claymers are traditionally used for interior decoration.
Pneumatic nail gun
Mechanical stapler
For external cladding, the lining is secured either with self-tapping screws or nails.
The work of finishing the facade requires not so much skill as care and accuracy. You need to have all the necessary tools at hand:
- jigsaw for sawing off panels;
Jigsaw
- level;
- tape measure, square and pencil;
- a block for tapping the panels together (you can use a mallet instead).
Wooden mallet
Brushed lining installation technology
The lining can be mounted on walls vertically, horizontally or diagonally. For vertical fixation, Soft Line eurolining is better suited than others. When decorating the facade, a technique is used to emphasize the most significant elements with vertically and diagonally installed panels.
Step 1. Installation of the first layer of vapor barrier.
Using staples and a stapler, attach the vapor barrier film so that its sheets overlap each other by at least 10 cm. The open edges of the film are glued with double-sided tape.
Step 2. Installation of the sheathing.
Wooden sheathing for siding
To install the sheathing, use slats with a cross section of 20x40 mm, which are installed in the direction perpendicular to the installation of the panels. The rail is secured with self-tapping screws. If the wall is brick or concrete, pre-drill holes (through the lath), drive in dowels, and only after that screw in the screws.
The sheathing strips are installed in increments of 40-50 cm. During the work, the correct installation is regularly checked using a level. It is necessary to ensure that all elements of the sheathing are located in the same plane.
If uneven walls are found, thin planks or plywood are placed under the planks. The bars should be located in the corners of the house and along the contours of door and window openings.
Installation of wooden sheathing
Step 3. Installation of insulation.
Mineral wool or polystyrene foam slabs are installed in the openings between the sheathing strips and secured to the wall using dowel nails.
Wall insulation
Insulated house
Step 4. Installation of the second layer of vapor barrier.
A vapor barrier film is attached over the insulation and sheathing.
Fixed membrane
Step 5 . Installation of the second level of sheathing.
If eurolining is selected, installation of a second level of sheathing is not required, since there are gutters on the back side of each panel that remove moisture from the wood. If brushed lining without gutters is used, bars of the same cross-section: 20x40 are attached over the planks of the first level of the sheathing. This way a ventilation gap is created.
Counter-lattice
Step 6. Installation of the first lining.
The lining is installed in the direction from bottom to top or top to bottom. The correct installation of the first row largely determines the appearance of the finish. Therefore, before installing the lower panels, markings are made using self-tapping screws and a thread stretched between them. If the wall is flat, a horizontal line is drawn on it.
We recommend: Refined and chic: how to use burnt wood in the interior
The first panels should be located at such a distance from the plinth or cornice that the flashing can be installed. The first lining, like all subsequent ones, is installed with the tongue up when laid from bottom to top, and with the tongue down when laid from top to bottom.
Corner decoration
Facade finishing with clapboard
Installation of lining horizontally
Completed installation of lining
Wood quality
For brushing, use soft but durable wood with good structure. Beech, cherry, and birch are not suitable for structuring.
Pine, spruce, larch, walnut and oak are suitable choices for all artificial aging techniques (with the exception of oak - it is difficult to fire, but is perfectly tinted). Pine is the most affordable material - frames, boxes, and shields are often made from it.
Boards and wooden products for brushing must be dry (dried industrially to 10-12%). A simple edged board will not work, since the moisture will evaporate for months and years and will affect the appearance of the treated surface (the board may “sink” and become warped over time).
What wood to use
The essence of brushing is a more vivid manifestation of the texture of wood, its natural pattern. This is achieved by creating a relief surface from which soft fibers are removed, while hard fibers, on the contrary, remain. Hence the first obvious truth: there must be fibers of different densities in wood.
Therefore, species with a uniform, dense structure, such as maple, beech, alder or teak, are not suitable for brushing. But this does not mean that hard wood cannot be aged by brushing. For example, when processing oak boards, a very interesting effect is achieved: the appearance of thin, ragged scratches, which, if painted correctly, makes such products a very valuable decoration.
Coniferous species look best after brushing. The most common pine has a poor texture, and the pattern after processing is unlikely to surprise anyone. But in spruce and larch truly unique patterns appear.
Any wood for brushing must be well planed and free from any kind of defects and blemishes; brushing will not eliminate them. The moisture content of wood should ideally be 10–12%, but in any case not more than 15%, otherwise the fibers will tear and form abundantly fine pile.
How the relief structure appears
Aging of wood occurs due to the difference in the hardness of the layers - the soft layer gradually becomes thinner, the surface becomes embossed. Natural wear takes years and even decades, but artificial structuring requires tools and paints.
The depth of structuring depends on the purpose of the wood. With strong aging, the depth of the unevenness can reach 3 mm, but such strong brushing is more suitable for a decorative product, for example, a box.
It is not advisable to brush floor boards more than 1 mm, otherwise the floor will be inconvenient to use.
Brushes and other tools
The main work when brushing is done with brushes. These are fairly coarse metal disc-type brushes with brass or steel bristles. It is desirable that the brush has a wide end part and is close in shape to the roller - this way the processing will be more uniform. The thickness of the wire depends entirely on the type of wood: the pile should be 7–10 times thinner than the soft veins, while straight wires are preferable to “curly” ones.
The brushes select the bulk of the fibers, but the surface remains too rough and fleecy. The quality of processing can be improved with the help of synthetic nylon brushes, in which abrasive powder of different fractions is fused into the thickness of the plastic. This type of sanding helps eliminate most of the small nicks and lint that interfere with painting; without them, the surface looks cleaner and more pleasant.
The third stage of processing is usually avoided, but if you want a premium surface quality, then brushed wood will have to be polished. Due to the presence of pores, this is not easy to do; it is necessary to use brushes with hard natural bristles, for example, sisal or coarse wool.
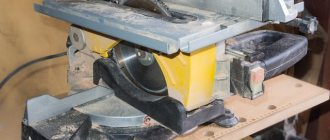
Good processing quality is achieved, as a rule, when using power tools. A drill will be preferable to an angle grinder; when working with it, it is easier to control the direction of grinding and speed. Careful fixation of the workpiece is also necessary; a pair of clamps will come in handy. And, of course, you will need means of protection against dust, which is generated more than abundantly, and its removal: a vacuum cleaner, glasses and gloves will definitely not be superfluous.
Mechanical restoration
To achieve a relief surface, the top layer of wood fibers is removed, after which the hard areas are exposed and beautiful irregularities appear.
In order to age wood with your own hands, you will need the following tools:
- hand brushes with hard metal bristles for the first treatment - they remove soft fibers and keep hard fibers intact;
- chisel for creating longitudinal grooves and artificial cracks;
- sandpaper to polish the wood and clearly highlight the natural pattern, as well as to decorate abrasions if desired after applying paints and varnishes;
- a grinding machine with attachments for primary and finishing - first use a hard brush, and finally take a sisal brush (a coarse natural fiber) or a nylon attachment with the addition of abrasive material.
Brush attachments should have straight bristles.
Note!
Do-it-yourself screen: a step-by-step master class for creating it yourself. Types of screens, manufacturing materials + design ideasDo-it-yourself installation of interior doors - preparation of the structure, selection of doors, installation step by step + instructions from professionals
DIY shoe rack - types of designs, manufacturing materials, step-by-step master class with simple diagrams and drawings
Preparing for aging furniture (antique painting)
Remove handles and other fittings from furniture. If the furniture is polished, remove the polish with a special compound from a hardware store, following all safety rules and instructions on the packaging.
If the furniture is painted, then the old paint should be sanded until smooth (if this does not contradict your main idea, see the effects of antique painting below). If the furniture has not been painted, then you need to remove with fine sandpaper the top layer of dirt, grease and everything else that has fallen onto the surface of the furniture over many years of use (use a respirator to protect your respiratory tract from dust and ventilate the room well).
All dust should be thoroughly vacuumed from the corners, then wipe the furniture with a damp cloth and let it dry. If the surface of the wood is too greasy, wash the furniture with soapy water and let it dry.
We don't need furniture putty. The idea of the project is precisely the effect of aging, (slight) wear of furniture, so we want to emphasize defects in the surface of the wood, and not disguise them with putty.
Chalk paints for the effect of aged furniture are produced in a wide range of fashionable blurred
To age wood and paint antique furniture, Arina recommends using special chalk paints for home creative projects (these are produced under the brands Autentico, Annie Sloan, etc.).
Chalk paints for the effect of aged furniture are produced in a wide range of fashionable blurred (as if faded with time) shades. Chalk paints can be used on a variety of surfaces (including clay and even plastic!), and no pre-treatment of the surface is required at all.
If you don't have chalk paint, use regular water-based matte residential wall and ceiling paint (NOT bathroom or kitchen paint!) from any hardware store. When using such paint, it is better to first prime the surface of the wood with a water-soluble primer (primer).
A universal (2 in 1) primer prevents natural oils from the wood from seeping onto the surface of the base paint and promotes better adhesion of the paint to the surface of the furniture. To paint antique furniture, it is better to use a paint roller rather than a brush. Before starting work, protect the surrounding area with plastic film; it is even better to work outside.
Chemical brushing
Chemical processing requires special knowledge and skills in handling chemicals. The task is complicated by the fact that not all reagents are freely available (acids, alkalis). For these reasons, chemical brushing done by amateurs at home is practically never found.
To briefly describe the process of brushing with chemicals, it looks like this: reagents are applied to the surface, which corrode the soft areas, after which all that remains is to remove the separated fibers. The chemical method is only suitable for structuring very soft rocks.
Simulation of the oxidation process
On wood, patina paint imitates the oxidation of certain metals. The result is a bronze color, which enhances the effect of antiquity.
- The varnish composition is applied. It helps to increase the wear resistance of wood.
- When the varnish dries, the second patina paint is applied. It should not be applied massively.
- After 40 minutes, the dried layer is processed with sandpaper.
- Dust is removed with a cloth.
- A transparent varnish is applied.
A type of patina for wood surfaces
| Compound | Description of material |
| Acrylic patina | Water-soluble, slow-drying paint. Odorless material. A large palette of shades is on sale. It lies on the surface easily and is used to emphasize relief. |
| Wax-patina | The consistency is thick, with a pearlescent luster. The material is applied with a brush, and the cracks are painted with a sponge. After rubbing, the wood takes on an antique appearance. |
| Bitumen-patina | Dark brown dye. Tree shading option. A brush is used for application. Grouting is done with cloth. |
| Oil composition of patina | Paste consistency. Brush or cloth are the application tools. Most often used. |
Burning
Wood is fired during self-decoration and at an intermediate stage.
After the initial removal of soft fibers, it is recommended to go through a gas burner once to get rid of residual fibers, dry the wood and place emphasis on the hard structure - emphasize the ridges and wavy lines.
This is an inexpensive way to color wood, but many people do without firing and use tinting. Pine and spruce are best treated with fire.
Note!
Do-it-yourself sliding wardrobe - manufacturing manual with a full description of the stages, types of structures, choice of manufacturing materials (photo + video)- Do-it-yourself carriage screed: step-by-step instructions for creating it yourself, diagrams and drawings for beginners, selection of materials and tools (photo + video)
- DIY stool - types of stools, manufacturing materials, step-by-step master class with simple diagrams and drawings for beginners
When brushing wood with your own hands by firing, the algorithm of actions is as follows:
- Burn the surface evenly and shallowly, burn the resin in the knots until completely evaporated.
- Use a hand brush to walk along the fibers (moving away from you and forward).
- Remove any remaining soft fibers with a stiff brush (like a flute).
- For a deeper and more prominent structure, re-firing.
The design will be pronounced and bright; after double firing, it is enough to cover the product with wax or varnish and do without tinting - the fire will already color the ridges and curls. Boxes and picture frames made of burnt wood look impressive.
Benefits of brushing
In addition to the obvious decorative advantages, artificial aging of wood has other advantages.
Firing eliminates many of the defects of wood - blue discoloration, incipient rot, therefore it is recommended to treat such surfaces with fire at least once.
Knots, curls, curls - any defects in wood when brushing turn into advantages. In addition, the firing process compacts the surface, which increases wear resistance.
Burnt wood is not sharpened by insects, so burning has not only a decorative, but also a protective purpose. This method is recommended to treat gazebos, fences, and country benches.
Toning also further protects the surface. Paints, in addition to decorative properties, often have antiseptic characteristics.
Brushing provides an exclusive appearance and makes it possible to transform ordinary pine into an exotic species (for example, wenge). For those who love working with wood, brushing with your own hands brings incredible pleasure with an excellent aesthetic result.
Artificial aging and patination are successfully used to stylize furniture and walls. The resulting structure after mechanical processing may be different.
The rustic effect is especially popular - the surface looks rough, uncouth, “natural”. Suitable for rustic style homes with matching interiors and decor.
No. 2 Paint filling method
This method works best on unsanded wood with a slightly rough surface (such as a wooden fence). With its help, wood can be given a rustic look and an antique effect.
- Clean the wood with soapy water and a brush and leave to dry.
- If your paint is too rich, thin it with thinner.
- After this, pour some paint onto the wood surface, and then take a scraper and spread the paint over the wood.
On an unsanded, that is, not completely flat, wooden surface, the paint layer will not be the same everywhere. A little more paint will flow along the depressions and less on the bulges, that is, in some places the white color will be more saturated, and in others more transparent, which will create the effect of antiquity.
You can see the result of painting a wall using this method above.
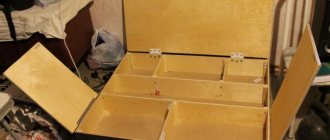
An example of do-it-yourself brushing
For brushing, you can buy mixed grade pine lining at the Leroy Merlin building materials store - this is an inexpensive dry board with numerous knots and cracks (for a more interesting result).
How to age a board with your own hands at home (without a burner):
- Wipe off dust from the surface.
- Work manually with a stiff brush, moving along the grain.
- Sand the board with coarse sandpaper.
- Remove dust from the surface.
- Aging the lining using stain: apply the coloring compound and immediately remove the excess - the stain will have time to absorb into the softer fibers and will not stain hard areas and ridges.
- Polish with fine-grained sandpaper.
- Coat the dry and clean surface with furniture varnish.
Manual processing is a labor-intensive procedure, but low-cost, with excellent results. For more details, see “Aging wood with your own hands. Video".
Care will help you avoid many mistakes.
Very often on the Internet you can find negative reviews about the painting compounds used. Some complain about significantly exceeded drying time, and manufacturers respond by assuring that this cannot happen. It's all in the instructions! It needs to be carefully studied and information extracted that will save you from unreasonable spending.
An example is special waxes that need to be diluted in water and used in dry rooms. Mainly for processing doors, ceilings and panels. The second layer is applied every other day. Rubbing the surface to add shine is allowed only after a week. By purchasing a different brand of material, you can save time twice as much.
Advantages of painting wood while maintaining texture:
- Destruction of pests that negatively affect the product.
- Prevention of the development of mold, fungi and rot.
- Painting prevents the development of cracks in the wood.
- Protection from moisture.
- Safety for people living in the house.
- Nice appearance.
The downside is that the coatings are not very resistant to aggressive liquids and fire. In most cases the material is flammable. But there are brands that do not have these disadvantages. The question is the price, which is always high for higher quality materials.
Safety precautions
When performing brushing, you must follow safety regulations. Working with a gas burner and grinder requires caution and precision movements. When performing all work, it is recommended to wear safety glasses, a respirator and gloves.
To clearly see how to age wood with your own hands correctly and consistently, see “Brushing wood with your own hands. Video".
Features of working with floor coverings
Not only furniture elements, platbands and all kinds of decor can be brushed. This processing technique is often used to imitate the aging of parquet and parquet boards.
The main difficulty in working with wooden floors is the large amount of work involved. The drill is of little use here: uniformity of processing and productivity suffer. At such volumes, it is reasonable to purchase or temporarily use a brush sander. This will allow you to maintain a uniform scratch depth with the brush and then quickly sand over a large area.
For the floor, it is not recommended to show deep wood relief, otherwise the coating will get very dirty and difficult to wash. The optimal depth is 0.5–0.8 mm, so the wood on the floor will become warm and pleasantly rough, and the unnatural gloss will disappear.