A plywood floor can be installed in any room, regardless of its purpose. Plywood flooring is often used as a leveler under the main floor covering. You can lay parquet or laminate on top. But the layers can also be used as the main coating. The installation of the frame and sheets will not take much time and effort, and the result will pleasantly surprise you.
Choosing plywood for laying on joists
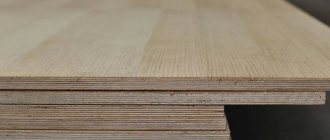
Plywood has a layered structure. The wooden layers are glued together during the pressing process. The strength of the source material depends on the thickness of the sheets. Manufacturing occurs from an odd number of layers. In order to know which plywood to use, you need to become familiar with the different types of material.
The performance properties of a plywood floor can be improved by installing heat-insulating material between the joists
The classification of plywood depends on the following conditions:
- Appearance and type of material;
- Processing of the front layer: sanded sheet or unpolished;
- Resistance to moisture, which is determined by the composition of the glue during manufacture;
- Environmentally friendly material.
Particular attention should be paid to the grading of plywood. The classification depends on the quality of the veneer and the presence of defects. This will help you make the right choice of sheets for your home.
Plywood grading:
- The first grade is high quality. There may be slight curvature of the veneer.
- The second grade may have small flaws, glue residues, inserts of different types of wood. Suitable for leveling floors.
- The third grade has knots and dried out places.
- The fourth rubbish is low quality. Has many defects and flaws.
The first and second grades are the most optimal option for flooring in an apartment. The first grade can be used for the front part. By painting it, you can get a flat and smooth floor.
To level the floor, you do not need to use sheets of plywood with an adhesive composition and the presence of formaldehyde resins.
The best types of wood for an apartment are birch or pine needles. This plywood is quite strong and holds heat well. The thickness of the layer should be 12-16 mm.
Related article: Floor leveling beacons: types and installation rules
It is worth noting the positive properties of plywood flooring. The advantages are the possibility of self-installation. It is also a quick and easy way to level the floor. Plywood serves as a strong and durable base for any other floor covering.
But laying plywood sheets also has disadvantages. These include difficulties in selecting layers. If selected incorrectly, the material will sag and creak. Another disadvantage is the possibility of the floor being too loud. But all these disadvantages are not observed if you choose and install plywood correctly.
Some information about plywood
Plywood is included in the list of the most durable, best-suited building materials for eliminating unevenness in rough foundations. She is preferred for her harmlessness. Plywood does not contain very harmful volatile carcinogens, which cannot be said about chipboard (for more details: “Chipboard or plywood for the floor - the pros and cons of materials”).
Versatility and durability make this material an excellent solution for the following work:
- elimination of unevenness of the old floor laid on logs;
- use as a base for dry screed;
- creating a clean floor covering;
- use as thermal insulation for rough foundations.
Determining the thickness of plywood for the floor by joists
When determining the required thickness of a plywood sheet, you need to take into account a number of nuances. First you need to pay attention to the distance between the lags, which is formed based on the characteristics of the floor. For example, the presence of insulation. Also, if desired, you can increase the strength and thickness of the flooring by laying plywood in two layers.
The thickness of plywood should be selected based on the purpose of the room.
Plywood thickness based on the presence of layers:
- One layer – 15-18 mm;
- Two layers - 8-10 mm.
If the flooring consists of one layer, then the thickness within these limits depends on the expected load on the floor covering. If this parameter is reduced, the structure will not become stronger. If the indicator is increased, then additional work will appear on cutting the layers. At the same time, the weight of the flooring will increase, and this is an additional load on the floors.
Preparatory stage
They begin laying plywood floors on joists with their own hands, like any other type of work, with careful preparation. It is very important to first clean the floor from dirt, dust, construction debris, etc. It is important to eliminate significant protrusions on the surface that are leftovers from the removal of the previous screed. As a waterproofing layer, a layer of thick polyethylene or rolled roofing felt (roofing felt) is laid on the cleaned subfloor. The film should be overlapped with a spacing of 15-20 centimeters. The film sections must be secured with tape. If a very thin film is initially selected, it is recommended to lay several layers.
When leveling the floor with plywood along the joists, it is very important to achieve an absolutely horizontal surface. Markings are made on the floor in order to establish the places where the beams will be installed. To do this, straight lines are drawn through the centers of future logs so that the beams can be laid parallel to each other. Logs are usually laid not on the floor, but on pre-prepared pads. These can be made from boards or the same plywood that is mounted as a covering. The optimal dimensions of the lining are 10x20(25)x2.5 centimeters. They must be secured to the floor along the marked lines using dowels.
It is also very important to install the logs at the same height. To determine this mark you will need to use a laser or liquid construction level. You can adjust the height of the lag by placing additional roofing felt or pieces of linoleum.
To more clearly indicate the pitch of the lag under the plywood, you can use beacons, which will be ordinary self-tapping screws. If you screw them in exactly according to the expected floor height, then there will be an additional way to control the height of the joists.
At the same stage, it is recommended to use an antiseptic to treat each wooden element in the floor structure, which will protect the coating from the formation of mold.
Requirements for the distance between joists for a plywood floor
For a plywood floor you will need wooden planks - logs. Dried wood is used as such bars. In this case, the dimensions of the planks should be 70 mm wide and 40-50 mm high. You also need to consider pads for joists. Their width is 100-150 mm, thickness - 25 mm.
The length of the lag must be at least 2 m. In this case, the plank must not have defects, flaws, or irregularities. Before installation, the timber must be kept for 10 days at room temperature. After this, you need to make sure that the wood does not crack due to drying.
The best types of wood for logs are coniferous or deciduous trees.
Choosing the distance between floor joists depends on the thickness of the plywood.
Related article: Modern methods of attaching curtains to a cornice
The installation of timber depends on the placement of plywood joints. They should lie on the logs. Therefore, when installing the base, you need to build on the size of the plywood sheets. The optimal interval between logs is 30-40 cm. Changes in this indicator depend on the thickness of the formation. The gap between the plank and the wall is 3-4 cm.
Plywood sheet sizes:
- Square layer – 152.5x152.5 cm;
- Rectangular – 122x244 cm.
It is optimal to install logs across the room, since the joints are located near the window. The plywood sheets should lie in the direction of movement. For apartment buildings, it would be correct to put soundproofing material under the joists.
Materials used
Naturally, for installation we will need high-quality logs and sheets of plywood. Wooden beams are effectively used as logs.
It is most practical to use a log with the following linear cross-sectional dimensions:
- width –7 cm;
- height – 4-5 cm.
The length of one log should be from 2 meters. The entire surface of the timber must be perfectly flat. Wood should be adapted to the conditions of the room. To do this, it is recommended to keep the material in the room where installation will take place to check its resistance to deformation and drying.
As for what kind of plywood to use for floor joists, the following proportions of sheet sizes are popular: 15.25x15.25 or 12.2x24.4 centimeters. The thickness of the sheet should start from 1.2 centimeters, but in the case of two-layer laying, you can stop at the option of 0.9 centimeters in thickness (for more details: “What should be the thickness of plywood for a floor along the joists”). The material must be checked for defects. It is unacceptable that the sheets were deformed on any side.
If you need to lay plywood on joists as a rough base, you can use a cheap type of material. This type is characterized by the marking “NSh” (unpolished). Parquet floors will be best combined with plywood that has been sanded on one side (grade “Sh1”). Any of the above brands of plywood is acceptable for use indoors with air humidity up to 60%. If the humidity in the room is extremely high or intensive contact with liquid is possible, then it is more advisable to use moisture-resistant plywood of the FK brand.
Installation of floor joists in an apartment
The technology for installing the sheathing includes preparing the base of the floor. All unevenness, holes and cracks must be repaired. Then the waterproofing is installed. The lathing must be treated with antiseptics and fire-resistant impregnation.
The planks are not installed on a concrete screed. To do this, use a lining in the form of scraps of boards and bars. You can also take pieces of roofing felt and linoleum. For a level floor, you need to find the highest point on the floor and install the first joist. Along the entire perimeter of the room, you need to make markings at what level the logs should be attached.
Before you begin installing the joists on the floor, it is worth studying the theoretical part of the process
After installing the outer bars, you need to start installing the intermediate strips. The step between them should be measured at 40-60 cm. It is important to take into account the size of the plywood sheets. Their joints should be in the middle of the bar.
If you plan to further install a porcelain tile slab, then the step between the joists should be 30 cm.
When the frame is installed, you can begin to insulate the floor. The interval between the lags is filled with cotton wool or expanded clay. The thickness of the wool should be 5 cm. Next you need to lay a vapor barrier. The material is attached to the top of the insulation using a stapler.
Related article: Do you need a niche in the bathroom and how to make it from plasterboard?
Basic principles of installing logs in an apartment:
- The installation of the bars occurs perpendicular to the window or the direction of movement in the house;
- The interval between the slats is measured as 40-50 cm;
- The distance between the wall and the frame is 2-3 cm;
- Insulation must be placed between the joists;
- If plywood is installed under parquet, laminate or linoleum, then you need to use second grade level flooring.
The interval between the wall and the joist must be observed due to the possible expansion of the timber. This occurs due to increased humidity. This procedure will prevent the appearance of sagging and deformation of the laminate, which can be placed on top.
Useful tips
Laying plywood on wooden joists is a rather complex and labor-intensive process that requires precise adherence to technology. We offer some useful tips from experts that will help you do this work faster and better:
- The material used for the logs is unplaned boards of the 2nd and 3rd grade, which are made from soft hardwood or softwood, except poplar and linden. The logs should not have any traces of bark, rot or cracks on the surface. Wooden spacers installed under the floor joists should have the following dimensions: length - twenty to twenty-five centimeters, width - ten to fifteen centimeters, thickness - from two and a half centimeters.
- The average distance between the axes of the logs should not be less than forty to fifty centimeters. But if large loads on the floor surface are expected, then the distance between the supports and the thickness of the logs themselves and the plywood sheet must be determined based on the available data.
- The logs are laid perpendicular to the direction of the light falling from the windows. In the corridors - only across the passage of people. The gap between the joists and the surface of the walls should be two to three centimeters.
- If it is necessary to use long-length logs, it should be taken into account that they should not be more than two meters.
- Plywood sheets are laid on the joists in such a way that they do not touch each other. The gap should be approximately 0.2-0.4 millimeters. The sheets are attached to the joists using self-tapping screws in increments of five to ten centimeters.
Such installation will allow for high-quality plywood installation, and as a result, such a floor will last much longer.
Denis Petrovich Lyubchenko
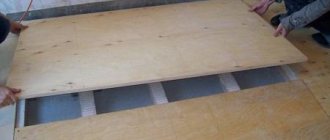
Laying a plywood floor on joists with your own hands
When laying plywood sheets over joists with your own hands, you need to start by preparing the layers themselves. If necessary, they are cut, all corners and protrusions are cut out. After this, you can lay the plywood on top of the frame.
To lay plywood on joists, be sure to purchase a screwdriver, screws and a level
Sequentially installing layers:
- First you need to calculate the plywood sheets. After this, you need to roughly determine the arrangement and make markings for the fasteners.
- On each layer you need to cut the edges at an angle and make holes for self-tapping screws.
- Next comes the countersinking. This is necessary so that the caps of the fasteners do not peek out.
- The next step is laying the plywood sheets. You can start from any corner of the room. The screws must be fastened vertically.
The plywood layer must be secured around the entire perimeter with screws. Additional fastenings depend on the sheet size. For little ones, you can make additional fixation only in the middle. For larger ones you need to use a cross fastening pattern.
The joints between the layers are sealed with sealant. Screw heads are also hidden using special mixtures.
The last step is cleaning the joints. Excess sealants can be easily removed with sandpaper. Next you can paint the floor or varnish it.
Tools and consumables
Even after it has been determined which plywood to lay on the floor along the joists, you should prepare a full set of tools for effective work:
- electric drill;
- Bulgarian;
- screwdriver;
- electric jigsaw;
- wood hacksaw;
- hammer;
- rule;
- measuring devices of various sizes.
You will also need consumables:
- nails 5.7 centimeters;
- screws or self-tapping screws 3.5, 5.7.5 centimeters;
- anchors or dowels with a diameter of 1 centimeter;
- rolled roofing felt or thick polyethylene;
- tape for construction work;
- adhesive mixture for construction work of this nature;
- elastic mastic;
- antiseptic;
- parchment or bitumen paper.
Laying rules
Laying plywood sheets should be carried out based on a number of rules. The service life of not only the rough, but also the finished floor covering will depend on how well the material is laid.
Basic installation rules:
- The sheets are divided into pieces of a certain size.
- Laying is carried out offset to reduce the load on the seams.
- For cutting, it is better to use a jigsaw or circular saw.
- When installing the sheets, 10 mm gaps should be made between them to allow for expansion.
- There should be a gap of 20-30 mm between the sheets and the wall.
- To secure the sheets, you need to use not only glue, but also self-tapping screws.
Tags: believe, plywood
« Previous entry
Types of plywood
Currently existing manufacturers can offer a huge number of building materials, which differ somewhat in technical characteristics.
Plywood boards can be divided into several types:
- production;
- furniture;
- construction;
- design;
- packing
Design and construction boards are best suited for covering a frame made of wooden beams, because they have increased strength and wear resistance. The level of moisture protection should not be ignored either.
You can consider the following types of plywood:
- FAB - does not contain formaldehyde, so it is ideal for residential premises. It has the ability to strongly absorb moisture, so it is not used for the bathroom, but is perfect for the kitchen.
- FC - repels moisture well, but is not designed for constant contact with water.
- FSF - the outer part of the sheets is coated with a moisture-repellent mixture, which allows it to be used in rooms with high humidity.
- FB - this type of plywood is impregnated with bakelite varnish, thanks to which it is practically not afraid of prolonged exposure to moisture.
- BS - used in shipbuilding due to its great flexibility and water-repellent properties.
- BV - has increased flexibility and strength, but quickly collapses upon contact with water.
When laying plywood on a concrete floor, according to the advice of experts, moisture-repellent types should be laid between the rough base and the front covering. An intermediate layer of high-quality material will prevent future deformations caused by temporary or permanent high humidity.
Key characteristics of plywood
When planning the finishing of a subfloor, you should take into account not only the thickness, moisture-repellent qualities and strength of plywood, but also its grade.
Based on the number of existing defects per 1 m2 of slab, there are 5 quality levels:
- E is a standard of quality, characterized by the absence of any damage to the surface of the slab.
- Grade 1 – sheets of good quality with minor defects no longer than 18 mm.
- Grade 2 – on this plywood, minor glue leaks and microcracks up to 20 mm may be visible. Often, such plywood is purchased for laying laminate flooring (for more details: “What is the optimal thickness of plywood for laminate flooring”).
- Grade 3 – less than 10 small knotty defects up to 5 mm in size can be detected on one square meter.
- Grade 4 is a poor quality material that can be used in extreme cases, for example, for subsequent laying of laminate flooring.
The rough flooring can be made using sanded or unsanded plywood. According to this parameter, such slabs can be divided into the following types:
- Ш1 – plywood with one-sided grinding;
- Ш2 – plywood with double-sided sanding;
- NS – without polishing.
Most often, the preparation of the subfloor for laminate is carried out using NSh and Sh1 plywood. Due to the fact that an additional substrate is laid under the laminate, the roughness of the material can be neglected.