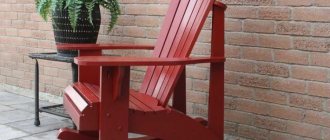
Hi all! Purchased furniture seems expensive and also does not meet expectations. It breaks down quickly, looks cheap, and they ask for a lot of money for it. What solution? Right. Do it yourself. What can you say about a DIY plywood chair?
In my opinion, this is an interesting and practical solution. You can find various drawings and assembly diagrams on the Internet. For others, a photo is enough for inspiration to create their own masterpiece at home.
What are the benefits of homemade chairs? Price, quality, as well as configuration and appearance. You do what you need. And you decide the progress of the work yourself.
And if a folding chair is difficult to make, then making a soft one for a summer house will not be difficult for a beginner.
If you want a good computer chair, then I advise you to go to a specialized store.
Tools and materials
If you decide to make a chair from plywood with your own hands, then you will first need to prepare materials, as well as tools.
I would like to remind you that I have already talked about a chair made of plywood and a rocking chair made of the same material. It has clearly proven that plywood is a convenient and versatile material for the manufacture of furniture structures. Check it out for yourself if you don't believe me.
To assemble a chair at home, you need a basic set, which consists of:
- sheet of plywood (thickness minimum 15 mm);
- roulette;
- pencil;
- scissors;
- electric jigsaw (or hand saw);
- screws;
- screwdriver;
- thin nails;
- wood glue;
- paints;
- varnish;
- stains;
- foam rubber;
- upholstery material.
Take additional components based on what you plan to assemble. But whether it’s a hanging or floor chair, the components presented above are needed in 99% of cases.
Decorating the soft part of the chair
Tools for plumbing work: 1 - steel ruler; 2 - protractor; 3 - compass; 4 - scriber; 5 — table vice; 6 — hand vice; 7 - files; 8 - hammer; 9 — hand scissors; 10 - hacksaw; 11 — adjustable wrenches; 12 - pliers; 13 - soldering iron; 14 - hand drill; 15 — table anvil; 16 — table sharpener; 17 - chisel; 18 — punch; 19 - center punch.
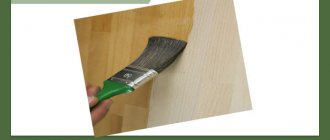
To make the chair look nice and interesting, you need to cover it with fabric. Don't forget about the plywood parts that need to be painted. The side parts can be treated with stain of any tone. To give the surface a deeper shade, you should go through this composition 2 times. The inside of the sidewalls is painted with black paint with a glossy base. In order to reliably ensure and protect unnecessary parts from painting, you can use special masking tape. The ends of the sidewalls should be reinforced with metal rims.
Related article: How to install folding doors (accordion, book)
Their dimensions must correspond to the dimensions of these parts of the chair. They are attached to points that will come into contact with the floor surface. The rims are fixed with screws, and the holes must be made with an electric drill. The diameter of the drill must be equal to the size of the screw thread. It is best to close the screw caps with plugs. They are sold in specialized stores in large quantities and in different colors.
To make the rocking chair soft, you can make a faux leather cover. It will be pleasant to sit and sit on it. The leather substitute can be selected in any color. First, they finish the back of the chair from the back. The fabric is secured to the frame with small nails with voluminous heads. In the rear part, the upholstery is fixed along the edges of the transverse parts; in the front it covers the strips at the top and bottom. To make the base as durable as possible, the attachment points should be reinforced with wood glue. The mattress, that is, the soft part of the chair, is made of foam rubber 8 cm thick. The outer part of the seat can be trimmed with the same leatherette.
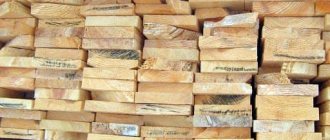
Plywood sheets
It is logical to assume that it is impossible to assemble a plywood chair with your own hands without having the main thing at your disposal. These are plywood sheets.
The material is presented in a wide range. Differs in varieties and types. Because of this, it is not immediately clear which option should be used.
- If these are visible pieces of furniture, then use only the highest quality sheets. When cutting, chips and cracks will not appear on them;
- For structures that will be painted and laminated, first-grade plywood will do;
- Invisible parts can be safely made on the basis of second-grade sheets;
- If the operating conditions of the furniture are dry, without high humidity, then use a plywood sheet of the FK brand;
- It is better to make a garden chair intended for the street or veranda from the FSF brand.
We decided on the materials and tools. Let's move on.
Creative plywood furniture – 50 photo ideas:
PreviousFurnitureChair with footrest - a convenient solution for home and office
Next
FurnitureArtificially aged furniture: a stylish solution accessible to absolutely everyone
Drawings and diagrams
You can find a number of videos and instructions online that describe the process of assembling a particular chair step by step. Alas, it will not be possible to describe in as much detail everything that I would like.
Everyone has their own requirements and wishes for homemade plywood furniture. Therefore, we can consider specific examples in separate materials. If you support this idea, write in the comments. Then I will tell you in detail how to make a specific version of the chair using plywood sheets.
Study diagrams online. There are a number of drawings that can suit your requirements. Specific dimensions are indicated there, as well as the types of raw materials used. Plus, each stage is described sequentially.
Consider several options. Then you can proceed according to 2 schemes. Create an exact copy of the chair, the diagram and assembly of which you have seen. Or be inspired by other people's ideas, but create your own drawing. And use it to make a chair.
What are the advantages of making a chair with your own hands?
Important components when making a chair with your own hands include:
- Selection of high-quality, natural materials;
- Adjusting the chair to your size and preferences;
- The choice of color scheme is yours;
- Possibility to fit into your interior;
- Financial savings;
- Improving your own skills in working with building materials;
- Formation of design skills;
- Have a nice time;
- Development of imagination, thinking, attention;
- Development of design taste.
The process of designing and creating a chair is in itself fascinating and interesting, primarily for its creativity and novelty of doing the work.
When buying a chair in a store, you cannot know 100% what materials were used to make it, or what adhesive components the manufacturer used. Most likely, to reduce the cost of production, they could have used low-quality and toxic analogues. You will not have the opportunity to detect this when purchasing, since everything is skillfully disguised, and only what is beneficial will be listed in the composition.
For high-quality execution, you need minimal experience working with plywood products and wood.
Cutting, processing and fastening
See also:
Choosing a loft bed with a work area and wardrobe design options
Any plywood furniture requires minimal skills and experience. Therefore, I do not advise beginners to start with complex structures. You just risk being disappointed with the result. It may not work out. And you will think that you don’t know how to do anything.
This is wrong. Furniture production is a real art. It requires skill, skill, and also a small amount of talent. Those who lack natural talent compensate with hard work and practice. So start with the basics. Gradually increase the complexity of designs.
As a result, you will be able to create a plywood chair that is no worse than a specialized furniture factory.
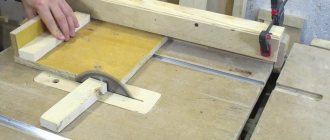
By the way, about the basics of creating chairs from plywood sheets. First, learn how to properly cut, process and connect elements.
In this regard, I will give the following advice:
- The cutting method is directly related to the thickness of the plywood sheet;
- If the sheet thickness is up to 4mm, it can be easily cut with a sharp kitchen knife;
- For thicknesses between 4 and 6 mm, it is recommended to use a manual or electric jigsaw. A jigsaw has more advantages in terms of speed, processing quality and productivity;
- If these are sheets over 6-8 mm thick, then you cannot do without an electric saw with a special disk;
- After cutting, the process of grinding the end surfaces occurs. Use sandpaper of suitable grit. And then don’t forget to remove all dust;
- To prevent the negative effects of moisture, after pruning and processing, apply a layer of antiseptic;
- Before tightening the fastener, you should always make a hole with a drill of a suitable diameter;
- Some plywood sheets are made from softwood. To obtain a high-quality and durable connection, use protective gaskets;
- There is a risk that the sheet will break off at the attachment point. To prevent this situation, you need to retreat at least 12 mm from the edge of the sheet to the screw.
These are the basic rules that you need to rely on.
What types of chair designs and plywood are there?
There are a huge number of modifications of plywood chairs, but all products are divided into two types:
All products with a swinging base can be assigned to the first one. We can list them endlessly, but let’s focus on two designs.
Rocking chair. The most comfortable invention of man. Just sit or lie down and enjoy the gentle rocking.
Products such as stools, due to the creative ideas of designers, are not always durable and reliable. Like this design, for example.
It may look nice, but you shouldn't make such an item yourself.
Homemade rocking chair
See also:
Bedspread for a corner sofa: beautiful ideas for protecting furniture
Many people prefer to make a chair out of plywood with their own hands, in which they can sit and swing.
Before starting work, decide on the model and appearance of the product. You can take a ready-made drawing, or use your own.
Let's look at a simple example. We will have 2 solid side parts, as well as 3 reinforcing crossbars and a lounger made of narrow slats.
First, scale the project, cut out the necessary elements from plywood sheets. The edges need to be processed, sanded and covered with a layer of wood glue. Wait until completely dry.
Now you can get started:
- Choose a suitable flat surface. Install one side element on it. Make 3 mounting holes, treat with PVA glue, then insert transverse reinforcing plywood slats;
- The edges of the slats should be coated with glue and then connected to the holes in the second side panel. That's it, the base is already ready. Left a little;
- Wait for the glue to set well. Now the structure can be placed on skids;
- Start from the front edge. Using screws, secure all the slats one by one. This will give you a seat that gradually transitions into a backrest;
- Upon completion of assembly, it is recommended to close the screw caps using special mastic. It must dry. Then you can sand until you get a smooth surface;
- Finally, all that remains is to cover the product with stain, and then with varnish or paint of a suitable color.
Even at the stage of creating the drawing, be sure to mark the location of the fasteners. Drill holes there.
You should not connect plywood with screws without drilling. There is a risk of cracks and chips.
Step-by-step instructions for performing a model on three legs
- Engineering project.
It is better to start making chairs from plywood by carefully studying and calculating a drawing, which you can sketch yourself or find on the Internet.
Overall dimensions of the chair.
As an example, we take a drawing of a round chair made of spherical plywood. The model is distinguished by its original design and ease of execution. It is better to take a birch leaf. For high-quality cutting, you need to prepare a template.
Drawing of the front legs of the chair.
- Making a template.
The drawing is redrawn on graph paper, then applied and traced along the contour.
Drawing of chair parts with dimensions.
- Cutting elements.
After a high-quality redrawing of the drawing, you need to cut out the elements with careful movements, while using the material sparingly.
If you rarely cut plywood, practice on an unnecessary piece, so you will not only get used to the jigsaw, but also decide on the cutting speed.
- Cutting out elements.
After cutting, you must carefully cut out all the elements with a jigsaw without damaging their structure.
During cutting, the movement of the jigsaw should be as smooth as possible - without acceleration or settings. Each jerk or stop will certainly leave a mark, and then you will have to sweat with it while polishing the cut area.
- Veneering.
The cut areas must be treated with sandpaper to remove excess roughness and prevent chipping and delamination during assembly.
Use different numbers of abrasive pads depending on the size of the defects.
- Treatment.
First, use special products with an antiseptic effect. Then comes the treatment with wood glue. This point is needed to prevent parts from scattering during assembly.
Pre-clean the surface from dust and dirt. Check the moisture content of the plywood, it should be completely dry.
- Product assembly.
Holes for screws and fastening points should be drilled according to the drawing diagram. Self-tapping screws should not be smaller or larger than the product; protrusion of any parts is unacceptable.
In order not to waste time sealing up “ugly” heads, use self-tapping screws with decorative heads.
- Putty.
After the assembly stage, protruding screws should be filled with putty. Coat the frame with varnish and let dry.
The number of layers of varnish must be at least two.
- Painting and upholstery.
To give a brown tint, the plywood sheet should be treated with stain. Afterwards you can make the upholstery of the seat and armrests.
For example, in the form of a soft pillow.
Tips and tricks for making
In order to produce any piece of furniture with high quality, you need to take responsibility for all stages of its production.
To begin with, carefully consider the choice of material from which you are going to make your furniture, be it a stool, chair or armchair. Prepare all the tools in advance and purchase the missing ones. Take all measurements accurately. Be sure to study the information on this issue. Take into account all the nuances, do not neglect the little things.
With a little practice, you can move on to heavier models.
Use helpers whenever possible, especially when assembling a three-legged chair.
Use the resulting product strictly for its intended purpose. If the furniture is for home use, then it may not withstand aggressive environmental influences (rain, sun, heat, cold, etc.).
Don't overload.
Having fulfilled all the conditions, you will gain significant experience, save your family budget and enjoy your holiday on a product of your own production.