People who are just getting acquainted with the work of wooden products are advised to start with plywood. Processing of this material is quite easy and the radius of application is huge, which is why it is considered universal.
Plywood sheets are used to create many toys and a variety of furniture. This gives food for thought about creating crafts on your own, similar to children’s crafts made from plywood for a child in kindergarten.
Almost everyone has seen photographs of plywood crafts on the Internet, and probably tried to replicate them with their own hands.
Features of the material
Plywood is a multilayer material. Natural wood is used for its manufacture. A sheet of plywood consists of several layers of veneer glued together in a certain way. The thickness of the slab depends on the number of layers - there can be 3, 5 or more. This is usually an odd number. Thin wood plates are assembled into a single whole using special glue. Depending on the type of impregnation, the degree of moisture resistance of the material is determined. Plywood has high strength due to the fact that each layer of veneer is glued perpendicular to the previous one. The type of plywood – longitudinal or transverse – depends on the direction of the wood fibers in the facing layers.
Pinocchio sharpeners
Mike He came up with an interesting way to play on the theme of the tale about Pinocchio/Pinocchio. A pencil inserted into the sharpening hole instantly turns into the nose of a fairy-tale hero. You can feel like Papa Carlo.
Wooden rattles
The owner of a designer furniture store, Nicholas Holmes, decided to expand his specialization and released a series of baby rattles, which at first glance slightly resemble pieces of curtain rods. Rattles are made from three types of wood - cherry, black walnut and ash. An excellent and more stylish alternative to conventional plastic, created, moreover, without the use of harmful adhesives.
Wicker cribs for children
These are the handmade wicker cribs created by BERMBACH Handcrafted. A small manufactory from Frankfurt specializes in minimalist rattan basket beds. A metal stand is used as the base, and the ends of the legs are made of oak, which will not scratch the floors. One such wicker crib costs 660 euros.
03.10.2018
Save the article to study the material carefully
Remember article
You can save this page using:
Types of plywood
Plywood can be made from rocks of varying densities - hard or soft. Each type of material obtained differs in:
- intended purpose - for construction, industrial production, packaging, furniture manufacturing, structural;
- operational life;
- raw materials - coniferous (larch, spruce, pine, fir) or deciduous (birch) wood;
- number of layers – 3, 5, multi-layer;
- water resistance class - marking of moisture-resistant plywood - FK, material with increased moisture resistance - FSF;
- type of processing - regular or laminated;
- visual qualities - by the presence and number of defects present on the front layers;
- price.
Choice and Design
This is the primary stage of any business. At this stage, it is important to decide what needs to be produced, the needs for the product, the completion time, and the materials used.
Determine the installation location of the structure, the possible impact on it by humans and external natural factors.
Assess the possibilities based on the availability of materials, time and tools.
Consider the stages of production, the sequence of processing of parts and the design itself.
How to choose plywood
To choose the right plywood for crafts, you need to evaluate the following material parameters:
- grade - is of great importance for creating an attractive appearance of the finished product. It is desirable that the chipboard sheet have as few defects as possible. Therefore, for such work it is better to choose grade 1 or 2 plywood;
If in the future the souvenir will be pasted over or painted, it makes sense to save money and purchase less expensive types of material.
- thickness - its choice depends on what product you plan to make. For various figures and decorations, a thin plate with a thickness of up to 5 mm is better suited. For the construction of furniture structures, it is advisable to choose thick sheets - up to 40 mm;
- moisture resistance - when making crafts that will be located in the open air - in a country house or on an unglazed balcony, you should choose a material that has a high degree of resistance to moisture. Plywood marked FB or BS is suitable - materials impregnated with bakelite varnish or glue;
- environmental friendliness - to create interior crafts, you should use safe plywood marked FBA or FK. The first material is glued with albumin casein glue, which is natural and environmentally friendly. The layers of the second are connected using a urea composition, which does not contain phenolic compounds and therefore does not harm health.
A little about plywood
Plywood is thin sheets of wood material joined together with an adhesive base. ITS thickness can range from three to thirty millimeters.
You need to know that there are types of it that can only be used for outdoor work. The adhesive base of such plywood is very toxic and can harm the health of residents.
To make crafts used inside the house, it is necessary to use FK grade plywood. It is advisable to make crafts made for installation in the yard from FSK brand plywood, this is a more moisture-resistant type.
When making crafts with an electric jigsaw, it is allowed to use sheets of maximum thickness. When using a manual jigsaw, as a rule, they use three-layer plywood, up to nine millimeters thick.
We recommend: How to make artificial snow with your own hands
You can buy plywood for crafts at any hardware store. The main thing before purchasing is to decide on the type, purpose and location of its installation.
Handmade items will decorate your home, yard, garden, or park area. They will give them a special charm and uniqueness. They will not only improve living conditions, but also create a wonderful atmosphere of comfort and well-being.
Necessary materials and tools for work
Before you start making plywood crafts, check that all the necessary tools are available. It is better to purchase everything you need in advance than to be distracted during the work process. You will need the following tools:
- manual or electric jigsaw;
- electric drill for drilling mounting and decorative holes;
- a set of drills, including attachments for large holes;
- ruler, pencil, scissors, printed stencils, drawings;
- vice for clamping parts;
- miter box, for washing down planks at an angle of 45 degrees;
- sanding machine or abrasive paper with different grain sizes;
- rasps and files of various shapes - flat, cylindrical, triangular;
- awl for making small holes;
- burning device for applying images and patterns;
- fastening fittings, glue;
- varnish, paint and other materials for decorating products.
Manufacturing technology
After applying the image to the plywood, the figure must be cut out. Thin sheets can be sawed with an ordinary jigsaw; for thicker material it is better to use an electric tool.
You should not cut along the contour, but leave a margin of about one millimeter. This action is necessary to prevent damage to the workpiece due to a file accidentally moving to the side.
Crafts from plasticine - the best ideas for making stylish and beautiful crafts with your own hands (90 photos)- Autumn crafts - the best ideas for crafts made from natural materials and making them yourself
Children's crafts - the best DIY ideas. Review of simple and original toys and decorations (video + 100 photos)
If internal cutouts are planned in a decorative product, the starting point is drilled with a drill, and then a file is inserted into the hole made.
After finishing the work, the unevenness is smoothed out with sandpaper or a file.
Various figures for interior and landscape design
Plywood figures will enliven any space. They can be used both in a house or apartment, and in the courtyard of a country cottage, in the garden and even in the vegetable garden. These can be planar images of people, animals, plants. Cats climbing or sleeping peacefully on a fence, a pig hiding in the bushes, an eagle owl nestling comfortably in the shade of grape vines look wonderful. By allocating a separate area for plywood figures, you can recreate a corner of wild nature or a Jurassic Park in your dacha, populating it with completely realistic characters.
Flat figures can be used to decorate furniture structures, organizers, decorative flower pots, and carts. Bright “tenants” will not let you get bored, will delight your children and surprise your guests.
Photos of plywood crafts
Read here - Hedgehog craft: the best options for creating hedgehogs for the garden and school. 120 photos and video instructions for creating crafts
Did you like the article?
0
Decorative shelves
Plywood is an excellent material for creating light, durable and comfortable shelves of any configuration and size. These structures will be an excellent place to store a variety of things. They will come in handy in any room of your apartment. In the living room - they will help organize decor, books and gadgets, in the office - documents and office equipment, in the bedroom - care products, cosmetics and accessories, in the nursery - children's toys, in the kitchen - spices and cook magazines.
Racks may differ in:
- the thickness of the plywood used;
- number of shelves;
- product dimensions;
- the presence of side walls;
- shape - linear or angular;
- location - floor or wall;
- method of decoration - the presence of carved elements, the use of various finishing techniques.
Volumetric figures
The possibilities of plywood in interior decoration are simply endless. And this is proven by the many sculptures made from this material. These are real 3D models of various animals, birds and even humans. The design consists of many small parts. Combining into a single whole, they form a variety of forms. This technique allows you to create a variety of models of devices - cars, ships or airplanes, practical and useful accessories, furniture. There is a wide selection of kits with ready-made parts on sale. Such kits vary in degree of complexity - there are simple options for children and clever designs for adults. If you wish, you can create an original and unique product with your own hands that only you will have.
Crafts for the kitchen
The kitchen is the very place where plywood crafts will always come in handy. These can be various storage containers - carved organizers for cutlery, napkin stands, spice sets. Personalized trays and trays with openwork edges look interesting. Very popular are vases for fruit and bread, lamps, and baskets for Easter eggs, assembled from plywood parts into a single structure.
Using plywood products you can decorate your kitchen space. Clocks, refrigerator magnets, various panels and figures will come in handy here.
Plywood furniture is no less in demand in the kitchen. Shelves, drawers and even kitchen fronts can be made from this material.
The process of working on a product
Initially, we must choose a craft and its diagram, based on photos and drawings. Then we copy the drawings onto plywood.
Work is performed standing. All work with plywood is carried out only in accordance with the markings. If the file goes in the opposite direction, then work must be stopped immediately.
We clean the entire surface of our work of art with sandpaper. And on both sides.
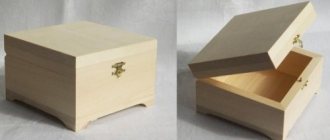
Openwork box
An openwork plywood box is a very popular product for storing a variety of small items. Exquisite “lace” boxes are a combination of functionality and decorativeness. They are useful for storing jewelry, hairpins, documents, cosmetics, notes and keys. The ability to choose a pattern yourself allows you to perfectly fit this item into any design. Carved plywood boxes look advantageous not only in ecological, ethnic, romantic, rustic styles, but also in noble classics, as well as in modern interiors. It all depends on the shape of the product, the chosen carving pattern and materials for decoration.
In order to make an openwork box, you need to choose a design and prepare a detailed drawing of the details of the future product. Next, we form a cutting sheet and transfer the contours of the elements to the plywood sheet. If you have a jigsaw, cutting out parts of the box will not be difficult.
You can order cutting from a special company that provides cutting services for plywood, fiberboard or chipboard. True, such a service may turn out to be expensive, since small work is priced more expensive.
We clean all cut parts using sandpaper. We process the ends of the workpieces especially carefully. After this, we transfer the pattern onto the plywood using a stencil. We drill a through starting hole using an electric drill. We insert the blade clamped in the jigsaw into it and begin cutting. We sand the cut areas with sandpaper and rasps, ridding them of roughness and splinters. The fine corners of the pattern can be smoothed out using a thin strip of sandpaper placed in a jigsaw instead of a blade. This simplifies the process and allows you to make the edges smooth and neat.
After processing the parts, we begin assembling the box. We glue the walls of the product and strengthen the structure using a furniture stapler or nails. We attach the bottom of the box to the manufactured frame. The lid and back wall of the product are equipped with metal hinges. We put a lid on them. You can equip the openwork “safe” with a miniature lock.
Progress
First, print out the drawing and transfer it to plywood. Let's drill holes and cut out all the contours of the spruce tree. It is imperative to go over the entire product with sandpaper. You can color the craft at your discretion.
Plywood crafts can play not only an aesthetic role, but can also have a functional application - for example, a birdhouse for birds.
The range of work can be limited only by imagination and thinking; all drawings and diagrams can be easily found, the main thing is that there is a desire.
Decorative finishing
Before decorating the box, you need to re-process all its parts and joints with sandpaper, fill up any uneven areas in the fasteners and prime the surface. You can treat the wood with a stain, which will reveal the structure of the wood and give the product the desired shade. This is followed by several layers of varnish.
If desired, we apply any image or inscription to the surface of the box using a burner or decoupage technique. You can decorate the product using dry brush techniques, patination, or adding craquelure to the paint, which cracks when dry.
Finishing
Naturally, even the most unique figurine needs at least painting in order to be a bright and interesting decorative element.
Before painting plywood elements, they need to be sanded to roughen the surface. This procedure will allow the paint to better adhere to the wooden surface. After processing, it is necessary to remove dust from the wood and degrease the areas intended for painting using a solvent.
Products painted in different colors are covered with masking tape at the paint joints. It is advisable to paint individual areas of such products at intervals to avoid mixing of paints.
You need to paint in several layers, and before applying a layer you need to wait until the previous coating has completely dried.
In this way, the design becomes most durable; the paint will not fade under sunlight and will not come off after atmospheric moisture.
Finally, the prepared surface is opened with varnish; this will make the figure more resistant to natural phenomena. The varnish should also be applied in more than one layer.
Step-by-step instructions for making a Christmas tree
If you are tired of ordinary PVC Christmas trees, make a New Year's “beauty” from plywood, designing and decorating it to your liking. On the Internet you can find a variety of ideas for such crafts. Choose one of the existing options or create your own original design.
The Christmas tree can be flat or voluminous. It may look quite realistic or only vaguely resemble everyone’s favorite New Year’s tree. Can fit in the palm of your hand or reach the ceiling with its top. The choice of size, design and construction is yours.
We present a method for making one of the popular options for a New Year tree.
Step-by-step instruction:
- We make a pattern. The drawing can be simple or intricate, ornate. The fewer carved elements, the easier it will be to cut out parts from plywood. If your skill with a jigsaw allows, choose templates with openwork patterns. Such a tree will look fabulous and truly festive.
- Cut out 6 identical parts. This number of elements will allow you to make a voluminous, “lush” Christmas tree.
- We sand the edges and cutouts of the fragments, achieving maximum smoothness.
- We paint individual elements and leave to dry.
- We assemble the structure using self-tapping screws and mounting angles. Fastening should be done in two places so that the load is distributed evenly.
- We decorate the Christmas tree - we draw balls, beads, snowflakes on it, you can attach real garlands and Christmas tree decorations.
Such a Christmas tree will delight you for many years, because after the end of the holiday it can be very quickly disassembled and stored.
Decoration, decoration and care of plywood products
The finished plywood product can be decorated in a variety of ways. Even if you limit yourself to applying varnish, such a thing will already look very impressive. If it's too boring for you, choose the technique you like. Any techniques from patination and pyrography to artistic painting are appropriate here.
Burnout
Among the techniques used for artistic wood processing, one cannot help but recall burning. This is one of the traditional types of Russian handmade craftsmanship. The art of painting on wood with hot metal rods developed along with turning, carving, inlay, mosaics and painting. It could exist as an independent type of design or be woven into other techniques, complementing them and making the decor more expressive.
Ancient craftsmen burned out patterns using red-hot iron rods or relief stamps. Today, the most common way to obtain a burnt image is to use a special electrical device equipped with a thin metal wire or a soldering iron with a set of various attachments.
It is also worth mentioning the pyrotyping technique - hot printing, burning in sand, in fire, using a magnifying glass in the sun, using acids, friction on a lathe.
Burning is a great way to decorate furniture, accessories, souvenirs and other plywood products.
Painting and varnishing
If you are not satisfied with the monochrome nature of the previous method, arm yourself with paints. Any plywood product can be made bright and picturesque by dyeing and painting. A cutting board, a birdhouse, a children's house - rich colors will make any of these items spectacular and colorful. If you don’t need any special skills for painting—dip a brush or roller into the paint and go ahead—then painting requires at least minimal artistic abilities. The choice of technique depends on the talent of the artist, on his level of proficiency in his skill.
Three painting options:
- Stencil - the simplest method, subject to people who are far from fine art, but have a sense of taste. All you need to do at the preparatory stage is to select an interesting pattern or image, print it on paper and cut it out. After this, we apply the template to the product and, using a foam sponge or brush, transfer the pattern to the surface. You can outline the outline with a simple pencil and then color it.
- Dot technology for creating a pattern is the connection of many dots transferred to the surface to be decorated. This technique is also available to those who do not have artistic skills.
- Drawing from a sketch - the method is suitable for both professional artists who can depict elements of famous paintings, and those who do not master the art of drawing, but can come up with their own original pattern using sketches. Such a painting may contain geometric shapes, flowers, leaves, curls. An example of such painting is the products of folk crafts - Khokhloma, Gorodets, Gzhel.
The finished image should be thoroughly dried and varnished. The finishing layer will protect the paint from moisture and mechanical damage. Hand-painted products will make your interior unique.
To keep products in their original form, it is necessary to protect them from prolonged exposure to moisture and temperature changes. They should be placed away from heating appliances, and after washing they should be immediately wiped with a dry cloth.
Wooden modular toys
Modular wooden toys that can be assembled like a construction set are a great success among children. A great example is the Creative Wooden Creatures sets, created by designer Hakan Gürsu and dedicated to land animals, sea creatures and amphibians. From one set consisting of 72 parts you can assemble from 10 to 12 real animals, and an infinite number of fictional ones.
Wooden catapults
You can create many different toys from wood, but catapults will not leave any child indifferent. California-based E&M Labs turns any child's room into a war zone with its Trebuchette toys. And not only a children's room, but also a student dormitory, classroom or office. You can assemble a toy trebuchet yourself, using a ready-made model and recommended materials (birch plywood, Delrin and leather). Once assembled, the catapult is capable of launching a toy ball over a distance of more than 20 meters.
Growth rulers for children
How to make an object from an ordinary board that will become a real family heirloom? The answer is simple: you just need to put length measurements on it and attach it to the wall. The idea for a giant growth ruler called Wooden Ruler Measuring Stick came from Lovestruck Interiors. Rulers are made from different types of wood, and the units of measurement are centimeters or feet.
Souvenir wooden beacons
An interesting topic for handmade souvenirs is lighthouses. Lighthouses are one of the leaders of the eternal theme of sea and freedom, romance and adventure, which will always be in demand by the audience, including teenagers. There are several options for such a hobby business: create exact copies of famous lighthouses, be partially inspired by some elements, or make completely fantasy lighthouses from the world of dreams.
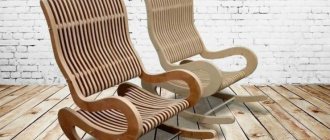
Wooden rocking chairs for children
Designer Chan Wai Lim from Singapore creates designer wooden rocking chairs for children in the shape of unusually shaped animals. Among her main works are barrel figures in the form of dogs, pigs and cats, located on giant springs. The girl admits that crafts, among other things, are a matter of her soul. The idea was inspired by childhood memories when she could play with real farm animals and wooden toys. Nowadays, Singapore is a continuous metropolis, where there is no place for trees or animals.
Beach slippers with animal prints
Kiko Kids has created children's wooden sandals Ashiato, which allow you to create unusual footprints in the sand. The shapes on the sole are made in the form of paws of various animals. The fun series includes sandals that allow you to make the tracks of owls, monkeys, cats, geckos and walruses.
Slingshots for aesthetes
Slingshots can create enormous scope for creativity. Some craftsmen follow the path of creating toy slingshots, for example, making them in the form of colored pencils, while others strive to turn the slingshot into a presentable souvenir. If the former are made for petty pranks, then the latter are for “satisfying the sense of beauty.” An example of the latter is a hickory slingshot called the BCX, which was clearly designed with not just little boys in mind, but their dads as well. Polished coating, unusual shape, comfortable grip - even holding such a weapon in your hands is already pleasant, let alone shooting. In addition, there is no need to hurt someone - the slingshot comes with a target, which seems to imply that you only need to shoot at it.
Toys for combining elements
French freelance designer Todd Borka has come up with a series of wooden toys that allow children to create characters from different body parts. A child can make faces with unusual noses, lips and eyes, put cubes into full-length people, changing their heads, legs and torsos, and so on. In general, the game is not educational, but entertaining.
Wooden robots
Very interesting wooden products are obtained if you work in the direction of “combining the incompatible.” Loulou & Tummie has created a series of wooden robots that aim to bridge the gap between modern and traditional toys. It turned out great - wooden robots look more alive and animated than their plastic and metal counterparts.
Tumblers 2.0
Masters Atina and Jose from Greece specialize in making handmade wooden tumbler toys. But not those tumblers that we are all used to, but those that need to be collected in a tower so that they do not fall. For example, a child is asked to put together a composition with a boat on the waves, using rounded and not entirely stable parts. The authors sell their products under the name The Wandering Workshop through the Etsy craft store.
Premium wooden toy
Pecanpals Woodys is a great example of how to market your products today. The toy has a tail, ears and arms that it can move, and the head itself can rotate 360 degrees, nod and look in different directions. Everything else is beautiful photographs, videos and pure marketing, thanks to which the product is positioned as an “eco-friendly” toy, and even a “premium one”. The creators of Pecanpals Woodys from Melbourne earned almost $9 thousand from it by presenting the project on the Kickstarter crowdfunding platform.
Constructor for developing empathy
Another example from the “creative marketing” series is the Empathy Toy constructor, designed to develop empathy. In addition to the designer itself, the authors also took care of creating the rules of the game. It gathers collectively: one of the gatherers is wearing a mask and does not see anything, and the second participant gives him a hint. As a result, victory is achieved through joint efforts, and in the process children learn to hear each other and find a common language. The creators raised more than 52 thousand Canadian dollars on their idea using crowdfunding