How to make a construction set for children? In one minute, from available materials, you will make an interesting educational construction set for preschoolers. This children's construction set is already 150 years old! This construction set for children was invented by Friedrich Froebel, the creator of the world's first kindergarten.
Friedrich Fröbel paid great attention to various manual works in kindergarten - beadwork, weaving from strips of paper, drawing on squares, designing. For the first time in the world, he created a holistic system of games and activities for the development of preschool children, which still exists today. You can read about it in the article “Froebel’s Gifts” and find out what the first educational games for children were and how to play with his gifts.
And today I want to talk about a pea construction set - one of the first children's construction sets created by Friedrich Froebel. This children's construction set is already 150 years old! I have seen its modern analogues on the Internet, but for some reason the authors did not bother to say who actually owned this idea. Apparently, they just didn’t know about it themselves!
This construction set for children is made of environmentally friendly materials, which is very important. These materials give the child extremely pleasant tactile sensations when creating crafts - try it, and you will understand that this is so! And seeing on the modern Internet analogues of such a construction set for children made of plasticine or self-hardening plastic, I am not very happy about them. More precisely, I’m not happy at all. Why? Because the sensations from wet, live peas are incomparable to the sensations from working with synthetic plasticine! In our world there are already too many completely “dead” synthetic materials, and so few living, natural ones! And the child really needs tactile sensations from natural materials!
The children's construction set makes it possible to develop fine motor skills, sensorimotor coordination, imagination and creative abilities of the child, and introduces him to the basics of geometry.
this very simple construction set for children at the first Moscow Biennale of creative projects of young teachers in the “Academy of Childhood” kindergarten. I’ll say right away that when the peas were on the tray, they didn’t attract me at all. And I chose a different type of work - weaving. But then, looking at how enthusiastically everyone was working with peas, I also decided to try it. And, taking this material in my hands, I was amazed by its capabilities. This children's construction set not only captivated me, but amazed me with the pleasant sensations of working with natural materials and its enormous possibilities. All of us - the adult “aunts”, the teachers who began to construct from it, had to be persuaded to finish this lesson and give way to others who wanted it. And it was simply impossible to tear yourself away from studying with this designer!
I think everyone already wants to try it? Then let's begin.
The construction set for children can be made in 1 minute and is very simple.
- We take ordinary peas (from which we cook pea soup), place them in a tray on damp cotton wool. Cover the top with another thick layer of damp cotton wool. This will take exactly a minute.
- And we wait, minding our own business. It takes about five hours for the peas to soak and become pliable (The amount of soaking time will vary depending on the variety. Once the peas have puffed up and increased in size without falling apart, it's time!)
- Place the peas on a tray. They should lie on something damp so as not to dry out!
- Take a package of wooden toothpicks. The pea construction set for children is remarkable because the toothpick can be inserted into the pea at different angles (and not just at a right angle), which makes it possible to make the most unimaginably complex designs.
- That's all! The details of the children's construction set are ready! It took exactly a minute to make the constructor.
Examples
Now let's take a closer look at specific models:
Example #1: cubes
Set of multi-colored dice "Bondibon"
This is what is recommended by all child development organizations for very young children. A variety of brightly colored cubes, cylinders, pyramids and parallelepipeds can be folded in any way you like, developing logic and intuition.
Possible options:
| Set name | Description |
| "Bondibon" | A large number of approximately identical elements with variegated, sometimes multi-colored colors, which make cheerful houses, towers or just fences. |
| "Tales of a Tree" | Here the fragments have smooth shapes, which gives them a resemblance to parts of trees. They can turn into a fairy garden or a dense forest, depending on children's fantasies. |
| "Plan Toys" | Its composition is reminiscent of the game "Towns", having a large number of cylinders and triangles, painted in calm shades. Allows you to build interesting structures for their further “destruction”. |
Set "Plan Toys"
Example No. 2: “Lesovichok” series
Wooden house constructor for little architects
This option is perfect for older children who want to try their hand at “real” construction. The following models are especially interesting:
| Set name | Description |
| "Collapsible house" | The set of parts can vary from 110 pieces to 410. It makes it possible to assemble more than a dozen different houses, differing in layout and size. |
| "Solar Farm" | The set of parts can vary from 110 pieces to 451. In addition to building components, there are also painted figurines of a wide variety of domestic animals, which will allow your child to assemble a “real” farm in his room. |
Constructor "Solar farm"
Helpful tips from my experience:
- During soaking, be sure to check the readiness of the peas for construction: take a toothpick and pierce the pea with it. Insert the second toothpick into the same pea at an angle of 90 degrees to the first. The pea should hold both toothpicks well and not crack. This happens if it has absorbed enough moisture.
- The most difficult thing is to find the right peas that are suitable for this construction set. It turned out that not every pea can be used to make such a construction set. Based on the results of my tests, the following conclusion was reached: there are peas that immediately split into halves when soaked. He doesn't suit us. Most likely, these are peas that have been pre-processed and are intended for quick cooking. And there is one that needs to be soaked for much longer - more than 8 hours. Therefore, try it!
- I do not recommend filling the peas for a children's construction set with water - you will not be able to get the necessary parts for the construction set using this method. When soaking, the peas should be just damp, but not wet and swimming in water.
- The peas to be designed should be placed on a damp tray (a damp towel underneath them so that they do not dry out. This is important!
- Of course, now this construction set is replacing peas with synthetic materials and even pieces of marmalade, but the sensations will be completely different. I understand - it’s easier this way. But! The tactile sensations that wet, hard peas give to your hands when working with the construction set are simply amazing! This is such rest and relaxation! And truly communicate with nature! Try it and you will understand me!
3D plywood construction set for children: features, reviews and drawings, where you can buy
Plywood, as one of the most affordable and practical types of material, can be effectively used not only in construction, but also in the manufacture of household items. You can make some of them at home.
Steam locomotive figurine
Such products include:
- figurines for decorating the garden and yard;
- doll houses;
- 3D plywood constructor;
- figurines for decorating the room;
- memorable souvenirs;
- all kinds of stands for stationery;
- napkin holders, etc.
Note!
Thanks to the high level of environmental friendliness and naturalness of the material, you can even make such a product as a plywood construction set for children without posing a risk to the child’s health.
Car figurine
Features of making figures from plywood
If you want to create a toy from plywood, it is best to start with the simplest products. As you gain experience, you can make your tasks more complex.
Three-dimensional constructor (triceratops figurine)
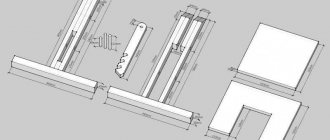
The first thing you should do is work out the toy patterns to make your own products. They will form the basis of your work. The external characteristics and functionality of the toy will depend on the circuit. If you want to make a construction set from plywood, the drawings must be accurately verified and made in full size so that during the assembly process you do not encounter any inaccuracies or errors.
Parts drawing (triceratops figurine)
After you make sure that your drawings are completed correctly, images of the parts can be safely transferred to the surface of the plywood sheet.
Tools and accessories
Not only the plywood construction set itself, but also all the work involved in its production can become an exciting activity for you.
The set of necessary tools consists of:
- jigsaw (for making too complex and curved cuts);
- circular saw (for making straight cuts);
- circular saw (for making curved cuts);
- sandpaper.
Note!
This is what the main set of tools looks like. If you cannot ensure the presence of at least one item from this list, the quality of your product may be seriously affected, and insufficiently polished cut edges may lead to injury in the future while playing with such a construction set.
Set of tools
Before you start making toy parts, make room for work. Provide yourself with a sufficiently large amount of free space so that nothing can hinder your movements and create inconvenience in your work. Concentration in this matter is an important part of success.
Parts manufacturing process
Before you start transferring your drawing onto plywood, check its surface for obvious and unwanted defects in the form of dents, knots, and other things. If any are identified, the surface can be treated first with coarse-grain sandpaper, then using fine-grained paper.
Set of ready-made parts
Note!
To transfer an image onto plywood with a flat surface, it is best to use a simple pencil with a soft lead.
The process of transferring the image itself is best done slowly and carefully; the drawing can be attached to the base using buttons. Cutting cuts, no matter whether they are straight or curved, requires certain skills and patience.
Before starting to make a construction set, it is recommended to practice on simpler figures in order to get better at it and feel firmness and confidence. The finished elements of the designer should be processed again using fine-grained sandpaper.
Finished product (side view)
Most often, many people make their first figures based on ready-made drawings, and rightly so. After all, they all have a detailed description of the assembly sequence. It will be easier for you to determine the quality of your work by assembling the finished product and correcting shortcomings, if any are identified.
It is very important to sand the surface of the plywood along its layers so that all the parts of your construction set have an ideal shape, and while playing with them your child does not experience any unpleasant sensations and, moreover, cannot get hurt.
Product reviews
Arthur Finyagin, Moscow
This is not the first year that I have been interested in cutting out plywood products. It all started with home renovations and since then I have been gradually improving my skills. When I saw a 3D construction set on the Internet, I decided to make something similar for my children. I got tremendous pleasure myself, and the kids are happy. Moreover, the cost of the material is very low, and there are a lot of examples and drawings on the Internet. Every month I create something new.
Evgeny Samusev, Ekaterinburg
Of course, I am not an expert in working with wood, so I buy ready-made plywood construction sets for my children in the store. I am very glad that such toys are safe and at the same time very exciting. I recommend it to everyone as the easiest and cheapest way to please children.
Where to buy
- Location:
st. Shkolnaya 11, Krasnogorsk - Call here:
(495) 77 766 75 - Find out more:
decupe.ru
Plywood construction kits are always offered at a competitive price.
- Location:
st. Pushkina 26 a, Kosaya Gora, Tula - Call here:
(953) 44 237 60 - Find out more:
syndythek.ru
What can be done from the constructor:
- Any crafts. Friedrich Froebel called such figures “forms of life.” These are images of those objects that a child encounters in life.
How to make a house from a constructor.
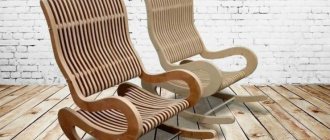
How to make a children's high chair.
How to make a cup from a construction set when working with peas.
How to make a bench.
2. “Forms of knowledge”, i.e. geometric bodies.
How to work with a constructor?
First, the child makes figures from a children's construction set according to the model (from simple figures to more complex ones).
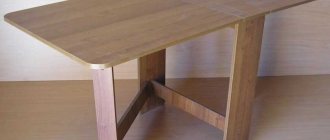
When he masters the capabilities of the designer, he will be able to come up with his own figures - a table, a cabinet, a bed for a fairy-tale hero, a flying saucer, a tree, a turret, a hut, etc.
In the future, you can combine the design from peas and other methods - for example, weaving. F. Froebel suggested making such a craft - a cart using weaving - with children.