Don’t rush to get rid of seemingly unnecessary things. Many of them can easily become an excellent material for making original flowerpots that can be used to decorate a garden, veranda or balcony.
Sometimes all you need to do to get inspiration is to look around, and then the idea comes to mind! Look into a closet, garage, kitchen drawer with unnecessary dishes - probably among the “junk” there will be something from which you can easily make a beautiful “designer” container.
Wine corks
Have you been collecting bottle caps for several years, but still haven’t figured out what to make from them? Meanwhile, all this “good” does is successfully collect dust and take up space on the shelf. Use corks as a material to create a textured flower pot. Find a suitable container, glue wine corks to the outside (you can also use small wooden blocks), then paint the flowerpot in your favorite color. Plain “prickly” flowerpots, for example, white or black, look impressive.
DIY flower boxes
But over time, the question arises, where is it better to plant flowers? First, you need to decide on the location of the flower bed. Secondly, choose the right flower boxes . It’s best if you can make them yourself, since purchased boxes are not always suitable in shape, size, or style.
For example, the entire area on the site is already occupied by plantings or buildings, and you really want to build another flower garden. To do this, you can build an ordinary flower tub, which does not require large financial outlays and will not take much time to manufacture.
- You need to take an ordinary board and cut it into fragments, depending on the height of the tub. Then connect them together with screws or nails.
- After this, you need to take plywood and measure the bottom, cut it out and also attach it to the tub. For reliable and long-term use, it is recommended to tie it with rope and coat it with acrylic varnish.
- Also, to conveniently move the flower bed to another place, you can attach the handles to the sides. The tub is ready.
The advantage of such flower boxes is that when transplanting, the plants will not die in the sun, since the tub can be moved to the shade; drag those plants that have bloomed to the backyard, and move the flowering ones to the foreground.
Concrete blocks
Continuing the topic of concrete, let’s add that there is an easier way to make a flowerpot using the material left over from construction work, which is probably hiding somewhere in the corner of your yard. As a matter of fact, a composition made of concrete containers will look great just in the corner or against the wall of the house. Paint the blocks with spray paint (because it's convenient and canned paints have brighter colors), arrange the containers the way you like, and plant the plants.
Design ideas
You don’t have to make the boxes yourself; you can take a ready-made wooden box. This could be an ordinary garden box, a tool box, even an antique chest. A little decor will add color, but sometimes you don’t need to do anything, the non-standard use of an item speaks for itself, example in the photo:
Don't be afraid to experiment and use things for other purposes.
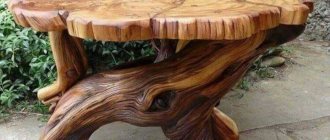
Wooden planters used to be often used at home for planting tall plants. Today they are appropriate in the garden. Several tubs with bushes can become an excellent hedge or act as independent elements.
Decorative boxes with flowers are often made with an emphasis on naturalness . The surface is varnished to protect and highlight the wood texture. If paint is used, it is often noble brown or, on the contrary, light and delicate tones. The main goal is to draw attention to the colors, and not overshadow them with bright colors.
For decoration you can use beautiful vintage patterns. Country style is suitable for a country garden. Not many people know how to make a box look aged. A sample of suitable size needs to be slightly burned with a torch. Pay special attention to the corners and joints of the boards. Clean the surface and varnish. On top you can make an imitation of an old stamp. Making such things does not take much time, but it greatly affects the color of the area.
Advantages
Everyone wants to decorate their garden in accordance with their ideas of beauty, but not everyone can order exactly what they want. The cost of custom work is often scary. It's not that difficult to put together flower boxes with your own hands. This choice has many advantages:
- The cost is much lower than the market price and even more so for custom work;
- The drawing will help you do exactly what you want, and not choose from what is available;
- A wooden box with your own hands will always be an original thing; few people can exactly repeat the design option;
- It’s easy to assemble a box of the right size and dimensions yourself;
- You can make boxes of different shapes with your own hands, but decorate them in the same style, observing the general concept of the garden.
Even a non-professional can make a flower box. Wood is a material that is easy and pleasant to work with. A regular ruler will help you make the correct markings. A box with flowers gives the area its own unique style, and you can rearrange it every day, updating the space in accordance with your mood.
Car tires
Yes, those same old rubber tires are also on our list of ideas for creating containers for flowers. But you shouldn’t grimace when you mention these words in a conversation about site design. Here, as in any other matter, the main thing is not to “overdo it”: paint the tires, but do not make patterns - the “native” texture of the wheel will be enough. Place such containers in one place, thinking through the composition.
If you are against the “tire” design and are going to get rid of old tires, do not burn them under any circumstances, but rather take them for recycling to a specialized center.
Clay flower pot
A unique classic - clay flower pots. They look the most stylish and democratic, and most importantly, you can make them with your own hands. All you need is clay, a kiln and rubber gloves.
First you need to make a clay solution. It should be plastic and without lumps, like good dough. After the clay is ready, separate a piece from it and roll it into a ball. The finished ball must be flattened evenly to form the bottom of the pot.
Next we start sculpting the walls. Separate a piece from the clay and roll it into a thin rope. We lay the flagella around the base, row by row, until the desired height is reached.
After completing the construction of the walls, smooth out the walls; if desired, you can apply a design on it with a toothpick. The pot can be sent to dry; after complete drying, it remains to be burned and decorated.
Rope
Jute rope, twine or rope made of other materials in skillful hands can transform any container. Pay attention to the image below on the left (see photo above) - by the way, this is a tire that is unloved by many! You will need glue, a base container and a rope: coat the surface and rope with glue, wrap the base and let it dry.
We hope we were able to inspire you to create unusual flower containers. We will be glad to see photos of your wonderful “crafts” in the comments to the article!
Designer's recommendations
If you decide to make such a wooden flower box with your own hands, then the outer surface can be decorated using wood cuts. These can be thick branches or planks that look like a picket fence. In the lower part you need to strengthen the legs, which should be made of bars. This will ensure ventilation and keep the wood in good condition.
The flowers inside should be placed in plastic pots, but an alternative solution can be to plant plants directly in the box itself. First you need to lay a film on the bottom, making drainage holes in it.
Balcony boxes with automatic watering function
Pots that are equipped with an auto-watering function have a special water container. From it, moisture is supplied by capillary method to the roots of the flowers through the drainage layer. However, you won’t be able to immediately enjoy all the positive qualities of these pots. First, you need to wait until the roots reach the desired length. At this time, standard watering should be carried out. And then you can forget about watering for up to 3 months.
Some useful tips:
- Dark balcony boxes may lose their color in the sun, so if your balcony is on the south side, it is better to give preference to light shades.
- Be careful when securing the pots. If you have an open balcony, it can be damaged or disrupted by a gust of wind.
- Choose stable pots so that they do not tip over due to external influences.
- Buy holders that match the dimensions of the pot.
- Pay attention to the presence of drainage holes.
From knitted napkins
A similar idea for pots can be used for crocheted napkins.
To keep the delicate white napkins white, use PVA glue instead of cement.
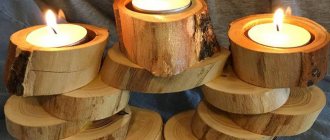
Delicate candlestick made of knitted napkin
Sequencing
Surface preparation
The final result of creativity largely depends on how well the surface is prepared for decoupage. Several operations that need to be done with the pot before decoupage:
Popular articles Digital postcard
- Wash even a newly purchased pot thoroughly, remove all papers, stickers, etc. from its surface.
- Degrease the surface with any alcohol-containing substance.
- If desired, prime with regular white acrylic paint. This procedure can be completely neglected if you decide to decorate a completely new pot with a smooth surface.
Preparing the napkin
From a three-layer napkin you need to cut out the required number of motifs of the required width and length to cover the selected pot. There are no conventions or rules here: your pot can be decorated with a single sunflower or several daisies around the entire perimeter, a thin border near the tray itself, or an ornament in the middle of the pot. It's up to you to decide.
After all the elements have been selected and cut out, you need to separate the other two layers from the colored layer of the napkin and put them aside as unnecessary.
Decoupage
Next comes the moment of decoupage: the napkin must be placed with the colorful side up on the surface of the pot and carefully glued using diluted PVA glue.
There is no need to rush here; it is important that the napkin does not tear. If it still didn’t work out without tearing in some places or folds, there’s nothing wrong with that either, because
Because similar effects are often achieved specifically by more experienced decoupage masters and even give them special names.
Consolidate the result
After complete drying, which in the case of the simple option of gluing several elements of the napkin onto the pot will happen literally within an hour or two, the surface should be covered with a protective layer of varnish.
At this point, the decoupage of the pot is completed, you can transplant the flower into the container and from now on admire the plant and the decor at the same time.
Cans
It’s really hard to find an item as functional and “reusable” as a tin can or a coffee can! Having long established itself as an excellent container for worms (those that you take with you on fishing trips), an excellent ashtray and a modest pencil holder, the tin can never ceases to amaze and appears before us as a stylish piece of furniture. Bend the can a little with a hammer, then paint it with gold spray paint.
Unnecessary dishes
Let's say you have already decorated the garden with an old table, stylized as a flowerpot (or vice versa - it's up to you!). Why not put a few cracked cups from your favorite set on this table? Metal objects also look good: a teapot, a coffee pot, a saucepan. A colander can be used as a hanging flowerpot, after painting it with paint.
Glass jars
Not far behind the tin ones are their glass counterparts, of which there are plenty on any balcony, mezzanine or pantry. Of course, glass jars are useful for preparing preparations from the harvest collected on the site, but why not allocate a couple of jars from the emergency “glass” stock for the design of the dacha? Here paint will help you again: choose a color scheme, paint the jars inside and out. You can use a stencil to create a design on the flowerpot (see photo above).
Care
Plants are planted in a container of suitable size. We must remember that flowers such as dahlias and chrysanthemums need freedom. Plant them at a distance from each other.
At the bottom there must be drainage made of expanded clay, shards or crushed stone. Soil is poured over the drainage, stepping back from the edge a few centimeters.
The balcony box is suitable for all types of plants and flowers, and allows you to combine them into spectacular compositions. For convenience, containers can be placed on the floor, railings or outside the balcony using fasteners.
Broken tiles
Broken ceramic tiles are an excellent material for decoration. To make a beautiful flowerpot, find a container (for example, an unsightly flower pot) and arm yourself with glue. Break the tile (if necessary) into smaller pieces, wash and dry the base pot. Using glue, secure the pieces of tile to the surface of the pot, then coat the product with varnish.
Paint can
We returned to banks again - and where would we be without them? This time the container will be larger than in the case of a tin and glass jar. If after painting you still have cans of paint, add (if necessary) some “smudges”, cut a drainage hole and plant a flower in a flowerpot.