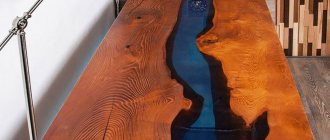
A table is the second item after a stool that a novice amateur furniture maker should take on. The design of a simple table is no more complicated than that of a stool; an unpretentious, comfortable table for the country house or for a picnic can be built in half a day using a hacksaw, hammer and drill. But a table made using the same technology and slightly refined can look great at home, on the left in the figure, instead of an expensive one. However, the table also gives greater freedom of creative expression; it can be a significant and even key element of interior design; it is not for nothing that artisanal furniture makers are called carpenters, and not sofa makers, cabinet makers or nightstand makers. Having become proficient in carpentry, you will eventually be able to take on exclusive tables and other positions. right there.
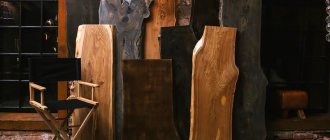
Various tables
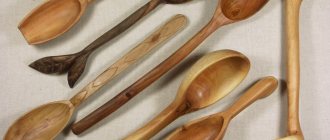
This article discusses how to make tables from wood. Wood is an environmentally friendly, affordable and easily processed material with remarkable aesthetic advantages. In utilitarian products, it forgives beginners quite serious mistakes, but delicate woodwork requires high skill. Having learned how to make wooden things, it will be much easier to master glass, metal and plastic.
Advantages of wooden furniture
Wooden furniture is primarily valued as products made from natural materials. Plus, when properly processed, wood is practical and durable, and its processing is not difficult if you study the rules for creating wooden furniture. Products made from natural wood will make the entire room presentable with their mere presence. And there are usually no problems with finding wood - a homemade table can be easily created even from pallets or old bars.
Tables are made from various building materials, but wood comes first in popularity. Furniture made from natural wood is expensive, although there is nothing complicated in creating some designs. The thing is that this is a noble material that has a lot of advantages:
- Environmentally friendly.
- Ease of processing.
- Attractive appearance.
- Natural drawing.
- Possibility of decorating products.
Colors of wood after treatment with impregnation Source kakpostroit.su
From specially purchased boards, pallets or small bars you can create a dining or computer table that will last for many years and will decorate any room or garden area.
On a note! A wooden table does not always look beautiful. This may be due to incorrect processing or assembly algorithm of the product. These factors directly affect the durability and frequency of repairs.
Types of breeds
If you choose the right material, study the intricacies of processing and creating a drawing diagram, you can make a table that will be one of a kind.
The overview table shows the most popular types of species that are suitable for making a wooden table:
| Wood type | Advantages | Flaws |
| Beech | A light weight. Suitable for manual processing. | Has a tendency to rot. Over time it shrinks and becomes deformed. |
| Pine | Pliable and light breed. It absorbs impregnation and antiseptics well. | Changes color over time. It becomes darker, and a white coating appears in the tree rings. |
| Spruce | This breed is an excellent option for designer products. After processing they become a unique natural pattern. | Difficult to process due to the large number of knots. It is difficult to obtain a perfectly flat surface even with a grinding machine. |
| Birch | Reliable wood that is resistant to chipping and cracking. In the section there are clearly defined rings. | Only for home interior. Outdoors, a birch table will quickly rot because the species is sensitive to high humidity. |
| Alder | A light weight. High strength, resinity and elasticity. Uniformity and elasticity. | Susceptible to wormhole in dry places. Lack of pronounced texture. |
| Oak | Noble texture. Saturated color. High hardness. | High price. Difficulty in machining. One of the heaviest breeds. |
The hardness of wood is not always a guarantee of durability. If a person decides to make a table from boards, then from the entire list the best option is alder or spruce. From it you can create furniture intended for both home and outdoor use.
If the issue of price is not urgent, but oak is beyond competition. 65% of all wooden products in Russia are made from this species.
Oak table Source allegroimg.com
It is not necessary to purchase whole-cut timber; you can purchase bars, which will be cheaper.
Important! For outdoor furniture, you should not buy a species with a high density, but a material that has elasticity, resilience, and resistance to deformation.
Photos and work progress
We put the metal disc on the grinder and begin to process each board of the tabletop, and the entire table as a whole. We give the effect of antique wood. I'm attaching a photo of what it looks like... The first one on the right is processed:
The knots become more expressive. And the cracks that exist are nothing to worry about... On the contrary, they can be emphasized with the help of an angle grinder, creating a greater effect of wear and antiquity...
…more photos:
As a result of all processing of the table, only with this disk, we have the following result:
It has already noticeably transformed; the edges and ends of the table were specially aged, using a grinder, holding it and burying it in the wood fibers. You see the results.
What do you think of this table idea? You can easily make such a table with your own hands... And the cracks on it give it an aesthetic appearance. Do you agree?
Step 5.
In fact, we could have stopped there and ended it. After all, you can go over it with sandpaper or a polishing machine, and then cover it with oil - and you’re done...
But I decided to go further and add more of an antique effect... Look what happened around the edges:
The same thing, repeated with other elements of the table...
Required Tools
To create a homemade table, you don’t need to use special equipment, but with it the process will go much faster. Cutting wood can be done with a regular saw, but the manual method will leave roughness on the cut, which will then have to be additionally sanded.
Emery for manual wood processing Source storge.pic2.me
See also: Catalog of companies that specialize in garden furniture.
For maximum comfort, you will need the following tools:
- Jigsaw. They can quickly and accurately cut bars in a vertical plane.
- A sander will help polish the surface. If a person does not know how to assemble a table without this device, ordinary sandpaper will come to the rescue. Sanding is carried out using sandpaper with coarse and fine grains.
- Drill and screwdriver for drilling holes and joining parts.
- Set of screwdrivers, fastening elements: screws and corners.
- Metal meter ruler and construction pencil.
Additionally, an antiseptic substance or special impregnation is purchased, which will significantly increase the service life of the tree. If you plan to varnish or paint the wood, you need to buy wood paint. If the table is being created for the street, it is important to check with the seller whether the products are suitable for treating furniture that will be located outdoors.
On a note! A woodworking machine will greatly facilitate the process, but purchasing one is not advisable if a person does not plan to work on wood regularly.
Processing wood with a sander Source wp.com
How to make a country table with your own hands
To make a wooden structure you will need:
- pine boards with a section of 25x200 mm and bars;
- measuring and drawing tools;
- hacksaw or electric jigsaw;
- edge sander;
- a set of screwdrivers or a cordless screwdriver;
- milling cutter (in the case of using a countertop with a complex geometric configuration);
- wood drills, screws and wooden pins;
- acrylic putty for wood;
- PVA glue or 2-component epoxy mass;
- impregnation (in a standard container or in an aerosol can);
- paints and varnishes;
- brushes and sponges for applying varnish.
We prepare the bars for the tabletop.
Algorithm for making a table with a stacked top:
- Keep the wooden blanks in a dry room for 10-12 days to evaporate any remaining moisture. If pre-dehydrated raw materials are purchased, then drying is not required.
- Mark the workpieces in accordance with the drawing dimensions.
- Sequentially cut out parts using hand or power tools.
- Lay the tabletop strips and crossbars on a flat surface, and then connect the components with screws. The length of the screw should be 25% less than the total thickness of the table top and connecting bars.
- Sand the front of the tabletop with sandpaper with a grit size of P80. Detected voids (for example, from fallen knots) should be filled with putty, followed by sanding with sandpaper.
- Assemble the support frame using screws or wooden pins, which must be driven into pre-drilled holes coated with glue.
- Cut table leg blanks from a square block with a cross-section of 40x40 mm and sand the surfaces with sandpaper. Drill holes in the supports to install additional spacer bars (located at a height of 200-300 mm from the floor surface).
- Attach the legs to the support frame in accordance with the selected table design and insert the jumpers. Use screws or bolts for fixation, and install wooden pins into the joint for reinforcement.
- Check the correct assembly and trim the lower edges of the supports in case of distortion.
- Impregnate the material with stain or other protective compound that emphasizes the structure of the wood.
- After the solvent has evaporated, fill the surface with a base layer of yacht varnish, and after 24 hours, clean the surfaces with sandpaper with a grain size of P120.
- Re-varnish the structure, followed by sanding with fine-grained sandpaper (size P240). It is recommended to apply 3-4 layers of varnish with intermediate drying and sanding, which increases the resistance of the material to external weather influences.
If the table is intended to be constantly used outdoors, then the tabletop is assembled from 2-3 boards 40-60 mm thick, which are installed on supports made of thick timber or logs. The lower edges of the legs are equipped with support plates made of thick boards.
To connect the elements, staples, nails and screws with increased length are used, the surface is treated with stain and filled with 3-5 layers of varnish that is resistant to ultraviolet radiation, temperature changes and high humidity.
We assemble the tabletop frame from the blanks, then grind it.
If it is intended to treat parts with protective compounds before assembly, then it is necessary:
- Place the products on a spread cellophane in an area previously cleared of dust.
- Apply the base coat with a spray bottle or spray the composition from a can. It is necessary to maintain a distance between the sprayer and the surface within 300 mm and move the container evenly.
- Let the parts stand for 10-15 minutes, and then turn the elements at the same angle in the same direction to ensure uniform coverage. The tabletop boards are painted starting from the bottom edge, directing the center of the jet to the edge of the element. It is recommended to stop spraying at a distance of 20-30 mm from the top end, and then paint the remaining area by directing the central part of the jet to the dividing line between the impregnated wood and the clean area.
- Wait for the solvent to evaporate, repeat the treatment if necessary, and then proceed with assembly.
To make a metal frame you need:
- Cut the workpieces in accordance with the drawings using an abrasive tool.
- Clean the cut lines, align the parts together (use clamps or mandrels to hold).
- Connect the parts using electric arc welding, mount brackets for installing wooden elements.
- Clean the seams from scale and slag with a hammer, and then clean them with an angle grinder.
- Cover metal surfaces with primer and paint to prevent the formation of corrosion areas.
- Install pre-impregnated wooden elements (for example, tabletop or bench boards) and secure the parts with screws.
- Finish the wood with yacht varnish and dry the protective coating.
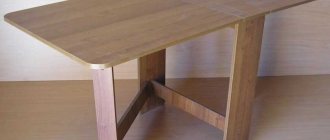
Table with stacked top.
Drawings of tables with photos
The series of photographs shows homemade tables made of steel profiles and wood, made by the owners of their summer cottages. The information can be used to create original projects.
The owner independently develops drawings, focusing on the dimensions of the room and the configuration of the countertop. To create documentation, special utilities are used (for example, “Vomnik”, “3D Suite Furniture Salon” or “Basis-Furniture Maker”), which allow you to determine the dimensions of the workpieces and reduce the risk of cracks or distortions during assembly.
Scheme for making tables.
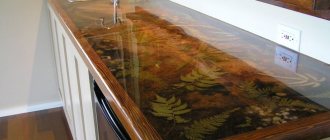
Separate photographs show a table with a solid wooden top with luminous areas. Cuts are made on the surface with a chisel or angle grinder, and then the irregularities are filled with a fluorescent mass. After cleaning and varnishing, the table is ready for use. The filler glows for several hours after dark.
Glowing tabletop.
To store a set of garden tools or kitchen utensils, mobile cabinet tables equipped with supports with rollers are used. The tabletop is made of hard wood or chipboard with a protective coating.
The drawers are installed on guides and have magnetic latches to keep them closed. Rollers allow you to roll the table around the territory of your summer cottage. Handles are installed on the end walls for ease of handling.
Table on wheels.
The site owner can assemble a table from pallets or pallets, which are connected with nails or screws. To obtain a level tabletop, a sheet of impact-resistant glass is installed on the boards, and rollers from warehouse carts with brake calipers are provided for movement. Pallets are also used to make benches on which pillows are placed.
Pallet structures have an original design and are resistant to external influences. The master needs to select workpieces without damage and with a clean surface.
DIY pallet tables.
191
Drawing
After the material is selected, it is necessary to create a drawing with the exact dimensions of the future product. The diagram can be found on the Internet or drawn according to your parameters. If a person plans to make a standard version of the table, then the dimensions will be as follows:
- 60x90 cm - a small table at which 3-4 people can sit. Small dimensions for small spaces.
- 90x120 cm - standard dining table for 4-6 people. Suitable for a kitchen or a spacious gazebo.
- From 120 cm – size for living rooms and large rooms.
- The length of the frame parts should be slightly less than the size of the tabletop.
- The length of the legs of the standard version is no more than 70 cm. If we are talking about a coffee table, then the parameters are smaller: from 35 cm to 60 cm.
The dimensions of the tabletop are only part of the scheme. A homemade table can be of various configurations and shapes: round, oval, square, rectangular or non-standard. It can be with four or one legs, with an internal niche or additional crossbars.
The legs can be mounted vertically or crosswise. To make the table more stable, some craftsmen additionally connect the legs together with crossbars.
On a note! Each element of the table is drawn separately, indicating the parameters.
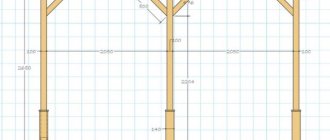
An example of a drawing of a classic table Source romashkino33.ru
Antique wood table
So. What we have regarding the material:
- 5 boards 5 cm thick - on the tabletop (length 1.6 meters)
- 4 beams high (10 by 15 cm) - on racks (length 0.75 meters). The clean height of the table is 0.8 m.
- ...and several boards from the five for cross ones. I'll show you from the photo.
Tools and “attachments”:
- Plane
- Grinder (angle grinder)
- Drill
- Hacksaw or saw
- Attachment: round metal brush - for an angle grinder (angle grinder) (for an antique effect, used on the table top, and all table elements). see photo
- A regular cutting disc for metal (for an antique effect, used for timber)
- Long bolts for assembling table elements (18 cm long, 12 mm thick)
- Drill bit 6 mm long (to pre-drill for long bolts)
- 10 or 12mm drill bit to pre-drill for countertop bolts
- On the table top - decorative furniture bolts of round shape + nuts for them, and washers. Bolt length – 120 mm. (to screw 2 boards of 5 cm each) – 20 pieces
- Several 120mm nails may be required. (in my case)
- Tape measure, square and other small tools.
- 120 grit sandpaper
To process the table we used:
- Decorative protective impregnation for wood – dark brown color. She first covered the table to give the main color.
- The wood oil was oak-colored, but it could have been transparent, since our color is already from impregnation. The oil is absorbed into the wood and protects it from moisture. In the rain, the table does not absorb moisture, but repels it. This is an important point! It's the oil. You can find similar ones in hardware stores.
- Tassels
Preparation of materials
When a person has decided on the dimensions, he will know how much material is needed, after which he needs to make cutting. If you have not previously had the practice of creating furniture products, then it is better to build a standard table without additional elements. The place and equipment should be prepared. It is better to carry out cutting in the utility room.
To understand how to make a table out of wood, it is important to analyze the algorithm of actions. Preparing the material is the main part of the work, so all that remains is assembly. After cutting, cutting of parts and grinding work is provided. Nuances of the procedures:
- Marking the wood will help make the cut even. The distance is measured on both sides and then connected into one line. For a large table, instead of a ruler for marking, you can use a regular strip.
- When working with a cutting machine, it is important to maintain safety. When creating a wooden table, cutting is the most important step. If this process is not carried out according to the drawings, then you should not expect a high-quality product.
Working with a jigsaw Source trudyagadv.ru
- After all the boards have been sawn and processed, they are scraped and cleaned mechanically or manually. Removal of irregularities is done with a grinder or sandpaper. The topcoat will not be able to hide the roughness.
It is important to check with your palm how well the work is done. The procedure is performed strictly along the fiber line. This will prevent the appearance of scratches and nicks. If manual cleaning is carried out, the wood is first processed with sandpaper No. 80, then with a tool with a finer grit No. 120–240. After the preparatory process, the elements are treated with an antiseptic or impregnation. During this procedure, the room temperature should not be lower than 5 degrees.
Assembly instructions
To figure out how to make a wooden table, it is important to familiarize yourself with the assembly algorithm. You can assemble a structure from pallets, make a folding product, or make a table from leftover boards. When all the parts are prepared, you can begin assembly. The instructions differ depending on the material from which the structure is created. Stages:
- frame;
- table top;
- legs.
Standard version of the table before opening it with varnish Source stroimaterials.ru
First, we will consider the standard version of assembling a table from boards, then from pallets, and then from a folding configuration product. Once the frame is made, you can think about decorating.
What materials are used for country tables: pros and cons
In the process of making tables for summer cottages, the following is used:
- plastic elements that are connected with rivets, screws or glued with epoxy-based materials;
- steel sheets and profile trim; welding, bolts or rivets are used for assembly;
- wooden or plywood blanks, which are fastened with pins, wood glue or screws.
Lightweight plastic
Plastic tables are assembled from factory blanks processed in accordance with the required dimensions. The advantages of the material include resistance to rotting and precipitation.
Synthetic materials are not destroyed by ultraviolet radiation.
But one should take into account the increased fragility of plastic at low temperatures (from +5°C) and flammability. Sheet plastic is rarely used for making homemade tables.
Plastic set for a summer house - table and chairs.
Iron sheets
The metal structure is assembled from steel angles connected by bolts or resistance welding. A tabletop made of sheet reinforced with profile scraps is mounted on top.
The table is heavy and durable. To prevent the product from sinking into the ground, support plates are welded to the legs. When installing the product outdoors, it is necessary to protect the surface with soil and impact-resistant enamel, otherwise traces of corrosion will appear on the metal.
Iron country table.
Wood
The most widespread are wooden tables made of solid wood, plywood sheets or chipboard. The material has a beautiful appearance, is easy to process and has a low specific gravity.
The main disadvantage is low resistance to external influences and fire hazard.
To reduce the rate of decay, wood is impregnated with compounds containing antibacterial additives. There are solutions that reduce the flammability of the material.
Wood table.
Recommendations from experts
Each process has its own nuances that can complicate the work. If you still have questions about how to assemble a computer desk or a standard design, advice from experienced craftsmen will help.
- The surface should be additionally polished so that the structure acquires a glossy shine.
- If you neglect polishing, the table will not be aesthetically pleasing, both in appearance and to the touch.
- Between varnish and paint, it is better to give preference to the first substance. It will better preserve the surface of the product.
- Varnishes come in various shades, so choosing a color scheme is not difficult.
- If paint is used, it is better to give preference to alkyd or epoxy enamels.
Don't be afraid to experiment. You can combine shades. Additional decor from small wooden blocks. You can experiment with the shape of the structure, add elements, change the board thickness, dimensions and dimensions. It is popular to use stencils or decorate with metal elements. To increase the functionality of an item, you can equip it with additional niches or drawers.
Unusual table variation Source mattdownerdesigns.com
Briefly about the main thing
To understand what to make a countertop for an outdoor table from, it is important to study five main stages: choosing wood, drawing, preparing the material, assembling according to the diagram.
Proper processing will increase the service life of the material, and correct instructions will allow you to create a high-quality product. The process looks like this step by step:
- choice of wood species.
- preparation of tools.
- creating a drawing.
- creation of the product: marking the material, sawing, scraping, grinding and assembly.
The final stage is painting and decorating.
Ratings 0