One of the significant disadvantages of wood is that it quickly loses its attractiveness. Even if the conditions for its storage and use of lumber products are the most favorable, over time the surfaces inevitably change color and “fade,” that is, the wood loses its original appearance.
Many technologies have been developed for restoration and renovation of furniture and structural elements. One of them is veneering (the term veneering is sometimes used), which is quite accessible for DIY implementation.
There is no definition of the term “veneering” in various dictionaries. In essence, it means pasting materials with the thinnest layer of decorative wood-based coating. In principle (if you don’t go into specific details) this is the same lamination technology. The only difference is that, as a rule, products (objects, structural parts) made of wood are subjected to such surface finishing.
Veneer has a certain classification. Differences in production technology, as well as durability and specific use. A detailed description of the groups is unlikely to interest the reader. It is enough to note that if you plan to finish furniture with your own hands, then it is advisable to focus on peeled veneer (a natural product)
and fine line (the so-called reconstructed modification).
They have a lot in common - ease of working with the products (the layer is very thin), a variety of textures (especially fine-line modifications) and an affordable price.
Veneering technology is applied not only to wood, but also to materials (sheet, slab) based on it - chipboard, OSV and a number of others.
Therefore, talking only about furniture restoration is not entirely correct. With the help of veneer, you can give a “second life” to old door jambs and panels, wall panels, countertops - there are plenty of options for using such finishing.
There are several technologies for fixing veneer. There is only one available for DIY implementation - “hot”, which is based on the use of glue. This technology. The other two require special equipment and are not suitable for home use.
Hot veneer technology
Preparing the base
- Removing fittings (if any) and structural parts. For example, a peephole from a door leaf, the rim of a keyhole.
- Dismantling the old layer of finishing on a wooden surface. It’s easy to decide what you’ll need – a spatula, an iron for heating the coating, and so on.
- Elimination of existing base defects. Methods and materials are selected based on their nature and “depth”. Basically, grouting agents, putties and adhesives are sufficient. Upon completion of the work, the base is carefully sanded so that no bulges, dents or folds are formed when the veneer is applied.
Veneer preparation
- Editing sheets. This thin finishing material is sold in rolls. Consequently, when straightened, it will try to return to its original position (memory effect). To restore their correct geometry, just walk along the reverse side with a damp sponge. The veneer will soften somewhat and straighten out. To consolidate the result, the sample should be clamped between two flat surfaces. For example, sheets of plywood, fiberboard slabs and the like, depending on the size of the fragment. To quickly remove moisture from the veneer, it is advisable to cover it with soft cloth or paper. After drying, it will remain in a straightened position.
- Editing edges. When restoring large surfaces, one sheet will not be enough. Veneer is sold with a blade width (with rare exceptions) of 30 cm. Consequently, splicing of fragments cannot be avoided. Edge straightening is nothing more than cutting sheets along a line. At home, 2 pieces of boards with treated ends are quite suitable for this (as an option). A sheet of veneer is placed between them so that only its edge protrudes. All that remains is to clamp the resulting “assembly” with clamps and trim off the excess (irregularities) with a sharp knife. It is advisable to work with a special tool designed specifically for cutting cardboard or thin plywood.
Veneering
Applying glue.
Recommendations for using the selected adhesive are always given by the manufacturer. But those who have already done this work with their own hands advise processing the base in 2 passes. First, the thinnest first layer - a short exposure until it “sets” - then the second. This technology allows you to see all the imperfections and distribute the glue as evenly as possible over the entire area.
Fixing sheets.
Experienced craftsmen recommend placing a sheet of paper (only waxed paper) first. The reason is that the veneer is thin, easily damaged, and it is unlikely that it will be possible to place it on the base immediately as needed. This means that it will inevitably have to be moved. When it reaches the optimal position, it is quite easy to remove the wax sheet without damaging the glue layer.
Processing of joints.
- Before the glue dries completely, in order to ensure the quality of the veneer, it is advisable to secure all joints with adhesive tape. Then it is easy to remove it.
- In some cases, it is advisable to first fasten the veneer strips into a single sheet, and only then lay it on the base. You will have to decide for yourself what to do best. But it’s worth considering (as one of the acceptable options).
- To avoid moisture absorption into the base, it is advisable to veneer not only the front part of the sample, but also the back and ends. This should also be taken into account when determining the course of action.
The final stage
After the adhesive composition has hardened (which implies reliable fixation of the veneer), a number of simple technological operations are performed.
- Inspection of the surface and identification of possible defects in the work.
- Removing excess (if any) glue.
- Sanding joints (edges). Extreme care must be taken here. The veneer is thin, and excessive zeal will lead to bald spots. Everything will have to be redone, since it is difficult to disguise the stains to match the finish, and it will not always work. Of course, the highest quality polishing is ensured by a grinding machine, but not every home has one. If possible, asking friends for some time is the best solution.
- Application of a protective coating. This is necessary mainly for peeled veneer. It is not difficult to choose a composition, depending on the design of the sample, its purpose and specific use. The range of various oils, varnishes, and stains is impressive.
Having dealt with all the nuances, it becomes clear that do-it-yourself veneering is not a very complicated process. Knowing the technology, anyone can implement it at home. And if you wish, you can bring some of your own “zest” to this work.
Good luck to you, home craftsmen!
All photos from the article
In this article we will talk about how plywood and veneer are combined into a single whole, what the material obtained in this way is and what are the features of its application. But, first, let's try to decide for what purpose veneering is done with walnut veneer or veneer of other more valuable species.
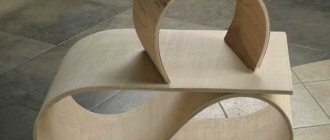
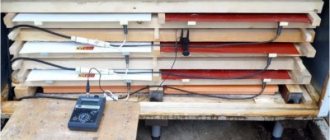
Veneering of a long base
Master class from the authors of the YouTube channel Family Business. Carpentry workshop BUK .
As a rule, the length of veneer rolls does not exceed 3 meters. If it is necessary to veneer a board up to 4 meters, then buy duplicated veneer. The peculiarity of this veneer is that it has a fleece backing and is spliced along its length in an imperceptible zigzag manner. Veneer up to 87 meters long is rolled into a roll.
Duplicated veneer
Before gluing, strips of the required length are cut from the roll and laid out on the base. To assemble a shirt for the base from the strips, they are fixed at the edges with clothespins.
Fixing clothespins
At a distance of up to 50 cm, pieces of gummed tape are applied to the joints of the strips, and then they are fixed with a hot iron.
Fixing pieces of gummed tape
The joints of the veneer strips along the entire length are glued with gummed tape. For convenience, use a device in which the tape is wetted with water.
Gummed tape sticker
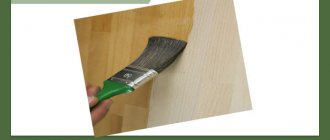
The adhesive composition is applied to the base with a roller.
Applying glue with a roller to the base
A layer of glue is also applied to the inverted surface of the shirt with a roller.
Coating a veneer shirt with glue
The water glue may cause the veneer on the shirt to curl into a tube. However, after the moisture evaporates, the veneer straightens.
Gluing of veneer begins after laying a strip of polyethylene on the base.
Plywood base covered with polyethylene
A veneer shirt is laid on polyethylene. A very important moment, since you need to very accurately combine the coating and the base. The polyethylene film protects against premature gluing of the shirt to the base.
Laying a shirt on a base through polyethylene
They begin gluing the shirt after grinding in a small area. Then the polyethylene is gradually pulled out and the veneer assembly is smoothed out. Ash bars are used for grinding. Particular attention is paid to the joints of the veneer strips.
Lapping veneer with ash bars
To remove gummed tape from a shirt, use sanding or scraping.
Removing the gummed tape
After removing the tape and sanding, the base takes on an attractive appearance.
Plywood base covered with veneer
Video about veneering a long base:
The need for veneer finishing
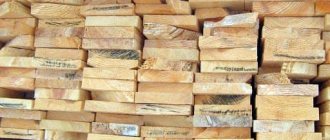
Plywood is a type of laminated lumber made from natural wood. But, despite its natural origin, the raw materials for the production of plywood are inexpensive wood species with an inexpressive fiber texture and an insufficiently attractive color.
In order to refine inexpensive material, rare or even valuable species are glued on top. As a result, the price of lumber increases slightly, while the aesthetic design improves significantly.
Finished veneered plywood and products made from it look as if they were made entirely from rare wood. However, along with a more attractive and solid appearance, as a result of veneer finishing, plywood acquires improved technical and operational properties.
In simple terms, veneering is gluing thin plates of wood with a beautiful structure (actually) onto a wooden base - be it a table, wall or door - of lower decorative qualities. It turns out that veneering furniture means dressing it in beautiful clothes.
Veneering is more correctly called veneering
. But it just so happens that the slang word “veneer” is more familiar to the average person’s ear than “veneer.”
Purpose of veneer
Veneer is a thin plate of natural wood obtained by peeling, planing or cutting. This material preserves the texture and decor of wood, which allows you to give the renewed surfaces the sophistication of ash, the presentability of oak, the splendor of mahogany, the delicacy of birch, etc.
The main purpose of veneer in a home interior is the cladding of doors and furniture. If necessary, cornices, portals of decorative fireplaces, picture frames and mirrors are finished in wood. If an apartment renovation project involves the use of wooden wall panels, then in this situation, veneer glued to a cheaper material will cost less.
Why veneer furniture?
Two main points can be highlighted.
Firstly, the price
. You can veneer a pine table with your own hands, “turning” it into oak, and the appearance will hardly be inferior to real oak. But the price will be much lower. And if you remember that it does not dry out, does not deform, and is not affected by moisture and temperature, then you should seriously think about whether it is worth spending money on furniture made from valuable wood?
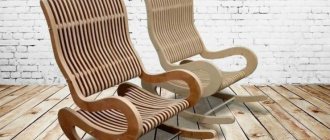
Secondly, wide design
. Do-it-yourself veneering allows you to turn a tattered window sill into a new one, and a boring cabinet into a completely new item in the Art Nouveau style without much expense, just by applying veneering.
Veneering: types
There are several main types of veneering, let's take a brief look at them.
— Hot veneering. With this method, the veneer is glued to the base using adhesives. The most accessible method for home conditions, it will be discussed in the article.
— Cold veneering. Here the veneer is pressed onto the base. We are talking about pressing machines or screw clamps, which not every home owner has.
— Membrane veneering. An industrial method used for veneering complex surfaces. Membrane veneering is based on vacuum joining of veneer and boards - both smooth and textured.
Preparatory work
First of all, it should be noted that the interior items on which the veneer will be glued must be made of chipboard, plywood or furniture boards (most importantly, wood). Their surface should not be greasy, have resin stains, knots, cracks or chips. Existing defects must be filled with wood putty and then thoroughly sanded. Before filling, knots must be removed and, if necessary, a rough surface must be created for better bonding, which can be easily done using a special plane with fine teeth.
What to do with veneer?
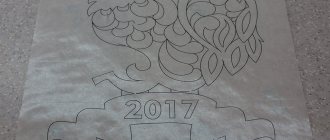
After preparing the base, you can proceed to preparing the veneer itself (see video). So, you need to unpack it all and select sheets whose pictures are similar. This is necessary so that the finished product looks as natural as possible. After marking, the sheets are cut. This can be done at home using a sharp knife and a ruler. When working with veneer, you need to know that it can be simple and figured. Simple sheets are those whose fibers are arranged in parallel, while figured ones are those with which you can get various interesting figures.
How to cut stone veneer?
During the manufacturing process, natural stone veneer is glued to fabric, fiberglass or other synthetic thin materials. Many companies that produce thin stone slabs have a service for cutting panels to customer sizes, so that time is not wasted on this procedure during the installation process. However, it is not difficult to do everything yourself. For this you can use:
- A familiar hand or electric saw with a carbide cutter.
- For large volumes of work, experts recommend using diamond-coated cutters.
- It is more convenient to cut thin sheets or small strips with metal scissors.
Progress of work on cutting the slab:
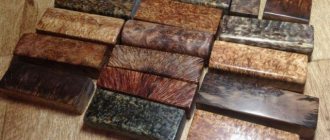
- Inspection of existing panels and arrangement of similar patterns and textures. Each batch is completed with slabs that are as similar as possible, but discrepancies are always possible.
- Marking is carried out using chalk and a construction ruler.
- Cutting the material is carried out with the above tools.
- An overlapping decal will require milling of one edge if it was not done in a production environment.
Pasting methods
The base on which the sheets will be glued must be degreased, after which it is covered with glue for gluing the veneer. The most popular method of gluing sheets is tightly. The glue for it is made thick and applied hot. You need to make sure that it dries on the base, because otherwise the adhesive solution may appear on the surface, especially if the veneer is very thin. After the contact adhesive for the veneer has started to set, it’s time to lap the sheets. This is done using a special lapping hammer, which is constantly moved in the direction of the fibers.
The grinding process begins in the middle of the sheet, gradually moving the tool heated to 85°C to the edges, while removing excess glue. It is advisable to moisten the veneer with warm water during operation. This is done so that the adhesive solution does not have time to dry too quickly. If it happens that not the entire base was covered with veneer glue, bubbles may form, to eliminate which you will have to cut the sheet with a blade and introduce a small amount of adhesive underneath it. After this, the veneer is processed again with a lapping hammer or a warm iron. Thus, you can quite easily glue veneer at home.
How to glue stone veneer?
For professional craftsmen, finishing walls with stone veneer is an easy type of work that can be done in a relatively short time. With the proper skills and tools, an ordinary person can also cope with this task. Stone veneer can be glued to flat and curved surfaces from:
- metal;
- concrete;
- plywood;
- wood;
- Chipboard and MDF;
- ceramic tiles;
- drywall.
Pasting stages:
- Leveling the surface from significant irregularities.
- Dust removal with a special primer if necessary.
- Marking and drawing up a sheet layout plan.
- Some craftsmen advise protecting the edges of the panel with masking tape from the adhesive.
- Dilution of glue. It is applied to the panel and surface with a special notched trowel using a zigzag motion.
- The panel is pressed against a section of the wall, smoothed and fixed by hand for about 10 seconds.
Stone Veneer Adhesive
In order for stone veneer on a wall or other surface to hold firmly and last for the number of years stated by the manufacturer, it is important to choose the right adhesive composition. Professionals recommend using two-component adhesives or sealants based on:
- polyurethane compounds, for example, Tenax Titanium;
- dispersion varnish compositions, for example, Stauf D3;
- epoxy resins, for example Litokol Litoelastic;
- silicones, which are used in Iposkol brand compositions, for example;
- hybrid polymer mixtures (MS polymers), for example, sm Soudal.
Which glue is better?
It is very easy to get confused among the variety of adhesive solutions. What glue is best for gluing veneer to plywood or other similar material (see photo). Very often, when gluing sheets tightly, ordinary PVA glue is used. But it is only suitable for flat surfaces. More complex elements can only be made using more reliable compounds, for example, Titebond adhesive solution for wooden surfaces. But it is worth noting that it does not cost that little. In addition to the above compounds, veneer can also be glued using polyurethane, epoxy, as well as soluble hide or liquid hide glue.
- It is best to start sanding the base for veneer with fine construction sandpaper and finish with fine sandpaper.
The color of the veneer sheets must be selected so that they harmoniously combine with wallpaper, furniture, etc.
The patterns left from sheets made from various types of wood are very interesting.
With the cold dyeing method, the coating of sheets at home turns out to be more uniform and stable.
After staining the veneer, it must be washed under running water and then dried in a warm place, but away from direct sunlight.
All about veneer and MDF
->
Veneer is a very thin sheet of wood, the thickness of which can vary from 0.1 to 12 mm. For industrial purposes, veneer is often made from valuable wood species such as oak, ash, beech, walnut, mahogany and others. But if you need veneer for personal purposes in small quantities, for example, for aircraft modeling, then you can read how veneer is made at home and, if you have the tools, do it yourself. In this article we want to talk about how to make veneer with your own hands.
Veneering (veneering)
Veneering technology makes it possible to achieve the almost impossible - to preserve all the advantages of a wooden surface, while eliminating its inevitable disadvantages.
Wood is an excellent material suitable for European-quality renovation, but its characteristics are accompanied by problems associated with the characteristics of natural materials. Although wood costs a lot, it is often used. But it does not retain its qualities in all conditions; for example, wood with clearly excessive humidity or dryness quickly deforms or dries out. Veneering will help to avoid all these troubles - it is also called veneering.
Veneering methods
The technology is simple - veneer is glued to MDF or chipboard boards.
In this way, the surface of a material more resistant than wood is given the actual appearance of wood. At the same time, the finishing of the premises will remain highly durable, quite durable and resistant to temperature changes that are difficult for wood and other factors. Construction finishing panels can be veneered using cold , membrane and hot methods. The surface of the boards for gluing is pre-leveled and treated with a special putty.
The first veneering option is more common: according to this technology, wood veneer is simply glued to the slab - of course, with special compounds.
If you need to mill furniture elements, a thin layer of wood is pressed onto a slab surface under heat.
And finally, the more complex membrane veneering technique involves attaching veneer to various products using vacuum bonding technology with a textured or smooth building board. A vacuum press is used for this. In this case, a material is obtained that is indistinguishable from real expensive wooden panels. Only it will cost much less, and maintenance will be easier. Such boards are used for the needs of the furniture industry; they are also used to make partitions, durable wall panels, and various other interior elements.
Types of veneer
What types of veneer are suitable for veneering? The use of planed, sawn, and peeled veneer is practiced.
Sliced veneer is often used for furniture sets . Its thickness is from 0.2 to 5.0 millimeters. Such veneer is planed into the thinnest strips of timber. For its production, valuable wood species are taken: oak, walnut, beech, acacia, mahogany, ash, Karelian birch.
Sawn veneer is easier to make from coniferous species - based on spruce, fir, pine, and cedar wood. This veneer is used to cover parquet boards, interior doors, and wall panels. It is generally thicker than planed - from 1 to 10 millimeters. There will be more waste with this method, but the result is a good surface texture.
Peeled veneer is made from various wood species; it is cut in a thin layer using the technology of removal from a rotating log. In terms of quality, such material will be inferior.
Depending on how the wood base is sawn, as well as depending on the texture, the veneer can be radial , semi-radial , or tangential and tangential-end .
This method of decorative finishing is suitable for both furniture production and finishing work. Veneering increases the service life of a “wooden” product. You can easily make any clear patterns on its surface - stripes, lines, and cones. And all this successfully creates the illusion of real wood, allowing you not to worry about how this material feels - it looks cozy, inexpensive and therefore popular.
How to make veneer at home
The easiest way to get yourself a few pieces of veneer is to “disassemble” a sheet of plywood. Place the plywood sheet in a container with hot water for 2-3 hours, maintaining a high temperature throughout the soaking period, and then cut the plywood into layers with a well-sharpened knife. Immediately after this, you need to put the resulting veneer slabs under a press to maintain a flat surface.
You can even make sawn veneer at home, but be prepared that this work will take a lot of effort and time. All you need is a prepared beam (not necessarily elite wood, ordinary maple or birch will do), a pencil, a ruler, a workbench and a good jigsaw, preferably with a set of replacement blades in reserve.
How to cover furniture with veneer yourself
Fix the workpiece in the workbench and mark it vertically in increments of 10-12 mm (thicker is not practical, and if thinner, it will be very difficult to saw). Take a jigsaw in your hands and cut the veneer along the lines layer by layer.
How to make veneer if you have a plane at home. Sliced veneer is made from the same timber as sawn timber, with the only difference being that thinner plates can be made. But there is also a downside to the coin - it is difficult to make plates of the same thickness with a mechanical plane. Well, if you have an electric plane with an adjustable layer thickness control, then the task is much easier. Firmly secure the timber in the workbench and remove the veneer, remembering to use a clamping ruler or beam. If you have access to a peeler or other woodworking machines, then the process of obtaining veneer is no different from the industrial one. How to make veneer suitable for further use? It must be sanded, coated with waterproof solutions or varnished, depending on the purpose of production.
MANUAL METHOD OF VENEER MANUFACTURING
Small pieces of thick veneer can be made using only hand tools. This is an ideal solution for home workshops.
Historically, for example, I work with veneer 1.5 mm thick. In general, up to 3 mm is a completely working and comfortable thickness.
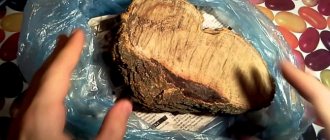
So, take a piece of dried wood (photo 1). In my case, this is a birch tree with interesting rot, which I personally saved from the fate of frying a steak on it. The rot produced an interesting pattern, but the wood remained solid.
I saw off a piece a little larger than the palm of my hand and manually trim it into a rectangular block (photo 2). Next, using a thicknesser along the entire perimeter, I mark the thickness of the layer that needs to be sawed off. To obtain 1.5 mm veneer, it will be approximately 2 mm.
I secure the block in a vice and carefully saw off the face (photo 3).
To simplify the work, I first carefully cut into the corners of the block with a saw blade. Further from the corner I continue to cut onto the plane of the block, shallowly. I turn the block, again there is a shallow saw on its other side. I turn again, then I cut a little deeper... As a result, I get quite deep cuts on all four sides of the block, ideally according to the markings, the saw has no chance to turn sideways. If the depth of the back saw is not enough to finish the job, I change it to a backless one. It already works like a miter box.
I carefully plan the resulting plate in the calibration bottom (photo 4). It consists of two walls of the required height (I have 1.5 mm, for the walls take the hardest wood you have - they will last longer), glued at a 90° angle to each other. I rest the plate against the corner and move the plane from one of the walls. When the plane rests on both walls, everything is ready.
Do-it-yourself veneering
Veneering is a procedure for covering a base with natural veneer, which has good decorative and wear-resistant characteristics, in order to increase the aesthetics of the surface and protect it from mechanical damage. Veneering is also used to restore the surface or update old veneer finishing with your own hands. After all, it is not necessary to purchase furniture made from expensive solid wood, which also requires regular maintenance, when you can choose veneer from the desired type of wood, which perfectly imitates solid wood, at a budget price.
Let's look at an example of how to update veneer doors with your own hands, the veneering procedure at home. First, you need to choose the type of veneer and its shade to match your interior or the existing coating. You can do this at a good price in a specialized store shpon.ru. Please note that depending on what wood the veneer is made from, its properties will differ. For example, if you are going to decorate wall panels in a living room, then you can take elegant oak veneer, and if you need to veneer a door to the kitchen or bathroom yourself, then it is better to take moisture-resistant teak, merbau, mahogany or larch veneer.
At the preparatory stage it is necessary to prepare the surface for veneering. To do this, the door should be removed from its hinges, placed horizontally on a stand and the fittings removed. Then, using a spatula, the old coating that requires updating is removed. To speed up the process, you can run a heated iron over the surface, which will make the coating come off easier. All irregularities and defects must be smoothed out; this will require sandpaper. If sandpaper does not help, then you will have to apply putty.
Next, you should take care of the purchased veneer - before work, the tape must be straightened. To do this, you can moisten the sheets with a wet sponge and press down on both ends. After the tape becomes straight and does not curl, you can cut the blanks according to the pre-measured parameters of the door. When doing veneering yourself, you should not forget that the veneer blank cannot be cut with scissors; it is best to do this with a special plywood knife so that the edges are even. It is also important not to forget to make a blank with a margin of several cm, which will not be difficult to trim when the work is completed.
The next step is to cover the door with veneer yourself.
How to make veneer at home
To do this, an adhesive is applied to the cleaned surface, and when the glue dries, it is covered with another layer to ensure the best binding effect. Next, a veneer blank is placed on the glue and secured through damp gauze or a sheet of paper with a heated iron set to medium temperature when heating. To prevent the sheet from going in waves, after ironing, go over it with a roller. The veneer sheets are joined on the surface with an overlap of 3-4 mm.
At the final stage of the do-it-yourself veneering technology, the remaining veneer is removed, the edges of the cuts are sanded and sanded. If traces of glue are noticeable in the joints, they can be easily removed by walking with a soft cloth or cotton wool soaked in a solvent. And in order to improve the aesthetic and performance qualities of the surface for the future, the veneer can be additionally coated with varnish, and then the fittings can be returned to their place and the door can be hung on its hinges.
Quite often, when making furniture, not the entire product is woven, but only a certain part of it. So, for example, when making tables or various stands for flower pots or decorative vases, the lid of the table or stand is braided only along the edge. The lid is usually made of thick plywood. Undoubtedly, “bare” plywood will not greatly decorate the product, even if the surface is treated with stain or varnish. Therefore, it is covered with veneer - sheets of valuable wood, such as oak, whose thickness ranges from 0.25 to 1.66 mm.
The process of covering with veneer is called veneering.
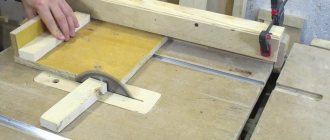
During the veneering process, the surface of the plywood blank is initially treated with a tsinubel plane.
Treating the surface of plywood with a tsinubel plane
After this, the veneer sheets are cut to the required length using a cutter with teeth specially designed for transverse cutting of veneer.
Cutting veneer strips with a serrated cutter
For better joining of veneer sheets, their edges are trimmed with an ordinary sharpened jamb knife.
Trimming veneer sheets with a jamb knife before joining
If the veneer is too dry, it is slightly moistened with water to facilitate processing.
Stone veneer - what is it?
At all times, decorating a room with natural materials was considered a sign of wealth and luxury. Few could afford stone slabs in the interior. In addition to being expensive, such a material has a high specific weight and installation features in which fastening is only possible on a flat, smooth surface. All the shortcomings that natural stone finishing has were leveled by the discovery of the German Gernot Ehrlich.
While renovating one of the stone countertops, he peeled off a thin surface layer of slate that looked just like the stone. At the same time, the layer was light, moderately elastic and durable. The specialist continued to work in this direction and soon the whole world learned that this was stone veneer. Ehrlich's company began producing building material from a thin slab of natural stone bonded with polyester resin and fiberglass.
Stone veneer - composition
In terms of its composition, composite stone veneer is a hybrid material that combines the gifts of nature and modern scientific developments:
- The top layer is a thin section of slate or marble (0.3 to 2.5 mm thick).
- A special adhesive composition is applied to the stone, connecting it to the substrate.
- When producing flexible stone veneer, manufacturing companies have learned to use a variety of materials as a base, the characteristics of which determine the further use of the product. Fiberglass, cotton, fleece, polyester, and translucent fiber can be used as a substrate.