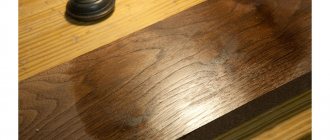
One of the most difficult types of finishing work on wood products is the process of polishing them. But this is a necessary action, as a result of which the coating becomes transparent and very beautiful. After polishing, you can enjoy the pronounced texture of the wood, as well as its shades.
Polishing helps the wood maintain its natural appearance, and the surface gives a mirror-like shine. About twenty years ago, this method was very actively used when polishing wooden car interiors and various luxurious pieces of furniture made of wood. In this way, the beauty of the wood was emphasized without the use of varnish.
Wood is polished at home, only with the help of a special composition called polish. This solution has its own advantage over conventional alcohol-containing varnishes, and it lies in the fact that the polish contains approximately three times less resin. This allows you to make the decorative coating very thin and mirror-transparent.
Polishing and its compositions
Nowadays, there is a huge variety of polishing compounds on the shelves in construction supermarkets. But it won’t be difficult to make such a composition yourself. The most commonly used polish is shellac polish, which can be easily prepared at home.
To prepare it you will need crushed shellac resin, approximately 60 grams. The next ingredient in the future mixture will be alcohol. However, there is no particular difference between ethyl and wine alcohol. The main thing is not to forget that the alcohol strength should be at least 90, but not more than 95 degrees, in a volume of 500 milliliters.
The solution is prepared in a glass or ceramic container with a lid, into which you first need to pour the resin, and then carefully pour in the alcohol and close it tightly. It is imperative to stir the composition periodically until the shellac resin is completely dissolved in alcohol. When this happens over time, the resulting mixture must be passed through a filter, while pouring into another clean container.
Stages of polishing work
Sanding wood
The polishing process itself is carried out in three rather complex stages.
Stage No. 1
At the first stage, before polishing, it is necessary to prepare the surface:
- sand the wood;
- remove all dust and lint from it;
Stage No. 2
The second stage will be priming the prepared wood. It must be carried out using varnish and a woolen thread swab or, in the absence of one, you can take a cotton one and wrap it in linen cloth. Why should you choose linen fabric? Because only this fabric does not leave small fibers. Cotton fabrics are absolutely unsuitable for this process, as they leave fluff, which is unacceptable during the polishing process. Remaining on the surface of the wood, they will noticeably spoil the appearance of the product.
Waxing wood
Dear visitors, save this article on social networks. We publish very useful articles that will help you in your business. Share! Click!
Working with plywood: drilling, gluing and assembly
When drilling into plywood, chips will most likely appear on the back side, so always drill from the front side. If you want both sides to be clean and chip-free, either place a piece of masking tape on the back side, or place another piece of wood pressed against the back of the plywood so that the hard surface of the other wood can help hold the layers of plywood together and prevent chipping.
To help hold the pieces together while you glue, drill, or nail, it's worth taking the time to create a setup like this.
Proper wood processing
Stage No. 3
The last step in polishing wood at home is polishing.
If you correctly follow the wood polishing technology described above, the final result of the work done will have an excellent appearance.
If the polishing layers are reduced or the workpiece is not completely dry, the polishing turns out to be of poor quality and cloudy.
If you have no experience in polishing, it is recommended that before starting work with the main product, you practice on something small and not very valuable. This needs to be done in order to practice a little, understand the subtleties and complexities of the entire polishing process and not spoil the main product.
And a little about secrets...
Have you ever experienced unbearable joint pain? And you know firsthand what it is:
- inability to move easily and comfortably;
- discomfort when going up and down stairs;
- unpleasant crunching, clicking not of your own accord;
- pain during or after exercise;
- inflammation in the joints and swelling;
- causeless and sometimes unbearable aching pain in the joints...
Now answer the question: are you satisfied with this? Can such pain be tolerated? How much money have you already wasted on ineffective treatment? That's right - it's time to end this! Do you agree? That is why we decided to publish an exclusive interview with Professor Dikul, in which he revealed the secrets of getting rid of joint pain, arthritis and arthrosis.
Video: How to polish furniture
The polishing system is designed for finishing turning works, toys, crafts, etc.
.
Because the polishing process adds nothing
to the wood's surface other than a thin layer of carnauba wax—
a non-toxic,
edible substance—wood polish is a particularly good choice for toys or utensils used to hold food.
This system consists of three wheels of different densities, two abrasive pastes and carnauba wax. You can buy either a complete set or each element separately. Wood polishing wheels are similar to metal polishing wheels, but are softer and looser.
so as not to blur the details. Its ease of use combined with the shine it produces makes it a particularly elegant solution to many finishing dilemmas. The wheels have leather flanges and can be mounted on stationary engines, lathes, or machining centers. The diameter of the hole in the flange is 8.5 mm - can be installed on a smooth shaft or specialized holders. And, although the system was designed for polishing small objects, it can be adapted to larger surfaces such as tabletops by feeding it with a grinding/polishing device.
The set for polishing on a lathe consists of:
1. Hard cotton circle 1 with a diameter of 150mm and a thickness of 20mm. Reinforced leather flange with a diameter of 90mm
2. Cotton circle 2 of medium hardness with a diameter of 150 mm and a thickness of 30 mm. Leather flange with a diameter of 50mm
3. Soft cotton circle 3 with a diameter of 150mm and a thickness of 20mm. Leather flange with a diameter of 50mm
4. Polishing paste 1 for pre-grinding. Bar 120mm x 40mm x 28mm. Weight 150g
5. Polishing paste 2 for final polishing. Bar 120mm x 40mm x 28mm. Weight 150g
6. Carnauba wax for final polishing. Bar f 65mm x 30mm. Weight 70g
All items can be purchased separately.
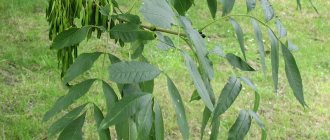
Carnauba wax
- wax of plant origin, produced from the leaves of palm trees in Brazil. This wax is completely digestible - it is absolutely harmless and hypoallergenic. The melting point is approximately 80-90°C (it is the most refractory of all natural waxes).
Application:
1. Install disc 1. Apply paste 1 liberally.
2. Set the rotation speed from 800rpm to 1300rpm. The softer the wood, the slower it is.
3. Polish the product. Renew the paste on the wheel as needed. The goal is to obtain a uniform matte shine.
4. Install disc 2. Apply paste 2 liberally.
5. Repeat polishing as with the first disc
6. To obtain a high gloss, set disk 3 and apply wax sparingly (!). Excess wax can make polishing difficult!
Safety instructions:
Be sure to use eye and respiratory protection! When using a polishing system, cotton threads and paste may fly off at high speed! When using polishing pads for the first time, work on a piece of unwanted wood with uneven edges to remove loose threads. Hold the workpiece while pressing. Always hold the workpiece IN THE DIRECTION OF ROTATION! Polishing TOWARDS THE CIRCLE CAN CAUSE INJURY!
Recommendations:
Surface cleanliness is essential to the successful use of a polishing system. The better polished the higher the shine. Minimum grain P240, preferably higher. It is also worth paying attention to the presence of burrs, defects or other damage. When polishing, these defects will be especially visible! If desired, it can be pre-treated with oil. Afterwards, intermediate grinding is required and polishing can begin.
Good luck in job
Polishing the varnish is done to make surfaces, even wooden ones, look mirror-like. The most popular options and solutions for making wood shiny as a mirror include polishing, varnishing and waxing the surface.
Polishing lacquerware is a process with many steps that require consideration.
The process is not complete without the use of abrasive materials and the polishing material itself, which in this case is called polish. The completion of processing leads to the appearance of the following types of surfaces:
- Nitro varnishes and shellacs are a way to get a sparkling gloss.
- Water-based, pentaphthalic or polyurethane varnishes make the coatings semi-matte.
- The result of using oil-varnish or only oil-based compositions is a matte shine. This is an ideal option for users who need to figure out how to polish polish.
The product is coated with several layers of varnish, then wait until completely dry.
In conclusion
Every day, throughout our lives, we subject things to tests - touches, impacts, placing them in the scorching sun or a damp terrace. Often, thanks to a decorative coating, it is possible to preserve/restore furniture, decorative elements or objects of art for a long time.
If you want to get super gloss on your furniture, the video in this article will reveal all the secrets of this process.
Wood products - bedside table, shelf, radio box, etc. look much more beautiful if they are finished. Wood painted with oil paint is just as rough and ugly as wood that is not finished at all.
You can, of course, cover the wooden surface with alcohol varnish (transparent or colored), but it is much better to polish it. Deciduous wood is best suited for polishing, especially hard wood: oak, beech, walnut, maple, birch. Oak is difficult to polish, but it has a beautiful pattern that can be further enhanced by tinting. Birch can be easily painted and polished to resemble walnut or mahogany. Coniferous wood is resinous and less susceptible to finishing, but, as we will see, it can also be successfully polished. The polishing process, commonly used in carpentry, although not difficult, requires a lot of labor, time and patience. At the same time, it can be significantly simplified and the results obtained are no worse. The surface intended for polishing should not have flakes, gaps, fiber breaks, cracks, glue drips, etc. There should be no knots on it. First of all, the surface of the product is carefully sanded, first with coarse sandpaper (No. 46-60), and as it is smoothed, with finer sandpaper (No. 80-100). Final sanding is done with very fine sandpaper (No. 140-170). The surface must be sanded by moving the sandpaper wrapped around a smooth wooden block along the grain. The result of this treatment should be a smooth, uniform matte color surface. It should be slightly moistened with warm water and immediately wiped with a dry cloth, and then dried for 1.5-2 hours at room temperature. This operation is needed to raise the pile - the smallest fibers of wood. The pile is then removed with sandpaper No. 120-140. Sometimes moisturizing, drying and removing lint has to be repeated even twice until the surface acquires an even matte sheen with a slight gloss. This completes the carpentry work and you can begin painting the prepared surface with transparent dyes. “To dye brown, stain paint is dissolved in hot water. The concentration of the solution is taken depending on the desired shade. The paint is applied with a cotton swab, after which the product is dried at room temperature for two to three hours. You can also use another dye: brown acid chrome - 15 g, acetic acid - 10 ml, aluminum alum - 55 g, water - 5 l. A reddish-brown color will be obtained if you take 20 g of walnut stain, 2 g of Ruby dye and 1 liter of water. To finish under mahogany, you need to dissolve 50 g of copper sulfate in 1 liter of water and 100 g of yellow blood salt also in 1 liter of water. Mix the solutions. The dried painted surface is rubbed along the grain with a lump of horsehair or wood shavings, after which it becomes smooth and glossy. Apply polish No. 13 or No. 14 to the painted surface using a conventional spray bottle used for spraying cologne. The polish should be applied evenly, avoiding the formation of drops and drips. At one time, you can apply five to six layers of polish, after which you should dry it for 6-8 hours at room temperature. Then the polish is applied again and dried again. This is repeated until the polish covers the surface in an even layer so that the pores of the wood are not visible. If some areas are not sufficiently covered with polish, they can be sealed with thickened polish. It is obtained by evaporating ordinary polish in a small vessel (for example, a saucer) for 10-18 hours. The product coated with varnish is dried for three to five days, after which its surface is cleaned with fine sandpaper. Polishing is done with cloth rolled onto a wooden block and rubbed with GOI paste (instead of GOI, you can also use razor stropping paste or chromium oxide oil paint), and generously moistened with sunflower oil. To prevent the cloth from gathering into folds, it is pinned on the outside with buttons. The polished surface gradually acquires a mirror shine. Sometimes you need to wipe a small area of the surface with clean cotton wool and check the quality of the polishing. When polishing is finished, the entire surface should be wiped with clean cotton wool, then with a swab moistened with sunflower oil, and then again with clean cotton wool. Although it is usually not recommended to polish resinous wood, it can be done as follows: the surface, cleaned with glass paper and painted with a stain solution, is covered with very liquid wood glue and allowed to dry thoroughly. Then, using a spray gun, five to six layers of shellac varnish are applied and polished as indicated above.
Waxing
There is nothing complicated about this process. Any master can handle it on his own. By treating the product with wax mastic, the owner has the opportunity to make the natural texture clearer and brighter.
The polishing surface becomes soft and velvety, at least visually. For hard rocks this method has become especially relevant. For example, it goes well with oak, ash and walnut.
For greater effect, tinting is used in conjunction with soft wood. As an example, you can take linden or alder, birch. A special type of wood polish is used.
During this process, it is necessary to carefully fill the distances between the wood fibers with material. The varnish is applied only after the surface has been given the desired level of smoothness.
Sanding the varnish using wax will look like this:
- The wood is covered with a thin layer of mastic. How to polish correctly? The main thing is to first clean the surface of lint using sanding. When drying is complete, wipe the base with a fine rag against the grain. After applying the first layer, literally all the spaces left empty must be filled, otherwise the surface will not become smooth.
- Coverings and products are placed in a warm room for two hours.
- A soft rag will help when applying the second coat. While the mastic is applied to the product, the pressure is constantly increased. We get a perfectly smooth and matte surface.
- A thin layer of shellac-based furniture varnish makes the product finished.
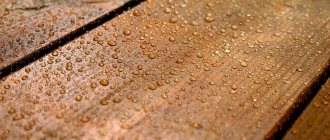
This processing method is not without its drawbacks. In particular, resistance to large amounts of moisture suffers. Small drops are enough to cause defects to appear on the surface.
In the video: how to polish furniture with wax and transparent resin.
How to paint plywood
Plywood can be painted with a foam roller, brush, or use a sprayer.
A sprayer should be chosen if the area to be painted is large enough. Paint the edges with brushes of different sizes.
The paint can be used either ready-made or as a base. Colored dyes are added to the base, tinting it to the desired shade.
As a rule, paint is applied to plywood in 2-3 layers. In general, the number of layers may vary. Depending on what effect you plan to achieve in the end.
To apply only varnish to the surface, the plywood must be additionally sanded with fine-grain sandpaper along the grain and the surface degreased. Next, apply the first layer of varnish.
The first coat of varnish will raise the lint on the plywood. Therefore, after the first layer of varnish has dried, the surface must be sanded again. And then apply the remaining layers of varnish.
What and how to paint plywood should be chosen based on the nuances described above.
For the development and existence of the channel, we vitally need your likes
.
Article rating:
How to sand plywood with your own hands Link to main publication
Related publications
- How to make a cutter for an engraver with your own hands
Varnishing works
Micropores after painting are filled with varnish. A surface with the formation of new pile is unacceptable. When working on wood, you can use a cotton swab. It is important to first wrap it in a canvas cloth. It does not leave lint on the surface.
The treatment promotes the appearance of a special protective film on the surface. It is resistant to dust and moisture. Images get more colors and clarity.
The sequence of independent work, including with acrylic, is as follows:
- Apply the varnish itself in two layers. It is important to ensure that absolutely all surfaces are treated.
- All varnish coating is removed using abrasive materials. Only cracks and pores should contain small amounts of material.
- Applying the second layer. It is considered to be a preliminary primer. Paste is used the same way.
- After secondary coating, dust is removed.
- Small thickness is a requirement for the third layer. You need to leave everything indoors for at least a couple of days. The main thing is that no dust gets inside during this period.
- Finally, they move on to the finishing coat for polishing the wood - in one or two layers.
If smudges appear on the surface at this moment, they will remain in the form of stains in the future. This can be avoided if the varnish layer is thin enough.
The main thing is not to destroy the film that formed during the previous movement. The work must be done quickly and efficiently, without interruptions. It’s good if you have the opportunity to use so-called control samples to test your skills and technique.
You can use both shellac varnish and regular oil varnish. Polishing pastes are also suitable.
Rules for varnishing with oil varnish
Oil-based varnish takes a long time to dry after the base is painted. The main recommendation is to use 200 grams of varnish per 1 kg of water.
During sanding, liquid varnish is applied with a thick brush to a surface that has been previously dried and sanded. Adding turpentine is permissible if the solution is too thick. Movements should be uniform, in no case abrupt. If something unnecessary appears, it is removed. It is important that no bubbles appear when moving the brush.
What paint is suitable for plywood
To decide what paint to paint plywood with, you need to consider the place where the sheet will be used.
If the plywood will be located indoors
, then acrylic paint is quite suitable for painting it. Or any other types of water-based paints. These paints are easy to apply, virtually odorless, dry quickly and are easy to apply.
Oil-based and enamel paints should be used for plywood that will be used outdoors
. These types of paints will help protect plywood from moisture in the form of precipitation. Oil and enamel paints are also simply applied to the surface and dry quickly.
You can also use varnishes to paint plywood. Moreover, varnishes can be applied to the surface of plywood. So on its already painted surface.
Polishing technique
Thanks to this technology, the most beautiful textures are obtained. The grain of the wood is preserved quite well. As a result, the varnished wooden surface is indistinguishable from wood. The process does not cause problems even when processed independently. True, not all materials are amenable to such processing.
Wood with a coarse texture is the least resistant to polishing.
The work is performed in the following order.
- First of all, the surface is primed in three layers. After the first, a thorough polishing is carried out, cleaning from all contaminants. Two subsequent layers are applied to the dried surface. Varnishing is done using a different technique.
- The so-called polishing is performed with a tampon. The polish is applied in a very thin layer. Grinders or abrasives are used in polishing. It is better to use automatic devices, otherwise the process will take too much time. Drying and sanding are repeated after each layer of polish. It is as a result of these actions that gloss is added to the surface. A couple of drops of oil will eliminate the danger of the tampon sticking to the surface.
- The next stage is to obtain a polished surface, for which polish is used. Then add oil in a small amount. You need to rub the surface until it is smooth and shiny enough. You only need to add a couple of drops per 10 cm2 so that the previous layers do not disappear. The work is done many times. A rag for wiping surfaces is used between stages. It is dipped into a solution of water and polish. In this case, the polished base will look better.
There are a large number of compositions with polymers on the market. Those that contain special additives work especially well. The main thing is to contact companies that specialize specifically in the production and sale of this type of product.
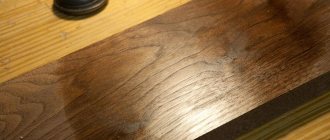
One of the most difficult types of finishing work on wood products is the process of polishing them. But this is a necessary action, as a result of which the coating becomes transparent and very beautiful. After polishing, you can enjoy the pronounced texture of the wood, as well as its shades.
Polishing helps the wood maintain its natural appearance, and the surface gives a mirror-like shine. About twenty years ago, this method was very actively used when polishing wooden car interiors and various luxurious pieces of furniture made of wood. In this way, the beauty of the wood was emphasized without the use of varnish.
Wood is polished at home, only with the help of a special composition called polish. This solution has its own advantage over conventional alcohol-containing varnishes, and it lies in the fact that the polish contains approximately three times less resin. This allows you to make the decorative coating very thin and mirror-transparent.
Polishing
This stage of work is aimed at obtaining a beautiful mirror shine.
- After the last layer of polishing has dried, the surface is treated with sandpaper with a minimum grit dipped in oil.
- Next, drop a little oil and polish onto the swab and begin to rub the surface until shiny. The amount of oil can be calculated from the ratio of 1-2 drops per 10 square meters. centimeters of surface. It is important that there is not too much oil, otherwise it will dissolve the previous layers of polish.
- To improve the strength of the finishing layers, polishing is carried out several times, and after the second time, the surface must be treated with a soft cloth moistened with a solution of polish and water.
The final result depends on compliance with the polishing technology. If you reduce the number of layers and their drying time, you may end up with poor-quality polishing, which will worsen the appearance of the product. If you have no experience in polishing, then before starting work it is better to practice on some small craft in order to get your hands on and gain some experience in polishing wood.
All photos from the article
The final stage of wood processing is like the finishing touch to a painting. A smooth, shiny or glossy surface begins to “sound” in a very special way. The color becomes deeper, the design appears brighter, emphasizing the perfection of the product. Careful polishing of the material will not only emphasize its beauty, but will ensure its preservation for a long time.
Polishing and its compositions
Nowadays, there is a huge variety of polishing compounds on the shelves in construction supermarkets. But it won’t be difficult to make such a composition yourself. The most commonly used polish is shellac polish, which can be easily prepared at home.
To prepare it you will need crushed shellac resin, approximately 60 grams. The next ingredient in the future mixture will be alcohol. However, there is no particular difference between ethyl and wine alcohol. The main thing is not to forget that the alcohol strength should be at least 90, but not more than 95 degrees, in a volume of 500 milliliters.
The solution is prepared in a glass or ceramic container with a lid, into which you first need to pour the resin, and then carefully pour in the alcohol and close it tightly. It is imperative to stir the composition periodically until the shellac resin is completely dissolved in alcohol. When this happens over time, the resulting mixture must be passed through a filter, while pouring into another clean container.
Stages of polishing work
Sanding wood
The polishing process itself is carried out in three rather complex stages.
Stage No. 1
At the first stage, before polishing, it is necessary to prepare the surface:
- sand the wood;
- remove all dust and lint from it;
Stage No. 2
The second stage will be priming the prepared wood. It must be carried out using varnish and a woolen thread swab or, in the absence of one, you can take a cotton one and wrap it in linen cloth. Why should you choose linen fabric? Because only this fabric does not leave small fibers. Cotton fabrics are absolutely unsuitable for this process, as they leave fluff, which is unacceptable during the polishing process. Remaining on the surface of the wood, they will noticeably spoil the appearance of the product.
Waxing wood
Dear visitors, save this article on social networks. We publish very useful articles that will help you in your business. Share! Click!
Chic, shine - beauty
What can and should be polished, with what and in what way are exciting questions for those who want or are forced to take up this difficult but fascinating task. Polishing wooden products - brand new walls or restored countertops - performs an aesthetic and protective function ().
Pros and cons of varnish
Take a closer look, you are surrounded by many things made of wood, the treated surface of which shines or glows matte:
- decorative crafts;
- decorative cutting boards, spoons;
- walls/floors;
- furniture;
- laminate (there are also such fans).
But polishing wooden products is not always appropriate and safe, this includes:
- spoons, if they are intended for food and not decoration;
- kitchen knives - a very smooth handle is more difficult to hold, and if dropped, the decorative layer will inevitably crack;
- gun stocks (for the same reason).
Proper wood processing
- You need to take a small amount of varnish onto a swab and begin to thoroughly rub the surface of the wood in different directions. This action is done in order to saturate all the pores and cracks of the wooden product with the solution. After the entire surface has been treated, the varnish should be allowed to dry.
- When the varnish has dried, the wood must be treated with sanding paper.
Be sure to use fine grain paper. The dust resulting from this action must be wiped off with a clean cloth. You need to rub the wood with polish using a cotton swab - At the next stage, after all the above steps, the wood needs to be coated with two successively applied layers of varnish. It is important to know that in order for the tampon not to stick to the surface being treated, it must be moistened with a few drops of ordinary vegetable oil.
- The wooden product must then be thoroughly dried. Next, the last layer of varnish at this stage is applied, which must first be diluted in a one-to-one ratio with polish. After this, the priming stage is considered complete. The product should be left in the closet for several days until the primer is completely dry.
- The next and second main stage of polishing will be polishing. This is where you will need a full solution of polish. In this process, you will again need a woolen thread or cotton swab, wrapped in a piece of linen cloth, which is pre-moistened with a few drops of regular vegetable oil so that the swab does not stick to the surface. Applying the tampon from the side, the movement should be made smoothly, in a circular motion.
- The amount of polish on the tampon should be average. If there is too much of it, then drops of this composition will form on the wood, which in turn will help dissolve the primer layer and leave stains on the treated surface. When pressing on the tampon, the polish should evaporate quickly, leaving no excess behind.
- Polishing takes place in three stages. After each stage, the surface must be dried. After drying, do not forget to sand the surface of the wood with fine-grained sandpaper. After sanding, the surface of the wood must be cleaned of dust using a clean, dry cloth. After applying the third layer of polish solution to the product, a slight glossy tint appears on the surface of the wood.
- This process is needed in order to complete all your work with the product and obtain the desired effect of a mirror reflection on the wood.
- When the last layer of polish applied during polishing has completely dried, you will need to treat the surface with sandpaper. At the same time, in order not to spoil the already obtained result, you need to use only very fine-grained paper.
- Before starting work, sandpaper should be moistened with a few drops of vegetable oil. Next, use a cotton swab, onto which a few drops of vegetable oil and a little polish solution are applied.
- The next job is to thoroughly rub the wood surface. It must be continued until a shine appears on the product. It is also necessary to observe the proportion when wetting the tampon. Two drops of oil are applied to a swab and used on no more than ten square meters.
- You need to remember that too much oil will dissolve all layers of polish and leave stains. To create durable layers, polishing must be carried out two to three times. After the last, the wood is treated with a soft cloth, which must be slightly moistened with water and a small amount of polish.
Stage No. 3
The last step in polishing wood at home is polishing.
If you correctly follow the wood polishing technology described above, the final result of the work done will have an excellent appearance.
If the polishing layers are reduced or the workpiece is not completely dry, the polishing turns out to be of poor quality and cloudy.
If you have no experience in polishing, it is recommended that before starting work with the main product, you practice on something small and not very valuable. This needs to be done in order to practice a little, understand the subtleties and complexities of the entire polishing process and not spoil the main product. Attention, TODAY only!
For modern furniture, polishing is not the most suitable surface treatment method. In fashion now is the soft shine of a wax or matte shellac-based coating. But for many pieces of old furniture, a mirrored sparkling surface is a tribute to style. Therefore, when caring for furniture and restoring it, it is often impossible to do without renewing the old polish, and sometimes - after repair - applying a new one in the traditional way.
How to polish wood
Polishing is a labor-intensive operation even for a specialist. Naturally, a beginner may have problems mastering it. But with practice, even a home master can achieve satisfactory results. In any case, it's worth trying to polish a couple of unnecessary pieces of plywood before you start working on furniture.
The ancient method of surface treatment is now used less and less, and it is not always easy to find the right materials. To obtain a flawless finish, you will need an alkaline polish and its corresponding solvent, as well as powdered pumice and polishing oil. All this can be bought at building materials stores. In addition, you will need a special primer composition. Like the matte finish solution, shellac polish is applied with a swab made from cotton wool, an old wool sock and a small piece of thin linen or cotton fabric.
The most difficult type of surface treatment for veneer and solid wood is still polishing. Today there are many clear varnishes available for creating shiny protective coatings. Those who want to refurbish old furniture should become familiar with the technique of polishing it.
What's better for your health?
Polishing oil can be easily removed with gasoline. However, it is better to do this with a clean cloth. True, you will have to spend more time, but there is no harm to your health.
Polishing
This process is carried out using a polish composition.
- A couple of drops of vegetable oil are again dripped onto a cotton swab wrapped in a cloth so that it moves over the surface to be treated easily, with sliding movements.
- The tampon is brought in from the side and they begin to make smooth movements in a circle. In this case, it is necessary to monitor the amount of polish on the swab - there should not be a lot of it, otherwise drops of the composition will form on the surface, which will dissolve the primer layer and leave stains. After pressing on the tampon, the polish should evaporate immediately, without excess.
- Polishing is carried out in three stages, between which the surface is dried, treated with fine-grained sanding paper and cleaned of dust. After the third layer, a light glossy sheen should appear on the surface.
Pre-cleaning
Polishing will be successful only if the surface of the wood allows it. Mirror shine will only appear on veneer or solid wood that does not have defects. If the product has been treated with stain, it should be bleached and then evenly coated with stain again. In this case, the color tone should be slightly lighter than before, since polishing slightly darkens the wood. There should be no unevenness on the surface. Small dents can be straightened by treating the defective areas with hot steam (using a damp cloth and iron). Protruding cut fibers are cleaned with fine sandpaper (180 grit). In this case, you need to work only in the direction of the wood fibers so as not to scratch it.
cycle
A scraper gives good results during preliminary cleaning - if it is impeccably sharpened. There should be no burr on it, which could leave scratches on the surface of the wood.
In the direction of the wood grain
The cycles only work in the direction of the wood grain. If, when scraping, the chips are of different thicknesses, then the scraper needs to be sharpened so that its cutting edge becomes evenly sharp.
veneer polishing
Polishing begins with leveling the surface of the wood. To do this, use a sandpaper or fine-grained sandpaper.
Cutting Plywood: Tips for a Clean Edge
Now, don't cancel all your projects because you don't have a table saw—you won't need one! Although it is easier to work with, if you need to make a lot of long cuts, you can create great plywood projects without a table saw. Most hardware stores will cut a sheet of plywood for you - some at no extra cost, some for a nominal fee.
You can also make all the cuts you need with a portable circular saw. A small portable circular saw will work well for smaller cuts or smaller projects, but a larger saw is more versatile for other projects as it can handle thick plywood.
Now some terminology:
- A rip cut is when the saw moves along the grain of the wood. I cut through, as a rule, with fewer chips.
- A crosscut is a cut that follows the grain of the wood, and is where you are most likely to get chips and other problems with your plywood veneer.
To protect the veneer and ensure you have a nice, clean edge, apply masking tape along the cut.
When you use a hand-held circular saw, the blade cuts upward, so the plywood should be face down. The table saw cuts downwards, so the face of the plywood should be on top.
The most difficult part of using a circular saw is how to secure the wood and saw to get a straight cut. It is easier and safer to cut on the floor using wooden beams or a sheet of polyurethane foam insulation. Simply set the saw blade so that its edge extends 3mm below the thickness of the plywood and lay it on top of the insulation sheet or timber beams. Make sure it is stable and then when you cut the saw will barely cut into the insulation or timbers.
For an even cut length you will need a guide secured with clamps.
Or consider creating a rack like the one shown in the photo.
For curved cuts or circles, you can use an electric jigsaw.
Primer
The sanded surface should be thoroughly cleaned of wood dust. It is better to do this with a stiff brush. This is the only way to remove dust from the pores of the wood. While the fabric removes only the surface layer of dust. And with dust remaining in the pores, perfect polishing will no longer be possible.
Wood not treated with stain sometimes looks pale. Perhaps there are scratches visible here and there. But after applying a layer of primer, the picture changes.
Solid base
The primer coating ensures uniform hygroscopicity of the wood, as it closes the pores at the very surface. At the same time, the tree begins to “play” slightly: its color becomes more intense, and it no longer seems pale. These color changes must be taken into account if you want to stain the wood first: the color that the wood acquires as a result of staining will become slightly darker after applying the primer.
The primer is applied in an even layer in the direction of the wood grain. Please note that the coating dries quite quickly. Therefore, to ensure that the primer layer is not too thick, it must be applied as soon as possible, otherwise you will have to remove the excess by sanding, and this is not only an additional, but also a very labor-intensive operation, which can cause mechanical damage to the wood.
The primer (also called hard base) is applied in an even layer using a large brush, brushing it in the direction of the grain of the wood.
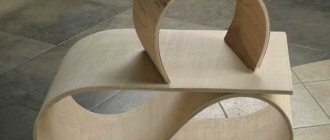
Curved plywood sheets
Admit it: you've tried leveling sheets of plywood. We, too. We tried weights, clamps, wetting the concave side, drying the convex side in the sun and gluing opposite folded sheets together. In fact, there is very little chance of alignment if the sheets have not been stored properly. The only solution is to save the straightest sheets for larger parts and use the worst sheets on smaller projects, minimizing any curvature.
We hope that our tips will be useful when creating your next projects. What tips would you add?
Follow us on Pinterest for more inspiration.
Subsequent grinding
Allow the primer to dry, that is, harden. Even if after some time the surface of the wood seems dry to the touch, you should wait twelve hours before moving on to the next stage of treatment.
Thorough sanding
After applying the primer, the ends of the cut wood fibers may rise and stand upright. They need to be carefully cleaned. If the primer is not applied very evenly, then smooth the surface with fine sandpaper (240 grit) or a roll of thin steel wire (000 or 0000). In this case, movements should only be in the direction of the wood fibers. When sanding with sandpaper, you should occasionally tap the boss on some hard object and thus shake off wood dust from the paper. It is also necessary to periodically move the paper on the boss, thereby replacing the treated area of the abrasive coating with a fresh one. If you are sanding a primed surface with a roll of wire, make sure that the thin steel threads are across the grain of the wood.
Dust must be carefully removed from the sanded surface, especially after working with a coil of thin steel wire, so that no metal particles remain. Otherwise, after some time they may rust, and this will lead to a change in the color of the polish.
After priming, unevenness is removed with fine-grained sandpaper or a roll of thin steel wire.
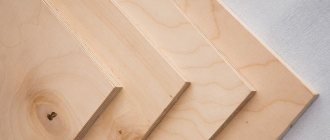
The difference between sanded plywood and unsanded plywood
The main performance characteristics are identical for both materials.
The difference between the products is as follows:
- The degree of processing of the sides. This is the main distinguishing feature. The unsanded surface has a dark, rough finish.
The presence or absence of grinding can only be determined by close examination of the surface structure or by touch. - Price. Unsanded products are more affordable, but only if used for rough work. If you lay the slabs before subsequent finishing, then for high-quality preparation you will need not only to make significant efforts, but also to use special equipment with a large number of consumables. From a financial point of view, purchasing sheets with sanding will be much more profitable.
- Scope of use. Products with a high degree of processing are used for any process; the area for laying slabs marked “NSH” is more limited.
- Size according to standards (GOST number 3916.1-96 for hardwood veneer panels). With a thickness of 12 mm (9 layers), the maximum deviation for sanded plywood is 0.5–0.7 mm, and the thickness difference is 0.6 mm. For an untreated sheet - 0.6–1.1 mm and 1 mm, respectively.
Products that have undergone the grinding procedure are subject to higher requirements, which is why their price is higher.
There are some differences in the quality of the slabs: low-grade products (4/4) most often do not undergo preliminary preparation at the enterprise.
Treatment with a mixture of polish and pumice powder
The next processing step is decisive. A mixture of liquid polish (diluted with a solvent) and pumice powder in a 1:1 ratio is applied to the primed surface.
Dilute the polish in a sufficiently large container. Place a smooth board or plank nearby.
Sprinkle some pumice powder on it. Soak a swab with diluted polish, lightly dip it in the powder and apply the resulting paste mixture to the wood.
First, the paste is distributed on the surface with wide circular movements, then rubbed in, moving the swab across the grain of the wood. This ensures that all pores and smallest cuts on the surface of the wood are filled with pumice powder.
Finishing
The successful completion of this stage of work is a completely flat, smooth surface on which pores are not noticeable. The next step is to apply a layer of polish with a swab without solvent and pumice flour.
On the resulting slightly shiny surface, the remaining irregularities and depressions are clearly visible: they should be filled again with polish and sanded. After this, the surface of the wood must “rest” for at least one day for the coating to harden. If you continue working too early, the next layer of polish may compromise the integrity of the previous one.
You should also wait one day before correcting any errors discovered after applying the pumice powder and polish mixture. That is, any applied layer must completely harden, and only then can further polishing begin.
A coil of thin steel wire is used only for processing a surface coated with a primer or the first layer of polish.
To fill pores, soak a swab in diluted polish and dip it in pumice powder. Then rub the mixture into the wood.
Priming and puttying plywood
- The next step is priming the surface. A primer is necessary to protect the plywood from moisture, mold and rot in the future. It is best to use an acrylic-based primer for plywood. It penetrates deep into the layers of plywood, which helps to avoid cracking of the plywood during its operation. The primer also promotes better adhesion of the paint to the surface.
- After priming, if there are cracks or chips on the surface of the plywood, it needs to be puttied. Putty will level the surface. After the putty has completely dried, the surface must be sanded again.
Applying polish
After the coating of a mixture of polish and pumice powder has hardened, it is treated with a roll of fine steel wire or lightly sanded with 220-grit sandpaper. Then the dust is removed.
The part is now ready for polishing. But first, you should lightly saturate the swab with solvent and thoroughly wipe the surface with it, making figure eights with your hand. The solvent slightly dilutes the previously applied layer of polish and pumice powder, which allows the next layer of polish to adhere better.
Then, making movements in the form of “eights”, the entire surface is covered with polish diluted with solvent in a ratio of 1:1. This layer should dry slightly, after which almost undiluted polish is applied to the surface with a swab, again making movements in the form of “eights”. To prevent the swab from sticking to the surface (this happens when the polish is used in pure or almost pure form), the surface is wiped with a special polishing oil. Take just a little bit of it - a few drops, but this is enough for the tampon to easily glide over the surface.
The first layer of polishing is left to dry for 24 hours, then the procedure is repeated.
Tampon elasticity
In between work processes, the tampon should be stored in a hermetically sealed container so that it remains elastic. If after some time you need a tampon again, then before using it, move the outer layer of fabric so that there is a clean section of this fabric on the lower, that is, working, side of the tampon. If, despite proper storage, the tampon becomes calloused, replace it with a new one with an outer layer of very thin fabric. Make sure that the fabric on the underside of the tampon is well stretched and free of wrinkles.
Beginners should not be confused by the fact that after applying polishing oil, “clouds” appear on areas of the surface that have just been coated with polish. This is a consequence of uneven evaporation of the solvent. However, the cloudy spots that appear soon disappear.
polish varnished wood
Only with skillful, careful polishing does the surface become smooth and mirror-shiny.
How to polish plywood to a shine. Wood polishing: means and technology
Polished furniture has a very “ceremonial” appearance. It is quite specific, but many people like it. The difficulty is that it is easy to spoil a shiny surface, but it is difficult to restore its attractiveness. Often the only solution is to polish the furniture.
The most common problem is scratches. You can also get rid of small ones using polishes with special properties. Deep ones, with damage right down to the wood or veneer, can only be removed by new polishing (if it is old Soviet-era furniture coated with nitro varnish). To do this, first completely remove all the old coating, then apply varnish and sand the entire part. That is, polishing furniture - new or old - occurs according to the same algorithm, with the only difference being that the old layer of varnish has to be removed.
If the product is newer, it is most likely covered with a thick layer of varnish. If the scratch is deep, but does not reach the veneer or wood, the situation is somewhat simpler. First, the scratched layer is cleaned off with 80 and 120 grit sandpaper. Then it is sanded with increasingly finer grains. Next, one or two layers of varnish are applied and, after drying, polished.
Another case when furniture polishing may be required is when the varnish becomes cloudy or yellowing. This happens often. The treatment is also not easy - completely removing the old varnish and applying a new one with polishing. Problems with all other traces that cannot be removed by conventional means () are solved in a similar way.
One more point: furniture polishing is done only and exclusively in a horizontal position. To do this, you often have to take everything apart. It's difficult, but there is no other way out. You can only work on a horizontal surface.