Marking and marking tool
Marking is an operation to transfer the dimensions and contours of a future workpiece onto wood.
Marking is one of the most important stages of work, the correct execution of which determines the quality of the product, as well as the cost of material and working time. Marking before sawing boards into blanks is called preliminary marking or marking of rough blanks . When preliminary marking, the workpiece must have an allowance (reserve) for further processing (for example, planing and grinding). Allowance is the difference between the size of the workpiece and the size of the finished, processed part. Allowances must be calculated accurately: allowances that are too small in the workpiece will not allow you to obtain a high-quality processed part from it, and allowances that are too large will lead to wasted wood, labor and time. On average, allowances in workpieces with a cross-section of up to 25 × 90 mm and a length of up to 800 mm range from 2 to 7 mm in width and thickness, and up to 20 mm in length.
Marking begins by choosing a base - a line or plane from which the dimensions will be plotted. If there are treated surfaces, then they are taken as bases; For symmetrical parts, it is convenient to take the axes of symmetry and central lines as bases. They are applied first. Marking of a large number of identical parts or parts with a curved contour is carried out using templates .
Marking is done with a sharpened pencil or an awl using marking and measuring tools (Fig. 1).
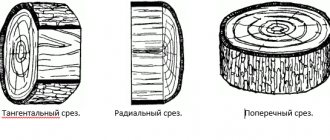
Rice. 1. Tool for marking : a – meter and tape measure; b – ruler; c – drawing triangles; g – carpenter’s square; d – erunok; e – malka; g – surface planer; h – compasses; and – bore gauges; k – compass with ruler; l – caliper; m – circle divisor; n – protractor; o – level; p – plumb line
The most common marking tools:
A tape measure is a tool for measuring and marking lumber and workpieces.
A ruler is a tool for measuring and marking dimensions and drawing straight lines.
A square is a tool for drawing right angles when marking, for checking the planing of adjacent sides at right angles, for checking right angles in assembled products.
Erunok is a tool for marking corners and drawing parallel lines at an angle of 45° and 135° to the edge of a part (for example, when marking a miter joint).
Malka is a tool for drawing lines that can be located at different angles relative to the edge.
Thicknesser is a tool for drawing lines parallel to the sides of the workpiece.
A compass is a tool for marking circles.
Calipers are a tool for measuring the diameter of parts.
Bore gauge is a tool for measuring the internal diameters of parts.
A caliper is a tool for measuring both internal and external dimensions of parts and workpieces, their thickness.
Awl - used when marking for drawing marks, making centers, places for screws.
A level is a tool for checking the horizontal and vertical surface.
Wood cutting
The process of manufacturing wood products includes various types of processing: wood drying, mechanical processing, gluing, assembly, finishing.
Mechanical processing of wood is a processing method in which products or their elements of given shapes and sizes are obtained without changing the chemical composition of the material.
Mechanical processing of wood can be carried out with violation of the fibers (sawing, planing, milling, chiselling) and without disturbing the fibers (bending, pressing). For the most part, wood processing is carried out in violation of the fibers, and the main method of this type of processing is cutting .
A distinction is made between cutting with the formation of chips or sawdust (sawing, planing, milling, chiselling, drilling) and without separating the chips (cutting veneer, cutting veneer with scissors, splitting wood). Most often, when machining wood, cutting with chip formation is used.
The working part of each carpenter's tool must have a cutter (plane, straight chisel, chisel) or several cutters (saw). The cutting process is as follows: under the influence of an external force, a wedge-shaped cutter, when inserted into the wood with a cutting edge, cuts the fibers and separates them in the form of chips. The use of force during cutting is necessary to overcome the resistance of the wood to the penetration of the cutter to separate the chips. This force is called cutting force and is measured in kilograms.
The cutter has front, back and side faces, as well as front, side and rear edges (Fig. 25). The intersection of the front and rear edges forms the cutting edge or blade of the cutter.
Rice. 2. Elements and angles of the cutter : a – elements of the cutter; b – working part of the plane knife; c – cutter angles; d – corners of the plane knife
In a cutter, the angle between its faces that form the cutting edge is called the point angle or sharpening angle. For a working cutter, the cutting angle, inclination angle, and rake angle are also distinguished. The cutting angle is the angle between the front edge of the cutter and the cutting plane (Fig. 2, c, d). The angle between the back edge of the cutter and the cutting plane is called the inclination angle, sometimes the clearance angle.
The size of the cutter angles has a great influence on the cutting force and the quality (cleanliness) of processing. For fast and high-quality cutting, not only the sharpness of the cutter is important, but also the correct rake and back cutting angles. The magnitude of the cutting angles depends on the direction (type) of cutting in relation to the wood fibers.
Three main types of cutting:
- cutting to the end (end) with cutting the fibers across perpendicular to their direction (Fig. 3, a);
- cutting along the fibers (longitudinal), in which the cutter moves in the direction of the fibers parallel to their length, pricks and tears them lengthwise (Fig. 3, b);
- cutting across the fibers (transverse), which is performed in the plane of the fibers, but in the transverse direction, while the cutter does not cut the fibers, but separates them from each other (Fig. 3, c).
Rice. 3. Types of cutting
During end cutting, the wood is destroyed along its growth rings, and the chips are small and crumbly. To reduce cutting resistance and obtain a smooth surface, reduce the sharpening angle of the cutter.
During longitudinal cutting, the cutter splits and tears the fibers and separates the chips, which turn out to be long, thin, and twisting into a spiral. The layers of wood are easily separated and the surface is smooth.
When cutting across the grain, the wood is cut partially along the grain, partially torn off, the chips are brittle and the surface is rough.
The cutting force depends on the type of cutting. The greatest force is offered in face cutting, two to three times less effort is required in longitudinal cutting, and the least effort (five to six times) is required in transverse cutting.
The cutting force is affected by the following.
- Wood species. The harder the wood, the more effort is required to cut it.
- Cutting angle. The larger the cutting angle, the greater the pressure of the chip on the front edge of the cutter and the friction it causes, so more cutting effort is required. However, the cutting angle cannot be greatly reduced: this will reduce the cleanliness of the processing.
- The sharpness of the cutter. During operation, the cutting edge of the cutter becomes dull and becomes oval. Such a cutting edge does not cut the wood fibers, but presses them, crushes them and tears them. This requires more effort than when cutting with a sharp cutter.
- Thickness of chips removed. The thicker the chip, the more pressure it exerts on the cutter and the more force must be applied when cutting.
Introduction
Sawing wood on a band sawmill is the most common type of lumber processing in private households. If you are the happy owner of a band sawmill, you have probably wondered how to work on it correctly. After all, all calculations go towards long-term service life, maximum profit and high productivity of the equipment.
It’s no secret that proper preparation of the saw and care during operation will extend its life and reduce the cost of ongoing repairs. How to learn to work on a band sawmill? Let's talk about this briefly. Why briefly, because I have everything in my cool book, the information given in it is simply irreplaceable for beginners and even experts.
In the book, I talk about why it is possible and even necessary to change the number of produced varieties and many other “goodies” several times a year. You can buy the book directly on the website in the “BOOKS” section.
Sawing wood
Sawing is the cutting of wood with saws to divide it into parts (blanks and parts). When sawing, a cut is formed, from which part of the wood comes out in the form of sawdust. A saw is a steel strip or tape with a number of teeth (cutters). The teeth have the following parameters (Fig. 4, a): the distance between two adjacent vertices is called the step , and the distance between the base and the vertex is the tooth height . A cavity (sinus) is used to remove sawdust formed during the sawing process. Each saw tooth has three cutting edges: one short front and two side ones.
transverse sawing (across the wood fibers), longitudinal (along the wood fibers) and mixed (curvilinear or at an angle of less than 90° to the wood fibers). Therefore, the saw teeth have different shapes (Fig. 4, b). For longitudinal sawing, saws with an oblique (inclined) tooth are used, for transverse sawing - with a tooth in the form of an isosceles or equilateral triangle, for mixed sawing (along curved outlines) - with a tooth in the form of a right triangle.
Rice. 4. Saw tooth elements (a) and saw tooth angles (b) : 1 – for longitudinal; 2 – for mixed; 3 – for cross cutting
Hand saws vary in shape and purpose. There are saws for straight and curved sawing, for sawing thin and thick materials, through and non-through cuts (Fig. 5).
Rice. 5. Hand saws : a – bow saw; b – hacksaws; c – jigsaw; g – obushkovaya; d – reward; 1 – saw blade; 2 – bowstring; 3 – stand
The bow saw (Fig. 5, a) is designed for longitudinal and transverse sawing of wood. The saw blade of this tool is fixed at both ends in the machine (beam) and tensioned, due to which it is longer and thinner than that of a hacksaw. During operation of a bow saw, its blade does not bend, the cut is thinner and cleaner, and therefore the size of the workpiece will be more accurate. This saw allows you to make movements at the full span of your arm, which greatly reduces the time required. Depending on their purpose, bow saws can have different blade widths and tooth pitches.
Hacksaws (Fig. 5, b, d) are wide, narrow and with a back. A wide hacksaw is used for manual sawing of wood and wood materials when performing carpentry and carpentry work. Hacksaws can be used for longitudinal, transverse and mixed sawing. Narrow hacksaws are used for curved sawing and sawing thin materials.
Backed hacksaws (Fig. 5, d) have fine teeth and a thin blade, the upper part of which is reinforced with a steel strip (backed) to give the blade rigidity. These hacksaws are designed for delicate work that requires precise and even cuts, for example, making tenon joints.
Reinforcements (Fig. 5, e) are intended for blind sawing of grooves, as well as for cutting veneer and thin plywood.
Jigsaws (Fig. 5, c) are used for sawing small parts from thin boards and plywood, curved sawing with sharp bends, and also for cutting holes in the central parts of boards.
To prevent the saw blade from getting pinched in the cut, the teeth must be set apart.
The setting of the saw teeth is that they are bent one by one: the even teeth in one direction, and the odd teeth in the other. When spreading the teeth, you need to bend not the entire tooth to the side, but only its upper part at a height of approximately 2/3 from the base. When sawing hardwood, the teeth are set apart by 0.25...0.5 mm to the side, and softwood - by 0.5...0.7 mm. The teeth of a hand saw are set as follows. The saw blade is tightly clamped in a vice, and then the teeth are bent alternately in one direction or the other by setting them. You need to spread the saw teeth evenly, without much effort or sudden movements, otherwise the tooth can be broken.
During the sawing process, the teeth become dull. To restore the cutting ability of the teeth, they are sharpened with files. Sharpening should be done evenly, without strong pressure (as this can cause the saw to overheat), so that there are no burrs. Cross-cut saws have an oblique sharpening, so when sharpening the file, the file is held at an angle of 60...70º. Having sharpened one tooth on one side, sharpen the missing teeth on the other side.
They work with a hacksaw as follows. The marked workpiece is placed on a workbench or table so that the sawn section hangs from
him. They press the workpiece with their left hand, and with their right hand they make a cut - several short movements of the saw towards themselves. After sawing, the hacksaw is moved along its entire length, aligning it with the marking line of the cut. There should be no physical effort when sawing correctly: only a slight, even pressure on the hacksaw during smooth movements will ensure an even cut. At the end of sawing, the pressure on the saw is eased so as not to break off the wood fibers when the saw exits. It is best to position the workpiece so that the piece to be sawn is on the left side: when sawing is completed, the free left hand will more easily hold the unnecessary piece and prevent it from falling on your feet.
For precise sawing of bars and boards at certain angles (90°, 45°, 60°, etc.), miter boxes are used (Fig. 6). The miter box has a grooved shape. It consists of a bottom and two sides, between which the workpiece to be cut is clamped. The sidewalls have cuts made at the desired angle. The saw blade is inserted into these cuts, after which sawing is carried out at the desired angle.
Rice. 6. Sawing in a miter box : 1 – bottom of the miter box; 2 – sidewall; 3 – workpiece; 4 – saw
Next, let's look at a couple of useful aspects of the work.
Processing frozen wood
Frozen trees, no matter what the species, are much more difficult to saw than dry trees, and therefore this type of sawing is a separate category. Due to the fact that trees are often cut in the cold season, selecting the optimal method for processing raw materials will be a very pressing problem. This will require tools with a strong construction - frozen wood will become stronger due to the fact that the moisture inside is frozen.
Wood planing
In order to give the wood workpiece the desired shape and size, as well as to obtain a smooth surface, planing is performed, which involves removing thin layers of wood in the form of chips from the surface of the workpiece. Planing is carried out using hand planing tools - planes with a wooden block or a metal body. All modifications of the plane (sherhebel, plane with a single and double knife, jointer) have a fundamentally identical structure (Fig. 7). They consist of a wooden or metal block (body), a knife and a wedge (or screw) to secure the knife. For ease of use, some types of planes have a stop (holder) in the front part and a handle in the rear part (at the jointer). The lower part of the last is called the sole and can be straight or profiled.
Rice. 7. Elements of a planing tool : a – wooden plane; b – metal plane; c – jointer: 1 – holder (stop); 2 – entrance; 3 – wedge; 4 – knife; 5 – body (block); 6 – emphasis; 7 – plug; 8 – clamp; 9 – screw; 10 – handle
Planes differ mainly in the thickness of the removed layer of wood and the cleanliness of the surface finish of the workpiece. Depending on their purpose, planes have cutters of different designs. So, in a plane for fine planing, the cutter blade is sharpened in a straight line, and in a Scherhebel - a plane for initial (rough) planing - the cutter has a narrow, rounded blade.
Sherhebel (Fig. is used for initial, rough planing of boards and blanks, when it is necessary to remove a thick layer of wood. The cutter in Sherhebel extends beyond the plane of the sole up to 3 mm; it has an oval cutting edge, removes thick chips, and leaves quite deep hollows on the surface being processed. The ovality of the cutting edge allows you to plan with scherhebel across the fibers and at different angles to them without their longitudinal tearing.
Rice. 8. Sherhebel and his knife
The plane knife (like the cutting part of all carpentry tools) is sharpened in the cutting part in the form of a sharp wedge. The two surfaces of the wedge at the intersection form a sharp cutting edge. This cutting edge cuts the wood fibers, and the front edge of the knife bends the cut layer in the form of chips. For a fine planer, the knife should protrude above the sole by 0.3...0.6 mm, and for a scherhebel, by 5...7 mm.
A single planer is used to level the surface after sawing or planing with Sherhebel. The blade of the knife (piece of iron) of the plane is straight. A double plane differs from a single plane in that it has a chipbreaker . The chipbreaker prevents the knife from going too deep into the wood and causing excessively long chips. The edge of the chipbreaker is parallel to the cutting edge. Moreover, the closer the chipbreaker edge is to the cutting edge, the cleaner the planing.
A jointer is necessary for the final finishing of surfaces. It smooths out unevenness and levels large surfaces. The tool is three times longer than a regular plane, making it easy to plan long boards. The length of the jointer knife is 180 mm, width is 65 mm. At the front of the jointer there is a device for removing the knife from the tap hole using a mallet.
The sander is a shortened double plane with a reduced span and an increased angle of addition. The sander is used for cleaning burrs, twisted places, and ends; removes very thin chips; Suitable for processing hard pressed wood.
There is a large group of planes designed to produce profile surfaces, for example, selecting quarters and grooves of different shapes (Fig. 9). These planes are built on a general principle, but have certain differences (in the design of the blocks or in the shape and fastening of the cutter), allowing them to perform the corresponding operations.
Rice. 9. Special purpose planes and their knives : 1 – sander with an oblique knife; 2 – tzinubel, and – tzinubel knife; 3 – zenzubel, a – knife of zenzubel, b – wedge, c – straight zenzubel (bottom view), d – helical zenzubel; 4 – selector (quadruple), and – quadruple knife; 5 – adjustable universal stop, a, b – methods of application; 6 – universal selector, and – action diagram (section); 7 – moulder, and – knife for moulder; 8 – knives for moulders, a – profile layout diagram, b – moulder template; 9 – universal humpback, a, b – forms of sole installation; 10 – small metal tongue and groove
When planing, it is important to hold the tool correctly and maintain a working posture. The workpiece is secured so that the side to be cut is directed upward. With your right hand, take the plane by the handle on the back side of the block, and with your left hand, by the block or handle on the front side. The plane is placed on the workpiece with the blade down and pushed forward.
At the beginning of planing, press on the front of the plane, and at the end - on the back, so that the surface being processed is flat. When the plane moves back, it is lifted above the surface. So, moving back and forth, they gradually scrape off the surface being treated until it becomes even and smooth. If the fibers on the surface being processed are lifted, then the part should be planed on the other side.
The plane must be held firmly so that your hands do not slip off it and hit the sharp side ribs of the workpiece. In this case, bruises and cuts to the hands are possible. The workpiece stops should not protrude above the surface to be machined. You should plan along the entire span of your arms, sending the plane forward with force. At the beginning of the movement, the plane is pressed harder with the left hand, at the end - with the right. The quality of planed surfaces is checked against light using a ruler or square.