A wooden floor, like any other base, loses some of its performance properties over time. Wood is a living material, and gradually it begins to change - it becomes somewhat deformed, the floorboards no longer become so even. But plywood will help correct the situation (and this may be necessary when laying laminate or other material that is demanding on the evenness of the base). How to lay plywood on a wooden floor?
Plywood
How to lay plywood on a wooden floor
Plywood over wood floor
Plywood is widely used in the construction industry. It can be used to create partitions, cladding walls and ceilings in a wooden house, it is used to build formwork, and it is often used to level floors before laying coverings that require evenness of the base.
Plywood structure
Stages of plywood production
This material is a layered “pie” created from wood veneer. To create it, an odd number of veneer sheets (from 3 pieces) are glued together, which are connected in such a way that the wood fibers in different layers are perpendicular to each other. Due to this, the strength of the material increases.
Plywood sheets
For installation in warm and dry rooms, for example in residential buildings, plywood is a material that is ideal. It’s easy and quick to work with, which is what attracts many builders and novice craftsmen to use it. If necessary, sheets that have lost their strength and reliability can be easily replaced with new ones.
On a note! Plywood makes an excellent option for a dry screed; you won’t have to wait 30 days for it to dry (unlike a regular cement screed) - you can begin laying the topcoat almost immediately after installing the plywood. Using this material will save not only time, but also money during renovation of the premises.
Installation of logs with plywood ceiling
How to improve plywood
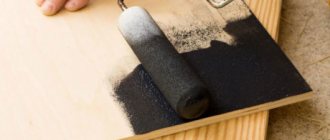
The moisture resistance of plywood can be increased by impregnation with polyvinyl acetate (PVA)-based putty; it is similar to very thin PVA glue and is cheap. Soak first on one side until spots appear on the opposite side, then on the other twice. Dry in a horizontal position. It will take a long time to dry - at least 3 days at room temperature. After drying, the sheets are treated with any antiseptic-fungicide for wood.
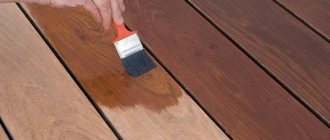
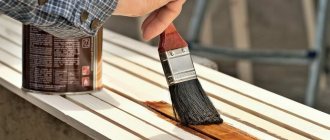
The strength of the surface layer can be increased with acrylic varnish. It is applied in two layers; the second - after the first has completely dried. If plywood needs to be stained for decorative purposes, paint it before varnishing.
Advantages of plywood on the floor
Plywood is so often used as a leveling material for wooden floors for good reason. It has a lot of advantages:
- has a low price , and therefore with its help you can perform budget but high-quality floor repairs;
- makes it easy to make floors even , copes with the curvature of the base and small surface defects;
- is an additional insulating material , thereby reducing heat loss in the room;
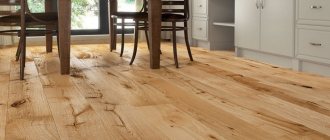
- can also be used as a finishing option for flooring;
- can be installed with your own hands without the involvement of craftsmen;
- easy to process;
- It is an environmentally friendly material and smells nice of wood.
Plywood has many advantages
Plywood itself is a fairly stable material; it practically does not deform under the right operating conditions, which means it allows you to create a reliable and durable subfloor that will last for decades. And to work with it, a small set of tools that are found in almost every home is enough.
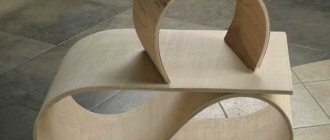
On a note! Sometimes very beautiful floor finishing options are created from plywood.
The disadvantage of plywood is its fear of water. Ordinary material does not like high levels of humidity, which means it cannot be installed in a bathroom or toilet. For these purposes, it is better to purchase moisture-resistant plywood.
Plywood with increased water resistance
Suitable material
Which plywood to lay on the floor depends on many factors:
- lay sheets on top of the old coating;
- laid on joists;
- used as a finishing touch or as a leveling base for decorative material.
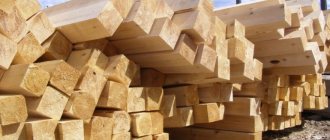
For the floor, choose birch sheets, which are stronger than other species.
It is important to understand which plywood is best to use for different types of work. For floors on joists, as well as for the base for rolled material, it is better to choose birch sheets, they are harder.
To save money, it is appropriate to use grade 3 or 4 unsanded material as a leveling base.
Under hard decorative coverings: laminate, parquet, you can use softwood plywood. For grouting joints, putty is selected to match the color of the selected material: birch or pine needles.
To level the base, use sheets with a thickness of 1 to 1.5 cm.
It is recommended to lay up to a maximum thickness of 2 cm in one or more layers. It no longer makes practical sense to increase the size; the properties of the coating do not improve.
Before purchasing, draw a plan for laying and cutting plywood to optimally select sheet sizes and reduce the amount of waste.
What types of plywood are there?
Plywood is divided into several types depending on its characteristics. For example, according to the presence and number of defects, the material can be divided into 4 groups.
Table. Types of plywood.
| Variety | a brief description of |
| I | The best grade of material. Sheets of such plywood have no defects, they are even, smooth, there are no knots or cracks on them. Although a certain number of small cracks are allowed, they practically do not play a big role on the quality and appearance of the material, since they are not visible to the eye. |
| II | Such plywood may have up to 5% defective area of the entire sheet. Defects may include small dents and glue residues (no more than 2-3%). |
| III | Such sheets have knots and wormholes, but in moderate quantities. |
| IV | The worst type of plywood. It can only be used to create formwork, as it has too many external disadvantages. However, the sizing of the sheets, as a rule, is still of high quality. |
Plywood grades: E (elite), I, II, III, IV
Also, plywood varies depending on its purpose. The following types are distinguished:
- industrial;
- for package;
- furniture;
- structural;
- construction
Removable plywood formwork
Sheets of material can be made from various types of wood. So, they distinguish:
- birch plywood;
- coniferous (made from cedar, larch, pine, fir, etc.).
Coniferous is cheaper than birch. In its production, varieties of deciduous trees can sometimes be used, although only in the inner layers.
On a note! The size range of plywood sheets is quite large. Parameters vary from 1525x1525 to 3050x1525 mm.
Existing sizes of plywood sheets
Table. Types of plywood depending on its properties.
| Abbreviation (designation) | Characteristic |
| FBA | The impregnation in these plywood sheets is albumin casein glue. Such plywood is afraid of water, but is absolutely safe for human health, as it is environmentally friendly. |
| FC | The plywood is impregnated with carbamide glue. It does not have increased moisture resistance and therefore can only be used for making furniture and for indoor work. It will not tolerate exposure to outdoor precipitation or high humidity levels. |
| BS | Also called aviation. It is made using bakelite alcohol-soluble glue. It was previously used in shipbuilding, the creation of aircraft and other aircraft. It has increased strength, resistance to external factors, and is not afraid of water and microorganisms. |
| BV | Bakelite-based glue is used to create this plywood. It is water soluble, and therefore the sheets are not used to create any open-air structures. |
| FB | The layers of material are impregnated with bakelite-based varnish. This plywood can be used in quite aggressive environments. If necessary, the material can withstand moisture for a long time. |
| FSF-TV | Plywood with high fire resistance. Otherwise, this material is unremarkable. |
| FSF | The layers of this plywood are impregnated with formaldehyde glue. The result is a durable material that is not afraid of moisture. It also practically does not burn, which is important for the construction industry. |
Prices for plywood for flooring
plywood for floor
What is contraindicated for plywood?
Nothing is perfect, and plywood is made from a hygroscopic material - wood. Therefore, plywood cannot be used in damp rooms: long-term air humidity should not exceed 68%; short-term within 12 hours – 78%. When laying untreated plywood, air humidity up to 60% is permissible.
The indicated values are valid in a comfortable temperature range of 18-27 degrees Celsius. Outside these limits, the sensitivity of plywood, except for FC, to humidity increases: at 16 and 35 degrees and a humidity of 85%, plywood begins to delaminate after two months. Therefore, ordinary plywood for floors and walls should not be used in the kitchen, balcony, closet, hallway and bathroom.
Which plywood to choose
Among such a variety of types of plywood, how can you choose the one that is suitable for a subfloor and will cost reasonable money? To do this, it is important to evaluate the operating conditions of the material. For example, in an ordinary room, plywood without any special properties can be used to level a subfloor of wood. This may be a material belonging to grade III or IV, because a finishing coating will be laid on top of it and defects will still not be visible.
Laying plywood on a wooden floor
Next, you should think about choosing the type of plywood. In a residential building, ordinary FC plywood will serve its purpose well. Moreover, it will even cope with the level of humidity that can be observed in the bathroom or kitchen. And in the nursery you can lay sheets designated by the abbreviation FBA. This is the most environmentally friendly type of material.
Advice! You should not buy plywood made with phenolic glue for your apartment or house. It may be too toxic. Although, it is worth admitting, its level of moisture resistance is excellent.
Plywood over wood floor
The dimensions of the sheets are also important, especially their thickness. To make wooden floors smooth, it is enough to use sheets 10-15 mm thick. Although some experts claim that only sheets more than 18 mm thick can withstand the load. And to achieve optimal strength, plywood can be laid in two layers. Here it’s easier to evaluate the actual costs and see which option will be more profitable from a budget point of view. For ease of transportation, you need to pay attention to the length and width.
Table of dependence of strength parameters on sheet thickness
Features of choice
When choosing plywood, you need to know the operating conditions of the material, as well as understand the strength of the material. Some people lay cheap plywood sheets in several layers to achieve greater rigidity. In any case, you need to immediately decide on the type of plywood material that will be used. To do this, just use the table below.
The nuances of laying plywood sheets
Plywood is a simple material, but nevertheless requires compliance with certain rules when laying. If they are neglected, it will not be possible to achieve the desired effect, or such a foundation will quickly become unusable.
- Plywood cannot be laid on underfloor heating systems, since it has improved thermal insulation characteristics. The effect of a warm floor will be minimal.
Plywood for linoleum
- Material, except moisture-resistant types, cannot be used in rooms with high air humidity . The optimal figure should be within 60%. The maximum permissible air humidity for no more than 12 hours is 78%.
- The optimal air temperature in the room where plywood is laid should be between 18-27 degrees . If the temperature varies within 16-35 degrees with a humidity of more than 85%, then the material will delaminate very quickly - just a couple of months will be enough. Plywood cannot be used in a room where there is no heating.
- If plywood is laid on joists, then the supports must be installed so that the joints of the sheets are directly on them.
Installation of plywood floor on joists
- When laying on joists, plywood with sheet thickness less than 15 mm cannot be used .
- In moisture-resistant plywood, you need to drill several holes with a diameter of 1 mm2 and close them with small plastic bushings . This is necessary for optimal fastening of the material.
- When laying sheets, the joints in two adjacent rows should not coincide . The plywood is laid with a shift of about 1/3 of the sheet. More than 3 seams should not converge at one point.
- Self-tapping screws are screwed into sheets of plywood in increments of about 15-20 cm . Their length should be 3 times greater than the thickness of the sheets. The heads of the screws should be slightly recessed into the top layer of plywood.
The distance between the screws should be 15-20 cm
What types of plywood are there?
There are many varieties of plywood. The following types of plywood are most often used in construction:
- FC is a moisture-resistant plywood based on urea resin, which is non-volatile and non-toxic. It has strength and elasticity comparable to BS aircraft plywood.
- NS – unpolished with casein glue. The cheapest, about 170 rubles/sq.m with a thickness of 12 mm. Before gluing parquet or other hard flooring onto it, it requires sanding.
- Ш1 is the main material used for the subfloor. Sanded on one side. The adhesive base is also casein.
- Ш2 – polished on both sides, on casein. For lightly loaded parts in dry rooms with a comfortable temperature it can be used as a substitute for FC.
How to lay plywood on the floor: installation methods
The process of laying plywood will directly depend on the condition of the subfloor, as well as on additional work. For example, sheets can be laid directly on a wooden base if it has not yet become unusable and is still strong, although it has unsightly gaps between individual boards or has lost its appearance. The sheets are placed with small gaps - up to 3-5 mm between them. A distance of 15-20 mm should be maintained to the wall. The sheets are attached using self-tapping screws or glue. Glue consumption is about 1.2-1.5 kg/m2. Installation of the sheet should be carried out by screwing in self-tapping screws around the perimeter, and then diagonally.
Laying plywood on the floor
Plywood can also be used to cover a slightly crooked floor. In this case, the material is partially laid on the base itself, as well as on small bars that will act as a kind of lags. The bars can have different cross-sections depending on the curvature of the floor. Sometimes even scraps of boards are used.
Less often, when the subfloor has completely become unusable, a new base is created from plywood installed on joists or supports. In this case, the old base is completely dismantled, and then logs are installed, onto which fresh sheets are attached. They are laid in such a way that the edges of the sheets do not sag - on the contrary, they must have support underneath them.
An example of leveling a floor with plywood along joists
Advice! Before installation, it is recommended to cut the plywood into separate elements measuring 60x60cm. Then it will be easier to work with sheets. This is the best option for subsequent installation of laminate flooring.
Installation of logs under plywood
Thus, installation of plywood on joists can begin immediately after marking and securing the pads. The beams are laid parallel to the wall with window openings in order to be perpendicular to the sunlight entering the room. For the distance between floor joists under plywood, it is best to choose an interval of 40-50 centimeters (read: “What is the distance between floor joists when installing a floor”). Only the two outer beams at opposite walls should be installed at a distance of 30-40 centimeters.
All other logs should be fixed at the same distance, strictly parallel to each other. The height can be checked using the horizon line previously drawn along the walls. Closer to the center of the room, such a tool will usually help determine how smooth the surface is. Naturally, all beams should have the same linear dimensions, but for the outermost logs near opposite walls it is best to use beams that are larger in width than those located between them.
The logs are secured to the prepared linings using screws. The fastener must be recessed into the beam so that the head does not protrude on the surface. It will probably not be very aesthetically pleasing if the laid floor covering is damaged. In the photo and upon visual inspection, such a floor can no longer be called high-quality.
To increase the strength of the lag in the places where the pads are located, you can additionally fix the beam using a special wooden profile (crossbar), which will also be fixed to the pad, enhance the adhesion effect and increase the stability of the base.1
The design becomes even more reliable if, after installation, each wooden element is coated with parquet glue or a similar mixture. It is advisable to fill the space between the joists with insulating or soundproofing material. Most often, mineral wool, expanded clay or polystyrene are used for these purposes. Various communications are also laid in the voids. From above, the contents of such areas are covered with parchment or bitumen paper (more details: “Laying plywood on a wooden floor - which one to choose and how to lay it”).
An alternative way to secure the joists does not require the use of spacers. In this case, the logs are also leveled with pieces of roofing material, and secured with long anchors or dowels, the length of which exceeds the thickness of the beam by 5-6 centimeters.
Required tools and materials
To install plywood sheets on a wooden base, you may need the following tools:
- screwdriver;
- drill;
- hammer;
- screwdriver;
- level;
- electric jigsaw.
The materials used are self-tapping screws usually 30-50 mm long, nails or glue. The first ones are preferable to use, since they are the easiest to work with.
Self-tapping screws for wood
Rules you need to know
Before laying plywood on a wooden floor, it is worth checking and repairing all communications running under the floor, so that later you do not have to open up a new finished floor. It's worth knowing that:
- The length of the screws used in the work should be three times the thickness of the plywood.
- The distance between the screws is no more than 20 cm.
- The sheets are screwed, retreating 2 cm from the edge.
- If there is thin plywood, it is used in 2 layers, placing the sheets so that the seams of the top and bottom layers do not coincide.
- When installing a plywood base using the point method, the bosses are placed at a distance of 20–25 cm.
Photos of beautiful modern coatings will not leave anyone indifferent, and an insufficiently level floor will no longer be an obstacle. Using these recommendations, any man who knows how to hold a tool will know how to lay plywood on a wooden floor and will be able to do it with his own hands.
Preparing for work
Before laying plywood sheets, a number of preparatory work should be carried out. It includes:
- assessing the condition of the wooden base and repairing it if necessary - replacing dried floorboards or floor screed. Floors should not “walk”, sag, or creak;
- checking and measuring the humidity level in the room;
On a note! You can find out the humidity this way: a piece of polyethylene measuring approximately 1x1 m is placed on the floor and secured to the base. After 3 days have passed, the film is lifted and its condition is assessed. If condensation has accumulated on it, then the humidity in the room is high and only moisture-resistant plywood can be laid.
How to determine the humidity in a room at home
- removing all debris from the rough base . If it remains, the plywood will not lie flat. The floors can be swept and vacuumed, and washed if necessary;
- The plywood itself must also be cleaned of sawdust and dust;
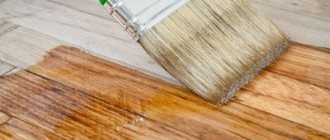
- It is recommended to treat the old wooden surface with a primer mixture .
The plank floor must be properly prepared
How to measure the moisture content of a concrete base under plywood
To do this, use a polyethylene film 1 m wide. Spread it on the concrete. Press the edges. This can be done using improvised means. For example, bars. Leave the center free. Wait a few days.
After this, inspect the polyethylene. If its surface is not wet, therefore, the humidity is within normal limits.
But if condensation appears, you should wait some more time for the concrete base to dry completely. Otherwise you will have to change the plywood.
Laying plywood on an old wooden floor
Step 1. If necessary, the rough foundation is repaired. The evenness of the floor is checked using a building level, after which the protruding parts can be filed down. The floor should be as level as possible.
Preparing a Wooden Floor
Step 2. Holes are drilled in the floorboards where the joists run and screws are screwed into them. This procedure will make the floors stronger. Screws are screwed into each board at approximately a distance of 50 cm from each other.
Self-tapping screws are screwed into the drilled holes
Step 3. The rough base is covered with a thin backing. Its individual strips are fastened together using tape. The strips are laid with an overlap of about 10-15 cm.
Laying thin underlay
Step 4. The first sheets of plywood are laid so that there is a small gap of 2-3 mm between them, and the gap to the walls is about 10-15 mm.
Laying plywood sheets
Step 5. Sheets of plywood are screwed to the boards with self-tapping screws in increments of about 20 cm.
The process of laying plywood sheets
Step 6. The plywood in the next row is laid with the joints shifted by 1/3 of the sheet. If necessary, the sheets are sawn in accordance with the measurements taken.
The shift between rows should correspond to a third of the sheet
Step 7. The joints of individual plywood sheets after installation can be taped. The base is ready for laying the finishing coating and installing skirting boards that will hide all the gaps near the walls.
The joints between the sheets are taped
Video - An unusual way of laying plywood on a wooden floor
Video - Installation of plywood on a wooden base
The procedure for leveling using joists
Before starting leveling, determine the highest point of the floor by level. From this point they begin laying lags - beams located in parallel. Lay the logs, adhering to the marks made during the initial layout of the plywood fragments. They need to be located at the junction of the sheets.
- The logs are laid one by one and secured to the wooden floor using special glue and self-tapping screws. Each beam is checked with a level in all directions, if necessary, placing bosses under it and filling irregularities with plywood trim. Pieces of trim should be additionally lubricated with glue to increase the reliability of the base. There is a special glue for plywood on wooden floors that does not require additional fastening. But more often, craftsmen use proven methods: they lubricate the required places with available glue (“Bustilat”, “Liquid Nails”, “Moment”), and then secure them with self-tapping screws.
- Then the sheathing is installed - transverse bars located at a distance equal to the width of the prepared sheets, and in accordance with the original marks. Installing a plywood sheathing on the floor will make the coating more stable and durable. It is necessary to carefully observe the markings so that the sheets, during the subsequent installation of plywood, do not, as they say, “hang in the air,” but are attached to the sheathing and form a reliable plywood floor in a wooden house or apartment.
- To improve heat and sound insulation, the sheathing space can be filled with appropriate material, after first getting rid of construction waste.
- Plywood sheets are fastened according to the diagram, checking the number marks. To ensure that the heads of the screws do not protrude above the plane, they are recessed. To do this, drill a recess at the attachment point equal to the diameter of the screw head.
After installation is completed, all that remains is to prepare the plywood floor in accordance with the type of finishing coating. For thin coatings, all irregularities, cracks at joints, and recesses from recessed screws are puttied. For more rigid coatings, a special noise-absorbing underlay may be needed. In any case, it is advisable to varnish the plywood several times to extend its service life.
Preparing tools
After determining the type of plywood and joists that will be used in arranging the floors, we proceed to preparing a full set of tools:
- Electric drill. A device for preparing holes for screws or self-tapping screws.
- Screwdriver. An excellent tool that will work and replace a regular screwdriver.
- Jigsaw. Cutting plywood will be better and faster if you use this type of electric tool.
- Wood saw. Will help prepare logs of the required size.
- Hammer. Will carry out adjustment of sheets and other work that requires severe intervention.
- Rule. It will clearly indicate possible unevenness during floor installation.
- Measuring tools. Taking measurements is an integral task before starting any work.
To install the floor structure, you will need to prepare the following consumables:
- Nail – 57 mm.
- Self-tapping screws – 35, 50 or 75 mm.
- Dowel plugs – 0.6 or 0.8 mm.
- Waterproofing material.
- Construction tape.
- Mastic.
- Antiseptic solution.
Tools for work
Installation of floor joists in an apartment
The technology for installing the sheathing includes preparing the base of the floor. All unevenness, holes and cracks must be repaired. Then the waterproofing is installed. The lathing must be treated with antiseptics and fire-resistant impregnation.
The planks are not installed on a concrete screed. To do this, use a lining in the form of scraps of boards and bars. You can also take pieces of roofing felt and linoleum. For a level floor, you need to find the highest point on the floor and install the first joist. Along the entire perimeter of the room, you need to make markings at what level the logs should be attached.
Before you begin installing the joists on the floor, it is worth studying the theoretical part of the process
After installing the outer bars, you need to start installing the intermediate strips. The step between them should be measured at 40-60 cm. It is important to take into account the size of the plywood sheets. Their joints should be in the middle of the bar.
If you plan to further install a porcelain tile slab, then the step between the joists should be 30 cm.
When the frame is installed, you can begin to insulate the floor. The interval between the lags is filled with cotton wool or expanded clay. The thickness of the wool should be 5 cm. Next you need to lay a vapor barrier. The material is attached to the top of the insulation using a stapler.
Related article: Do you need a niche in the bathroom and how to make it from plasterboard?
Basic principles of installing logs in an apartment:
- The installation of the bars occurs perpendicular to the window or the direction of movement in the house;
- The interval between the slats is measured as 40-50 cm;
- The distance between the wall and the frame is 2-3 cm;
- Insulation must be placed between the joists;
- If plywood is installed under parquet, laminate or linoleum, then you need to use second grade level flooring.
The interval between the wall and the joist must be observed due to the possible expansion of the timber. This occurs due to increased humidity. This procedure will prevent the appearance of sagging and deformation of the laminate, which can be placed on top.
Stage of preparation for installation of plywood floors
Layout of sheets
This is where you should start. In order to draw a plan of a specific room on a sheet of paper, taking into account all the features of its configuration, you do not need to be a specialist. The main thing is to maintain the scale. After this, measurements of all linear parameters of the room are taken and marked on the diagram. The result is a drawing that will be needed to calculate the required volume of purchases of the required materials.
What's special? Plywood sheets have the correct geometry and are available for sale in certain sizes. Mostly for household use, samples 244 x 122 or 152.5 x 152.5 (cm) are purchased - this is the standard format. There are also larger products, and when finishing large areas they are much more convenient. But the question arises: how to transport it? For example, with a sheet length of 3.6 m (such are also sold).
After drawing up a room plan, all that remains is to apply a “grid” to it, the cells of which are projections of each sheet. The task is simple - to draw up a scheme for laying them in such a way as to do as little cutting as possible. For those who are faced with the issue of arranging floors on plywood joists for the first time, it is worth explaining what such careful planning gives.
- The amount of waste is reduced, therefore, construction (repair) is partially cheaper. A thrifty owner will appreciate this.
- When it comes to performing a particular technological operation with your own hands, it is assumed that the home craftsman uses household tools. Does every home have a jigsaw? This means that you will have to cut the plywood with what you have at hand. For example, a hacksaw. And this takes time and poor quality of the cut.
What to consider?
When drawing up a plywood laying scheme, you need to arrange all the sheets so as to cover the maximum possible area with them, and in whole samples. Naturally, there will be separate areas for which fragments will have to be cut (to size). But in this case, you can also purchase the so-called substandard. It is available in every building/materials store and is sold at bargain prices. An alternative is to buy sheets of plywood of smaller sizes (there are also such).
Such careful preparation will significantly optimize costs. By the way, this applies not only to plywood (the number of sheets and their sizes), but also to joists. They are also characterized by different lengths, so you will have to decide on them too.
Plywood selection
By variety
One of the tasks of doing the work yourself is to achieve maximum savings. From the same point of view, you need to approach the purchase of consumables. In terms of the quality/cost ratio per sheet for flooring, the best are two types of plywood - FK and FSF. Both categories are moisture resistant, sold in a large assortment, and have identical linear dimensions and sample thicknesses. What is the difference?
- FSF is 1.5 times cheaper than FC.
- During the manufacturing process of both plywood, adhesives are used to hold the veneer layers together. But if the preparation for FC does not contain toxic components, then the glue for FSF does contain them (formaldehyde). That is why the latest modification is recommended mainly for external work, since when the ambient temperature rises, harmful substances begin to be released from such plywood.
How to proceed? If the floor is installed using joists in a living room, it is clear to rely on FC sheets. For installation in unheated utility rooms (sheds, outbuildings), cheaper plywood marked FSF is also quite suitable.
By thickness
Purchasing plywood for this parameter is complicated by the fact that the following points must be taken into account. Firstly, the interval between the lags, which is selected depending on the features of the floor arrangement. For example, how and with what it is supposed to be additionally insulated. Secondly, you can increase the strength of the flooring not only by increasing the thickness of the sheets or reducing the distance between the joists, but also by laying the plywood not in 1, but in 2 layers.
What is recommended?
- For a single-layer installation scheme, it is worth purchasing sheets with a thickness (mm) ranging from 15 to 18 (depending on the expected load on the floor). Reducing this value will not ensure the reliability of the coating; increasing it will complicate the work with sheets (primarily cutting them) and increase the weight of the entire mounted structure (and this is an additional load on the floor).
- If you plan to lay plywood in two levels, then you can purchase samples with a thickness of about 8 - 10 mm.
By grade of plywood
As a rule, when arranging floors along joists, cheaper sheet material is purchased. After all, all its shortcomings are reliably hidden by the finishing. The main thing is that the samples do not have significant defects in the form of chips or emerging cracks.
In some cases, the owner leaves the flooring as is, covering the plywood only with varnish. With such a floor arrangement, purchasing sheets of grades lower than 2/4 is impractical. What is special about this product? GOST allows for the presence of defects on its surface, but only on one side. When arranging a floor along joists, such plywood (2/4) is the best choice.
According to the specifics of processing
It is appropriate to note this characteristic of the sheet material. In order to optimize costs, you should pay attention to plywood, the abbreviation of which contains the designation NSh (unsanded) or NSh1 (one-sided sanded). Accordingly, what is better to buy depends on how you plan to finish the subfloor further. If you just paint (apply varnish) - then NSh1. In other cases, cheaper sheets with the designation NSh are sufficient.
Selection of lag
By material
There are only two possible options - metal or wood. If we consider from the point of view of ease of installation, weight, correct geometry and a number of other parameters, then the conclusion is clear - for arranging the floor it is better to purchase metal logs. But such a judgment does not take into account all the nuances of operation.
In any room the microclimate changes, sometimes quite dramatically. First of all, this relates to temperature. Its changes cause deformation of materials. In order for the structure to be as stable as possible, when combining several different types of elements, they are selected according to expansion coefficients; they should be as identical as possible.
What is a plywood floor with joists? Sheets are glued and compressed layers of wood veneer. Therefore, it is better to choose a wooden base on which they are supposed to be attached. That is, a beam or a thick board installed on an edge. No matter how convenient metal is to work with, it is unlikely that it will be possible to avoid warping of the floor with such lags. If not immediately, then in a couple of years it will definitely appear.
By wood type
The specifics of the room (dry or wet) do not yet provide a complete understanding of the conditions under which the wood will be exposed. The logs are mounted on the ceiling. What is underneath - a heated room on the lower floor, a basement or something else? The options may be different. But the possibility of rotting and deformation of the material cannot be excluded in any case.
What is recommended? Larch is the best solution. This coniferous wood is not only resistant to dampness, but unlike other similar species, when the temperature rises, it does not resin so intensely, and when wet (in the long term) it only gains strength. It is not for nothing that experienced craftsmen use it when laying the lower crown of a log house. In addition, the price of lumber is quite reasonable.
By geometry
It's short here. All joists must be absolutely straight. Even the slightest distortion is unacceptable. Otherwise, not only will their alignment be complicated when laying them on the base. Even minor discrepancies in the upper cuts in height will result in an uneven plywood floor. It is extremely difficult to correct such defects, and even in several places, with your own hands.
The optimal cross-section of timber for logs (mm) is 100 x 50.
By wood moisture content
You only need to purchase industrially dried lumber for the logs (with an indicator no higher than 12%). It costs more than products with natural humidity, but this is where the savings are not justified. It is unlikely that you will be able to achieve proper drying of wood on your own - this is a complex process that requires time, a suitable place, and competent organization.
Selecting fasteners
- The good thing about a plywood floor is that it can be easily repaired by replacing sheets. Consequently, only self-tapping screws (for wood) are used as fasteners.
- Since any floor must be subjected to wet cleaning, the hardware must be made of stainless metal. There are enough galvanized self-tapping screws on sale.
- Leg length. It is selected depending on the thickness of the plywood sheets and should exceed it by approximately 2.5 times - this is a general rule for work related to fixing materials to the base.
Plywood acclimatization
Before describing how to lay plywood on the floor, we should talk about its acclimatization in the room. Plywood, like any wood material, requires acclimatization at the site of use. The acclimatization period depends on changes in temperature and humidity: if the conditions in a warehouse or store are the same as in an apartment, a day is enough; with a temperature difference of 2 to 8 degrees – three days; with more – a week. During acclimatization, the plywood is kept stacked in a horizontal position.
Laying the tiles on a plywood base
Most often, linoleum or tiles are laid on a plywood base. And if there are no special questions about laying linoleum, then the installation of a slab base requires clarification, since this is a rather responsible and painstaking process. Therefore, we should talk about how to lay tiles on plywood.
Advantages and disadvantages of this technology
Tiles laid on a plywood base.
pros
- High strength of the facing layer.
- The adhesive on which the tiles are laid is an additional waterproofing agent.
Minuses
- Warm floors cannot be laid on plywood under tiles.
- If the humidity level in the room is too high, you should provide additional waterproofing, which will increase installation costs.
Laying technology
Installation tips:
- The tiles are quite heavy and therefore require a very strong base. Sheets of plywood are fixed in such a way that even the slightest deflection or vibration is eliminated. Self-tapping screws are used as additional fasteners.
- The smallest possible step should be provided between the lags. If necessary, the design is completely redone to reduce the pitch to 30 cm.
- The minimum thickness of plywood slabs is 30 mm. Otherwise, the tiles may crack due to deflections of the base.
Preparing for work
We level the tiles.
Once the plywood is laid on the floors, you can immediately begin installing the tiles. When calculating the required amount of material, you should take into account the design, installation method and size of the products. Typically, 10% is added to the calculation results for trimming. The amount of glue is calculated depending on the recommendations indicated on the packaging.
Before laying tiles on plywood, the base should be thoroughly primed. This will ensure better setting of the solution. We lay the soil in two layers. Having laid the first layer, wait 5 hours for it to dry. After this, the second layer should be laid. The next day you can start laying the tiles.
Laying tiles
- The ceramic coating is usually fixed using special adhesives that are highly elastic. Their use is justified by plywood’s poor tolerance of moisture and significant temperature changes. The best choice is to use a two-component polyurethane adhesive, which is very often used when installing parquet.
- Laying begins from the corner of the room:
- Apply adhesive to the tiles, leveling the layer using a notched trowel.
- Apply adhesive to the floor.
- Press the tile tightly, holding it for several minutes until the mortar sets.
- Using a level, check that the installation is correct.
Using a cross for a seam when laying tiles.
- When installing adjacent tiles, use special crosses that allow you to control the width of the seam. Their thickness can vary from 1 to 3 mm.
- After installation, grout the seams using a special grout.
- Remove excess glue from the surface using a damp sponge or rag.