We straighten crooked boards and beams.
How to remove the arc or helicopter of a bent board or beam? It is always easier to make a geometrically correct frame from “fresh” lumber. Then it will be easier to finish using this base. from well-dried boards that have already weathered
.
Even if you carefully selected the boards when purchasing them, after a month of storage they may become noticeably warped. Especially if the storage was incorrect. But it is possible to work with such material.
For example, remove the " arc
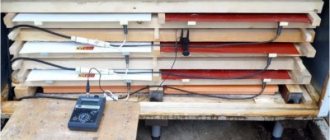
» is not difficult if you act as shown in the figure. As a stop, you can use a “temporary” mounting angle, bolt, washer, nut and wrench. It turns out to be a regular stretch...
When performing such a task, attention should be paid to the specific conditions of the current situation. In the above example, timber ( A)
used as a beam, fixed on both sides with corners to the beams (
B
), after which it was straightened. Then he was securely fastened in the middle, and when he was no longer in danger, the spacer was removed. In each specific case, there may be options for solving the problem.
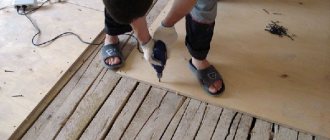
Here's another example. How to remove " helicopter"
» from the stand:
The lower part of the rack is rigidly fixed. The “helicopter” is straightened with the help of an improvised lever. While you are holding the straightened beam in the desired position, your partner ( here it is more difficult to do without him)
) quickly tightens the screws and fixes the structure from above. For convenience, it is more practical to secure the upper mounting angle in advance at the end of the beam to be straightened.
In all cases, the straightened beam will be covered with cracks, but the structure will be of the correct shape. Cracks often appear in boards and timber as they dry out, and this is normal. The thicker and more massive the material, the more noticeable the cracks will be, and where the material was pulled
“The cracks will be even larger. By the way, the appearance of cracks indicates that the internal stress has eliminated itself...
Beams and boards that have been straightened must be fastened firmly so that when the wood dries out and becomes cracked, it does not have time to break the fasteners.
Advice:
It is in the light of what has been said that I advise allowing the frame house to
stand
until insulation and interior finishing are completed.
After drying, you can fix some things, tighten screws, caulk
strong cracks.
Otherwise, all these processes will occur inside the cladding, and you will not be able to do anything, although the house will look great from the outside...
Tools used
In order to straighten wood, you need to prepare the following tools:
- manual or electric plane;
- grinding machine.
You should be careful when choosing such tools. For example, the plane must have a long sole, otherwise defects may remain on the surface of the board. To begin with, it is important to fix the beam motionless and remove all kinds of defects from the surface. If you need to work with only one board, then you can get by with a hand plane, but if you need to straighten a lot of wood, then it is advisable to choose an electric option. This will help save energy and time.
It is important to remember that after processing the thickness of the lumber decreases.
There are times when curvature occurs over time. For example, if a house has already been built using wooden beams, then over time the walls may bend under the influence of negative atmospheric phenomena. In this case, you can also carefully eliminate all kinds of defects.
It should be remembered that the reverse process cannot be instantaneous and it will take time for the walls to become the same again. The alignment may take at least a month, but a positive effect is guaranteed.
Newly purchased boards were brought in. What to do?
Congratulations, I bought boards for the floor. Tongue-and-groove, 27 mm thickness, 3 m length. "Made from conifers." 4 pieces per bag.
Although I had no experience, I knew that I was taking a big risk: damp room + summer + weather, there was no way to dry it. But there was no other way out. I chose the boards that were more even, gave me the money, brought them back, took off the bags, and put the boards in a pile. A few days later I looked - almost all of them were bent. Not with a screw, in one plane. Deviation from straight line - 5-10 mm. Please advise what to do with this firewood now? lay crooked? wait for them to straighten up on their own? throw it away?
Under pressure and wait six months, or even more. In principle, you can put it down immediately, pulling it harder, but you still need to rally it in a year.
The miner wrote: Deviation from straight line - 5-10 mm.
-Are you kidding? yes, this is almost a perfect board, you’re not supposed to make furniture.
Hubert wrote: In principle, you can put it down right away, pulling it harder, but you still need to rally it in a year.
Should I screw each board to each joist or skip it somewhere (bearing in mind that later there will be repeated joining)? How to re-raft - again sequentially one board at a time or all at once?
VladM wrote: -Are you kidding? yes, this is almost a perfect board, you’re not supposed to make furniture.
Features of leveling a house by lifting
You should always use at least two jacks,- maximum lightening of the lifted part of the building is achieved by removing furniture, and, if necessary, dismantling windows, doors and floors,
- slow and uniform movement of the house structure is ensured by alternately raising the head of each jack by no more than 5 cm (in this case, it is advisable to use safety pads made of boards of appropriate thickness),
- correct control of the lifting height - carried out by measuring the distance between the marks marked on the wall and the independent stand (it is not recommended to use the jack scale for this due to its sagging under load),
- maintaining vertical movement - at the first sign of distortion, the lifting stops and the position is corrected.
The main causes of wood deformation
- Changes in temperature and humidity
- Improper drying
Changes in temperature and humidity
A natural material such as wood tends to absorb water. In a room with constant high humidity, wood will absorb water and swell. This will ultimately lead to deformation. The same thing happens from temperature changes in the room. Especially in combination with high humidity.
Improper drying
The largest percentage of deformation occurs during drying. It happens that they sell you under-dried boards, which then, when dried under natural conditions, can warp. The fact is that moisture from the wood does not evaporate evenly along its entire length. This creates tension in the wood fibers. This stress ultimately leads to deformation.
Or you bought good quality boards, they were delivered to your site. They lay in a damp garage, so the geometry of the material will be disrupted. It’s a shame to throw away such material, but it’s also impossible to use it for its intended purpose.
So what should we do? You can try to correct the deformation.
We offer 4 working methods for leveling the board.
The board can be leveled:
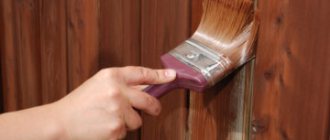
- Using a plane
- Exposure to heat and moisture
- Steam processing with pressing
- Leveling under pressure
Learn more about each method.
Additional wall fixation
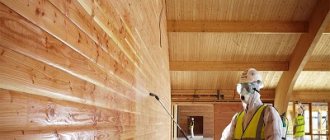
Sheathing and insulation of the walls of a timber house.
Installed screeds can be beautifully disguised, further protecting the walls from deformation. The inside of the structure is sheathed with metal or wooden slats that tighten the wall. If necessary, insulation and a film are placed on top of it to protect the material from moisture. If the house is located in a cold region, it is worth installing shielding foil, which will provide additional heat protection. The presence of a film near the wall is mandatory: most modern materials for insulating rooms do not tolerate moisture, steam, and with prolonged exposure lose their qualities. The next stage is cladding with plasterboard, wood, clapboard or block house.
If the wall is bent from the outside and it has been leveled, the metal parts used are insulated and then torn with finishing materials. If the situation is not neglected, the wall is plastered. To avoid further possible deformations, the outside walls are sheathed with siding. Quite often, if wooden structures are leveled, but they continue to deform in new areas, they are covered with bricks as a saving measure. It is important not to forget about the vapor barrier necessary in this case.
Wood for housing construction always has a special appeal. It is always a pleasure to be in such a house; its atmosphere is extremely friendly. Therefore, you should not abandon this building material just because of the risks associated with possible deformation of the walls. There are plenty of opportunities to renovate on your own, improving the design and increasing the value of your home.
Troubleshooting End Board Problems
Good afternoon. I would like to share useful tips related to the operation of end cutting boards. I hope my advice collected on the Internet will help you solve your main problems.
The kitchen cutting board is constantly subjected to extreme stress. This is too dry air in the living room during the heating season, this is also abundant moisture on the working side of the board, etc. So what can happen to your board!?
Small cracks or along the entire length of the board indicate that there is insufficient humidity in the room. This can be solved by lubricating the board with Vaseline oil or a mixture of wax and oil. I will write in more detail below how to make oil-wax impregnation for wood and where to buy Vaseline oil.
There could be several reasons why the board bent You may have only oiled one side of the board, or you may have left something wet on the board for a long time. There is nothing wrong with that. Lubricate the concave part of the board with Vaseline oil every day until the board becomes smooth. this may take from 1 to 5 days. If this does not help, then you need to cover the convex part of the board with plastic wrap and continue to lubricate the concave part of the board.
Changes in color, stains When regularly lubricating the board with oil, there may be some change in the color of the board and this is not a defect. Stains from food left for a long time can be removed by washing the board with dishwashing detergent. If the stains cannot be removed by washing, then it is necessary to dry the board thoroughly and sand the stained areas or the entire board with fine-grained sandpaper. After sanding, apply Vaseline oil.
Regularly lubricating the board with petroleum jelly or, better yet, an oil-wax mixture will significantly extend the life of the cutting board.
Vaseline oil, also known as paraffin oil, or lamp oil, is a mineral oil obtained from petroleum products. It is colorless and odorless and can be ingested even by infants. Is a laxative. Sold in pharmacies in bottles of 50-100g. Large containers can be bought in church shops under the name “lamp” oil, usually sold in 0.5 liter or 1 liter bottles. Also, in organizations or stores selling sauna stoves and accessories, you can buy impregnation for canopies, this will also be Vaseline oil.
Vaseline oil and beeswax mixture is made by mixing 1 part beeswax with 4 parts petrolatum oil. Simply mixing will not work; it is necessary to heat the composition to a temperature of approximately 60 degrees. You can melt it in a steam bath, just put the container with the mixture in hot water for a few minutes. You can also use a microwave oven, just do not leave it for a long time, but heat it for 20-30 seconds until the result is achieved.
The mixture is applied with a cloth by quick rubbing; if the composition begins to thicken, reheat it. The frozen mixture can be stored for any time and to re-process it, just melt it and use it again.
Methods of performing work
There are several alignment methods, each suitable for different cases:
- Laying a substrate made of elastic material is used if the unevenness does not exceed a few millimeters. This increases sound insulation. Most often, materials such as isolon or polyethylene foam are used. The thickness is set within 2-5 mm.
- For more serious defects, scraping is suitable. This method is also not capable of leveling out serious differences, but it can refine the surface and give it an attractive appearance. Before starting work, the floor is carefully inspected for the presence of metal fasteners. Staples and screws will have to be removed, and the nails will be sunk into the boards so that there is no chance of damaging the sanding machine.
- The putty is suitable for height differences of 2-3 mm. Sealants or acrylic compounds are used.
- Self-leveling floors or cement screeds.
- The most reliable option that will allow you to level a wooden floor with serious differences and cracks is plywood or OSB boards. For work, material with a thickness of 14-22 mm is used. There are two methods that can handle different sizes of bumps.
It is worth talking about putty and plywood in more detail.
putty
Repairing gaps between boards using putty
Leveling a wooden floor using this method will require preparatory work. They consist of cleaning the surface from dust and dirt and priming. The primer layer ensures a high degree of adhesion of the putty to the wooden surface.
The material for processing is selected depending on the finishing floor covering. If you plan to lay tiles, linoleum, laminate or parquet on the boards, then acrylic putty is suitable. When using a wooden floor as a finishing floor and then covering it with varnish, use a sealant matched to the color of the material.
Acrylic mixtures are characterized by low strength, so you can replace them with other compositions:
- if the layer does not exceed 1-2 mm, putty on plaster using PVA glue is suitable;
- For a thicker layer, a mixture of sawdust and PVA is used.
The disadvantage of this composition is that it is difficult to distribute over the surface, so after drying it will require sanding until completely leveled.
Laying plywood
The most reliable way to level the boards. After laying the plywood, you can install the flooring (tiles, carpet, linoleum, laminate, parquet). There are two technologies for performing work:
- without intermediate supports for differences of less than 1cm;
- with intermediate supports for differences of more than 1 cm.
Laying without supports consists of securing the sheets with glue and screws. Before starting work, it is necessary to lay out the elements and cut them. The distance between the parts is taken to be 2-4 mm, and between the wall and plywood - 8-10 mm. This is necessary so that the sheets do not affect each other and waves do not appear when the material expands.
Layout options for plywood sheets
Having laid out the parts of the flooring, they are numbered. And they begin to fasten. The adhesive layer should not exceed 2-3 mm. The composition is applied to the leveled surface. Sheets must be laid with a spacing of at least 10 cm.
After the glue has completely dried, you can begin installing fasteners. Before starting work, holes are drilled in the sheets for self-tapping screws, which are located at a distance of at least 20 mm from the edge of the part. The fastening pitch is taken within 15-20 mm. After completion of the work, the surface of the plywood is sanded with a special machine.
The use of intermediate supports increases the leveling capacity . You can use logs or point support points (blocks). The former allow for higher reliability, while the latter save on materials. It is important to provide for the arrangement of the elements so that the joint of the sheets falls on the place of support. The pitch of the elements is determined depending on the thickness of the plywood sheet.
- when using flooring with a thickness of 12-14 mm, the support spacing should be 30-40 cm;
- thickness 16-16 mm – 50 cm.
For OSB and chipboard, other values are accepted:
- thickness 16-18 mm – step 30-40 cm;
- thickness 20-24 mm – step 50 cm.
Laying plywood on intermediate supports
The thickness of the supports is taken on average 15 mm. The width of the boards for making logs is 40 mm. Fastening to the plank floor is carried out using self-tapping screws. Attaching the plywood to the supports can be done with self-tapping screws or glue.
When leveling the floor without removing boards, it is important to ensure that the subfloor is in good condition. If the logs are rotten, then none of the methods described above will help; only replacing the structure will give the result.
Korovin Sergey Dmitrievich
Master of Architecture, graduated from Samara State University of Architecture and Civil Engineering. 11 years of experience in design and construction.
How to straighten a board
1. Straightening a warped board.
The board intended for parquet must first be straightened. Knowing the property of wood to bend under the influence of moisture, it should be used in combination with mechanical action. If the board has not been impregnated with any moisture-resistant substances and absorbs moisture, the situation is simpler. If the wood is not “prone to drink,” then some layer of it that inhibits moisture absorption will have to be removed by scraping and even planing, depending on how significant the obstacle is.
Gender survey
At this stage, you will have to carry out not only a thorough inspection, but also measurement of irregularities. The wooden floor must meet the following requirements:
- the boards should not be damaged by rot or mold;
- cracks or gaps between elements should not be more than 5 cm (even if they are less than 5 cm, leveling with plywood will be required; other methods cannot be used);
- height differences do not exceed 1-2 cm.
Assessing gaps and height differences between boards
If these conditions are not met, then it will be almost impossible to repair and level the wooden floor without changing the boards. To choose an alignment option, you need to know the height difference. The following instruments are used for measurements:
- construction levels (laser, hydraulic, bubble);
- rule.
The simplest option is to attach a long strip or metal profile to the floor and measure the deviations with a ruler. You can also buy a bubble level at a hardware store to inspect a wooden floor yourself. It determines the slope of the board and costs between several thousand depending on the length of the body.
You can make a hydraulic level yourself. All you need here is a thin transparent tube and water. The disadvantage of such a device is that it is not very convenient to use. The most accurate way to measure a wood floor is with a laser level. This device is used by professional builders, its cost is high, and its use requires special skills. If you need to level the boards in a house or apartment yourself, there is no need for such precision.
Furniture
Individual restorers, under the influence of commercial interests, can remake, modify old furniture, making it, perhaps, more attractive, more “stylish”. They thus become falsifiers. As is known from the history of artistic furniture of the 18th - 19th centuries, this approach existed in the second half of the 19th century. And at present this path is not excluded - the influence of the customer is too great. This is evidenced by numerous fakes in antique stores. From there they end up in the homes of inexperienced collectors.
Sources:
https://zen.yandex.ru/media/id/5a6f1acb9b403cc11b640ef8/5a8a9cd779885ec645144a3f https://mastergrad.com/forums/t83372-povelo-svezhekuplennye-doski-chto-delat/ https://drevologia.ru/4-rabochix -sposoba-vyrovnyat-derevyannuyu-dosku/ https://www.livemaster.ru/topic/2690129-ustranenie-problem-tortsevyh-dosok https://legkoe-delo.ru/remont-doma/materialy/61291-kak- vypryamit-dosku
RELATED MATERIALS
Jigsaw: saw blades for different materials
If you need to saw off, cut, cut out, it is difficult to find a tool equal to a jigsaw. Wide .
Tools: A jigsaw that won't chip wood
The saw blade for a jigsaw can be different. Why?
Tools: Hacksaw with replaceable blades
Which tool is better – specialized or universal? We will talk about using a hacksaw.
Tools: chainsaw work
There are two types of chainsaws: electric and gasoline. Chainsaw - more powerful than .
Tools: Adjustable drill
How to drill with an adjustable drill?
DIY wooden tiles
The path in the yard can be paved with tiles made from wood yourself. And do it.
How to make a wooden floor on joists
To make a wooden floor on joists, it is not necessary to call a specialist. You can make everything your own.
Types of irregularities
Uneven wood subfloors fall into two categories: overall slope and unevenness within its perimeter. When the entire floor has a slope, the second category is not paid attention to: it is eliminated during general leveling.
If all four sides of the perimeter are at the same level, and the problem is sagging or unevenness in individual places, this local deficiency can be eliminated in another way: by adding a substrate or applying a leveling compound, or by shaving off protruding boards.
Let's look at how to level a wooden floor without tearing down the boards.