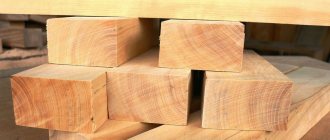
Carving is one of the art forms that still requires the hands of a master. Although there are many machines, even with programs, real warm wood carvings are done step by step by people who have mastered the craft for many years, and the only thing they use are wood carving knives.
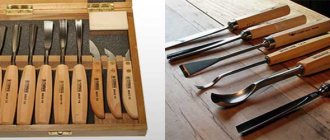
The master has many of them, of different sizes and shapes. Where to start, and how to use each - a person who wants to join the ancient art should start with mastering this.
They differ from ordinary ones because the length of the blade is designed to withstand the high pressure with which the master cuts elements on a wooden surface. Therefore, it is shortened and the handle is shaped so that the hand does not overexert itself and does not get tired for a long time.
Types of wood knives
A professional knife for wood carving made of metal is a serious tool designed for enormous loads. A complete set of cutters is not a cheap pleasure, because all chisels and cutters must be made of the best grades of steel, which are particularly durable - only then will they cut the material.
Reference. In addition, sharpening is important, which will not require constant renewal.
Knife jamb
Their tools are universal, used for making geometrically correct lines and elements, as well as for final finishing of the finished product.
The blade is beveled and sharpens to 600.
In the sets, the knife jamb for wood carving is presented in various sizes, for different types of wood and the nature of the work performed.
Knife cutter
A universal tool that is in the kit of an experienced carver, and should also be in the life of a beginner.
Applicable at all stages of work.
The blade is elongated, there are options straight or curved. Curved butt.
Sharpening is done at an angle of 350.
There is a modern modification that allows you to combine a whole series of knives in one item. This is a comfortable handle with a collet lock, with which you can secure the desired blade option.
Hatchet knife
A rather rare type of knife, with its help, with some skills, you can do almost everything.
It is made in the form of a small hatchet; the blade has a different “heel” and “toe”. Sharpening is a double-sided wedge, the angle is selected depending on the hardness of the wood.
This type of knife is often made by hand, choosing the thickness of the blade and the sharpening angle for a specific job. You can literally get the job done with this tool.
In experienced hands, a wood carving hatchet knife is used in its entirety: the heel, toe and middle of the blade. Cuts are made in any direction, and the recesses in the reliefs are cleaned with the nose. The central part perfectly cuts out convex elements.
Bogorodsky knife, “Tatyanka”
It got its name from the carving technique in which it was used - in Bogorodsk carving. It looks a little like the European version of the cutter, but with a longer blade and a shorter handle. Suitable for the initial stages of work and for the finishing stages.
It is characterized by a smooth edge and is partially sharpened. The Bogorodsk knife for wood carving is available in several sizes.
Detailed review of this knife:
How to make a blunt knife
Hello dear readers. In this article I will tell you how to make a jamb knife for the workshop.
For the blade, I decided to use a plate cut from a saw blade that once stood on a circular saw. This disk is all-metal, without soldering.
I cut the plate in such a way that the cutting part was slightly wider than the handle. I sawed it with a grinder, carefully, trying not to overheat.
Then I used a tile drill bit to drill two 5mm holes.
I cut out two dies from a walnut block, larger in size than the piece of iron. You can also use other materials - plastic, textolite, birch, apple, maple or oak.
I drilled holes in the dies of the same diameter as in the plate.
After that, I connected the dies using two drills in order to process the ends on the blade side, since this would be difficult later.
Now you can rivet the blade covers. I made the rivets on my jig from copper wire. The wire was annealed with a torch in advance for greater plasticity.
Numerous light blows
Use a hammer to rivet the wire until it is filled with patter.
Now you can start sanding. We attach the knife by the blade to the table and use sanding tape to grind and form a round surface. After such sanding, you need to sand it with finer sandpaper along the grain of the wood.
We sharpen the knife, making a bevel on one side, treat the handle with varnish or oil and you're done!
Source: https://zen.yandex.ru/media/id/59fd59e32f578cef49ef51c1/5ac4ff229b403c0429e865bc
Varieties of Chisels
Chisels are used for many operations:
- preparation of grooves
- chamfering
- carving along drawn contours
- carving bas-reliefs.
The shape of the tip corresponds to the task that the tool performs. It can be straight, curved, with different shapes.
Angle chisels
It looks like the letter V - it is formed by two planes that connect at different angles depending on the task. With the help of such a chisel, recesses are made. For deep recesses, chisels with a smaller angle are used.
Flat chisels
Chisels with a flat cross section. They vary in blade thickness; the cutting edge is straight or beveled.
Semicircular
This tool is a must in a carver's basic kit. The blades are semicircular and are used for cutting ornaments, making notches and cuts.
The range of sizes is very large - in height and bend radius of the blade.
Bracketed
They are also called box-shaped - by cross-section. They are flat chisels with sides. The width of the chisel and the height of the side vary.
Correct sharpening
Now, to get started, we just need to sharpen our knife.
The sharpening instructions are as follows:
- Place the blade on an abrasive block with coarse grain (pre-wet it with water) at an angle of 15 to 24 0. Using movements away from us, we shape the cutting edge until the sharpness can be felt under the finger.
- We switch to a medium-abrasive stone and repeat the operations, leaving a ground metal chamfer (burr) on the cutting edge.
Procedure for sharpening
- On a small (diamond) block, generously moistened with water, we finally remove the burr, forming a blade.
- We perform editing either on a leather belt or on a special block. For straightening we use GOI paste or a similar material, which allows us to get a perfectly sharp knife with mirror-like surfaces of the cutting parts.
These operations must be repeated regularly to maintain the sharpness of the knife, since only with the help of a perfectly sharpened tool can clean and high-quality wood carving be performed.
Editing on the belt
Additional tools and cutters
The range of additions that a master needs is large. Many craftsmen, in addition to purchased tools, also have their own developments. In the broad sense of additions, sets of skins with grains of various sizes are also part of his professional arsenal.
Klukarzy
A type of corner chisel for complex carvings with volumes. Used for ornaments, bas-reliefs.
It is similar to a semicircular chisel, but differs from it in that it is rounded along its entire length, including the neck. This ensures a smoother and easier movement during the cutting process.
Cranberries can be semicircular, angular, or straight. They are available in a wide range of sizes, so you can easily choose one for any type and size of work.
Spoon cutters
Chisels for selecting volume - with a sharp bend in the form of a circle. Usually large in size.
They are used to cut spoons, cups, and other products.
Goat legs
A stepped chisel, which different manufacturers classify as different types of tools. Russian manufacturers are inclined to consider it cranberry, while European manufacturers place it in a separate category of chisels.
Thanks to its curved shape, the chisel easily selects volumes in places that are inaccessible to other tools. Using this tool, craftsmen make lace products with a fine selection of volume under the elements.
Klepiki
A chisel for fine finishing of the relief - with their help, volumes are selected in hard-to-reach places where larger tools cannot reach.
The blade is made in the form of a leaf, marigold or sword.
How to choose a carving tool
A novice craftsman is recommended to use a ready-made set, and it should be selected in accordance with the intended nature of the carving. For relief carving you need a set with rivets and glue, creating wooden sculptures will require a large set of chisels.
Knife sets for wood carving with excellent characteristics are not a problem; there are domestic and imported products on the market. The kits are divided according to the specifics of the work or are assembled from universal tools.
Since it is quite expensive, it is better to buy a small set, but of good quality. To master the basics, several knives with straight and round blades will be enough. As the tasks become more complex, the arsenal will be replenished.
Help: Before buying, you should try the knife on your hand so that it does not slip and the handle is comfortable.
Over time, an understanding will certainly come of the need to make some knives for wood carving with your own hands - after all, this is part of the secret of the art of real masters. It is important that when the handle fully matches the contours of the hand, the hand does not sweat or slip, even if the master works for hours. This is also part of the skill that comes with time.
It is also possible that the master can do almost everything with one or two knives. In this sense, the knife hatchet for wood carving has become a real universal favorite tool for some craftsmen.
Here you can watch a video about homemade wood carving tools:
Selection and purchase
A novice carver naturally has a question: where to get a carving tool. Nowadays this is not a problem. The industry offers chisels and knives of all types and modifications. You can purchase several knives and one or two chisels, or you can buy a set of tools, guided by your own taste and financial capabilities.
Oddly enough, the wide range of carving tools makes the choice much more difficult. It's difficult to navigate and buy a really good thing. It is not difficult to become the owner of a “disposable” tool that will last for several hours of work.
Before purchasing a tool, you should definitely ask:
- grade of steel from which the tool is made;
- manufacturer;
- country of manufacture.
An instrument is an individual thing. When choosing a knife or chisel, the right thing to do is to hold it in your hands, check how convenient it is to use, and only then buy it. It would also be useful to communicate on thematic forums, where experts share their own experiences; they will be happy to give practical advice.
How to sharpen a tool correctly
Cutting wood requires a sharp blade. If the wood begins to wrinkle and crumble during work, this is a signal for the master, it’s time to sharpen the blades.
This is a separate art that every carver will have to master. With increasing skill, you will understand how to sharpen a tool to suit your hand, so you should not entrust knives and wood carving chisels to someone else.
Sequence of sharpening actions.
- Leveling the work surface . A coarse grained sandpaper is used, circle. It is important that the sharpening angle does not change, so sharpening should be done without haste.
- Change the sandpaper to a fine-grained one , taking breaks during the process so that the metal does not overheat.
- Then the working surfaces are sanded with sandpaper for finishing ; gradually they need to be changed to finer ones, up to 1200. The treatment is completed by polishing with leather with a special sanding mixture.
Watch a video about wood cutters and the correct angle for sharpening them:
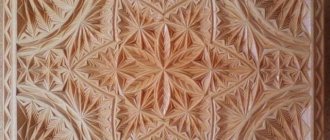
Tree in a pattern
The most important thing for a master carver is a well-sharpened tool. A sharp knife will not only give you a lot of pleasure from the cutting process, but will also help you save valuable time. Therefore, it is necessary to sharpen tools on time and with special attention.
In order to sharpen a jamb knife, you first need to grind the blade at an angle of 40-60 ° to the cutting plane. Only after this can you begin to sharpen the cutting surface. This can be done on an emery wheel, or on an emery stone (at home).
Moreover, it is best to have several such stones with different abrasiveness (grain sizes). A coarse-grained stone is used for initial rough sharpening of a knife, a fine-grained stone is used for sharpening during work.
The ideal type of fine-grained stone is whetstone (it feels smooth to the touch when you run your finger over its surface).
The knife must be wetted when sharpening on an emery block. You can also wet the bar itself to reduce the number of times you have to dip your knife.
The blade is sharpened on both sides to such an extent that a burr appears, which is then removed using a grinding (emery) block. It has a granular structure and, therefore, under the pressure of a knife, moistened grains of sand will form a grinding paste.
This facilitates the process of removing the thinnest layer of metal from the knife being sharpened. During grinding, the block should be stationary, and sharpening is done by moving the blade back and forth until the burr disappears.
The blade is ground on both cutting sides.
Now the knife has become sharp enough, but to do quality work, you need to make it razor sharp. Therefore, the cutting surfaces still need to be polished. Polishing makes the blade super smooth and clean.
To do this, you will need a piece of leather (for example, a soldier's belt), coated with a special GOI paste. This paste looks like green plasticine.
But it was only invented for polishing optical glasses at the State Optical Institute (abbreviated as GOI), which is why it received such a name.
With one hand you need to hold a piece of leather with GOI paste applied to it, and with the other hand you need to move the knife in the direction from the blade (to the right), then turn the knife over and move it in the other direction (to the left) along this surface.
The joint knife can now be used for cutting. It should be treated with care. To protect the blade, you can make a foam cover. After two to three hours of work, it is necessary to polish the cutting surfaces, then the knife will always be sharp. And cutting out patterns with such a tool will only be a pleasure.