What tools and materials are needed?
In order to make a lamp from plywood with your own hands, you need to have the following tools:
- An electric jigsaw (can be manual) and a set of files for it.
- Electric drill, you can use a hand drill.
- Piercing tool, awl.
- Small hammer.
- Burning device, you can use a soldering iron.
- A clamp or other clamping device that will be needed for gluing the elements of the lamp.
Tools for creating a lamp
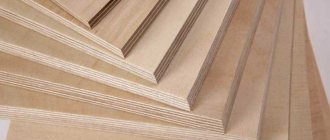
The material from which the lamp parts will be made is plywood, but it is recommended to take it of different thicknesses, since we use thick sheets for the base, and a thin sheet of prepared material for the lampshade and decor of the lamp. In addition, you need to prepare the consumables that you will need for your work:
- sanding paper of different grain sizes;
- glue brushes;
- wood glue or PVA;
- wood stain and varnish.
When choosing a model of your plywood lamp, always keep in mind that this is not interior decor, but a working device; for this reason, you must immediately think about how to mount the light bulb socket and how the electrical wire will be laid. In addition, immediately think about what type of lamps you will use: LED, energy-saving, incandescent lamps - they all have their own requirements for installation in wooden products.
Important! Experts recommend using a safer option for wooden lamps made by yourself - LED lamps, since they do not give off heat, which means that the risk of spontaneous combustion of the lighting device is eliminated.
Required Tools
Creating a plywood chandelier begins with preparing the tools. For this you will need:
- jigsaw;
- hand jigsaw;
- electric drill;
- ruler, tape measure, pencil, cardboard;
- sandpaper;
- glue;
- sheet of plywood.
It is best to take a sheet of plywood 5 mm thick. Coniferous veneer material is ideal; such plywood is soft, with a pronounced texture. Birch plywood, on the contrary, is denser, and the texture is not as distinct.
You need construction glue or casein glue. PVA is also suitable, but will hold worse, so it can be used on small table lamps.
How to make a table lamp?
If you want to make unusual lighting lamps yourself, do not be afraid that the work will seem complicated; you need to divide it into several stages, performing each one gradually, in the end you will get an original table lamp made of plywood.
- Preparing the place for work:
- a table or workbench for work, it must be clean, without any foreign objects on it;
- tools should be prepared and laid out for ease of work;
- You can work on an insulated loggia so that no one but you cleans the workplace, so you can take a break from work.
Making a table lamp
- We are preparing the material from which we will make a table lamp, as well as an electrical wire, a lamp socket, a plug and a switch:
- We choose an electric cartridge with an E14 base, its cost is about 30 rubles;
- an E14 ball-shaped LED lamp costs about 140 rubles;
- a switch and plug cost from 80 rubles.
Electrical equipment of the lamp
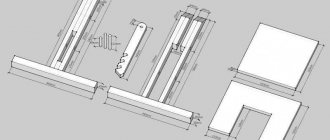
We take into account that the hole for this base must be made with a diameter of 28 millimeters, and 43 millimeters for the outer ring. We choose plywood with a thickness of 3 millimeters for work; if we take plywood of a different thickness, we need to change the scale of the sketch, the grooves must correspond to the thickness of the plywood. Before transferring the drawing onto a sheet of plywood, it is prepared, coarse and fine sanding is done.
- Transferring the drawing to a plywood sheet:
- we attach the paper drawing to the plywood sheet using buttons;
- check the overall dimensions;
- we check the layout and correctly place all the elements of the lamp on a sheet of plywood;
- We do everything carefully, without rushing; the type of future lamp depends on this work.
On the Internet you can download various drawings for making a lamp from plywood of any complexity.
- The process of cutting out the plywood elements of a table lamp is as follows:
- The internal elements are cut out first, and the lamp outline comes next;
- The jigsaw should always be held at an angle of 90 degrees to the sheet;
- cutting should be carried out strictly along the marking lines;
- the jigsaw always moves from top to bottom and from bottom to top evenly, without jerking;
- if you accidentally left the line, you need to return to it; the error can then be removed with a file.
- Take a break from work, as a lot of stress is placed on your fingers and back, and your eyes may get tired from tension.
- The assembly of the elements of the lighting device is carried out according to the instructions, from the first part to the second in order. When assembly is complete, check elements Z9–10, which should have holes for the electric socket.
Table lamp assembly elements
- The gluing procedure takes place using PVA glue or wood glue. Experts do not recommend using glue in abundance; a sufficient amount must be applied. Experts also recommend tightening the parts to be glued together using a strong thread, and then setting them aside to dry. The entire lamp gluing procedure takes no more than 30 minutes.
- We varnish the finished product with purchased wood varnish; it is effective to pre-stain it in some places. Apply the varnish in an even layer without streaks.
Interesting ideas - examples of popular models with drawings
Since there are so many varieties, it makes sense to determine the type of lamp in advance. To make it easier to understand the features, several types with descriptions and drawings are presented.
Desk lamp
This option is most often small in size and is designed to get work done or serve as a decorative decoration and an additional light source. The “Bouquet of Flowers” table lamp looks stylish and at the same time provides soft diffused lighting.
Most of the parts have the same configuration, which simplifies manufacturing.
The structure is made of 20 elements, which are arranged around a circle. They are fixed on the upper and lower platforms. A cartridge with a small diffuser lamp is also installed on the supporting part. But you can use an LED lamp of a suitable size; it gives diffused light and hardly heats up, which is important for a wooden product.
Artificial flowers are added to the finished product for decoration.
If you need to make a night light for a nursery or assemble a New Year's craft, you can use the idea from the photo below. This plywood table lamp looks modern and is simple to make: the base is cut out, holes are drilled in it for diodes, which are connected and connected to the power supply. A frame is cut out of several layers of plywood - the more there are, the deeper the diodes are located.
The product can have any shape; the good thing about the star is that it stands securely on the table.
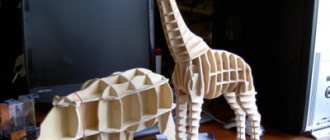
Master class: Making a table lamp in the shape of a dog from scraps of plywood.
Wall Light
Here they often use a lampshade of a suitable configuration, which is hung on a wooden or metal mount. It is easy to make a sconce from plywood using the option shown in the photo.
This option looks beautiful and is easy to make.
There is no point in indicating the dimensions, since everything depends on the required dimensions and the power of the lamp used. For the top and bottom parts, two octagonal blanks are used. Small holes are made in the top for ventilation, in the bottom there is one large one, it can be covered with a lampshade, or you can leave it if the lamp is diffuse.
All the workpieces are easy to make if you have a jigsaw and a hand router on hand.
8 identical strips are cut out on the sides, in which cutouts are made for lighting. There are no requirements here; the more cutouts, the better the light. The main thing is to make all the parts the same and secure them evenly with glue. If you make a support, you will get a stylish floor lamp.
Video tutorial: Making an LED lamp from plywood in one day.
Chandelier
When choosing a specific option for a plywood chandelier, you should take into account the design of the room. There can be many options; most often they use products from a large number of parts, which are made from thin plywood.
Such a balloon will attract attention in any setting.
Since the product is hung on the ceiling, the load most often falls on the power cable. It is worth choosing options with durable thick insulation; they can easily withstand the weight of a plywood structure. During manufacturing, the main attention is paid to the accuracy of the fit of the parts, since they must fit well with each other.
How to make a lamp from wood?
Designer lamps made of wood are perfect for the interior of a private home or farmstead; they can incorporate elements of rural life; in the photo there is a lamp using a cart wheel.
Cart wheel at the heart of the design
Let's consider the advantages of a wooden lamp of this type, which are reflected in its design:
- uniform placement of lighting lamps provides even illumination of the room;
- internal structural elements do not interfere with the passage of light;
- wood is a natural material that saturates the surrounding space with its aroma;
- It is easy to work with wooden blanks; no special equipment is required for processing the material.
Disadvantages of wooden lighting structures:
- flammability of the material, for this reason it is not recommended to use incandescent lamps with high heat output in the design of the lighting device; it is advisable to use LED lamps;
- It is periodically necessary to check the contact group in the lamp; a loose contact may heat up;
- the tree is subject to attacks by pests, as well as fungal diseases, it is necessary to treat the wooden structure of the lamp with an antiseptic;
- The hygroscopic properties of the material can change the initial design, there is a risk of cracks, therefore sudden temperature changes in the room are undesirable.
All designs of wooden lamps must take into account the distance between the lamp and the wooden elements of the device. Lamps in such products are mounted straight up, since the emerging upward flow only in this position has minimal impact on the wooden structure.
Do not use wooden lamps if the ceiling is made of flammable material. Installation of this type of lamps in the kitchen and bathroom is not allowed.
How to make a chandelier?
How creative a plywood chandelier will be depends largely on what material we will make it from:
- Birch plywood is considered the cheapest material, difficult to process, which affects the appearance;
- Finnish plywood is rated by experts as an excellent material for processing, but for independent work it is an expensive material;
- Experts recommend coniferous plywood for home craftsmen; it is not a very expensive material and can be processed well.
We divide the work of making a chandelier into several stages:
- We prepare the necessary drawing or find it on the Internet, and make a real scale of all elements.
- Transfer the sketch to a plywood sheet.
- Using an electric jigsaw, we cut out all the elements, starting with the internal lines; for this we pre-drill technological holes.
- We sand all the resulting parts of the chandelier, smooth them and polish them.
- We assemble the structural elements, treat them with stain and varnish.
- We install the electrical circuit: attach the socket, lay the wire.
Star lamp
Lamps in the form of a star are considered easy to manufacture, for them you can use plywood with a thickness of 1 to 1.5 centimeters, the work is carried out according to the above procedure, starting with a template. Holes for lamps can be made to your own taste; electrical wires are placed at the back of the structure. It is recommended to use low power lamps.
Learning to make a beautiful chandelier from plywood: making a lampshade
In order to make a beautiful, modern and very cheap to make lampshade, you do not need any special carpentry skills, nor expensive materials and tools - the main thing is the desire and availability of 6-7 hours of free time.
Today there is an endless variety of chandeliers on the World Wide Web, so the first place to start is to decide on the design that appeals to you the most.
and select the necessary drawings. If you don’t have confidence in your abilities, it’s better to start the process of exciting creativity with simpler models, for example, with this one:
If you don’t have the skill to work with plywood, it makes sense to first practice cutting out simple shapes according to a template, for example, the plates from which the lamp in this picture is assembled:
submitted to the master on the third day of mastering the jigsaw.
By the way, about tools: in order to master making a lampshade with your own hands, you need to have the following in your work corner:
- 5-6 sheets of sandpaper, ruler, pencil, paper, compass.
- Hand jigsaw with a set of files
- Electric jigsaw – for simple work
- Electric or hand drill for drilling holes for fastening points of elements.
- Glue – casein glue is suitable, although carpentry glue is preferable;
- A set of clamps for securing plywood to a table or workbench.
You should start by mastering the techniques of working with a jigsaw, which a short video at the end of the article will help you with.
If you can train on any sheet of plywood, then to make a chandelier from this material you need to decide on its type: the so-called. “Finnish” plywood is the most elastic; accordingly, the most complex figures “with a bend” can be made from it. Regular birch plywood is the cheapest, but products made from it are also rough. But coniferous veneer represents the “golden mean” in terms of price/quality ratio, and most hand-makers prefer to cut crafts from it.
- A suitable socket is selected and mounted in the lampshade, approximately as shown in the figure:
Making a chandelier with your own hands is completed. If you did everything exactly according to the templates, took your time and carefully cut out and processed the elements of our original lamp, then it can become an excellent decoration for your home for many years or a great gift for loved ones!
Considering that the cost of such a product usually does not exceed 500 rubles, you can update the interior of your apartment at least every year, gradually improving your skills.
How to make a wall lamp from plywood?
Correct design lies not only in the proper placement of furniture, but also in the correct lighting of the space; this can be helped by making sconces from plywood yourself; such lamps are suitable for any interior and will add a special atmosphere to the room when the overhead lighting is turned off.
There are many options for making wall lamps, which can affect the appearance of the room in different ways:
- the use of unnecessary things in addition to wood in the structure, for example, connecting parts of a water pump and a wooden structure;
- The original lamp is made from a single piece of wood with wood selected from the inside and colored glass elements.
Wall lamp from sticks
Instructions on how to easily make a wall lamp (sconce) from sticks:
- you need to take a board and give it the desired shape, attach a hook to it;
- we make a lamp from sticks of the same length, assembled in the form of a well;
- we assemble an electrical circuit, a socket and an LED lamp, we route the wire through a decorative holder that is attached to a hook, the result is an almost fairy-tale sconce lamp.
Openwork decoration
For those who want to update their interior and replace old things with something more original, it is not easy to decide where to start, and there is not always enough money for repairs and renovations. Therefore, you can make some elements for decorating your apartment yourself. In this master class we will learn how to make a beautiful openwork chandelier from plywood yourself. Before you start work, first of all you need to select a lampshade model and find drawings.
What we need for this:
- main material – plywood;
- beautiful fabric or lace;
- glue, it is better to use PVA.
We take plywood and draw identical circles on it, after which we cut everything out. We make sure everything is one to one. Next we need to fold them into hexagons, inside of which we cut out round holes. Now we move on to the fabric from which we need to cut circles; the diameter is greater than in plywood. All that remains is to decorate our lampshade with fabric.
Related article: Beaded Christmas tree: master class on weaving a New Year's accessory
To do this, we stretch the fabric and glue it to the round parts. But we should leave two untouched in order to insert the socket and lamp, and we also need an outlet for hot air. You need to use a file to make such entries in order to fold these hexagons one into one. This is how we fold our chandelier.
Let's look at the main photo of how it should look:
Tips and tricks at work
Experts recommend that novice lighting equipment designers pay attention to the following recommendations and tips:
- When working with plywood or wood, use safety glasses or a mask;
- from a lamp with one light bulb there are two wire strands - one phase, the second zero, the phase always goes through the switch, zero is connected to zero directly;
- when a lamp has many bulbs, there will be more wires, but the switching circuit works on the same principle;
- It is optimal to place wall lamps at a height from the floor covering from 1 meter 20 centimeters to 1 meter 60 centimeters;
- in corridors, the installation height of sconces is recommended at 2 meters.
We can conclude that anyone with skills in working with a jigsaw and knowledge of electrics can make their own lighting device from plywood or wood, not only in the form of a chandelier or floor lamp, but also in the form of a wall lamp for a children’s room.