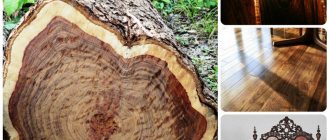
Burls are growths and thickenings that are found on the trunks of birch, maple, oak, walnut, pine, etc. The following swellings occur in areas of tissue proliferation:
Its name comes from the Slavic “cap” - head. And indeed the burl resembles a human head on a tree. Burl is found on the branches of old trees and trunks. There is also a burl root, which is a burl that forms at the root part of the tree. The largest capo roots reach 2 m in diameter. Furniture is often made from capo root:
How it is an unusually durable and extremely decorative material, which is valued on a par with valuable wood. The texture of its pattern when cut is an interweaving of annual layers, the core of dormant buds in the form of concentric circles and dark dots. There are more dormant buds in the stem burl than in the root burl, so its texture is more expressive:
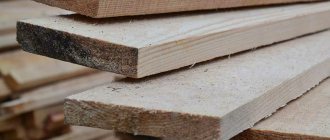
Burls are harvested only from fallen trees in sawmill areas. After the burl is cut, it is freed from bark, knots, and resin. Then the workpiece is boiled in a 5% solution of table salt. The duration of boiling depends on the diameter of the workpiece: up to 10 cm in diameter, boil for about an hour, large pieces are boiled for up to 3-5 hours.
Boiling is necessary to neutralize the juice inside the workpiece, so it dries faster. After boiling, until the workpiece has dried, it is cleaned of any remaining bark. Boiling makes the texture of the design more expressive. Then the workpieces are dried for several weeks indoors, or for several hours in a drying cabinet or on a radiator. After this, the burl is sawed into plates. After this, give full rein to your imagination, making sure that your plans do not contradict the natural beauty of the wood, emphasizing its structure. The inner part of the product is selected with an adze, semicircular chisels, and cranberries. When finishing the product, excess knots are removed, trying to reveal the interplay of different layers of wood, and sanded with sandpaper. Small cracks can be filled with putty by mixing small sawdust with PVA glue. If desired, the product can be tinted with stains or natural dyes, such as onion peels, alder cones, etc. You can coat the finished product with varnish or wax mastic.
Burls are used to make beautiful boxes, smoking pipes, chess sets, and knife handles:
Burls also make very decorative vases, candlesticks and simply sculptures for decorating the interior of natural shapes:
- Related Posts
- Pictures and sketches for wood burning. Flowers, fruits, berries, cereals
- Wood intarsia. Video of intarsia technique
- Sculptural wood carving. Making a talisman staff. Sketches
« Previous entry
Harvesting wood for crafts
Discussion: 14 comments
- Angelina:
08/06/2014 at 2:09 pmFew people engage in this craft, and at sawmills they are generally thrown away or burned
Answer
- Paul:
09/29/2015 at 1:10 pm
Actions for boiling burls in salt water, drying them for many years, steaming them in shavings, etc. - is a meaningless “witchcraft” that prevents people from getting involved with growths. Cooking is only needed if the bark needs to be removed, exposing the needle-like structure of the wood surface.
In other cases, replace boiling with microwave heating of the burl, followed by drying and sawing into plates. It is better to add color to the burl at the stage of painting the finished product, followed by fine grinding and polishing. 1. It is better to dye with fat-soluble dyes. The rest somehow mask the texture of the material. 2. You can use the “internal” capabilities of wood to reveal its texture. Wood is a complex composite of cellulose and lignin. Each of them has its own areas and directions of thermal decomposition. For example, caramelization of cellulose when heated gives the burl a color from yellow to honey and then to dark brown. Heating can be done by “dry” steaming or boiling in oil. The latter itself produces dyes when burned: the older (blacker) the oil, the better. Lignin, as a derivative of hydroxycinnamic alcohol, binds metal ions, such as iron, well, but this has already been written about here - how to etch a surface with iron salts. I will only say that additional heat treatment of wood impregnated with certain metal ions gives a beautiful contrasting black and white surface pattern. But at the same time, the “depth” and pearlescent quality of the burl are lost.
Answer
Alexander:
10/14/2015 at 7:15 pm
Why such categorical statements about cooking the workpiece? As a rule, such statements are made by people who themselves have no experience in this matter. I work quite a lot with suvel and burls and I can assure you that cooking in salt water is an excellent way of drying. And if you also need to paint the wood, then sawdust or bark is added to the solution. They paint the workpiece. I also tried drying it in a microwave oven. Yes, the method is suitable, but only for small workpieces.
Answer
Paul:
10/23/2015 at 12:29 pm
I dare to assure you that I have been working on a daily basis since 1993. And he developed the technology entirely himself - as a professional chemist (there was no miracle Internet then :)). I couldn’t find any difference between “passive” drying of a burl with a saw cut coated with nitro-varnish and “drying” by boiling down. It's just less hassle. I prefer to paint products after they are made: it is easy to change the palette and penumbra, from one piece you can make products with different color saturations, and not as luck would have it with “traditional” technology.
Answer
- Natalia:
11/22/2019 at 4:40 pm
There are blanks and even finished products available. Dad was engaged in this craft, he is no longer there, it’s a pity that they are lying around, there are quite a lot of them. write, maybe you need them
Answer
Vladimir:
12/10/2019 at 11:42 am
Hello, do you happen to have a few blocks of burl or suveli?
Answer
- Lyudmila:
01/15/2020 at 4:19 pm
Your message about preparing burls aroused interest... Is it still relevant? Or did you break up with them? If possible, send a photo via email. Thank you and see you later.
Answer
- Andrey:
03/02/2020 at 11:42 pm
Good afternoon! Is your offer still valid regarding blanks and finished products? maybe there is a tool?
Answer
- faith:
03/19/2020 at 3:05 pm
Natalya, if the offer is relevant, write to the mail. Interested in pieces of wood. Thank you, Vera
Answer
10/23/2015 at 12:42 pm
...and now I looked at a piece the size of a head, steamed for 40 minutes in the microwave in 4 approaches with an intermediate exposure for steam to escape. After two weeks it is dry, without cracks. I dry it with bark, because I like to include sections of bark in the composition. To prevent them from rebounding and shrinking when the texture contrasts, I pre-impregnate the area with “epoxy”, having previously heated the product to 100-110 C. Its remains on the outside are then carefully sanded off.
Answer
- Sergey:
03/11/2018 at 6:58 am
I can ask you a few questions, I’m very interested in this topic. Please write to me by email
Answer
11/02/2015 at 1:30 pm
I was waiting for the discussion to continue... I'll have to have a monologue :)
Drying by boiling in salted water, of course, looks original. Wet to dry. All the “salt” of such drying is in the salt. Due to osmotic pressure, the cells in the wood burst. This promotes rapid removal of water from these cells. Microwave treatment gives the same thing - the cells explode from the inside with steam.
Normal drying cracking is caused by the thinner parts of the wood drying faster and shrinking. All tensile stresses during this shrinkage go to the thicker, still wet parts and cause them to crack. To eliminate this phenomenon, you can adopt techniques from ceramic technology - paint the thin parts with waterproof paint (or paraffin), leaving a free spot of wood just opposite its thick part. Then there will be no warping or cracking. I didn’t try it, because I almost didn’t work with large burls that didn’t fit in the microwave oven, and if there were rare ones, I completely painted them over and dried them in the pantry “through the bark” for a year.
Answer
- Alexander:
02/17/2017 at 12:24 am
I came across an elm burl 1 meter in diameter. Can you tell me how to dry it? I'll try to work with him..
Answer
03/02/2019 at 5:16 pm
Pavel, can you tell me more about microwave drying? What is the total time? How many breaks? How long are the breaks? Temperature?
Answer
What are cap and suvel and what are the differences
Many knife lovers or hunters make knives themselves, and most of them order the necessary components from online stores: a blade, a bolster, a butt pad, a block of exotic wood.
It’s about the last one, that is, about the tree, that I want to tell you. I have worked with different types of wood: bubingo, merbao, different types of walnut, beech, ebony... But here we are talking about a completely different type of wood. About our Russian birch burl and suveli. What is it and how to prepare wood yourself for subsequent processing and achieving the final result - a knife handle?
The harvesting method is not new, and I am not the author of the technology described. I gleaned some information from the Internet, and read some from books on artistic wood carving. I simply managed to systematize the experience gained and adapt the technology of drying burl and suveli wood to my conditions.
The result is a completely workable and not too tedious technology. But first, I’ll explain what is cap and what is suvel. Often, not only people who are far from nature, but also experienced hunters confuse these concepts. And for some reason girls generally call cap and suvel chaga. Although chaga is a parasitic fungus that grows on the surface of a tree.
Suvel is a growth on a tree trunk with a bizarre, intertwined arrangement of fibers.
A burl is a suveli-like growth, twisted in the arrangement of its fibers, from which many small branches also grow. Thanks to this, the structure of the burl acquires not only curliness, but also beautiful rings, stains and wormholes.
With proper processing - drying and impregnation (which will be discussed below) such wood becomes not only extremely beautiful, but also viscous.
How burl and suvel are formed on wood, I cannot say for sure.
In different sources, respected people, experts in their field, put forward different theories, I read quite a lot of them. First stage
made of wood, plywood, cardboard, tape reels, plastic baguette
An elegant box with a lid for one or several compartments is needed everywhere, from the office of a large businessman to the bedroom, bathroom or living room. Making a box with your own hands is not at all difficult; amateurs make unusually beautiful objects from various scrap materials. Today, the Homius editors have prepared several step-by-step master classes with detailed descriptions of making and decorating boxes that will not only be a wonderful decoration for any interior, but also a wonderful gift.
A designer box can be made from affordable and simple materials that are found in every home PHOTO: mylittlefrance.ru
How to make a wooden box with your own hands
In the first master class we will tell you how to make an elegant wooden box. Simple work does not require much time, complex calculations or expensive materials. You can even use unnecessary scraps lying around in the pantry.
A well-polished box is beautiful even without additional decoration PHOTO: yandex.uz Solid wood boxes look unusual PHOTO: yandex.kz Decorating a box in the shabby chic style PHOTO: yandex.by Even simple milling will become an elegant decoration for the box PHOTO: livemaster.ru
What you need to make a box
A solid piece of wood is suitable for our box. It is preferable to use cherry, but other species can be selected. In addition, you need to prepare the following:
- wood glue and brush;
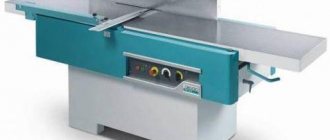
- band saw or jigsaw;
- clamps;
- chisels of different shapes for figured carving;
- wax or oil for processing the finished product.
Sketch of cutting a solid piece of wood PHOTO: woodschool.ru Sketch of the blank for the lid and bottom of the box PHOTO: woodschool.ru
Step-by-step instructions for making a wooden box
Making a box from wood requires certain skills in working with the material. Let's look at all the stages in more detail.
DIY box
How to make a box from a jar and satin ribbons
Such a small box will make an interesting gift, and it is easy to make. How to make topiary with your own hands, watch master classes here.
Let's collect the necessary materials for work:
DIY GIFT box / MASTER CLASS / Elena Shevchenko
- small plastic container 6 cm high.
- paper tape.
- scissors.
- shiny packaging foil.
- PVA glue.
- openwork braid for decoration.
- brocade ribbon 2 cm wide.
- two decorative leaves with glitter.
- glue gun
- needle with thread.
- lighter.
So, let’s take a container of the required size with a closing lid.
To ensure that the foil adheres firmly to the plastic, all necessary areas should be treated with paper tape. If desired, you can also seal the inside of the jar. We just don’t touch the place of the thread, the connection between the cover and the base.
Next, cut out all the pieces for the box from shiny pink packaging foil. In a circle for the inside and outside of the lid. Two more mugs for the bottom of the jar itself. We measure the side strip along the container itself and cut it out with an allowance of 1 cm for folding to the bottom of the box.
And then we fix everything with PVA glue, it takes time to glue. You need to try to process the rounded parts. If necessary, when bending, make small cuts with scissors.
Only after the box has completely dried will we begin to decorate it. We will use a beautiful braid along the outside of the jar, placing one strip closer to the bottom of the jar. But if the inside was also pre-treated with tape, then it should also be covered with foil.
And on the lid we will close its entire narrow side part. And again we give time until the glue dries completely.
In the meantime, let's start making a roof decoration from ribbon. Ours is made of brocade, 2 cm wide. We cut 8 strips of 6 cm each, and process the cuts with a lighter. And with a needle and thread we make petals out of them. Let's look at their implementation step by step.
First, we lower one upper corner to the bottom cutting line and immediately at the bottom with a needle we make small stitches along the folded corner. Next we lower the second upper corner, but on the other side. And with a needle we will continue to secure this edge along the bottom edge. Then you just have to pull the thread a little and you get a petal. We make all the details the same way, only in one petal you need to pull the thread tightly.
We will assemble the flower from 6 parts. We arrange them in one row, overlapping them slightly with one petal overlapping the other. And with a thread and a needle we again make small stitches along the bottom, connecting the parts together.
All that remains is to connect the first and last petals into a circle and pull them together, leaving a small hole. Gather the remaining two parts together like a bud and insert it into the middle of the collected petals. We fix the assembled flower well with a thread along the wrong side.
Next, we cut two 16 cm cavities from the same tape. Separately, fold the strips in half and secure with thread. Then we simply overlap the resulting two parts together with a slight twist and fasten them together.
All that remains is to secure the finished flower to the resulting bow with a thread.
Then we apply two more suitable shiny leaves and sew them on the wrong side to the ribbon blank.
Finally, using a glue gun to securely attach it to the foil, carefully glue the resulting composition onto the middle of the box lid. The gift in the form of a box is ready.
Ice cream stick box
Every girl loves all kinds of jewelry, but sometimes there is nowhere to put it. If you are faced with such a problem and don’t know how to solve it, then this master class will help you. But for this you will need to stock up on a certain number of ice cream sticks. In the end you will get such a charming box for small things.
If you like, then prepare everything you need for this:
- ice cream sticks (the bigger the better),
- glue gun,
- decorative elements.
First we need to make the bottom of our box from 8 sticks.
Place one stick at the top and bottom, 1 cm apart from the edge. The lid of the box will look exactly the same.
Next we glue it on the opposite side along the stick.
This is how the walls of our box will be lined up.
The more sticks you place, the higher the box will be.
For such a low box it took about 40 ice cream sticks. If you have more, you can build the box higher.
In such a low box all sorts of hairpins and nice little things will fit.
You can decorate it in any way you like - beads, buttons, rhinestones, and ready-made flowers will do.
In our case, we used a ready-made composition made of satin ribbon. It turned out very elegant. As you can see, it was not at all difficult to do, the main thing is to have a little patience and desire.
Casket made from a cardboard box
Box with cells made from tape reels
In this lesson, I offer beginner needlewomen a master class on how to create an interesting box with cells made from tape reels. See how to make other paper crafts here.
For work, I collected the following materials:
3 burl boxes for sale
- 2 pieces of different wallpaper;
- 4 spools of tape;
- ruler;
- glue gun;
- tube with PVA glue;
- simple pencil;
- scissors;
- a piece of thick cardboard;
- pink half beads.
First, I found a piece of wallpaper that was left over from a recent renovation. And I took 4 reels of tape.
I measured the height and circumference of the cardboard rings, and then drew the desired stripes on the white side of the wallpaper. It turned out 4 stripes 7 cm wide and the same number of narrow strips 4 cm wide.
I used these blanks for gluing rings. I glued wide strips to the outside of the bobbin. I made cuts on the protruding edges, folded them over and glued them inside the ring.
All that remains is to glue narrow strips into the middle of the paper rings with PVA glue.
This is how beautiful the tape spools look now. They will be the inside of the box.
I started the second stage - making the outer part of the craft. To do this, I took a piece of thick cardboard and drew three blanks on it. You need 2 squares 20 x 20 cm, and 1 rectangle with dimensions 20 x 5 cm.
I cut out all the cardboard blanks and glued them to wallpaper of the same shade as the reels. The rectangle was placed in the center, and the squares were laid out on the sides of it at a distance of 6-8 mm.
I glued the edges of the paper inward and covered them with a rectangle of the same wallpaper measuring 45 x 19 cm.
The result is the outer part of the box, which easily bends in 2 places.
Next, on one of the squares, using a glue gun, I fixed 4 rings in two rows at the same distance from one another.
And the second part became a lid that fits tightly on top.
The last stage of production remains - decor. I decided to make it from wallpaper in a contrasting shade. I cut out 10 flowers (five larger and the same number of small ones), as well as oval-shaped leaves with sharp edges.
I glued small flowers into the center of large ones and placed them in a circle on the lid of the box. I glued the leaves between them and in the very center. A pink half-bead fits perfectly into the middle of each flower. It turned out simple and at the same time elegant.
But something was missing. I also wanted to make the corners for the box in the same shade as the flowers. I cut 4 squares of 4 x 4 cm from dark brown wallpaper. On each of them I drew smaller squares measuring 2 x 2 cm and drew one diagonal.
Then I bent all the blanks along the lines into small squares.
I glued the bottom and sides. We got these corners.
The top corners were rounded to make them look more beautiful.
I glued the blanks to the corners of the lid and bottom.
That's it, your DIY bobbin box is ready! Round cells are very convenient for storing beads and beads for needlework.
This thing is a pleasure to use, it opens easily and looks cool both outside and inside.
This original box is made from tape reels, thick cardboard and two pieces of old wallpaper.
The box can become an original souvenir that you wouldn’t be ashamed to give to your best friend. She will definitely figure out what to store in it. Read about the quilling technique here.
Master class on decorating a box in vintage style
In every home there are little trinkets dear to the heart that are not needed and would be a pity to throw away. It is for such things that a box in the “vintage” style with an aging effect was made. You come home, open your “antique” box, take out the contents and plunge into pleasant memories.
For work you will need the following items:
- box made of wood or plywood;
- acrylic primer;
- acrylic paints;
- decoupage glue;
- napkins for decoupage;
- craquelure varnish;
- acrylic varnish;
- sandpaper, scissors, brushes, spatula.
Master Class box “Nostalgia”
Procedure 1. Sand the box with sandpaper. 2. Cover with acrylic primer using a spatula and let dry. 3. Paint with white acrylic paint and let dry.
4. Cover with craquelure varnish. Let dry for at least 2 hours.
5. Paint with black acrylic paint. During the drying process, cracks form through which the white paint becomes visible. Allow to dry completely.
6. While the drying process is underway, you can select suitable napkins and cut out the necessary fragments.
7. By attaching the pictures to the box, we find suitable places for them. Before gluing, you need to clear the surface underneath until there is white paint. To do this, you need to take a small piece of cloth or napkin, moisten it with water, and in those places where you plan to decorate, wipe off the black paint carelessly and carelessly, thereby creating scuffs like on antique things.
8. Lubricate the surface of the box in those places where the pictures will be pasted with decoupage glue. We apply the picture and cover it with the same glue on top, observing the direction of the brush - from the center of the picture to the edges. Allow to dry completely.
9. If you really want, you can add abrasions using sandpaper. If in your opinion the image of a vintage box is complete, it can be coated with acrylic varnish, preferably in 2-3 layers.
Thus, we received a wonderful box made using the decoupage technique using craquelure varnish and other methods of aging the surface.
Master class box “Nostalgia”
DIY box made of cardboard and boxes “Mom’s Treasures”
In this lesson we will make a “Mom’s Treasures” box with our own hands. You don't need any skills for this. All materials can be purchased at any office supply store.
You will need:
- Whatman paper (thick) 1 sheet of A1 format and 4 sheets of A3 format;
- scrapbooking paper 3 sheets with a density of 180 grams, size can be taken 30.5 by 30.5 centimeters;
- glue moment (more suitable Crystal);
- pencil;
- paper knife;
- knitting needle;
- ruler;
- glue stick;
- meter of satin ribbon;
- thick cardboard;
- various decorations.
Box as a gift
The box will be square in shape, and inside there will be 4 small boxes for storing valuables.
You should start with small inner boxes. To do this, on sheet A3 you should draw the base of the box and the lid.
Chest, casket, cardboard box. Master class.Universal organizer, box.
An iron knitting needle or a pen rod is needed to make creasing. If this term is not familiar to you, don't worry. You need to take a knitting needle and, pressing it to the paper, draw along the fold lines several times. This is done so that the folds on the front side are neat and the paper does not crack.
Then you need to cut out the base and glue it, as shown in the photo. We carry out the same manipulations with the lids for the boxes. Glue a pencil with glue.
When all 4 boxes are ready, you can begin making the box itself. First you need to put all the boxes together and measure all sides. In order for the boxes to easily fit into the box, you need to add 0.5 centimeters on both sides. Then, based on the measurements obtained, you need to draw a diagram of the base of the box on a sheet of Whatman paper A3.
Before gluing the base, you need to crease along all the lines. Then bend the base along the lines, put 4 small boxes inside and try on everything to see if everything is fine.
When the base is glued, you need to make a lid for the box.
It is necessary to measure the base and add a centimeter to each side. Taking into account the measurements obtained, we cut out 2 sheets of cardboard. Then, measure the height of the base, add 1 cm and cut out a strip of cardboard, as shown in the photo.
We lay out the resulting pieces of cardboard on whatman paper, leaving a margin of 2 centimeters on each side. We cut off the excess and glue all parts of the cardboard.
Be sure to crease around each piece of cardboard. Next, you need to bend the edges of the Whatman paper and glue them tightly to the cardboard.
We take the tape, cut it into two parts and glue it to the inside of the lid with glue.
Now the inside needs to be decorated. To do this, you will need scrap paper, measure and cut it so that it hides all the errors in the lid. Scrap paper is usually not large in size, so we separately glue the missing fragment. The joint will not be visible, since the base of the box will be glued at this place.
We glue the base to the lid so that it holds better, using instant glue.
The base of the box is ready, let's start decorating.
We cover the front part and all the side parts of the box with scrap paper. We cover small boxes with scrap paper and shaped napkins.
Finally, we decorate the front of the box with flowers or any other decorations of your choice. We glue all the decorations with instant glue. The ends of the tape need to be slightly burned with a lighter. Small boxes can be signed by hand, or print out the inscriptions and glue them to the lids. See how to knit amigurumi toys here.
This is such a cute “Mom’s Treasures” box, which will be an excellent gift.
Master class: making an exclusive burl box. Part 1: preparation of the workpiece
I’ll tell you how you can make a very beautiful and original box.
The material for the preparation is Siberian larch burl.
We will cover the inside of the box with artificial velvet, and for ease of use, I “place” the lid on two small magnets (their diameter is 6 mm). Then, if you accidentally drop or turn the box over, its contents will not spill out; you must agree, this is convenient.
When finished, the box will be coated with oil and Belinka oil-wax.
I found the preparation itself in the taiga; it was dried under natural conditions for 2 years.
39) (PART 2) The most detailed master class on doll boxes! Amazing result!
As can be seen from the last photos, the workpiece is covered with bark. It needs to be cleaned using a figured chisel.
We remove excess using a cutting machine.
And then we clean the surface with an angle grinder.
The top of the box looks like two humps. It is clear that with this configuration of the upper part, it will not be possible to make a normal lid. Therefore, I have to remove another part of the workpiece (my finger points to it).
Using an angle grinder, we work on the workpiece, removing the bark and sanding the sharp corners of the burl.
At the same time, I leave part of the bark, its thin layer here and there in the recesses, so that its color and texture give greater originality to the workpiece.
This is what we got.
Now you need to form the lid of the box. I do this on a large cutting machine.
I secure the workpiece between two bars.
Using a wedge, we strengthen our fastening of the workpiece.
And we cut off the future lid of the box.
This is what we have.
Since the machine disk has a thickness of 3.5 mm, a ledge has formed between the lid and the body of the box.
We trim it with an angle grinder.
We will assume that the workpiece is ready.
I’ll tell you what to do next in the next parts of the master class.
Where can I find a cap?
Growths grow on trees. Therefore, you need to look for them in the forest. However, this is not so simple, because the mouth guards grow spontaneously, and only the most stubborn and big-eyed can see them. The growth can only be cut off with a very sharp saw. The best place to find burl is at logging sites. There these growths end up in waste. At logging sites, you can also find caporoots, which you simply cannot find in the forest.