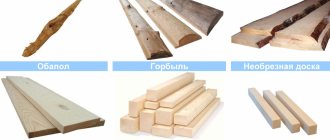
The main causes of wood deformation
- Changes in temperature and humidity
- Improper drying
Changes in temperature and humidity
A natural material such as wood tends to absorb water. In a room with constant high humidity, wood will absorb water and swell. This will ultimately lead to deformation. The same thing happens from temperature changes in the room. Especially in combination with high humidity.
Improper drying
The largest percentage of deformation occurs during drying. It happens that they sell you under-dried boards, which then, when dried under natural conditions, can warp. The fact is that moisture from the wood does not evaporate evenly along its entire length. This creates tension in the wood fibers. This stress ultimately leads to deformation.
Or you bought good quality boards, they were delivered to your site. They lay in a damp garage, so the geometry of the material will be disrupted. It’s a shame to throw away such material, but it’s also impossible to use it for its intended purpose.
So what should we do? You can try to correct the deformation.
We offer 4 working methods for leveling the board.
The board can be leveled:
- Using a plane
- Exposure to heat and moisture
- Steam processing with pressing
- Leveling under pressure
Learn more about each method.
Classification of circular saws
Edge-cut. With mechanical feed machines, 90% of the time is occupied by automated processes. With their help, you can make preliminary or final cutting of materials - make edged boards, timber blanks, sheet materials, trim slab materials, parts lined with natural veneer, laminate. The type of saws on circular saws depends on the material being processed. Saws made of hard alloy or with fine teeth are suitable for cutting chipboard and fiberboard. It is better to choose saws with the smallest diameter that are suitable for the given conditions in order to reduce power consumption and reduce the width of the cut.
Trimming. Machines with a cross-cut carriage are designed for cutting ends, including at a given angle. The number of saws is one or two. Most often, workpieces are fed manually, while on some machines the workpiece is fed onto a saw, on others, a rotating disk is pushed onto the workpiece. The quality of the machine is determined by the accuracy of the work, on which the geometry of the materials depends. The size of the saw and the material depends on the drive power. Saws of small diameters are more stable in operation, provide a better quality cut, and the teeth are easier to sharpen.
Multi-saw. The saw unit includes up to 10 circular saws mounted on a horizontal shaft. For longitudinal sawing you need saws with a diameter of 300 to 500 mm with tooth profiles I and II made of hard alloy steel, for transverse sawing - with profiles III and IV. They allow you to produce several workpieces in one pass, thereby increasing the profitability of production. The resulting blanks are of high quality, and frozen wood can be used as a raw material.
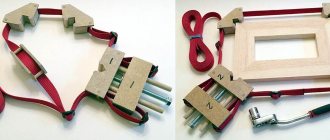
Leveling the board with a plane
The method is quite simple. Use a plane to remove wood from the uneven area until the surface is level. It should be borne in mind that the thickness of the board will decrease. Therefore, this method is suitable for correcting small curvatures.
Important: take a plane with a long sole.
This is necessary to avoid the appearance of waves on the board from the plane.
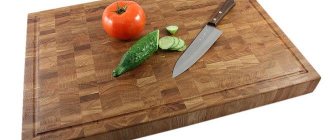
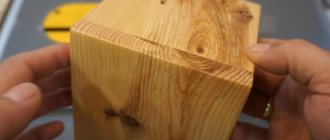
DIY end cutting board? Easily!
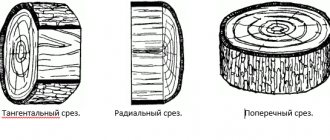
Lately, end cutting boards have become extremely popular. What are they and how do they differ from ordinary cutting boards found in every kitchen? Everything is simple here: in the standard cutting boards we are used to, the wood fibers are parallel to the surface of the board, and in the end ones they are perpendicular . This key difference gives end boards a number of advantages over their regular counterparts. The main one is that the end board wears out less and also dulls less the knife you use to cut food on this board. And all thanks to the movement of the knife “along the fibers”. When using an end board, the knife seems to “spread the fibers apart,” and subsequently they return to their original position. At the same time, both the sharpness of the knife and the board itself suffer less. In the case of a regular board, the knife simply cuts the wood fibers crosswise, which quickly destroys the board and dulls the knife. With intensive use, pieces of wood may even separate from the board. For clarity, I drew schematic pictures:
End cutting boards are usually made from hardwood : oak, ash, walnut, cherry, maple. Exotic breeds are also used, but in small quantities due to their high cost. The simplest end boards are simply rectangular pieces of one type of wood glued together, but there are more complex options that combine bars of different shapes and different species, usually of different colors and textures, to create an interesting pattern on the surface of the board. There are also truly unique products with a so-called 3D pattern.
To make my first end cutting board, I decided to choose not the simplest option, but decided to use wood from at least two different species to obtain at least the simplest pattern - “checkered”. When combining several species in one board, the density of the wood should be taken into account - it should not vary greatly between the species being combined, otherwise there is a risk of cracks and other defects. After a little analysis, I chose beech and ash: these species are similar in density, but have a fairly pronounced difference in color cuts. I purchased small bars, approximately 500x150x50 in size, which, according to my calculations, was enough to make even two medium-sized boards 250x350x40. Looking ahead, I will say that I incorrectly took into account the consumption of material at some stages of production, and only one board came out. These bars cost me about 900 rubles each. For the first time, it would probably be more logical to take something cheaper, for example, oak. From the tools we need, we will need a full set of carpentry machines: a jointer, a planer, a circular table and maybe even a miter saw.
Related Posts
A single cross-cut of a board can be done with a cutlass, an electric jig, or just a hand hacksaw. with varying degrees of accuracy, speed and manpower. But when you need to cut the size of thousands of boards, aluminum or plastic profiles, it is better to use a specialized tool: trimming or cross-cutting (it has a mechanism for limiting the cutting depth) saw (machine).
By the way, where does this name come from? A mustache is not only decorative for a carpenter. miter sawing means making a cut at an angle to the longitudinal axis of the workpiece, not to the full thickness, forming a through or tenon pin.
WRONG?
In everyday life, an expensive and rather bulky device will probably be overkill, but if you regularly need to carry out various types of construction, installation, finishing, carpentry or furniture, including small-scale production, then this is a great assistant. Using a miter saw, you can, for example, erect a frame building, sew the walls of a country house with lining, install blinds or door panels, lay parquet or solid boards, etc. Such an electric tool performs the operations of cutting the ends of workpieces at a right or a certain inclined angle to their longitudinal axis, cutting ends at an angle to the normal to the surface, selection of material to a certain depth. With combined sawing, the cut is both oblique and at an angle to the workpiece.
Trimming line for edged lumber LT-1T
Trimming lines are designed for end cutting of lumber of a given length and trimming of wood defects. We offer to buy the LT-1T trimming line of our production, which is designed for woodworking and furniture enterprises and is suitable for the production of carpentry, furniture, and building materials. Order the line through a special form, we will contact you to discuss the details.
How to cut a board smoothly with a simple hacksaw
A hacksaw is a simple tool needed for cutting various materials. The process is energy-consuming and progresses at low speed. Despite this, a hacksaw is the most popular tool needed for cutting boards, timber and other materials at home.
Varieties
Modern experts distinguish the following types of hacksaws:
- necessary for cutting wood. With its help you can work with logs, boards, chipboard leaves. The process is simple, a person with minimal knowledge in this area can handle it;
- capable of sawing metal products. A narrow and thin file with fine teeth is attached to the C-shaped frame. To make it convenient to work with the tool, there is a special handle made of rubberized or plastic material;
- working with concrete. The teeth, unlike other types, are larger.
The wood saw is easy to use and lasts a long time. The choice of tool must be made depending on the size of the board. You need to pay close attention to the length of the teeth. A saw with teeth equal to 3.5 mm can cut soft wood perfectly. To cut hard wood products, you should take a hacksaw with a tooth size of 5 mm. Be sure to sharpen the tool before cutting.
How to make a cut at an angle of 45 degrees?
This angle is found in the manufacture of various products. Let's start the cutting work. First, the saw blade moves ninety degrees. Depending on the model, there is a bolt with a red handle on the side of the sole that needs to be loosened.
After which the sole is shifted at an angle of forty-five degrees and the bolt is fixed back. We take a piece of chipboard as a blank. We fix it with clamps on the tabletop so that the part that we will cut off extends beyond the table.
Afterwards the ruler is set. It is usually included with the circular saw. The saw has 2 marks zero and 45. We will cut off 30 millimeters, for which we combine the three on the ruler with the mark forty-five on the sole. Then you need to tighten the bolt that secures the ruler.
Next, the sole must be positioned so that the ruler rests against the edge of the workpiece. The saw is started and after it is fully untwisted, pressing the ruler tightly against the edge of the workpiece, they move in the forward direction.
Stages of work
To cut a workpiece quickly, you need to proceed in stages:
- Take a board of the required size and decide on the tool. If the workpiece is large, you should use a hacksaw with large teeth. For smaller wood materials, use a saw with smaller teeth.
- The necessary markings are applied with a pencil and ruler. Draw lines that are barely visible to the naked eye. You need to follow the well-known proverb: “Measure twice, cut once.”
- First make a drink. To prevent the canvas from wobbling, experts advise holding it with your thumb or a special device called a miter box. This makes the procedure much easier.
- Cut the wood straight, do not sway the body of the tool from side to side. If the hacksaw gets stuck in the material, carefully release it and try cutting again.
Combination miter saw - both lengthwise and crosswise
ImhoDom › Forums › hands from shoulders › Combined miter saw - both along and across
- This topic has 2 voices and 1 reply.
- The science
Manufacturers of such tools rightly expect that they should be constantly used not only by workers in specialized workshops, but also by household users. Therefore, there are a significant number of modifications of combination miter saws on the market of varying power, capabilities and prices. Nevertheless, structurally all these devices are approximately the same, and consist of the following components:
The bed is made of high-strength aluminum alloys and has a developed surface for securely securing the saw to a workbench or table.
A rotary table with which you can angularly move a workpiece to a given angle.
Adjustable guides ensure adjustment of the unit for processing workpieces of the required width.
A tool head equipped with a measuring scale that can be adjusted to the required cutting angle.
An electric motor on the axis of which a saw blade is mounted.
Pulling mechanism. Saws with broaching of the source material allow you to process workpieces of increased width.
Measuring laser head, with which the accuracy of the cut is controlled.
Control panel (some versions of combined miter saws provide a soft start function for the engine).
Saw blades with different diameters, thicknesses and tooth pitches are used as replaceable technological equipment, with smaller pitches designed for cutting non-metallic workpieces.
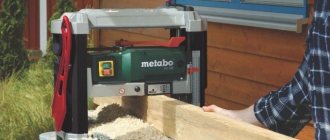
Among the manufacturers of combined miter saws are foreign brands Bosch, Metabo, DeWolt, Makita, as well as domestic brands Enkor, Zubr, Interskol (the latter produces products of joint Chinese-Russian production), etc.
How to make a crosscut from a manual circular saw at home
Hello dear readers and subscribers of Andrey Noak's blog. In this article I will tell you how to make a cross-cutting device from a hand-held circular saw for your home purposes, while spending a minimum of money on production. A hand-held circular saw is a good helper in your household, with which you can do “very big things”!
I consider it inappropriate to focus attention on the term “circular”, since everyone already has first-hand knowledge of what this device is, and there are enough thematic materials on my blog. I will try to tell you what a miter saw is and convey as much useful information as possible for a visual presentation.
Trimmings are divided into the following types:
- Pendulum;
- Combined;
- With a broach.
The pendulum trim is the following design. The basis of any machine is the bed. The table is fixed on it, which in turn is made on a rotating mechanism with a ruler. This device solves the problem of setting the cutting angle with its adjustment.
The cutting angle can be adjusted by moving the work table relative to the plane of the bed. The saw element is strengthened by a lever and spring-loaded by a hinge. Using a pendulum, the saw moves in the vertical direction.
As for the combined model option, the cutting angle can be changed if necessary in two directions. The device is the same as that of a pendulum saw, only an additional hinge is added to the design. As for changing the cutting angle in the horizontal plane, it can be changed in the horizontal direction, which in turn is opposite to the mounted drive.
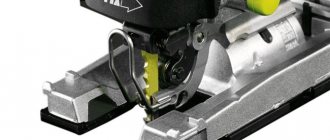
A saw with a broach makes it possible to move the cutting element both around the axis of the hinge mechanism and in the direct direction along the cut. This was achieved thanks to the installed guides (pictured below).
For convenience on a cross-cutting machine, operators use a special device for cross-cutting on a circular saw, called a miter box. A simple design, which consists of a tray for boards, a pressing sheet of plywood or other material, and clamping fixing elements (clamps, etc.). How does this device work? I will try to answer this banal question simply and clearly.
The board is placed in a tray and pressed with a sheet of chipboard. Fixed with a clamp and a hand saw, circular saw, or grinder, the workpieces are cut through special side slots. Often, a miter box is used to cut material at an angle of 45-90 degrees in home workshops using circular saws. Using this device, you can quickly cut the board into a pallet or board.
After all the information, you have an idea of what cross-cutting is and why it is needed. Next, I will tell you how to make a cross-cut trim using a hand-held circular saw using scrap materials with your own hands.
The base of the structure was a box made of chipboard. It has a “U” shape. Knocked down and held together by confirmants. To prevent this shelf from moving, it is attached to the work table (workbench) with clamps.
The base for the saw is screwed onto the shelf from above. Fastening is also carried out by confirmants. We maintain the perpendicularity of the planes, since the sole of the saw will be aligned along the edge.
We level the saw blade along the edge. This will prevent shifting and fidgeting. We screw strips of chipboard onto the sides with self-tapping screws. In this way, the positioning of the sole is achieved.
The saw is fixed with clamps and clips. You can make wing clamps. This is the device for cross-cutting on a circular saw in this version. This device is popularly called “Foreman”.
Next to the base we fix the “table” base to the table. The only drawback is that the cutting depth is reduced by 15 mm. Therefore, you have to place the profile as close as possible to the saw blade.
After making a test cut, we obtain a cutting line based on the stop. Thus, I was able to construct a circular cutter with my own hands. This design of the device copes with the task one hundred percent. If you still can’t design this type of equipment or simply don’t have time to do it, you can use the services of renting a circular saw with a trimmer at affordable prices in specialized workshops.
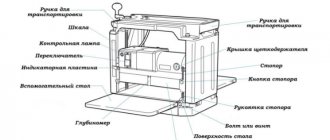
Another good device for working with wood is a thickness planer. What is it? It can be divided into two types - manual and in the form of a full-fledged thickness planer. As a rule, the manual version is needed only to transfer data from the drawing to real material and workpieces.
As for the thickness planer, it, in turn, is more functional. In addition to transferring information, you can carry out full processing of workpieces. Such equipment is purchased by furniture factories and can also be found in everyday life during the construction of private facilities. This is what a surface planer looks like with a circular saw and a trimmer, I attach a photo below:
As for the usual planer device, it consists of three parts. A supporting stand with a dimensional ruler, a clamping device and a device for applying markings to the part. They are usually made from hardwood material.