Introduction
In the workshop, everything should be at hand and the abundance of tools makes the master truly free to choose methods and techniques of work. One of the most basic operations in any workshop is sawing workpieces. Moreover, sawing can be different - somewhere you need to saw off quickly and the quality of the cut is not important, somewhere you need a blind saw and a circular saw or jigsaw with a special file can handle it, somewhere you need an extremely even saw, and so on.
A DIY wood band saw deserves pride of place in the workshop. Not everyone has it, however, the ease of its use is undeniable. Its advantages include the following features:
- High cutting quality, as there is no return movement of the cutting blade.
- High sawing speed, as the cutting band moves at high speed.
- High maneuverability when sawing due to the small thickness of the cutting blade.
- High versatility and flexibility of tool use.
- High operational safety.
However, the band saw also has disadvantages. Let's list them:
- This is a stationary saw, so there is no possibility of its mobile movement.
- Limited sawing area due to design features.
- Large dimensions.
Design and principle of operation
The cutting blade with a toothed metal belt is mounted on two pulleys. They rotate, setting the entire mechanism in motion. This way you can cut wood and other materials with greater or less strength, of natural and synthetic origin. It is possible to create equipment on which, if necessary, it is possible to change attachments and saws in order to adapt it to the task.
You will find expensive products in stores; you can save money if you make the machine yourself. The main element is the cutting blade, this will need to be selected and purchased in advance, and then reels produced, the width of which must match the band saw tool.
Making a band saw
Preparing for work
When starting work, you need to prepare all the tools and materials, as well as a place where it will be comfortable and safe to make a homemade band saw.
Tools:
| Basic tool | Descriptionoperation | Alternative tool |
| A circular saw | Performing longitudinal cutting of workpieces |
|
| Jigsaw | Sawing out a niche, groove and top bolt. Making pulleys. |
|
| Clamps | Fixation of workpieces during gluing, as well as during other operations | There are no worthy alternatives, but you can adapt and try using a carpenter's vice or some heavy object as a press. |
| Drilling machine (+ drills) | Drilling holes |
|
| Grinding machine | Sanding the surface of workpieces and edges |
|
Materials, fittings, fasteners
- Plywood 15 mm thick;
- Solid wood block;
- Bolts for horizontal and vertical adjustment;
- PVA carpentry glue;
- Wing for adjustment bolts;
- Insulating tape;
- Bearings for the upper axle;
- Two bearings for the drive axle;
- Two shafts;
- Cutting blade;
- Two bushings with internal thread;
- Self-tapping screws, nuts, washers, fittings, studs;
- Belts or attachments for a sander or screwdriver.
Main structural elements
The band saw drawing will include the following components:
- Base;
- Tape tension mechanism;
- Sawing table;
- Pulleys;
- Saw blade (cutting tape).
Preparatory activities
At the preparation stage, the optimal design is selected, the necessary calculations are made and drawings are developed. After this, materials and tools are prepared and a place for installation of the sawmill is arranged.
Design work, drawings
The construction of a sawmill begins with the selection of a production site. It has been experimentally established that this will require an area of at least 3x6 m in size. In any case, when planning the length of the working area, it is necessary to take into account the maximum size of the forest being processed. It is best if the unit is installed indoors or under a large canopy. In this case, you can work in any weather.
Then the number of angles (channels, I-beams) and profile pipes required for the manufacture of rail guides, stock and saw frame is determined. The distance between the rails is calculated by adding gaps of at least 0.3 - 0.4 m on each side to the maximum diameter of the log. In addition, it is necessary to take into account transverse reinforcements, which are installed between the rails every 0.8 - 1 m. Supporting elements for timber can be mounted on the same reinforcements, raising the bed to a height of at least 0.2 m above the level of the guides.
Sawmill diagram Drawing of a saw carriage Drawing of a sawmill Drawing of a sawmill Drawing of rail guides Drawing of a sawmill
Depending on the design, drawings of components are drawn up that will need to be turned on a lathe - rollers, screws, shafts, bearing housings, pulleys, etc. The design of a homemade sawmill is taken based on financial capabilities, availability of materials and individual components, so the exact design of the unit everyone does it independently. However, we provide diagrams and drawings of the sawmill and its individual components as an example. They can be used in your own developments.
Drawing of the tension mechanism Drawing of the roller Impeller assembly
Preparing the base
A properly made foundation will ensure the equipment’s stable linear characteristics during operation.
Since building your own sawmill is a serious matter, you need to approach it responsibly. Perhaps in the future the equipment will become not only a good help in the household, but also a source of additional income. Such important factors as the durability and reliability of the sawmill, the ease of operation and the quality of the resulting lumber largely depend on how strong and level the base it has.
The construction of a base slab is no different from the construction of a shallow floating or simple strip foundation. A lot has been written about it, so there is no need to dwell on the construction process in detail. Let us only remind you that you will need a cushion of sand and gravel, the thickness of the base is made at least 10 - 15 cm, and its strength is ensured by an armored belt made of steel rod with a diameter of at least 10 mm. In this case, significant variable loads will not lead to cracks or subsidence of the concrete slab.
Manufacturing of structural elements
The manufacturing instructions will be divided into 5 points and include steps to produce a homemade bandsaw. The article provides photo and video materials that will help you not make mistakes during production.
Base
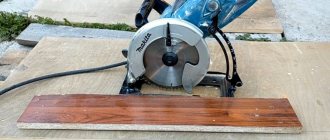
- Since the band saw must be strong, it is necessary to prepare plywood with a thickness of at least 15 mm. We cut four blanks 550 mm long and 23 mm wide.
- Next, we make the markings using a pre-created stencil, or you can make the markings directly on the workpiece. The two plates located inside must have a niche for the adjustable mechanism. For external parts it is necessary to draw a through groove. The amount of vertical adjustment will depend on the size of this groove. Next, you need to mark a through hole for the lower drive shaft. In addition, we will need a surface for a saw table, the dimensions of which in terms of the width of the table will not exceed 150 mm. In all workpieces, it is necessary to cut a square between the circles in height equal to 15-20 cm, and not exceeding 15 cm in width.
- Using a jigsaw, you need to cut out the necessary parts, as well as the adjustment groove for the upper pulley, then drill a hole for the lower drive shaft.
- Next, you need to assemble the future foundation. For assembly, use PVA glue or any other wood glue. We apply it in an even layer on all the surfaces to be glued, then we apply the parts to each other, avoiding inaccuracy. Fixing the products must be done with clamps, since high-quality gluing requires a tight fit of the workpieces. It is necessary to wait a day until the glue dries completely.
- We install bearings for the lower drive shaft.
Saw blade (band) tension mechanism
- To make a tensioning mechanism for a band saw, you need to make a block, the dimensions of which will correspond to the niche in the saw body. A hole is drilled at the end of the block for the pin and fitting. Sockets for bearings are cut out on both sides.
- We insert the pin and secure it in the block. It should stay firmly in the hole. To increase the strength of the fastening, before inserting the pin, apply PVA glue to its surface, and you also need to additionally secure the pin with a self-tapping screw or screw.
- Next, the shaft bearings and fixing sleeve are installed.
- Using a screw in the foot, the saw blade tensioning mechanism will be rigidly fixed.
- It is necessary to install a handle on the pin, the rotation of which will allow you to change the depth of immersion of the bar into the base, thereby changing the distance between the pulleys - this is how the belt is tensioned.
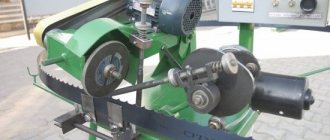
Pulleys
While the base glue dries, we begin to manufacture the moving elements, namely the pulleys. The entire process of their manufacture is reflected in the photographs provided.
- On a sheet of plywood 15 mm thick, you need to mark the contours - a circle with a diameter of 150 mm.
- Cut the blanks with a jigsaw along the outlined contours and drill a hole in the center of the circle.
- Even the most precise and careful sawing will not give the workpiece perfectly correct shapes, so it is necessary to grind the ends. For this, a grinding machine with a table at 90 degrees relative to the plane being processed will be used. If you do not have a suitable tool, you can grind the edge using a hand-held grinder or a homemade screwdriver with a grinding attachment. The workpiece is fixed with a bolt or self-tapping screw to some base. Thus, when it is fed to the grinding wheel and rotated around its axis, a perfectly smooth circle is obtained.
- After processing the pulley on a grinder, you need to wrap its ends with insulating tape in several layers, and you can also use rubber from bicycle inner tubes.
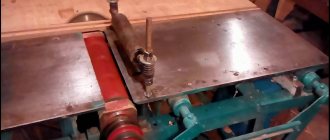
Sawing table
The saw table will be 15 cm wide. It will be installed on a special end face of the base of the machine between the pulleys. You need to make a cut in the table for free movement of the saw blade. The dimensions of the table being manufactured depend on the needs and preferences of the craftsman. You can make a small table that only slightly protrudes beyond the machine and saves space, or you can make the upper surface area larger for ease of work. As always, in life you need to choose the “golden mean”, so the final decision is up to the master.
Saw blade (cutting band)
It is best not to make the cutting blade yourself, but to buy a ready-made one. In stores you can find a wide variety of options, which differ in type, size, type of steel used, hardening of the material, shape of the teeth, their setting, etc.
Below is a table with some parameters of saw blades.
| International marking | Decoding | Body hardness | Teeth hardness | Application Feature |
| Constant hardness | with equal hardness over the entire area | 45 – 48 units. HRc | 45-48 units HRc | This type is used on small diameter pulleys. |
| Flex back – Hard Edge | with high levels of tooth hardness, but a flexible body | 30-33 units HRc | 63-65 units. HRc | The upper part of the tooth is hardened, while the rest of the product is flexible. Able to withstand larger feeds compared to the previous type. |
| Hard Back | blades hardened over the entire area | 48-53 units HRc | 63-68 units. HRc | The saw band production technology is the most modern and is used in industry. Capable of performing a larger volume of work, but the price is significantly higher. The canvas is used in professional machines. |
In addition, band saws differ in tooth size:
- with small tooth
- with middle tooth
- with large teeth
The greater the hardness of the tape, the greater its resistance to dulling. The rigid blade allows you to cut material at high feed rates without compromising the performance characteristics of the work.
In this case, for our band saw, the best option was to choose a blade 1065 mm long made of carbon steel, marked Constant Hardness.
Rules of use and safety precautions
After manufacturing and setting up, you can use the sawmill for work, observing certain rules and safety precautions.
It must be remembered that the canvas can tear, burst or come off. Therefore, if you have doubts about the reliability of the fastening, it is better to stay at some distance from the equipment.
There are the following rules for operating an electric saw:
The size of the saw teeth is directly dependent on the workpiece. The larger the part, the larger the teeth of the blade.- It is most practical to use universal tapes. Then, when changing the material being processed, there will be no need to change the blade frequently.
- You need to select the installation location of the device in advance. There must be an outlet nearby and the place itself must be well ventilated.
- Before work, check the tension of the cutting belt.
- It is not recommended to turn on saws for more than two hours at a time. After such intensive work, the tape is removed from the pulley and left to “rest” for twenty-four hours.
- The machine needs regular lubrication.
- The teeth on the saw must be set correctly.
As a result of proper assembly, the tool you need on the farm will appear, assembled according to the drawings of a band sawmill with your own hands. With a little skill, working with it is convenient and easy. The original cutting material is transported by trolley. Saw material is placed on the bed, fixed, and the log or other material is processed using a saw.
A homemade band saw needs care and regular checks. If fasteners fail or become loose, it is better to stop work and correct any deficiencies noticed. When operating the device, you must be careful and careful.
Assembly
- Processing the base. After the glue has completely dried, you need to remove the clamps and treat the gluing area, ends and other surfaces.
- Installation of the saw blade tension mechanism. It is installed in the mounting groove, and a thrust element must be placed on top. During operation, the mechanism must be firmly fixed.
- Installation of pulleys. It is necessary to pay attention to the fact that the installed pulleys must be parallel to each other and rotate easily around their axis, while the axis must be absolutely static. Strong beating of the wheels is not allowed, as this can lead to the saw blade slipping off the pulley and injuring the operator. The lower drive shaft must go all the way through the housing and have a sufficient end on the reverse side so that it can be clamped into the drill chuck. The upper pulley is installed in the saw blade tension mechanism.
- Installation of the cutting blade. The saw blade should be installed over the ends of the pulleys. First, it should fit freely onto this structure, and by rotating the adjustment knob, the block with the axis of the upper pulley moves upward, thus increasing the distance between the centers of the pulleys. In this case, the tape is tensioned. After tensioning, you need to tighten the screw in the fitting to firmly fix the tension mechanism.
- Installation of the saw table. The saw table is located on the horizontal surface of the base, as shown in the photo. Its area should be sufficient for a comfortable process of sawing the workpiece. It should be noted that the perpendicularity of the table to the saw blade is very important, and in two dimensions - longitudinal and transverse. The table is fastened with self-tapping screws. Although there is an option to “plant” it with glue, and install dowels for strength.
- Installation of power tools. At the very last stage you need to make this design come to life. To do this, you need to clamp the shank of the drive shaft of the lower pulley into the drill chuck. Alternatively, you can use a hammer drill or screwdriver. But the power of a screwdriver will clearly be insufficient, so use a drill or hammer drill.
- Setting up and commissioning. Before starting work, run the band saw at idle speed. Make sure that the tape does not slip and runs smoothly. Check its tension and fixation of the saw blade tension mechanism.
What you will need to build a sawmill
For those who think building their own sawmill is not a difficult task, let us say right away that creating a high-quality, efficient unit is not easy. And the point is not even that you cannot do without certain financial costs - as a rule, the budget of a homemade sawmill easily fits into the amount of 30 - 40 thousand rubles. Assembling a unit capable of producing high-quality lumber will require solving problems related to stability of operation, ensuring the strength of components and parts, setting up and adjusting mechanisms, making devices for sharpening a band saw and setting its teeth, etc. Are you not afraid of difficulties? Then check out what materials and tools you will need for the job.
As rail guides, you can use steel angles with a flange width of at least 50 mm, a channel or an I-beam. The main requirement for rails is their straight geometry. It must be borne in mind that any shortcoming of our miniature “railway” will affect the quality of the cut, since the tape blade will copy every unevenness, transferring it to the surface of the board. That is why the best option would be T, N or U-shaped rolled metal. Unfortunately, corners are most susceptible to bending during manufacturing and transportation. The most ideal case would be to use factory rails, for example, from narrow-gauge transport, which, with some luck, can be found at scrap metal collection points.
The rollers that provide longitudinal movement of the sawmill can be turned on a lathe and hardened. In some cases, the use of conventional ball bearings is allowed.
Excellent rollers are made from linear guides based on ball bearings, which can be found on sale. This solution cannot be called the cheapest, but there is no doubt about the reliability and durability of such a unit
Actually, the frame, saw carriage and bed for laying logs are made of square and rectangular profile pipes. It is best to use rolled metal with maximum wall thickness. This will provide the equipment with the necessary strength, since the operation of the machine is associated with variable dynamic loads.
For the mechanism for adjusting the height of the carriage (traverse), you will need guides made of steel pipes with sliders and two long screws with nuts. For these purposes, you can use parts from decommissioned screw-cutting lathes (unlikely, but never mind), mechanical presses, or threaded rods from a construction store (the most affordable, but least preferred option). You can also order the production of parts from a turner - it’s still unlikely to be possible without contacting a specialist. In addition, you will need a chain drive, which is often borrowed from the gas distribution mechanism of automobile engines. Alternatively, you can use a bicycle chain and sprockets.
Pulleys from old domestic combine harvesters of the Kolos, Niva brands and other agricultural machinery are best suited as impellers for the belt blade. By the way, you can also get shafts and bearing housings from there. Please note that the diameter of the guides must be at least 30 cm (optimally 50 cm), otherwise excessive mechanical stress will lead to cracks at the base of the saw teeth.
Pulleys from decommissioned domestic agricultural machinery can be used in the design of the band saw drive
There are designs of homemade installations with guide pulleys in the form of wheels from passenger cars. For skeptics, we note that such a homemade solution has a lot of advantages, starting from the possibility of using assembled hubs and ending with the fact that fine adjustment of the belt tension during operation can be done by inflating the tires.
You can buy a band saw new or used. It is best to have several blades in stock, which can be replaced with sharp ones as they become dull.
As for the tools that will be needed during the work process, every self-respecting owner should have one. In particular, you will need:
- welding machine;
- “grinder”, or, in professional language, an angle grinder;
- drill press or electric drill;
- a set of drills for concrete and metal;
- set of metalwork clamps;
- set of wrenches;
- hammer;
- pliers;
- fasteners (bolts, nuts, washers of various sizes);
- measuring instrument (ruler, caliper, tape measure);
- level (preferably laser type).
Don’t forget that you will need to prepare a strong, level foundation, so be prepared for concrete work - stock up on sand, crushed stone and cement, prepare a concrete mixer, tampers, formwork and a long rule.
Rules for working on a band saw
A large volume of processed materials requires the installation of a blade with large teeth on the machine. The best option is to use universal band saws.
- if the workpiece is large in size, it is worth installing on a band saw with large teeth; It is better to use universal type cutting belts. This way there will be no need to change the blade when processing different materials;
- Decide on the installation location of the machine and securely mount it on a static surface, avoiding vibrations during operation. The room in which the band saw will be installed must be well ventilated.
- After finishing work, remove the sawing band and, accordingly, tighten it only before work. This will extend the useful life of the canvas
- Every two hours of operation, turn off the band saw and give the motor, in this example the drill, a rest, and at the same time check for malfunctions. Compliance with this rule will protect the worker from injury and the tool from overheating.
- Check the set of cutting teeth from time to time.
Characteristics
To use a band saw effectively, you will need several blades of varying widths and thicknesses. When choosing a tool for a particular job, it is important to consider the following:
- Only soft wood can be processed with a thin blade, otherwise it will quickly bend and the cutting line will be uneven;
- the wider the blade, the more accurate the cut will be;
- a thick saw is not suitable for working with small bars and thin sheet material, they are deformed due to heating;
- Angled cuts and shaped cutting can only be done with a narrow blade.
In addition to the geometric dimensions of the blade, it is important to pay attention to the profile and height of the tooth. An important criterion for a band saw blade is the number of teeth per unit length.
Note! The more frequently the teeth are spaced, the smoother the sides of the cut.
A saw with a fine tooth has a longer service life due to less pressure on each tooth. A saw with a wide tooth is preferable for hardwood due to the greater pressure on the cutting edge.
The quality of the cut is also affected by the height of the tooth. The large tooth is great for rough work and cutting thick wood. Small bars and thin sheet material can only be cut efficiently using a fine-toothed tape.
Another important parameter is the tooth pitch. There is a rhythmic step and a variable step. A saw with a rhythmic step is suitable for fine work; this tool is convenient for cutting thin slats and sawing out parts from plywood. A variable pitch blade should be chosen for processing large pieces of soft wood. Thanks to the asymmetrical arrangement of the teeth, this blade will not clog and will easily cut thick boards.
Desktop
The main requirements for the working surface are its optimal height. Working at the countertop should be comfortable for the master, so it should be high enough, but not too high.
You can also make the tabletop in the form of a closed cabinet, then it will be able to accumulate sawdust remaining after processing the logs. To make cleaning the sawdust collector easier, you need to make the table in such a way that the accumulated waste is accessible, for example, using a door.
The tabletop in a wood band saw is usually installed on the lower support of the bar and additional supports; in some cases, you can get by with a simple additional support or supports connected to the bar. The main thing is that the weight distribution is optimal and the tabletop does not tip over.