How to make a photo frame with a jigsaw
On the NemolotokTV channel they showed how to make, using a jigsaw, a photo frame in which you can place a photo of a famous actress or your loved ones. The result was an original and beautiful product.
Original photo frame with a jigsaw
Today we will work with the Rose template. The photo frame template itself looks relatively simple. But we will create an unusual picture frame from it. The template has already been transferred to plywood. Before sawing, we will make internal holes with pushpins. We just need small holes so that the internal parts can be reused for another craft. Each hole must be widened so that the jigsaw blade fits through it. It is convenient to make two holes as close to each other as possible. And then combine them into one.
This Chinese store has a lot for woodworkers.
Sawing a photo frame
Let's start cutting. First we cut out the general outline. Then loosen the screw that secures the jigsaw. We take out the canvas. We insert it into the inner hole, fix the jigsaw with a screw again and begin cutting. The first part is ready. Then you can continue in the same way. Or you can change it a little.
Let's take an old, dull jigsaw blade. Use pliers to remove the protective cap. Now the jigsaw can not be removed from the machine. But you will need to be extremely careful when working on a machine with such a jigsaw. The jigsaw had previously become dull. Therefore, in order to work with it again, it will need to be shortened. So that the dull teeth are lower than the working area of the jigsaw. Our jigsaw has become shorter. But its length is enough to saw our plywood. And it will cut like new again.
We replace the jigsaw on the machine. And let's start cutting. So we cut out all the remaining parts. At the end of the work, be sure to put back the jigsaw blade with the protective cap. Next we cut out a frame 3-4 mm wide. To do this, you can use leftover plywood from other crafts.
We will glue the frame. Therefore, it can consist of several fragments. We place the frame on the second part of the sheet and place the sheet with the rose on top. This is what our picture frame will look like.
Sanding a photo frame
Let's start sanding. Our parts are relatively large. Therefore, the first sanding can be done with paper with grit P 120. We do not sand the outer edges at this stage. We will sand them after gluing. Next, we take paper with grit P 320 and do a fine sanding. As usual for internal parts, we cut the paper into strips, attach a clothespin and sand.
Coloring
Before gluing, we need to paint the inside of the parts. We temporarily isolate the areas where the glue will be applied with paper tape. We will paint the lower part from the inside with azure. Teak color. Stir the glaze. And we begin to apply with a semi-dry brush and rub well. The top piece will need to be painted from the inside. Before we glue. We will also paint with Renner glaze - chestnut color. This is a darker tone so we have some contrast. We start by painting the inner edges. They need to be painted very carefully. So that there are no drips on the front side.
Next, we begin to paint on the inside. Here, too, it is important to prevent drips on the front side. We leave the edges of the part unpainted - where we will apply glue. The teak glaze bottom piece has dried. Now we apply varnish to it. We paint with Renner M827 varnish under a brush. Stir and apply in a thin layer. The varnish is applied, like transparent paint, in a not very thick layer. Otherwise, bubbles may remain on the surface after drying.
Let the first layer dry for an hour. Then we do a light sanding to knock down the pile. And apply the second layer. The varnish has dried. Remove the strips of tape.
All parts are ready for gluing. We will glue them together with bindex. As usual. The reason is that it is slow. You can have time to fix everything. And after drying it becomes transparent. Those. almost unnoticeable. We apply bindex to the frame parts. Apply to the bottom part. Then we apply it on top of the frame. We install the top part. Next, we check from all sides and align all the parts.
Usually, when we paint large sheets of plywood with water-based materials, the sheet of plywood may become slightly deformed. On flat crafts this is not very noticeable. But on composite products like ours, the deformation is noticeable. That's why we put our parts under the press. You can use clamps. You can just books or other flat and massive objects. Let it dry for several hours.
Final processing
Our picture frame is almost ready. In principle, you can leave it in this form. Dark azure on the inner edges looks aesthetically pleasing. You can only do external sanding and apply varnish. It's transparent. After drying it will look exactly like this. If you want to preserve the feeling of untreated wood, then instead of varnish you can apply the lightest of oils - maple. You can leave it without finishing. But then the surface will be less protected.
We will grind the edges on a machine. And we will try to make all 3 parts look like one. To do this, draw lines as close to the edge as possible. And then we sand the edges, focusing on these lines. After this we round the corners. Next we sand it by hand. In order to give a rounded shape to all corners and edges, we need paper with large grain. We'll take P120. If you have a hand nozzle, you can do the same with it. This is, of course, more convenient. Next we place a circle with a finer grain. We have P220. And for the final grinding we use a wheel with P400 grit. We aligned the ends of all 3 parts. Corners and edges were rounded.
Now we remove the dust and start painting. We will paint the outside on all sides with Renner Azure, chestnut color. To avoid staining the inside, insert a paper plug. It is better to take a laminated magazine cover. So that the plug does not become soaked through. We begin to apply the glaze from the ends. Dry the first layer of glaze for 1 hour. Then we do a light sanding to knock down the pile. It is very important not to sand. Azure has a thin film. Therefore, you need to sand carefully. Don't push. The goal is to make the entire surface matte. Next, remove the dust and apply the second layer. The second layer of glaze has dried. And we can leave it like this.
For a painting that is not under load, glaze can act as a finishing coat. But let's add another layer of varnish to give the characteristic shine of the varnish coating. We do light sanding again. We put the paper plug again. We will apply the same varnish M827 under the brush. Apply a thin layer. We carefully ensure that there are no drips. Varnishes have a high dry residue. Any drip will be visible after drying. This is what we got in the final. You can do another sanding and apply another coat of varnish. The shine will be even more pronounced. But the surface will also become even less wooden in appearance. We will leave the product as is.
Plywood frames: what they are and how to make them
Today there are many materials with which you can make souvenirs with your own hands. It can become a home decoration or an excellent gift for any occasion. Plywood frames are extremely popular among craftsmen. This is due to their diversity and the relatively simple method of their manufacture.
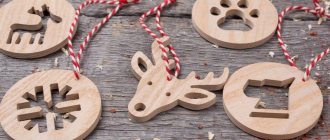
The pattern can be almost anything
How to choose material
Plywood is an affordable material that can be easily purchased at any construction department. For its production, wood veneer is used, which is glued together with a special adhesive composition. Depending on the glue used, the level of moisture resistance of the material changes. The veneer layers are laid perpendicular to the direction of the grain.
Depending on what product will be manufactured, the appropriate thickness is selected. In stores today you can find sheets with a thickness of 3 to 30 mm, while the sizes are in most cases standard production. From one sheet you can make a fairly large number of frames. In order for them to turn out high quality, it is worth using the highest class plywood. Photo frames made of plywood look great and original and will become a decoration in any home.
Original solutions
Frame design options
For many who are the first to encounter this, the question arises: how to make frames from plywood? Everything is quite simple, the main thing is to prepare all the necessary tools and materials. As for appearance, they can be very diverse. These can be classic straight products without grace. If you show a little imagination, you can make them on several photographs at once, and you can come up with various inscriptions and drawings as decorative elements. You can also come up with three-dimensional elements. When used skillfully, plywood can create incredible masterpieces.
Gift for a fisherman or hunter
Necessary tool
In order to make a frame, you need to prepare in advance not only plywood but also equipment. The main set of tools includes:
- a manual jigsaw (you can also purchase an electric one for cutting out large parts);
- a set of files of different sizes;
- clamp;
- bed.
In addition to the basic set of tools, it is also worth preparing the materials with which grinding work will be carried out. For small work, it will be enough to acquire sandpaper with fine grain, the index of such paper is 400 - 2000. With its help, all the ends of the products will be processed after sawing. If various patterns and places are expected that cannot be processed with sandpaper, it is also worth preparing files. In this case, it is best to take several basic ones: square or rectangular, round and triangular.
Rectangular stand with cut out branches
Before starting work, it is very important to prepare your workplace. In order to properly process all the parts, it is worth setting up a special workbench. It can be either stationary or mobile. It will significantly speed up the work process and ensure high-quality work.
Making a template
Today, drawings of plywood frames can be easily downloaded from the Internet. Alternatively, you can get just an idea from the Internet and add your own elements.
Note! For those who want to make the frame unique, it is better to create a template yourself. For ease of drawing, you should draw a grid on a sheet of cardboard; it will make it possible to more accurately draw every detail. The drawing is applied to a sheet of cardboard, after which the finished piece is cut out using scissors or a stationery knife.
Cheap and cheerful
Stages of work execution
A DIY plywood frame will become an original design for your favorite photo. In addition to the main tool for sawing and cutting, it is worth preparing auxiliary materials that will be needed during work:
- several brushes of different sizes;
- rulers and stationery patterns with which the template will be prepared;
- scissors;
- stain and varnish;
- PVA glue;
- cardboard for making a template.
If you use a thin sheet of plywood, you should cut it in half and glue it together, using PVA glue. The entire surface is coated with glue and connected. In order for the material to stick together better, the two halves are pulled together with clamps. In this position, the plywood should lie for at least three hours at room temperature.
After the two sheets are glued together and completely dry, you can begin to apply the design to the surface. To do this, the template is applied to the front side, and all contours are outlined with a simple pencil. Once the design is applied, you can start cutting.
Family photos together
Frames are cut out of plywood with a jigsaw. In order to cut out internal parts, it is worth drilling a hole with a diameter of 8-10 mm using a drill. This is necessary for the jigsaw blade to fit in. It is necessary to cut out in such a way that the drawn line remains visible. This will allow you to make minor adjustments in the future. Having cut out the inside, you can now prepare a place for placing the photo. To do this, you need to make a fold 4-5 mm deep. To form it, you should use a cylindrical cutter. After all this, you can begin cutting out the outline externally. The outer ends should be treated with a grinding machine. You can also use a shaped cutter to shape all the outer edges.
When the frame is ready, it must be completely cleaned of dust and only then can varnish or other coloring agent be applied to the surface. To achieve a better effect and richer color, it is better to apply several layers. After drying, you need to attach a cardboard base to the back that will hold the photo. If you plan to additionally attach decorations, this should be done after the paint or varnish has completely dried.
For a memorable date
Plywood photo frames can stand on a table, nightstand or decorate a wall. A variety of colors, varnishes and decorative elements will allow you to realize the most interesting ideas and ideas. Such a frame can decorate an interior made in any style.
Types of frames: deciding on the choice
Frames, despite their simplicity of design, can be of several types:
- Classic - without inscriptions. Here you can enter additional division along the internal contour and the shape of the external perimeter. For example, the inner and outer perimeter can be oval, round, rectangular, with or without additional carved fragments.
- Modern - with inscriptions. There are also options here when the inscription is adjacent to any part of the frame, or one of the letters in the inscription is itself a photo frame.
For your information! In this article, we did not adhere to a strict classification division, since there are many intermediate solutions, including non-standard ones. In any case, initially you will have to draw drawings of the future product.
Preparation period
Transferring the design to the material.
At this stage, it is necessary to prepare the necessary tools, select basic and additional materials. And despite the apparent volume of the problem, in reality everything is simple.
Tools you will need:
- jigsaw and saws for wooden plywood, laminate;
- electric drill or hand drill with wood drills of the required diameter:
- measuring instruments, pencil, scissors and patterns if necessary;
- furniture stapler with staples;
- reinforced thread or metal bracket to fix the frame;
- abrasives or grinding devices.
Materials mean:
- multilayer plywood at least 10 mm wide;
Note! In some sources you will find recommendations to use thin plywood, 3-4 mm wide. This makes sense if you plan to make a puff pastry from several parts. For example, a glass frame + photo frame + back wall, in this case the stacked design will look quite good.
- glass for a photo frame is an optional element, although possible.
We work with plywood
Preparing tools is a responsible task.
Working with this material involves several stages.
- Transferring a design from paper to plywood. This is not difficult to do; letters and elements are cut out with scissors, applied to plywood and outlined with a pencil. In fact, you get a constructor that needs to be cut from a blank.
- Using a drill and drills, it is necessary to drill several through holes, especially in the inner perimeter of the frame, as well as the internal contours of the letters of the inscription.
Advice! The dimensions of the inscription can be any, but plan them in such a way that when drilling, the jigsaw blade will fit freely into the hole. And one more clarification - if you have chosen elements for decorating the frame, but the internal fragments are so small that they do not allow you to start the jigsaw file, then the power tool can be replaced with a hand tool. The sawing process will be slightly longer, but the effect will be the same.
- A jigsaw file is inserted into the prepared holes and the necessary fragments are cut out. As a result, you receive a frame blank according to your drawings.
Some tricks to complicate the solution
Glass can be cut to any size.
It would be unfair not to mention the possibilities of inserting glass into the frame.
This can be done in two ways:
- The first and simplest is to stick a similar one with a large internal perimeter on the base of the frame, while the glass completely repeats the internal dimensions of the second contour, the limiter for the glass is the internal protrusions of the first frame. You can also make a solid back wall from thin plywood; the plywood can be replaced with thick cardboard.
Advice! The choice of glass sizes directly depends on the size of the photo. The photograph and glass are made the same size.
- The second method is more complex and requires special cutters, ideally a CNC machine. It will allow you to cut out the glued veneer of the required dimensions and fit the glass into the frame.
Thin glass is chosen for the frame. You can easily work with it yourself; cutting is done with a glass cutter. Considering that you need small glass sizes for the frame, it can be purchased at any workshop. The price of the issue is the price of broken glass.
Sanding and painting
You can choose any color.
- After choosing the final frame design, all parts are polished. This is done with ordinary fine-grained sandpaper. You can use mechanical and electric sanders with special attachments, keeping in mind that your design may have a lot of narrow parts.
Advice! If you have prepared a frame or lettering with many small details, but you do not have sanding attachments, you can sand with narrow strips of sandpaper prepared in advance.
- All elements of the frame are painted with wood varnish, varnish + stain, or any paint that you like best.
- After drying, the photograph with glass is inserted into the frame. The back wall can be fixed with a construction stapler or small furniture screws. Fixing the fastening thread can be done with a construction stapler. The metal bracket, depending on the design, is fixed with a self-tapping screw.
DIY creative work – ready!
What and how to cut out of plywood with a jigsaw
Various kinds of crafts made of plywood and wood, made by skilled craftsmen, are highly valued all over the world, causing universal admiration. Undoubtedly, carving is creativity and art, but you can certainly master it with effort and constantly honing your skills. This optimal hobby related to wood and plywood will not require too much free time from you and equipment that is not very expensive. Of course, this means carving plywood using jigsaws!
It is rapidly gaining popularity: who doesn’t want to make an excellent piece of decoration for themselves, decorating their home, furniture, and creating an artistic ambience! Cut-out products of different thicknesses are optimally integrated into many existing decorative styles, and we get, for example, frames for photo cards with ornaments, words, individual letters, figured shelves made with jigsaw carving on plywood. In addition, such creativity is an action that is accessible to anyone interested in the process, even a beginner. You just need to get an idea of “how it works.” And you can start creating!
Plywood frames using a jigsaw: DIY video, photo
Photo frames can be purchased ready-made or made by yourself. The second option will not take much time and will not require significant financial investments, but it will stand in a prominent place in your place, reflecting the creative state of the master’s soul. Such products can be made for yourself or as a gift that will be appreciated.
One of the available and inexpensive materials for making a frame is plywood. It belongs to the category of environmentally friendly raw materials for crafts, does not deform during use, and is easy to process.
Plywood frame using glass
Complex frame
To make photo frames from plywood, you will need the following tools and supplies:
- jigsaw;
- drawing;
- scissors;
- glue gun;
- glue;
- decorative carnations.
The list of additional materials can be expanded or reduced, it all depends on the type of plywood frame and the specifics of the creative concept. The premises for the production process can be anything, even your own kitchen: the amount of waste is minimal.
What products can be made
A jigsaw is a universal tool that allows you to make original photo frames according to pre-made drawings. They can be of various shapes, thicknesses and configurations.
The following do-it-yourself plywood frames are distinguished:
- round,
- square,
- rectangular,
- diamond-shaped
- oval,
- complex shape.
You can even make exclusive products in which the fabric will not be a solid plywood strip, but intricate lace. You can see how to make such frames with your own hands in the video.
Let's start the preparatory stage
When choosing a jigsaw for making plywood products, many craftsmen prefer hand tools. Its electronic analogue is convenient, but consumables (files) are much more expensive and you need a lot of them.
So, we take a hand jigsaw and at least 10 metal blades. In the photo you can see what this tool looks like: a frame in the shape of a curved sickle, a wooden handle and two screw-type clamps. They are designed to hold the file in a fixed, tensioned state to the maximum. In many models there is a tension screw on top, which allows you to adjust the degree of tightness of the metal sheet.
When making a photo frame from plywood with your own hands, these characteristics are very important: cutting is done in any direction. If you need to figuratively process a hole inside a narrow canvas, first make a hole with a sharp object. A nail file is threaded through it and only after that it is secured in the instrument itself.
The process of cutting a photo frame
We take drawings of plywood frames, select the most interesting ones and try to implement them in practice. It is better to use carbon paper, which is placed on a sheet of material, with paper with a diagram on top, and the contours of the future product are outlined with a sharp pencil.
When the plywood already has an image of a photo frame or its parts, you can proceed directly to the cutting process. You can fix the material on a flat surface using a clamp. This is a compact version of clamps that takes up much less space in the apartment than a standard dimensional vice. It is better to take sanded plywood - you do not need to re-process it with a machine; it will be enough to cover the photo frame with a layer of paint and varnish, getting the perfect result.
Making internal holes in oval-shaped products is not difficult if you skillfully operate the tool handle. You shouldn’t put in significant effort - you can damage the design of the jigsaw or ruin a sheet of plywood with one wrong move.
If you need to make small cuts in a closed circuit, select small-width files with thin teeth.
But the thinner the saw, the more fragile it is. When making a photo frame from multi-layer plywood, you need to use rougher metal elements, and the final fit is carried out through a sanding process.
Innovative ideas in frame making
The beauty of homemade products for storing photographs is that you have the opportunity to choose your own shape, color, and decorate using:
- beads,
- rhinestone,
- stones,
- shells,
- feathers
Each idea according to which a new creation will appear - photo frames made of plywood - allows you to decorate the interior of any room. It doesn’t matter in what style the design is implemented. For classics, strict square or rectangular frames and covering with pastel or dark shades of paint are suitable. Modern and high-tech allow products of extraordinary designs in various colors. All the creator needs is a little free time, a jigsaw and plywood. Minimum financial investment, but maximum pleasure.
Why use plywood to create carvings?
This wood material is chosen for the following reasons:
- moisture resistant;
- temperature changes do not have a negative impact;
- quite low cost;
- ease of learning to cut with a jigsaw;
- low weight of products.
It is also necessary to choose plywood of the 1st and 2nd grades for crafts. The rest are not suitable for creativity: the surfaces have cracks with knots and chips (unless they can be used for internal substrates). Birch plywood (3-10 mm thick) is most suitable for cutting.
At the present time, this material is divided into a fairly large number of subspecies - each for specific purposes.
- Experts and folk craftsmen advise using sheets produced using a urea-formaldehyde composition. Such material is marked “FC”. This type of plywood can be bought “clean” or coated, for example, with varnish. It is most convenient to transfer the drawing to untreated plywood sheets for cutting with a jigsaw.
- Plywood marked “FOF” is intended for furniture production, and is often produced over 12 millimeters in thickness.
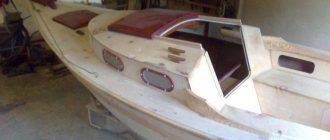
- The FB brand was originally developed as a boat material, which is why its cost is high (but if it is possible to use it, then it is suitable for cutting with a jigsaw).
- But masters do not recommend purchasing FSF. Although attractive in appearance, it is toxic because it is made using a composition of phenolic resins.
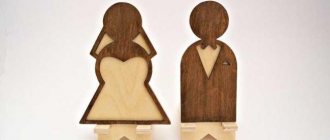
Cutting out a wedding photo frame from plywood
Here, using one small example, I would like to talk about how I carry out my work. So, let's begin. The task is to produce a frame for a wedding photograph of a non-standard size (144% larger than the true one). Birch plywood, 10 mm thick, was chosen. The work took 3 evenings, about 8 hours. Electric jigsaw, straight spiral files. Now painting work. I'm going to process it to look like gold, then varnish it. I'll post the result later.
We print the drawings and paste them onto the workpiece, saving space as much as possible (Do not use drafts; powder ink from the printer is disgustingly removed from plywood)
Next is a many-hour painstaking process of directly cutting out. (Nothing interesting) Next we have the following intermediate result. To remove the glued sketch, we wet the workpiece and all the parts with water, let it soak for a couple of minutes and remove the paper using a knife. We clean the parts, sweep out the dust from the cracks We cut out the backing and attach it to the legs, I do this using a pneumatic gun I go through it again with fine sandpaper I singe off the burrs using a soldering device We put everything together
I blow dust off the resulting frame with a compressor, because when using spiral saws, a lot of dust remains at the ends at the cut points. That's basically all. If anyone is interested, I will be happy to answer any questions you may have.
What additional materials and tools will be needed?
- Stencils and drawings with drawings for work. You can come up with them yourself or copy them on the Internet.
- Carbon paper to transfer patterns and lines according to the drawing;
- Glass paper and sandpaper, a set of files - for grinding parts;
- Joiner's (optionally casein) composition for gluing parts;
- Transparent varnish – for coating;
- To make holes inside the material to thread the blade through, use a drill and an awl.
- Before starting cutting with a jigsaw, carefully sand the material with glass paper, and only then transfer the patterns according to the drawing.
- Transfer elongated shapes of designs with narrow elements onto plywood so that they are located along the fibers of the “face” of the material.
Artistic cutting with a jigsaw: drawing, stencil and work
Let's get to know the devices
A jigsaw is a toolkit that is designed for working on different contours. The device includes a blade equipped with teeth small enough to cut the working material, practically without forming burrs or chips.
Manual
The “founder” of the genus is, of course, the manual jigsaw. Everything ingenious is simple: a metal U-shaped arc, and a working blade is stretched between the ends, which is secured with clamps. They hold the files during operation, and with their help, its tension is also adjusted. The handle for convenient operation is located on one side of the frame. The tool clamps can be rotated, thereby creating a different plane for carrying out work, providing opportunities for carving plywood with a jigsaw of increased complexity.
- When creating with a hand-held device, you must be extremely careful: the design is quite fragile, and with intense pressure, the blade sometimes breaks and needs to be replaced. Every novice craftsman should stock up on additional working files.
- When working with a jigsaw, it is convenient to use an auxiliary board: it protects the table and solves problems with the convenient location of the plywood workpiece.
Jigsaws
This device operates using electricity. It is a housing where the mechanism is located, and the control handle is also located there. The sawing element is located at the bottom of the device at the front. The blade is protected, and this allows you to cut along the contour very smoothly, without deviations. Professional models of equipment have many attachments that greatly facilitate the work process, for example, leveling the edge of the material. Jigsaw blades can also have teeth that vary in shape and size. They should be selected in accordance with the material for the saw to avoid damage to the plywood sheets during operation.
- Household electric jigsaws for non-production purposes are usually of low power (from 350 to 500 W). For beginners, this is the most common option when you are just learning to cut out crafts and figures from plywood (usually of small thickness). It is quite safe to operate such a device, especially when it is equipped with protection.
- A professional jigsaw is intended for industrial purposes, has a power of more than 700 W, high speed and cutting accuracy. It can cut sheets over 10 cm thick, aluminum, and thin steel.
Video: simple jigsaw:
Fraser
Sometimes this device is used for carving. It is a type of special hand tool, with the assistance of which you can perform various types of work on wood and plywood in everyday conditions. However, working with it requires some skill; but craftsmen who deftly handle this equipment can create real, highly artistic masterpieces of folk art.
Preparing the stencil
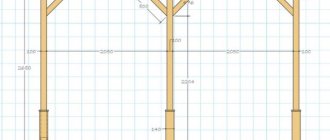
Drawings for creative work come in different sizes, depending on the scale of the products being manufactured. For example, for diagrams of a shelf or a piece of furniture, for a three-dimensional toy, you should take a sheet of whatman paper in A1 format, a roll of wallpaper left after repair may also be suitable, and for small figures (such as souvenirs) we take office paper (A4 or A3 format).
Using a marker or pencil, we draw the contours of the future object on the surface of the paper, adhering to the specified dimensions. Templates are presented in the public domain in a wide range, we choose the appropriate one (for beginners, as a rule, it is not too complicated). Or you can come up with your own options for cutting with a jigsaw and then transfer it to a paper base.
Then we transfer the images to the surface of the working material (plywood, boards). To do this, cut out a figure from paper, apply it to plywood and carefully trace along the contour with a pencil. The lines must be precise and even. If necessary, correct it by erasing it with an eraser.
The contours are applied “from the rear” of the material so that no remnants of the drawing are noticeable on the finished form. The internal areas can also be shaded so as not to cut off an extra piece, thereby indicating an inviolable fragment.