Not everyone knows how to dry wood. Moreover, in construction such a need arises quite often. Any work with wood will be done more efficiently and reliably if the material is pre-dried. This is due to its improved dry characteristics. Wet wood has less strength, warps a lot, sticks worse, is more susceptible to rotting, its service life is shorter, and products are more likely to crack.
It is important to know that only dry logs must be used for construction, because... wet logs do not retain heat well and are susceptible to rotting.
Wood is very sensitive to changes in the humidity of the environment in which it resides. This is the main disadvantage of this material. It is recommended to dry lumber to the humidity level at which it will be used. For products that are used indoors, the optimal value is 10%, and for outdoor ones – 18%.
What is wood moisture content
- wet – humidity more than 23%;
- atmospheric-dry – humidity 18 – 23%;
- air-dry (after artificial drying) – humidity 12 – 18%;
- room-dry – humidity 8 – 12%.
The lower the wood moisture content, the less susceptible it is to rotting. In addition, after drying, almost all properties of wood that are important for use are improved:
- its strength increases;
- deformability decreases;
- the quality of sawing, grinding, gluing, painting improves;
- indicators such as electrical conductivity and heat capacity decrease, the calorific value increases;
- The density of wood is directly related to its moisture content; the drier the wood, the lighter it is.
If these parameters change, the wood will either release moisture into the surrounding atmosphere or absorb it until the humidity reaches a new certain value.
Thus, during the drying process of wood, its moisture content is deliberately reduced to equilibrium values, depending on where and how the lumber will be used.
Drying of other fruit species
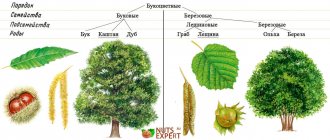
In addition to apple, pear and cherry, wood is widely used:
Features of drying fruit wood are related to the structure, density, humidity, and resistance to biological agents. In any case, the conditions are individual for each breed, and a competent drying process takes from 20 to 40 days.
Although industrial drying is optimal to obtain an ideal result, it is also possible at home if the features of the process are studied, you have a professional moisture meter and good dryers are selected.
Source: blog.flexyheat.ru
Wood drying methods
All methods for removing excess moisture from wood can be divided into the following types:
- natural drying;
- forced drying.
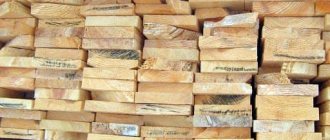
The first method is known to everyone. It consists of putting the lumber in a stack, where the rows are interspersed with spacers, putting a covering on top to protect it from precipitation, and leaving it to lie in the air. Due to constant ventilation of the stack, the wood loses moisture and dries out.
The second method is to dry the wood in special drying chambers , where you can regulate the air temperature and humidity.
But this option is suitable for drying large volumes of wood and is used mainly in woodworking enterprises.
Basic drying methods
It is quite difficult to determine how to dry wood correctly and which method is the most correct. All methods are used taking into account specific requests and requirements for the finished material. The most common methods for drying wood are:
Natural
One of the simplest and most accessible ways. All that is needed for high-quality natural drying of lumber is a dry, warm room in which there is a constant flow of fresh air. During the process of natural drying, the harvested raw materials are placed in stacks on elevated surfaces ( at least 50 centimeters from the ground ). The material cannot be laid tightly; air must freely enter the gaps between the workpieces; also, to prevent cracking of the ends, they must be treated with oil or resin. The main disadvantage of drying wood in natural conditions, despite its simplicity and accessibility, is that for a good result it will take at least two years.
Chamber
Quite a popular and fast method of industrial drying of lumber. The harvested wood is placed in special drying chambers, in which excess moisture evaporates. It is possible to determine how long it takes to dry the wood depending on the specific requirements for the final result. At what temperature is wood dried in such chambers? Typically the temperature ranges from 40 to 100 degrees . The low humidity of chamber-drying timber is a huge advantage when choosing materials for building a house, since the drier the timber is, the less shrinkage of the house will be in the future. Kiln-dried timber is not inferior in properties to laminated veneer lumber.
Rotary
This method is based on the use of centrifugal force to influence lumber. Stacks of wood are stacked on a special moving platform in a well-ventilated and heated room. The platform rotates, due to centrifugal force, the moisture accumulated in the wood appears on the surface. At the same time, heated air moves intensively inside the stack, and the processed material dries very quickly and evenly.
Contact
Suitable only for thin sheet materials - plywood and veneer . When contact drying, sheets are placed in a special press, clamped and heated on both sides due to direct contact with heated surfaces. The most fire hazardous of all methods, therefore it requires serious control of the process and compliance with fire safety rules.
Atmospheric
One of the most common and cheapest methods, it justifies itself in the presence of large areas for drying wood and large-scale volumes of processed material. Wood for drying is stacked in piles, which are located on a foundation of reinforced concrete supports. The height of the foundation is calculated taking into account the surface (open ground or asphalt) and the average height of snow cover for this region. The main disadvantage of atmospheric drying of lumber is the state of the air, the main drying agent, depends on the weather, time of year and time of day. The atmospheric drying process cannot be controlled with the same ease as when using the chamber or rotation method. A prerequisite for a high-quality final result is the treatment of lumber with an antiseptic at the initial stage of drying.
What methods of drying wood can you use at home?
There is such an unpleasant property of wood as cracking when drying. However, not all types of wood are equally susceptible to cracking:
- alder, linden, birch, poplar and aspen - dry almost without cracks;
- larch, spruce, cedar, fir, pine - crack, but not too much;
- beech, hornbeam, maple, ash, oak are subject to severe cracking.
This circumstance requires a separate approach to drying each type of wood.
One of the well-known folk drying methods is drying the tree directly on the root. It is carried out as follows:
- At a distance of about half a meter from the ground, the bark is removed in a ring along the entire circumference of the chosen trunk. The width of the ring is approximately 1 - 1.5 m. Reducing the width of the ring leads to an increase in drying time.
- The removed bark stops the flow of moisture into the tree crown, while the foliage quickly consumes the remaining moisture in the trunk, thereby dehydrating it.
- The readiness of the wood is determined by the degree of drying of the foliage.
- When it is completely dry, the trunk can be cut down and used.
Drying the cut trunk:
- The tree is cut down and, leaving a ring of bark on the trunk 0.7 - 1 m wide from the point of cutting, the rest of the trunk is left without bark. The crown is not touched.
- The foliage remaining on the trunk quickly draws moisture from it, effectively drying out the wood.
- After 2 - 3 weeks, the trunk can be sawed and folded under a canopy for final drying.
Drying wood in air is done in the same way as in enterprises: a flooring is built on a flat, dry area, on which lumber is stacked. The top row is laid with a slope and covered from precipitation.
This method allows you to get rid of 75% of the moisture in the wood, but is very slow:
- coniferous and soft hardwoods dry out within 1 – 1.5 years;
- hardwoods – more than 2 years.
Drying wood in a closed, ventilated area. To do this, you can use a spacious barn or a fairly high attic. Here, a stack of wood laid on pads will dry out much faster than outside. It is only necessary to ensure constant ventilation of the room.
Drying lumber on a cement floor. This method is sometimes used to dry small volumes of lumber. It is laid out in one row on a cement floor and the boards are turned over from time to time. The method is based on the ability of cement to draw moisture from other materials upon contact.
Drying small wooden pieces and parts using newspapers:
- the workpiece is tightly wrapped in dry newspaper and placed in a plastic bag, which is tightly wrapped.
- The bag with the workpiece is placed in a warm place.
- When the newspaper becomes damp, it is replaced with dry one and the process is repeated until the workpiece reaches the required humidity.
This process usually lasts about 3 – 4 weeks. As the wood dries, the newspapers have to be changed less and less often. To speed up the process, the workpiece can be wrapped in a thicker layer of paper, but it is important not to overdo it here - drying too quickly can lead to cracks.
Drying workpieces using sawdust or straw: workpieces are covered with a thick layer of sawdust or dry straw and placed under a canopy. Sawdust and straw take moisture from the wood, but there is no need to change them, they quickly dry out on their own.
Drying by steaming and boiling wood.
These are more complex methods, but they can be successfully used at home. The steaming method is used to replace the moisture contained inside the wood with vegetable oil. To do this, place the workpiece in a container with any vegetable oil and heat it over low heat for 6-7 hours.
Description of some workflow options
Raw lumber always creates problems. The use of such wood leads to a low-quality end result. At home, freshly purchased boards can quickly turn black if stored improperly. It is necessary to ensure high-quality natural drying in the open air. When planning construction, it is necessary to take into account the time for the drying process of lumber.
When exposed to open air, the moisture content of wood reaches a certain value (air humidity). In the process, moisture evaporates from the wood, then the workpieces take it from the external environment (the dimensions of the material change slightly). There is a cyclic process of taking and releasing moisture from the surrounding air. The wood goes through several of these stages (shrinkage/swelling) and reaches the desired condition, but almost no change in size is observed. Naturally dried lumber is less susceptible to cracking and warping (the process occurs smoothly).
Drying in stacks
When choosing a method for drying boards, outdoor drying is considered the most effective option. It is suitable for large volumes of wood. It is important to choose the right place so that it is open and ventilated. The middle of the garden and the flat roof of an outbuilding are well suited for these purposes. The prepared area should be covered with pieces of roofing felt (a large overlap must be made to prevent moisture from being drawn out of the soil).
Before laying lumber, it is necessary to determine the prevailing wind direction in order to lay the boards crosswise. The stack should be made up to 1.2 m (optimally choose 0.8 meters) in width. Otherwise, the boards located inside will take longer to dry. The height of the stack can be made to any height (if it is convenient to lay it out).
It is important to maintain the distance to the bottom of the stack from the ground (optimally 0.5 m). The easiest way to lift the bottom lumber off the ground is to use a lumber. The beams from which the supports for the stack are made must have a length equal to the width of the stack.
Bottom gaskets (made of bars with a cross-section of 20-50mm) are laid on the finished supports (the distance between them is 1.5 m). The spacers are positioned perpendicular to the direction of the boards. Planed spacers within one layer of boards must have the same thickness. The ends of the boards absorb moisture from the air faster than the rest of the surface, so they should be treated with a lime solution (a creamy mixture containing wood glue). Can be coated with drying oil, oil or paint.
To prevent lumber from drifting, the finished stack must be loaded or pulled vertically. Spacers are placed on the top layer of lumber. The ends of the upper and lower gaskets are tightened with a rubber band (30-40mm wide). In this position, the boards dry out in a few weeks (the process naturally accelerates in the summer). This method is distinguished by preventing the occurrence of cracks in wood.
The finished stack should be reliably protected from precipitation (especially slanting rain). It is important to cover the lumber so that moisture continues to evaporate. Several fairly thick pads are placed on the top of the stack (full length). After this, the roofing iron is laid overlapping so as to build a canopy of 15-25 cm around the perimeter of the stack. The tin is pressed against a pair of bars, which are tied to the spacers for strength. A ventilated gap of 10 cm should form under the iron. Other roofing materials may be used. It is necessary to choose a hard coating that should not touch the boards being dried.
Construction of a canopy
The drying technology is the same as the previous method, but the canopy is built in advance and reliably protects the stack from precipitation and direct sunlight. You can build a simple structure from bars on which a roof made of any roofing material is built. A flat base is constructed under the canopy, on which the workpieces are laid. There should be a distance of 30 cm from the ground. Before arranging the base, the ground is covered with roofing felt to avoid the penetration of moisture from the soil.
Drying on the vine
To dry standing wood, it is necessary to remove a ring of bark that is fairly wide in height from the root. It is recommended to start work in the spring. During this period of time, the tree lends itself especially well to natural drying. After removing the bark, the flow of water through the trunk to the crown stops, and the tree gradually dries out. The foliage helps dry by drawing out moisture naturally. Then this tree can be felled and sawed into boards.
Other options
Natural types of wood drying also include the option when the tree is first felled, then cleared of bark (the crown remains), the foliage draws out moisture for about two weeks, the tree is dried in a fairly short period of time (while boards stacked in the open air dry in months ).
Concrete absorbs moisture well. There is a method of drying wood based on this. Lumber is laid in one layer on a clean concrete floor, which should be turned over regularly.
When you need to quickly dry small-sized wood, the workpiece is wrapped in 7-14 layers of paper. From above everything is covered with a layer of polyethylene, in which holes are made. The workpiece is placed next to the heat source. Drying occurs evenly by regularly turning the board over.
The paper absorbs all the moisture, so it needs to be changed regularly. If the thickness of the board is 3 cm, then drying will take 4 days. If at the end of this process the lumber becomes warped, then the resulting defect can be corrected by using a plane.
Small pieces of wood can be dried using steaming methods; two weeks after drying, such pieces can be processed.
How to dry wood cuts
Let me start with the fact that my husband and I bought our first apartment in our lives and began to gradually inhabit it. I am very inspired by eco-design, but we live in a large metropolis, so I wanted to add a piece of nature to the new interior. The first thing that needed to be done for a more or less comfortable stay was to equip the kitchen. After scrolling through a lot of beautiful pictures, I really wanted to make a panel from wood cuts for the wall above the dining table. I read a bunch of sites on how to dry wood at home, since no one uses fresh saw cuts - they crack badly and can become moldy. To be honest, there is very little information on the Internet on this matter, it is poorly verified, scarce and contradictory.
Search data for your request:
Wait for the search to complete in all databases. Upon completion, a link will appear to access the found materials.
Go to search results >>>
WATCH THE VIDEO ON THE TOPIC: Drying birch cuts in the microwave. // Drying birch cuts in the microwave.
How to extend the shelf life of a house made of timber?
Knowing about the upcoming problem before construction begins, you can thoroughly prepare for it and significantly extend the life of your future home. Believe me, over the centuries-old history of building log houses, craftsmen have found more than one way to deceive nature.
Calibration
Everything in this world moves along the path of least resistance, so most cracks appear on the edge of the beam that is closer to the core of the material. But what does this give us?
A lot, actually. If you take this fact into account when building a house, and hide problem areas inside or between the crowns, the facade will remain free of defects longer, and the cracks themselves, when they appear, will be insignificant.
Of course, all this applies to ordinary non-profiled timber. A comb already created by the manufacturer will not give you any freedom to maneuver.
Compensation cut
But you must admit that in the realities of mass production, keeping track of the fibers is quite troublesome. This will greatly reduce the speed of work, and therefore increase the cost of the finished product, ultimately reducing its competitiveness. Although if there was no other choice, they would have done so. We calibrated the logs manually, made notes for the front side, but why?
The problem can be easily solved using an expansion joint. Indeed, why allow spontaneous ruptures to occur when you can carry out a neat, civilized cut?
Through it, moisture will leave the tree more evenly, and there will be no cracks. The cut will just widen a little and that’s it. Of course, such a trick will be clearly visible at the open ends and even such technical cracks will have to be caulked, but it’s better than the tree itself cracking wherever it wants.
Impregnations
This is how we gradually reached construction impregnations. Along with antiseptics and fire retardants, there are also compounds that slow down the process of moisture evaporation.
And here the key word is “slow down.” If you completely make the surface of a tree vapor-tight, it will simply begin to rot. But with slow evaporation, the moisture in the core has time to rise to the surface, and therefore the tree dries out much more evenly.
In particular, similar paints and impregnations are often used to open the ends and joints of timber, and not at all because of cracks. Having the opportunity to remove moisture along the fibers, lumber shrinks more significantly towards its edges than in the middle, and this leads to the appearance of inter-crown cracks, for which corners are so famous in a wooden house.
But everywhere has its advantages and disadvantages. Many people cannot afford colorless expensive impregnations, and the composition of the solutions is not very natural. Cheap ones are not as effective, have a far less woody color and are often difficult to use.
Confused?
Then let's talk about them in a little more detail.
How to dry wood correctly
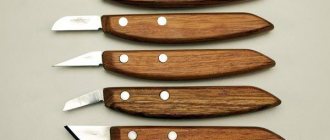
Any chisels in sets and individually from foreign auctions and stores. Delivery guarantee. Welcome, Guest. Please login or register. Did not receive your activation email? Submit this topic Print. What should be done to prevent wood from cracking during drying? Andrey, you hit the nail on the head. The most pressing issue for any carver. Guys, let's develop it. The very first thing is to block the pores on the ends of the wood, on the cross sections, so that they do not dry out faster than the main part.
When drying, the tree decreases in size, and the difference in drying causes tension in the wood, and as a result, cracks. This can be done by smearing the ends with paint or glue. I use PVA. In addition, you need to avoid drafts, since the breeze removes moisture only from the side that blows.
The best drying temperature is slightly above room temperature. And constantly turn the wood over so that it dries as evenly as possible. It is also important not only to avoid cracks, but also rotting, the appearance of fungus, larvae, etc. To do this, the tree must be cleaned of bark, dirt, and rot that appears on the surface must be cut off.
Dry in a dry place. Away from wet and dirty surfaces such as dirt floors or damp concrete walls. You can also treat the wood before drying with alum to remove rot, fungi and larvae. I would like to ask Alexander Balter how he dries alder, I’m so tormented with this tree - I can’t find the temperature, or it will sprout with a fungus or ferment, I was surprised the first time, it smells like decent mash and foam comes out of the ends.
At least they drank it on the boards before drying. I read somewhere that you can put it on the battery by first wrapping it in newspaper and securing the whole thing with tape, while rotating the tree and replacing it as necessary. In principle it is possible. In this case, newspaper is needed so that the moisture comes out more evenly. I'm not too sure about the tape, just put it in the bag.
And change the newspaper more often. So that you don’t have time to get damp. Don't forget to process the ends. Yes, but in the bag, condensation will form from the battery. Anatoly A. Andrey, always leave a reserve in the workpiece for cracks. Andr, IMHO – the battery is too much. It is enough to put it somewhere in a corner of the house and change the newspaper every other day, and tie the bag tightly.
This is how I dry pieces of boards if I need them very urgently. And you know, from completely raw ones, with almost dripping juice, normal material is obtained. Dry and without cracks. Leonid, my alder tree was cut down in the winter and dried in the stumps, although in the village, all year round in a panel house. Nothing was rotten, on the contrary, it was even dried out in my opinion. But they cut down my aspen tree in the summer, cut it down onto boards and threw them in a heap in the open air.. How I cleaned these boards later, dear mother.
So they were covered either with mold or something else. Such a specific smell, similar to medicine and clearly with a hallucinogenic effect.
At one time, I carried out all sorts of experiments on drying boards and settled on batch assembly and drying on the “edge” or “upright”. He placed the blanks on the gaskets with his feet, then twisted the outer gaskets with wire and placed them on the edge. This method prevents the boards from curling into a “propeller and groove” and allows moisture to escape more evenly.
It is advisable to periodically change the boards. Drilling also helped, if I noticed that a crack had appeared, then I drilled a hole along its path, but here you need to take into account that the invisible part of the crack can already go far. I drilled both the ends and the side parts, where the threads are small or there are none at all according to design. We need to experiment. It is better to harvest wood closer to autumn, when sap flow decreases; you must also keep in mind that in the butt part the humidity is higher than in the middle of the trunk.
Methods for creating dried timber
Atmospheric, natural
In the photo, the timber is dried naturally.
- We store the beams in stacks under sheds in the open air for several months.
- We will cover their ends with glue or lime to avoid cracks.
- But due to changes in weather, humidity and temperature, the material sometimes becomes deformed and small cracks form.
Chamber
A highly effective alternative to the atmospheric method is chamber drying.
- Timber in drying chambers equipped with heating coils, fans, and air ducts facilitate uniform, proper drying.
- The effectiveness of such drying is undeniable: we do not depend on the weather, and the process is controlled by a computer, reducing time but increasing volumes.
Generator
Drying with high frequency generators.
- Here, the wood in the circuit of this generator is a dielectric in a capacitor (the electrical energy of the supplied alternating current is converted into heat).
- The timber, when heated, dries intensively and evenly.
- But the energy costs are significant, which means the price of the timber is higher. By the way, ready-made dry timber is always 2 times more expensive.
How to correctly make a cut (pancake) from a tree
Wooden slabs are wide vertical cuts of a tree trunk, similar to large slabs or horizontal parts of logs that have undergone special processing. They are made from hard wood, mainly oak or poplar. They are used for the production of original furniture products or as separate, independent parts of the interior of the room. With their help, product design projects are created that are unlike any other. And a room with such furniture looks creative, elegant and unique. The use of wooden slabs is very widespread.
How to treat timber
Now that we know where the legs of our problem come from, and how all this can be solved, let’s see what can really be used to treat the ends of the beam so that it does not crack.
Lime
Lime is a cheap natural antiseptic, but few people know that it protects wood well from solar ultraviolet radiation and prevents it from drying unevenly.
However, do not rush to take up the popcorn. Firstly, lime is washed off very quickly, and secondly, it does not have the most pleasant color.
Would you like the ends of your beautiful log house to turn white with stains? Agree, this protection is for the most extreme cases.
Dye
You can also protect the ends with any breathable paint. Today there are more than enough of them on sale. But, again, the wood texture will be lost, but the capillarity in the beams will be completely killed. It’s a fact that if you cover previously chamber-dried wood with good paint, the likelihood of it cracking will be minimized.
Another thing is that the paints and varnishes supplied to the market are in no way inferior in cost to specially developed impregnations, and more often than not they cost significantly more, so what’s the point in reinventing the wheel then?
Wax
Another remedy we inherited from our ancestors is beeswax. The ends sealed with it remain transparent for steam exchange, but not for moisture. Plus, this material is of natural origin, 100% safe for human life and time-tested.
Another thing is that working with such a product is extremely inconvenient; it requires constant heating, and also makes the wood more susceptible to fire.
True, today manufacturers have refined the idea of their ancestors and created wax-based mastics that are easy to use, which, in addition to the properties described above, improve the mechanical properties of wood and give it a beautiful silky shine. The only problem is the price. Not everyone's budget allows them to purchase such a miracle.
How to dry wood
This tree species can figuratively be called universal, since logs and finished lumber from birch are dried in the same way as any other wood, which we will discuss in detail in this article. Before you start drying birch, it is important to block the pores at the ends of the workpieces and on their cross sections. Wood processors cover the ends and cuts using paint or glue, in particular PVA. If these actions are neglected, the ends and cross sections of birch blanks will dry out quite quickly than the main parts of the blanks. When a birch dries, it shrinks unevenly, decreases in size in some places more and more quickly, and in other places practically does not change its basic dimensions. As a result of this unfavorable uneven drying of the wood, a certain tension is formed in it, which, so to speak, is released and breaks the fibers of the material, forming cracks.
Why dry wood?
When drying, the strength of lumber increases and the risk of rotting and fungal damage is seriously reduced. It's all about water, which is a comfortable environment for fungus and microorganisms. When drying, the moisture content of the wood decreases significantly, hence the conditions inside the fibers become partially unsuitable. And in combination with treatment with antiseptic solutions, the tree becomes completely invulnerable to the effects of microorganisms.
Moreover, working with dry lumber is a pleasure and a minimum of problems.
Drying end-cut wood at home
By Turbo4x4, October 9, in Technologies. There are several ways to dry wood, but as a rule these methods are industrial - if you have a log and it’s five to seven years old, then there won’t be any problems - I covered the butt with paint and forgot. But what about boards and blanks that I cut in the forest not in the spring, of course - When is the maximum amount of sap in wood in the fall? At the moment I need two axes with a natural bend in degrees per mm of the product. Can you imagine this crookedness? And with great difficulty, naturally, I found such a crook. Birch, perfectly clean when cut - like butter.
What is needed for the process
To obtain high-quality products, be sure to use well-dried material. Raw wood does not sand well; paint and varnish quickly become cracked. Drying boards is an important stage in the preparation of lumber.
There are several options for naturally drying wood with your own hands. The methods describe how to properly dry the boards to rid the wood of excess moisture. In addition to lumber, you also need to have auxiliary means:
Question for those who have experience in drying wood (+)
I decided to make oak dies for the handles for the first time. I will list what I did in chronological order. — I chose logs of beautiful texture from the butt part of the tree; — processed the saw cuts with PVA; — kept in bags wrapped in newspapers for three weeks; - changed newspapers daily; - after the fourth week, took it out of the bags and laid it out in a dry, warm attic; — after 3-4 days I saw that the saw cuts began to crack; — chipped and sawed off the excess, making blanks 150X50X40mm; — put the workpieces in a galvanized bucket, poured it with sunflower oil, sank it with a weight, and put it on low heat for 6-7 hours. — in the morning, when everything had cooled down, I took out the spoiled preparations. The question is, what did I do wrong?
The question is, what did I do wrong?
The oak should be dried with a log and the bark should not be removed. If the trunk is thick, cut into quarters. Dry immediately in a dry place without newspapers or bags until dry. Afterwards, cut off the torn ends and begin selecting wood for dies. Be prepared for the fact that even the slightest bit of humidity will lead to the formation of cracks along the lines, so oil treatment in the finished product is mandatory.
Do quick methods of drying in oil or salt water not work with oak?
The trunks tear when boiled and tear into splinters when dried