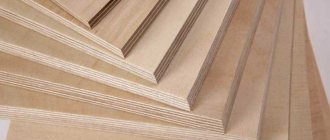
Plywood is a multi-layer wood board that is still in demand by consumers. It is used in everyday life for interior decoration or as an element of furniture structures. Despite its obvious advantages, this material has a serious drawback. Wood is susceptible to moisture.
Therefore, the question of how to impregnate plywood from moisture is relevant. Without pre-treatment with moisture-proofing agents, wood veneer swells and flakes.
Only correctly selected LCS, which will be used to process plywood layers, will extend the service life of the product, make the surface moisture-resistant and protect it from delamination.
Work order
Treatment of plywood from moisture involves three types of operations.
PVA putty
Canvas treated with this material is resistant to moisture, protected from rot, dampness and fungal diseases of wood.
- The first layer of PVA is applied to a horizontally laid sheet.
- After the layer is saturated with the composition, this area (layer by layer) is covered with the selected product until stains appear on the reverse side.
- Next, the slab is dried at room temperature without the use of additional means.
- The treated areas are covered with plastic film while drying.
Drying oil
A simple way to protect material from moisture. The popularity is explained by the low price of the product and high results. How to treat a plywood floor with drying oil:
- Impregnation begins by heating the drying oil in a water bath (when hot, the penetrating power of the product doubles).
- The sheet, cleared of dust and laid horizontally, is processed alternately on both sides. After saturating the surface, the oil is applied in a thin layer.
- Each new coating is dried with a construction hairdryer.
- Treatment and drying are alternated until the surface absorbs the product.
- The ends of the sheet, edges not protected by special means, quickly delaminate. Therefore, after completing the work, they are covered with thickly rubbed paint - a paste diluted with a film-forming agent to protect the wood from water.
- The impregnated and dried surface and ends are coated with a finishing layer of varnish.
Impregnation with nitro paint
These are additional measures that enhance the water-repellent properties of oily compounds. Instructions for using the method:
- The surface is impregnated with drying oil.
- Liquid primer paint is applied to the dried composition.
- Next apply thick nitro paint or nitro putty diluted with a solvent.
- Finally, the sheet is coated with liquid nitro paint and dried.
Protection with reinforcing fiberglass
This method of impregnation increases the service life of the material by 30%. The work order is as follows:
- An antiseptic is applied to the cleaned base and coated with varnish that does not contain polyester or epoxy resins.
- Then the layer is dried for 5-6 hours.
- Glue fiberglass onto the sheet.
- Reapply the varnish to the entire surface, including the ends of the material.
- After the plywood has completely dried, a final coating of varnish is applied.
If necessary, it is possible to replace fiberglass with technical gauze.
A few words about the structure of plywood
Before we talk about ways to protect a product, we need to understand what we are dealing with. The building material in question, consisting of several interconnected veneer layers, is plywood.
Most often it is used in the construction industry. It resists the negative effects of moisture due to the use of bakelite varnish and/or glue that binds its layer in the production.
Boats and other watercraft/crafts are made from this material without special or additional processing. Although, such material is very expensive.
Preparing for work
The veneer is treated before painting to protect the product from moisture and to obtain an even surface finish. Processing is carried out in the following way:
- Before treating plywood, sheets intended for painting are pre-dried for several days in a dry room at an air temperature of at least 20 degrees.
- Then the base is cleaned and polished with abrasives. If a large area is being prepared for painting, it is recommended to use a grinding machine. For small areas, use fine-grained sandpaper.
- Before coating the veneer with paint, the treated surface is primed with an acrylic composition with a high adhesion index.
The primer, penetrating into the wood structure, prevents drying out, cracking and improves the properties of the surface.
What and how to cover plywood on the floor for moisture resistance?
For many years, plywood has been one of the most common floor coverings. It attracts, first of all, with its affordable price.
And the fact that it is a natural, strong and durable material only adds to its popularity.
In most cases, it is used as a substrate for more modern materials, such as carpet, laminate, linoleum and solid boards. But it can also be used as a finishing decorative coating.
To figure out how to properly cover a floor with plywood, here are a number of basic rules:
- Before laying, the sheets are brought into the room where installation will take place and left there for acclimatization.
- If the base (cement or screed) is not level and there are significant differences on the surface, it is better to cut the plywood sheets into 50-100 cm squares. In this case, voids will not form under the sheets, in which fungus can develop over time. For a smooth base, laying in solid sheets is allowed.
- Before laying, the base must be cleaned of construction debris and dust, and, if necessary, wet cleaning.
- The next step is primer. If you plan to use regular plywood, then you need to cover the floor with a moisture-resistant primer, preferably with an antifungal effect (this is especially true for wet rooms). When using moisture-resistant plywood, regular primer will do.
- The choice of glue also plays a big role; it can be: water-dispersion, polyurethane, epoxy. Read more about which glue to choose here.
- In addition to glue, the sheets must be secured with self-tapping screws, this is especially important when using water-based glue. Self-tapping screws with plastic dowels are best suited for this purpose. Hats should be of medium size, preferably galvanized.
- 1 Step by step coloring
- 2 Tools
Tools
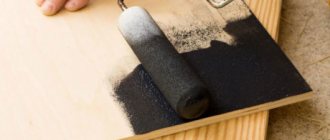
Painting and varnishing work can be done using a roller (with a lint-free surface) or a brush. If the amount of work is large and there are many corners and hard-to-reach places on the surface, then you can use a sprayer or a soft sponge. Empty containers are also useful: a ditch or simple buckets, basins.
How to paint
Regardless of where the pressed veneer will be used and why it is painted, it should be treated with paints and varnishes that contain moisture-proof components.
Before covering the plywood on the floor with an antiseptic, pay attention to acrylic LKS. This type of paint is resistant to abrasion, dries well, and its smell quickly dissipates. Such mixtures also protect wood from various types of environmental influences.
If plywood sheets are used outdoors, it is better to give preference to oil or enamel products.
Processing plywood sheets with drying oil
Treatment with drying oil is considered the most affordable and simple solution, which is performed in a certain sequence:
On a note!
To quickly penetrate the protective composition into the surface to be treated, it is necessary to preheat the drying oil to 50-600 C. In the heated state, the drying oil has better penetrating ability.
- Using a brush, apply a protective layer.
- Having soaked one side, a similar procedure is performed on the second side.
Important!
It is necessary to pay special attention to the ends of the plywood and thoroughly saturate them with drying oil.
The process of applying water-repellent composition
After saturating both sides of the material with drying oil, you can begin drying. In this case, a forced option using an industrial hair dryer is allowed.
About safety precautions during work
Many people forget and/or neglect basic insurance standards, working without observing their own safety measures, in vain. Some of the products used to treat sheets and protect against moisture are toxic. Have a negative impact on human health.
Therefore, when working, it is necessary to use personal protective equipment, which includes: gloves, goggles and a respirator. The issue of using protective equipment when processing sheets of plywood mounted on the outside of the room is especially relevant. Indeed, in this case, the use of epoxy resin is allowed.
Painting plywood
Painting can refresh or highlight the natural texture of plywood. But usually the surface of the plywood is painted completely, without revealing the unique texture of the veneer. Paint can be applied:
- roller;
- brush;
- sprayer.
Colored plywood can be used for both exterior and interior decoration. Before painting, its surface should be treated with a special solution to prevent fungi and blue staining, since the chemical resistance of transparent paints is greatly limited by a small amount of binder.
Similar news
All lumber is a material that has a wide range of applications in construction and renovation work. Plywood is no exception. This is a unique building material with high technical characteristics (strength, wear resistance, water resistance, etc.). The most popular type of plywood is laminated plywood. This is justified by its properties: high moisture resistance, strength, reliability, beautiful appearance (imitates natural wood). The only drawback of this material is its high cost. That is why people often buy cheaper options and use impregnations at home to give them the desired qualities.
Protective compounds are selected based on what properties the plywood (link) should be given (moisture resistance, protection from mold or mildew, etc.) and where these boards will be used (outdoors or indoors).
Most often, the following substances are used to impregnate plywood:
- Epoxy (resin with added solvent). Makes the top layers harder, which prevents delamination and cracking of the material.
- Linseed oil. Due to this treatment, the service life of lumber increases. It is worth considering that plywood absorbs oil worse than natural wood. Therefore, such treatment does not solve all environmental protection problems.
- Used oil. Guarantees a water-repellent effect, protection against insects and rodents. They are used for stoves that are found outside the living space, since such oil can be dangerous to humans.
- Soil impregnation. This composition protects the material from moisture, and accordingly from swelling, deformation, mold and mildew. Some also prevent cracking and even rotting. Most often used before applying paint.
- Antifungal impregnations. They provide a waterproofing effect and protection against mold and mildew. Requires subsequent painting with paint and varnish material.
- Drying oil. Increases the moisture resistance coefficient. The simplest and most common means of protecting plywood.
- Putty-PVA. Creates a protective coating against the action of microorganisms and biological influences.
- Nitro paint. Protects against moisture (even suitable for boats). The disadvantage is the multi-stage application procedure.
Paint protection
If you need to solve the problem of how to make plywood waterproof on its own, you will have to take measures to protect its top layer from corrosion using paint and varnish coatings.
For this case you will need the following materials:
- Natural drying oil. Before starting the process of applying it to plywood, the drying oil is heated to 50° C.
- Varnish 6T, or 6C. Varnishes intended for flooring, as well as 4T and 4C varnishes are also an acceptable option. But “epoxy” and polyester resins, contrary to widespread belief, should not be used due to their incompatibility with drying oil.
- Fabric for reinforcement. Professionals prefer to use fiberglass (rare and thin), but for amateur construction, ordinary gauze is also suitable.
- Turpentine for wetting fabric.
- Oil paint.
- Corners made of thin metal to protect the ends of plywood.
To make plywood moisture resistant, you need to prepare the following tools:
- Brushes for applying drying oil and varnish.
- Iron for drying the top plywood layer. If the structure has large dimensions, only a construction hair dryer can dry the top layer of veneer.
- Trimming brush. It is needed to ensure a tight fit of the fabric during reinforcement.
- Brush, roller, sprayer are tools used in the final painting of plywood.
Sequencing
Varnish is applied to plywood after it has been soaked in drying oil.
- Deep impregnation with drying oil. A layer of heated drying oil is applied to the plywood with a brush. The surface is dried with a household iron or a hair dryer. In this case, the devices must be heated to 150-200 ° C. Impregnation is repeated as many times as the plywood can accept drying oils. This way the material will be completely saturated.
- Varnish is applied to the oiled surface. Be especially careful on the ends of the plywood sheets.
- Applying fabric for reinforcement. Necessary to increase the strength of the oil paint layer at the final stage. This is done a few hours after applying the varnish (you need to wait until it thickens). To ensure that the fabric is well straightened and fits tightly, it is moistened with turpentine and tapped with a cross-cut brush.
- Reapplying varnish. This is done after a few more days, since the fabric should already be completely dry.
- The final stage is liquid putty with varnish and painting with oil (or other) paint suitable for the oiled base.
To make plywood qualitatively moisture-proof, the sheet treated with drying oil and painted with paint is protected with overlays in the places most vulnerable to moisture - the ends.
If everything is done clearly and carefully, there will be no doubt about the protective layer for the plywood. But over time, after a few years, the paint (even on a reinforced surface) will still be covered with a network of microcracks. Using coarse sandpaper, you must definitely remove such a damaged layer and then re-coat the plywood with a thin layer of paint.
Methods for laying moisture-resistant plywood
In our review today we will look at the use of plywood as a subfloor. As a rule, this is the base for such flooring as parquet, solid wood boards, laminate, linoleum. Plywood serves to level the base so that the floor surface is perfectly flat, without drops or other defects.
At the same time, sometimes, in accordance with the project, premium plywood is laid as the “main” floor, varnished and looks quite presentable, but modern renovations still require the use of more respectable materials.
Thickness
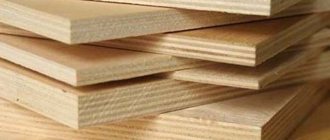
Plywood consists of several layers of wood, compressed and glued. The more layers, the thicker, stronger and more reliable the coating. Sheets of plywood that are optimal for constructing a subfloor must have at least 11 layers and be at least 16 millimeters thick.
Stamps
For domestic use in interior spaces, we recommend the FK and FSF brands. FK grade plywood has average water resistance; the layers are glued with glue based on urea resins. FSF brand plywood has increased moisture resistance; not only the layers, but also the top veneer are impregnated with an adhesive composition based on phenol-formaldehyde.
Wood
To make plywood, both coniferous and deciduous wood is used. For interior work, we recommend birch plywood; due to its quality, it is best suited for flooring.
Quality
The quality of plywood depends on the grade. The first and second grades are distinguished by high quality and a small number of defects. The third and fourth grades are significantly worse, less durable and not suitable for subfloors.
Set of tools for work
- drill/hammer
- screwdriver
- jigsaw
- hammer
- building level
- scotch.
Plywood installation methods
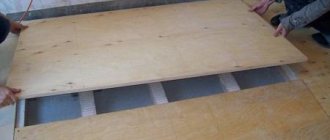
The base for laying plywood is usually a concrete or wooden floor. If the surface is relatively flat, then we attach the plywood directly to it. There is no need to remove old wooden flooring, even if the boards are worn out, cracked and creaky. If the surface has significant unevenness, we first install the logs as a basis for plywood sheets. Let's look at these three methods in more detail.
Method one. Laying plywood on a concrete base
- We clean the concrete base from dirt and debris; it must be clean and dry.
- We start with waterproofing the floor. We use thick polyethylene for this purpose and lay it out in strips over the entire surface of the floor. Each subsequent strip should overlap the previous one by about three to five centimeters. We glue the strips together using tape.
- Before laying, we take measurements of the room, draw its plan and mark the plywood sheets on the plan. We place the largest solid sheets of plywood in the center of the room and in the direction of the door, taking into account the areas of maximum traffic.
- We cut the plywood into sheets of the desired format, which will be located along the edges. We use a jigsaw with a special file that will cut the edge smoothly.
- In accordance with the markings, we lay out sheets of plywood on the floor surface from the center to the walls. We lay the sheets in a checkerboard pattern, which is called “staggered.” When laying, we observe the necessary indents and gaps: to the wall - at least a centimeter, between adjacent sheets - a couple of millimeters.
- We attach the plywood directly to the concrete base.
Using a hammer drill, we drill holes in concrete and plywood, using a drill diameter slightly smaller than the thickness of the self-tapping screw: this way it will not fall into the hole. We use plastic dowels. We tighten the screws so that their heads are completely recessed. In this case, the topcoat will lie flat and the caps will not interfere or stick out. - For reliability, we drill a significant number of holes and also use a lot of fasteners. We first fasten the edges, then drill holes around the perimeter of the sheet, then in the center and near it.
Method two. Laying plywood on a wooden base
- Basically, laying plywood on an old wooden floor repeats the previously discussed steps, but it also has its own characteristics.
- Since a wooden floor is not monolithic, unlike a concrete one, it is important when fastening it not to miss or fall between the boards. To do this, we mark holes on the surface of the plywood sheets.
After the sheets of plywood are laid out on the floor according to the plan, lift the edge of each sheet and mark the location of the boards. In accordance with the marks, we mark the location of the boards lying underneath on the surface of the plywood.Focusing on the location of the board, we mark the locations for the holes and subsequent fastenings on each plywood sheet in the form of a grid: a system of horizontal and vertical lines.
- Since old, dry wood floors tend to squeak, it is important to tighten the plywood tightly and securely to the boards.
The amount of fasteners is important. The distance between the screws (nails can also be used) should not be more than ten centimeters.
Method three - laying plywood on joists
- We use this method when the surface of the concrete base is clearly uneven and has significant differences in height. It is labor-intensive and requires care: the main task is to create an even horizontal base.
- We use lags, i.e. bars, ten centimeters wide, five centimeters thick, about two meters long. If it is necessary to increase the length of the logs, we join them together at the ends.
- Before installing the logs, we waterproof the floor using polyethylene (see procedure above).
- We install the logs directly on the concrete base, leveling them using a building level. The distance between adjacent logs should be about forty centimeters. Next, we install crossbars with a distance between them of up to half a meter. We have a wooden mesh.
- We lay sheets of plywood on the joists so that the edges of each sheet are on them. We fasten the plywood to the joists with self-tapping screws or nails, first along the edges. Next, since the format of the plywood sheets is quite large, we fasten it along all the cells of the wooden mesh formed by the joists and crossbars.
Source: https://www.TopDom.ru/articles/repair_furnish/vlagostoykaya_fanera_sovety_po_ukladke.htm
Plywood finished floor
Plywood is a natural wood material made up of strong, thin layers in odd numbers. Glue them together so that the fibers of the sheets are perpendicular to each other. This method gives the plywood plank strength and reduces the likelihood of stretching.
Plywood flooring is an economical option, but how good is it and is it worth using?
Types, types and grades of plywood
Depending on the purpose, plywood can be:
- construction;
- furniture;
- structural;
- industrial;
- packaging
Plywood sheets have different thicknesses depending on their application
Depending on the glue:
- Waterproof (FC). Kabamide glue is used;
- Increased moisture resistance (FSF). The sheets are glued together with phenol-formaldehyde glue;
- Non-waterproof (FBA). Albumin-casein glue is involved in the process of joining sheets. Despite poor waterproofing, it is highly environmentally friendly;
- Capable of maintaining its protective functions even in water (FB).
- 4th grade. Very low quality, many external defects and short service life. The material is obtained as a result of adjustment in production and is considered a defect. To refine the material, unusable parts of the sheet are cut off, usually resulting in less than half remaining. Experts recommend using the floor for rough laying, and covering it with good quality plywood on top;
- 3rd grade. It is difficult to call such material a defect, because the percentage of defects is much lower than that of fourth grade plywood. But it is not recommended to use it for a “clean” floor;
- 2nd grade. Only small cracks are allowed, the length of which is less than 20 cm. The cost is lower than first-grade plywood, but it requires additional processing, and therefore additional costs;
- 1st grade. Cracks up to 20 mm are allowed. This plywood can be used for any purpose. Suitable for finishing floors;
- Elite plywood. The quality of elite plywood is at the highest level. Its surface is smooth and there are no defects. Suitable not only for finished floors, but also for making arches.
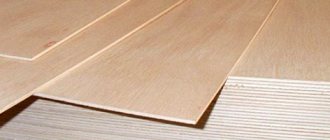
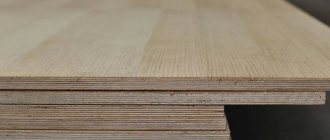
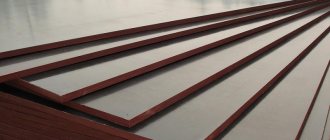
A visual representation of the surfaces of different types of plywood
Types of plywood by methods of processing:
- Laminated. Suitable for concreting due to its smooth surface. Also used in furniture production for the manufacture of decorative panels;
- With double-sided grinding. Most often used to make bed bottoms;
- Polished on one side. Excellent for finished floors. Easily laid on both concrete and wooden bases;
- Unpolished. Suitable for rough work only.
Leveling the floor with plywood
Plywood is perfect even for leveling the floor with your own hands. If the difference between the highest tubercle and the deepest depression reaches 100 mm, then any ordinary flooring is out of the question.
Installation of plywood floor along joists
First, the floor surface is thoroughly cleaned. Then a primer is used to further remove dust and improve the adhesion of various types of materials. Next, a concrete screed is poured, which dries for about 1.5 months.
After this, a mandatory check of the moisture content of the concrete is carried out: a section of the surface is covered with a film and secured at the edges, such a structure must be left untouched for up to three days, and if after this period no moisture forms under the film, then leveling the floor can be continued.
Next, the surface is covered with waterproofing, and plywood sheets are laid on it. Specialists cut them out and adjust them, numbering them according to a pre-formed pattern.
The material should be sawed very carefully to avoid delamination and torn edges. But if you get low-quality plywood, it will delaminate in any case and such a coating will not be suitable for the floor. The plywood is cut into square-shaped pieces, then adjustments are made, laid out on the floor and numbered. The seams between the sheets should be 8-10 mm, and the gap between the plywood and the wall should be 15-20 mm.
The standard size of a plywood sheet is 125*125 cm, but to make it easier to lay the floor, it is usually cut into four parts. Moreover, smaller sheets create a larger number of seams, which play a huge role in compensating for deformation, because the smaller the sheet area, the less it deforms.
Plywood sheets are laid with glue and secured with self-tapping screws, the length of which should be three times the thickness of the sheet.
Glue with a thickness of 1-2 mm must be applied specifically to the surface of the concrete screed.
The final stage is sanding the floor to give it additional smoothness. After the work has been done, you must check the evenness of the surface, whether there are gaps between the sheets and whether there is space between the wall and the sheets. The thickness of this plywood floor reaches 16 mm.
Features of installation on different bases
- Wooden floor. Laying plywood on a wooden base is very simple: either along the joists. or using self-tapping screws.
- Concrete or cement floor.
In this case, the floor must be very flat, and a waterproofing layer underneath is required. Plywood is attached in two ways: floating or using glue. The floating method eliminates the use of glue; the flooring occurs in two layers in such a way that the joints of the sheets of one layer are located in the central part of the sheets of the other layer. They are fastened with ordinary self-tapping screws, and a waterproofing film can be laid between the sheets.
The thickness of the sheets varies from 3 mm to 30 mm or more.
To increase the thickness of the floor, standard sheets with a thickness of 12-16 mm are usually used and laid in two or three layers.
Experts use plywood to create masterpieces that look like wood or parquet floors. But for this, the plywood sheets must be of the highest quality, and the front side must be sanded. Before creating a floor pattern, the plywood is covered with stain. After final installation, the finished floor is sanded and varnished.
The advantages of the material include the following:
- natural material;
- humidity level is 12-15%;
- has good contact with the floor covering;
- low financial and resource costs;
- no special preparation is required before installation;
- creates additional insulation;
- can be used both as a subfloor and as a decorative finishing coating.
The disadvantage of using plywood is its intolerance to sudden changes in temperature and humidity. Only proper installation and subsequent maintenance can extend the service life.
This kind of beauty can be created using this material for finishing the floor.
After purchase, the sheets should lie down for some time and get used to the conditions of the room in which the flooring will be laid:
- One day with minimal difference in humidity and temperature between the store and the installation site;
- 3-5 days, if the temperature differs by 5-8 degrees and the humidity by 10%;
- More than a week if the deviations are significant or the sheets are deformed.
It is better to lay plywood at a temperature of 20-30 degrees Celsius. These are considered to be optimal conditions.
Before installation, it is better to treat the sheets with an antibacterial primer to protect against fungi and mold.
Product selection criteria
If you prefer plywood to laminated or linoleum covering, then pay attention to:
- Name;
- wood species;
- brand;
- veneer durability;
- type of glue;
- surface type;
- sizes (format, large format). This criterion is very important for transportation and storage;
- GOST;
- emission class;
- number of layers.
Before choosing the right material, you should think about which room will be finished. If we are talking about a bedroom or a nursery, then moisture-resistant plywood would be optimal because of its safety. And in an industrial area, a material with increased wear resistance is acceptable.
Opinions and reviews
What to choose: moisture-resistant or laminated plywood, wooden flooring, linoleum or laminate? Plywood sheets are perhaps one of the cheapest finishing materials. Which one to choose and whether it’s worth pursuing cheapness at all is up to you to decide. Consumer reviews vary.
Those who choose to save money on finishing such an important element of their home as the floor are disappointed after a certain time - the thickness of the base ends up being quite significant. Plus, if we are talking about fine finishing, the surface has to be covered with a thick layer of paint or varnish, and this is a considerable expense.
In addition, even moisture-resistant or laminated plywood is not durable. It turns out that the savings are reduced to nothing.
Source: https://pol-v-dome.ru/chistovoj-pol-iz-fanery.html
Finnish goods
The most striking example of maximum protection of plywood from the effects of dampness is the so-called Finnish plywood. It is a material glued together from several sheets of birch veneer and impregnated with bakelite varnish. It was this composition that made it a unique material in terms of water resistance, which can be used in almost any climatic conditions. Bakelite plywood is not afraid of fungus, and it is also highly fire resistant. True, purchasing this building material can cost a pretty penny.
Return to contents