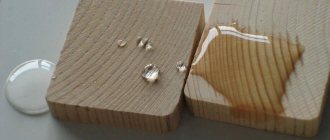
The problem of maintaining optimal moisture content in lumber is relevant both among builders and among those who like to make something in their own carpentry workshop. Drying wood at home allows you to save a lot on its purchase, because dry raw materials are always more expensive than wet ones.
By the way, if you don’t have any time for construction work, then you can dry the wood at home or in the country even under atmospheric conditions.
Some owners adapt ready-made haylofts, sheds or other suitable buildings for these purposes. This is the way out of the situation that one of our forum members found.
Timakval member of FORUMHOUSE
I used the yard attic (former hayloft) size 10*5 m for drying. I laid it out, as it should, through spacers in each row. Total 3.5 cubes of boards of different categories. The advantages of this drying place are always shade, a finished roof and good ventilation. Last May I took boards, beams and beams of different sizes - blanks for small construction. The boards were too heavy to lift due to moisture. During the time they were lying in the hayloft (1.5-2 months) they dried to fluff, they did not curl or bend.
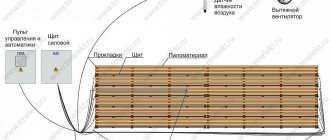
Drying under atmospheric conditions is a rather lengthy process, and since we have decided to take a comprehensive approach to this issue, let’s look at the sequence of building a home dryer with our own hands, which allows us to more effectively achieve the required humidity levels. We suggest that you select a building of the required size as a suitable premises, and after that you can begin to work. The room can have dimensions of 2*3 m or 4*3 m (more is possible). It all depends on your needs and the scope of your activity. But when choosing a building, you should remember that there should not be much free space left in the dryer. After all, drafts and chaotic air movement negatively affect the quality of wood.
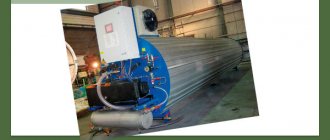
Vacuum chambers for drying wood
In vacuum chambers, timber is dried under high pressure conditions of 700 mmHg. Art., but at a low temperature of 45 C. A vacuum is specially created in these devices, which entails high energy costs.
Vacuum drying is an extremely expensive method of drying timber for a number of reasons:
- expensive vacuum chambers, a huge amount of electrical power for proper operation, a small load, approximately 5-8 m3.
In such devices, timber is dried for one to two days. For example, to dry 40 m3 of boards it will take approximately 8-16 days. And if the timber is vacuum dried, it will take even more time.
Due to the high cost of the process, vacuum drying of wood is carried out mainly for expensive types of timber, such as oak, ash, beech, and cedar. In such cases, it is necessary to dry a small amount of lumber. For mass production of lumber, convective drying chambers are used because they are more accessible and have a low cost.
Some examples of vacuum drying:
- oak boards 52 mm thick with a moisture level of 50% will dry to a moisture level of 4-5% in approximately 28 - 35 days oak boards 52 mm thick with a moisture level of 30% will dry to a moisture level of 4-5% in 16 - 18 days oak boards 25 mm thick with a humidity level of 50% will dry to a humidity level of 4-5% in approximately 15 days oak boards 25 mm thick with a humidity level of 30% will dry to a humidity level of 4-5% in 9 days pine boards 55 mm thick with a humidity level of 50% will dry to a humidity level 5 -6% in about 8 days pine boards 55 mm thick with a humidity level of 30% will dry to a humidity level of 5-6% in 6 days building timber 100 x 100 mm and 150 x 200 mm with a humidity level of 65% will dry to a humidity level of 6% in for 8 – 12 days. A beam of 200 x 300 mm will need 22 days to achieve the same parameters.
Under vacuum conditions, wood drys more gently. However, even with this drying method, cracking is possible. Wood is a living raw material.
Wood has different types of stress. These stresses depend on the area in which the tree grew, on the cutting method, and on age. When drying wood, even in such chambers, not all stresses are relieved evenly.
Construction of a dryer
Construction of a simple dryer for drying small volumes of wood with your own hands under natural conditions consists of several stages:
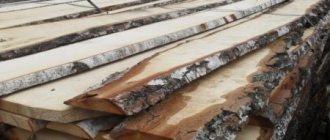
Drying device for lumber.
- It is necessary to select and prepare an area to place the building. You can build a dryer on the adjacent land. To build a small dryer, a flat roof will do. The floor can be made from several layers of roofing felt, sprinkled with sawdust.
- Wood to be dried is stacked in a stack no more than 120 cm wide. The optimal size for its width is 80 cm. The stacking height is 50-70 cm. Separate layers of boards or beams are laid with slats at least 2 cm thick. It is recommended to lay the stack across the air flow on this area.
- Provides protection from rain and snow. Dry wooden beams with a cross section of approximately 50x50 mm are laid on the top row of the stack. Iron is placed on them, which is pressed against the same beams.
In such a dryer, the material is blown with air, the moisture gradually evaporates, and the humidity level decreases.
How does vacuum drying of wood occur?
Injecting a vacuum inside the chamber where timber is dried significantly changes the physical nature of heat and mass transfer processes in wood. Drying is carried out by the action of a constant vacuum of 0.95 MPa and steam generated from the moisture of the timber. Since there is a natural movement of the drying agent at a speed of up to 0.3 m/sec, there is no need to use fans, lumber humidification systems, or install a dry/wet thermometer.
Drying is controlled by lumber moisture sensors. For example, during the drying of oak lumber from an initial moisture level of 65% to a residual moisture level of 6%, about 450 liters of moisture are released. If you load a maximum of 12 m3 of oak with a thickness of 55 mm into the chamber, the total amount of moisture will reach 5,400 liters.
Today, all companies producing vacuum drying chambers have certificates of compliance with European standards. In such devices you can dry different types of wood at the same time.
Drying quality:
- the residual level of importance is from 6 to 0.5%; the difference in humidity level across the stack does not exceed 1%; the difference in humidity level across the thickness and length of the board does not exceed 0.9%.
Features of drying chambers
Most modern cameras have a similar design, regardless of type. Most often, the drying chamber device is a horizontal structure in a cylindrical shape, less often in the form of a parallelepiped. The inlet is closed with a massive lid, through which raw materials are loaded and unloaded from the chamber. Vacuum models have a rubber gasket on the door, which allows you to create conditions close to an ideal vacuum.
Lumber is placed on heating plates made of aluminum alloys. All plates are mounted on rollers, which ensure optimal movement of wood and uniform drying, as well as convenient loading and unloading.
Depending on the camera layout, appropriate equipment is installed.
Vacuum chambers are equipped with a pump, some models are equipped with heating elements to pump hot air into the chamber (using electric or wood heating), and some are equipped with a steam engine.
Equipment for condensation drying of lumber can be made independently, based on the basic principles of the structure of drying chambers.
DIY vacuum drying of wood
The drying process is very beneficial when done with your own hands. However, purchasing a factory-made vacuum chamber is quite expensive; in this section we will tell you how to make one yourself. Drying at home can be done in a special chamber, which requires a spacious room, a heat source, and a fan to distribute the heat inside the chamber.
The best option for creating a chamber is an iron conveyor. You don't have to buy a new one, you can find used ones. In addition, you can weld the chamber yourself from old iron.
In order to retain heat inside the chamber, the walls need to be insulated with foam plastic and lined with clapboard. In addition to polystyrene foam, mineral wool and any other insulation material are suitable.
In order for heat to be reflected from the surface, it is necessary to lay a special material. You can use foil or penofol. By the way, the heat-reflecting and preserving qualities of penofol are much higher.
After this, you can begin assembling the heating device. The entire heating system must be installed separately from other heating circuits; it must be constantly functioning. A heating radiator that heats the water to 65-90 degrees is suitable.
To distribute heat evenly in the chamber, it is worth purchasing a fan. Without it, drying will not occur evenly, and the final product will be of poor quality. Do not forget about fire safety rules when creating a vacuum dryer.
Another important point is the creation of a system for loading lumber into the chamber. For this purpose, you can use trolleys that move on rails or a forklift.
Raw materials are placed on shelves or directly on the floor to dry. To monitor the drying process, you need to install special sensors - thermocouples and pressure sensors. If you approach this event wisely, you will end up with a chamber for drying high-quality lumber.
After loading the raw material into the chamber, the door closes tightly and the drying process begins.
Under such conditions, bound and free liquid will move smoothly from the center to the periphery, which guarantees high-quality and uniform drying of the material. The dry top cells of the lumber absorb liquid from the cells located closer to the core. First, thin places dry out, then moisture from thick layers moves into already dry ones, making them wet.
To prevent displacement, a special mixture is applied to the lumber, which is made from chalk and drying oil. Most often, this mixture is applied to the end parts of the workpieces.
Traditional drying Vacuum drying Number of days R consumption, kW/h Guarantee. defect, %t, °СGarant.
humidity, % Number of days R consumption, kW/h Guarantee. defect, %t, °СGarant. humidity, %710 0002015015150055010
- Technological procedure for drying wood
- Vacuum drying of wood material
- How to dry wood at home
The fate of the product will depend on what kind of wood it is. And since humidity is an integral parameter, wood drying takes one of the first places in importance.
Step-by-step manufacturing instructions
Making a homemade lumber dryer at home is quite difficult. For these purposes, you should use a ready-made chamber assembly drawing, or when assembling, rely on the instructions of the factory drying chamber. For production, you should use only high-quality materials and equipment, preferably new, old only after careful inspection and the necessary maintenance.
To make the simplest drying chamber, you should prepare the following materials:
- aluminum profile;
- sheet metal;
- insulating material and waterproofing film;
- sawdust;
- heat construction gun or boiler for drying.
The entire manufacturing process can be divided into the following stages:
- Site selection. It is better to place the dryer indoors or at least under a canopy. Placing it outdoors has a number of disadvantages: the frame of the dryer can corrode, the level of heat loss increases and the drying process becomes more complicated due to high air humidity. Placing the camera indoors requires compliance with fire safety rules; it is better when the work space is separate from the living space, does not have flammable elements, has several exits and ventilated windows.
- Laying the foundation. The foundation can be made of any type; if the floor in the room is flat and well concreted, you can install the camera directly on it. The foundation can be built from concrete or metal profiles, or pipes.
- Installation of the frame. An aluminum profile is best suited for these purposes, but other materials are also suitable. Depending on the choice of material, the frame is assembled using bolts and nuts or welding. The shape of the frame is selected individually; the easiest way is to make the chamber in the shape of a parallelepiped.
- Frame covering. The pre-installed frame is sheathed with sheets of steel or aluminum.
- Installation of insulation. Mineral wool is excellent for these purposes; an insulation thickness of 10-15 cm is sufficient.
- Bottom coating. The bottom must be covered with waterproofing film and covered with sawdust.
- Installation of stacks. Supports are installed on the walls of the housing so that the stacks rise above the bottom. Lumber is stacked in such a way that there is free space between the boards for hot air to pass through.
- Installation of the heating element. For this, a construction gun is best suited, which runs on electricity, heats the air and creates its circulation.
- Installation of electrical equipment. First of all, you should install an electric thermometer to monitor the air temperature, as well as a humidity sensor.
By following the manufacturing scheme, having high-quality materials and equipment, you can easily obtain a high-quality drying chamber that will serve the owner for many years.
Technological procedure for drying wood
Important: for the wood to become completely dry, it must be dried in special equipment in the laboratory. The humidity remains at 0%.
There are two important stages in the drying process: the process of moisture exchange and moisture transfer.
The first implies the evaporation of moisture into the atmosphere, the second - the movement of moisture inside. Wood drying technology involves the interaction of both processes. In other words, moisture moves upward from the inside and then evaporates from there.
Modern technological capabilities make it possible to quickly remove moisture from a material; the only question is which of them are most effective. The following types of drying wood processing are used in industry:
- Aerodynamic heating chambers (or PAP) Rotary (based on the laws of centrifugal force) Petrolatum (in liquid, when wet workpieces are placed in an oily environment heated to more than 100 degrees) Chamber (in special drying chambers) Contact (for flat materials that are clamped in a press ) In a high-frequency field (a very effective, but costly method) Induction (wood dries due to contact with a heated metal element) High-temperature drying of wood in vacuum chambers allows you to obtain a material that is not only dry, but also very durable Natural drying of wood involves an open-air process under cover microwave drying of wood (it occurs in special generators that provide microwave radiation) Infrared drying of wood (it is also called radiation, creating a beam of infrared radiation that heats the surface of the material and promotes the evaporation of moisture).
Important: the wood drying temperature has three categories: from 60 degrees and more. It all depends on the required quality of the process.
Step-by-step manufacturing instructions
Making a homemade lumber dryer at home is quite difficult. For these purposes, you should use a ready-made chamber assembly drawing, or when assembling, rely on the instructions of the factory drying chamber. For production, you should use only high-quality materials and equipment, preferably new, old only after careful inspection and the necessary maintenance.
To make the simplest drying chamber, you should prepare the following materials:
- aluminum profile;
- sheet metal;
- insulating material and waterproofing film;
- sawdust;
- heat construction gun or boiler for drying.
The entire manufacturing process can be divided into the following stages:
- Site selection. It is better to place the dryer indoors or at least under a canopy. Placing it outdoors has a number of disadvantages: the frame of the dryer can corrode, the level of heat loss increases and the drying process becomes more complicated due to high air humidity. Placing the camera indoors requires compliance with fire safety rules; it is better when the work space is separate from the living space, does not have flammable elements, has several exits and ventilated windows.
- Laying the foundation. The foundation can be made of any type; if the floor in the room is flat and well concreted, you can install the camera directly on it. The foundation can be built from concrete or metal profiles, or pipes.
- Installation of the frame. An aluminum profile is best suited for these purposes, but other materials are also suitable. Depending on the choice of material, the frame is assembled using bolts and nuts or welding. The shape of the frame is selected individually; the easiest way is to make the chamber in the shape of a parallelepiped.
- Frame covering. The pre-installed frame is sheathed with sheets of steel or aluminum.
- Installation of insulation. Mineral wool is excellent for these purposes; an insulation thickness of 10-15 cm is sufficient.
- Bottom coating. The bottom must be covered with waterproofing film and covered with sawdust.
- Installation of stacks. Supports are installed on the walls of the housing so that the stacks rise above the bottom. Lumber is stacked in such a way that there is free space between the boards for hot air to pass through.
- Installation of the heating element. For this, a construction gun is best suited, which runs on electricity, heats the air and creates its circulation.
- Installation of electrical equipment. First of all, you should install an electric thermometer to monitor the air temperature, as well as a humidity sensor.
By following the manufacturing scheme, having high-quality materials and equipment, you can easily obtain a high-quality drying chamber that will serve the owner for many years.
Flow of vacuum drying of wood material
Vacuum drying of wood is considered one of the most advanced technologies today. The fact is that this type of drying combines all the principles of previous technologies that exist today. The process uses all factors that help to obtain the highest quality result.
During operation of the chamber, a constant increase in temperature occurs simultaneously with an increase in pressure. Vacuum chambers allow you to change the color of the material, impregnate it with various compounds, and prevent cracks from appearing from inside the wood. True, at the moment this type of work with wood cannot be called very widespread.
How to dry wood at home
Drying wood at home can be done in several ways, some of which have been known since ancient times.
One of them requires a stove. In it, wood blanks are placed in a cast iron pot, sprinkled with sawdust and simmered at a temperature of 60 to 70 degrees. As a result, the wood not only dries out, but also acquires a rich color that sets off the natural pattern.
The paraffin treatment process involves drying in melted paraffin in an oven for several hours at a temperature of 40 degrees. In addition, there is another way to steam it in linseed oil. Also known for a long time.
It was used to make wooden products (dishes, spoons, ladles). The result was very water-resistant household items. This method is still suitable today if you need to dry a small amount of wood at home.
On the eve of each harvest, people massively stockpile supplies for the winter. Not surprising - in the usual boiled jam, 5% of vitamins are retained, in fruits covered with sugar - 25%, when frozen - up to 60%, and when dried - up to 97%! Why not start a new habit - drying your vitamins for the winter?
You can do it the old fashioned way - using old-fashioned methods, by placing fruit on the roof of the veranda.
You can buy a new dryer - stores offer “pocket” options, with low productivity and the absence of a “soft” temperature regime (the best temperature for drying is 40 degrees; at +65 ° C, vitamins precipitate and can even cause harm). High-quality fruit dryers cost at least 1,500 hryvnia. There is another option - no investment at all. We take an old refrigerator and make a new dryer!
What you need to make your own dryer
To make a homemade dryer, we need the body of an old refrigerator and a fan heater (a heating element from an electric grill, a dryer from a washing machine, or a special heating fan). Also, we will need old shelving or, if there are none, a bunch of boards. with which we will later make the necessary shelves for our drying.
Advice. Use old refrigerator grilles, increasing their width, because by removing the glass wool and the entire inner layer of the refrigerator, we increased its size inside.
Making a fruit dryer from the refrigerator
Be prepared that creating the design will take you several hours. But then you will praise yourself for your resourcefulness several winters in a row! So, here is a step-by-step algorithm for the invention.
1. Carefully remove the freezer, compressor and cut holes on top for forced air ventilation. These actions will require almost nothing except your accuracy.
If your efforts are unsuccessful and you accidentally damage the refrigerator body, it doesn’t matter. Call a neighbor or put in your own efforts to carry out welding and repair work. Image is nothing, but sealing the housing in this matter is everything!
2. Clean the body of the refrigerator from unnecessary things - first of all, from the insulating layer (glass wool). Don't forget to wear rubber gloves so that your hands don't itch.
After removing the insulating layer, we begin dismantling the electronics inside the refrigerator, the motor and the protective grille of the refrigerator. We only need the metal body of the refrigerator, which we take as a basis.